Manage default and individual user and group quotas for a volume
This article explains the considerations and steps for managing user and group quotas on Azure NetApp Files volumes. To understand the use cases for this feature, see Understand default and individual user and group quotas.
Quotas in cross-region or cross-zone replication relationships
Quota rules are synced from cross-region replication (CRR) or cross-zone replication (CZR) source to destination volumes. Quota rules that you create, delete, or update on a CRR or CZR source volume automatically applies to the destination volume.
Quota rules only come into effect on the CRR/CZR destination volume after the replication relationship is deleted because the destination volume is read-only. To learn how to break the replication relationship, see Delete volume replications. If source volumes have quota rules and you create a replication relationship later, all the quota rules are synced to the destination volume.
Considerations
- A quota rule is specific to a volume and is applied to an existing volume.
- Deleting a volume results in deleting all the associated quota rules for that volume.
- You can create a maximum number of 100 quota rules for a volume.
- Azure NetApp Files doesn't support individual group quota and default group quota for SMB and dual protocol volumes.
- Group quotas track the consumption of disk space for files owned by a particular group. A file can only be owned by exactly one group.
- Auxiliary groups only help in permission checks. You can't use auxiliary groups to restrict the quota (disk space) for a file.
- In a CRR/CZR setting:
- You can't create, update, or delete quota rules on the destination volume until you delete the replication.
- If a quota rule is in the error state after you delete the replication relationship, you need to delete and re-create the quota rule on the destination volume.
- If you're using large volumes (volumes larger than 100 TiB):
- The space and file usage in a large volume might exceed as much as five percent more than the configured hard limit before the quota limit is enforced and rejects traffic.
- To provide optimal performance, the space consumption may exceed configured hard limit before the quota is enforced. The additional space consumption won't exceed either the lower of 1 GB or five percent of the configured hard limit.
- After reaching the quota limit, if a user or administrator deletes files or directories to reduce quota usage under the limit, subsequent quota-consuming file operations may resume with a delay of up to five seconds.
Create new quota rules
From the Azure portal, navigate to the volume for which you want to create a quota rule. Select User and group quotas in the navigation pane, then click Add to create a quota rule for a volume.

In the New quota window that appears, provide information for the following fields, then click Create.
Quota rule name:
The name must be unique within the volume.Quota type:
Select one of the following options. For details, see Understand default and individual user and group quotas.Default user quotaDefault group quotaIndividual user quotaIndividual group quota
Quota target:
- NFS volumes:
For individual user quota and individual group quota, specify a value in the range of0to4294967295.
For default quota, specify the value as"". - SMB volumes:
For individual user quota, specify the range in the^S-1-[0-59]-\d{2}-\d{8,10}-\d{8,10}-\d{8,10}-[1-9]\d{3}format. - Dual-protocol volumes:
For individual user quota using the SMB protocol, specify the range in the^S-1-[0-59]-\d{2}-\d{8,10}-\d{8,10}-\d{8,10}-[1-9]\d{3}format.
For individual user quota using the NFS protocol, specify a value in the range of0to4294967295.
- NFS volumes:
Quota limit:
Specify the limit in the range of1to1125899906842620.
SelectKiB,MiB,GiB, orTiBfrom the pulldown. The minimum configurable quota limit is 4 KiB.
Edit or delete quota rules
On the Azure portal, navigate to the volume whose quota rule you want to edit or delete. Select
…at the end of the quota rule row, then select Edit or Delete as appropriate.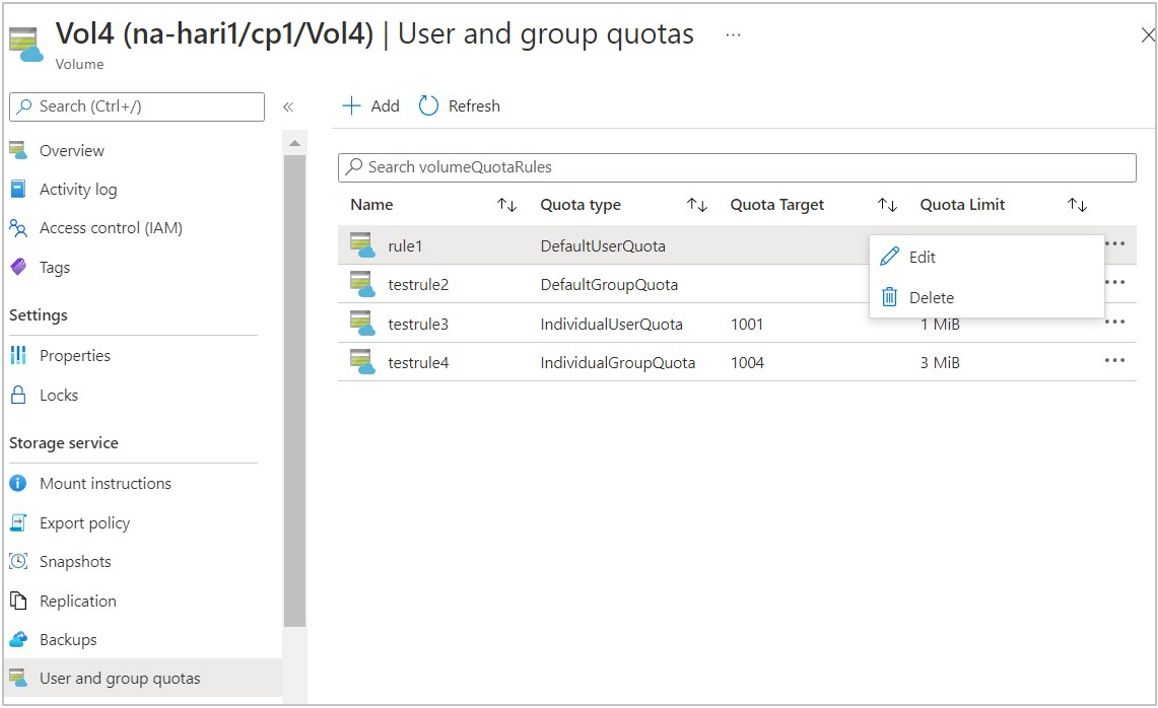
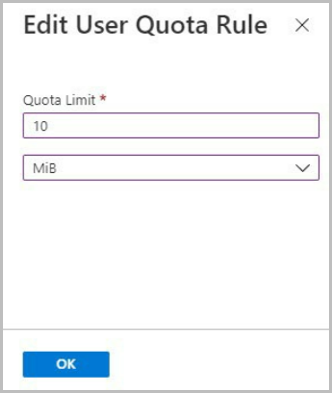
If you're editing a quota rule, update Quota Limit in the Edit User Quota Rule window that appears.
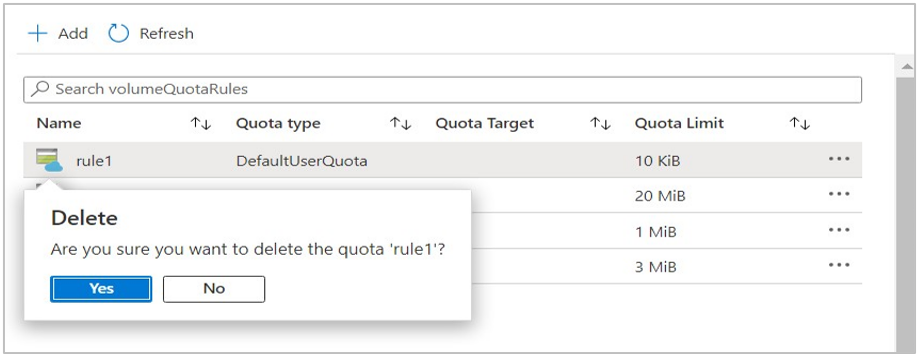
If you're deleting a quota rule, confirm the deletion by selecting Yes.
Next steps
Feedback
Coming soon: Throughout 2024 we will be phasing out GitHub Issues as the feedback mechanism for content and replacing it with a new feedback system. For more information see: https://aka.ms/ContentUserFeedback.
Submit and view feedback for