Note
Access to this page requires authorization. You can try signing in or changing directories.
Access to this page requires authorization. You can try changing directories.
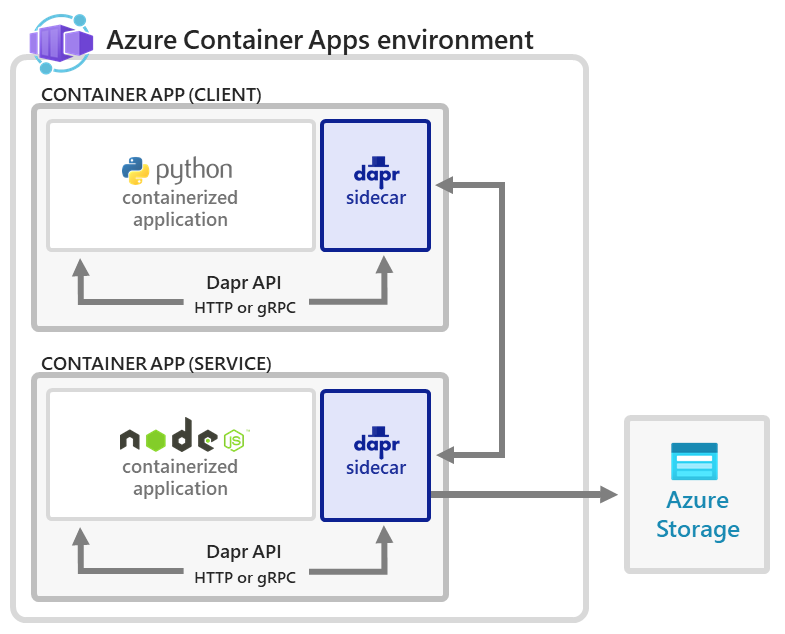
Dapr (Distributed Application Runtime) helps developers build resilient, reliable microservices. In this quickstart, you enable Dapr sidecars to run alongside two container apps that produce and consume messages, stored in an Azure Blob Storage state store. Using either Azure Resource Manager or Bicep files, you'll:
- Pass Azure CLI commands to deploy a template that launches everything you need to run microservices.
- Verify the interaction between the two microservices in the Azure portal.
This quickstart mirrors the applications you deploy in the open-source Dapr Hello World quickstart.
Prerequisites
- An Azure account with an active subscription. If you don't already have one, you can create an account for free.
- A GitHub account. If you don't already have one, sign up for free.
- Install Azure CLI.
- Install Git.
- Install Bicep tools.
Setup
To sign in to Azure from the CLI, run the following command and follow the prompts to complete the authentication process.
az login
To ensure you're running the latest version of the CLI, run the upgrade command.
az upgrade
Next, install or update the Azure Container Apps extension for the CLI.
If you receive errors about missing parameters when you run az containerapp commands in Azure CLI or cmdlets from the Az.App module in PowerShell, be sure you have the latest version of the Azure Container Apps extension installed.
az extension add --name containerapp --upgrade
Note
Starting in May 2024, Azure CLI extensions no longer enable preview features by default. To access Container Apps preview features, install the Container Apps extension with --allow-preview true.
az extension add --name containerapp --upgrade --allow-preview true
Now that the current extension or module is installed, register the Microsoft.App and Microsoft.OperationalInsights namespaces.
az provider register --namespace Microsoft.App
az provider register --namespace Microsoft.OperationalInsights
Set environment variables
Set the following environment variables. Replace the <placeholders> with your values.
RESOURCE_GROUP="<new-resource-group>"
LOCATION="<location>"
CONTAINERAPPS_ENVIRONMENT="<containerapps-environment>"
Create an Azure resource group
Create a resource group to organize the services related to your container app deployment.
az group create \
  --name $RESOURCE_GROUP \
  --location $LOCATION
Prepare the GitHub repository
Go to the repository holding the ARM and Bicep files that's used to deploy the solution.
Select the Fork button at the top of the repository to fork the repo to your account.
Now you can clone your fork to work with it locally. Use the following git command to clone your forked repo into the acadapr-templates directory.
git clone https://github.com/<your-github-username>/Tutorial-Deploy-Dapr-Microservices-ACA.git acadapr-templates
Deploy
Navigate to the acadapr-templates directory and run the following command:
az deployment group create \
  --resource-group $RESOURCE_GROUP \
  --template-file ./azuredeploy.json \
  --parameters environment_name=$CONTAINERAPPS_ENVIRONMENT
az deployment group create \
  --resource-group $RESOURCE_GROUP \
  --template-file ./azuredeploy.bicep \
  --parameters environment_name=$CONTAINERAPPS_ENVIRONMENT
This command deploys:
- The Container Apps environment and associated Log Analytics workspace for hosting the hello world Dapr solution.
- An Application Insights instance for Dapr distributed tracing.
- The
nodeappapp server running ontargetPort: 3000with Dapr enabled and configured using:"appId": "nodeapp""appPort": 3000- A user-assigned identity with access to the Azure Blob storage via a Storage Data Contributor role assignment
- A Dapr component of
"type": "state.azure.blobstorage"scoped for use by thenodeappfor storing state. - The Dapr-enabled, headless
pythonappthat invokes thenodeappservice using Dapr service invocation. - A Microsoft Entra ID role assignment for the Node.js app used by the Dapr component to establish a connection to Blob storage.
Verify the result
Confirm successful state persistence
You can confirm that the services are working correctly by viewing data in your Azure Storage account.
Open the Azure portal in your browser.
Go to the newly created storage account in your resource group.
Select Data storage > Containers from the sidebar menu.
Select the created container.
Verify that you can see the file named order in the container.
Select the file.
Select the Edit tab.
Select the Refresh button to observe updates.
View logs
Logs from container apps are stored in the ContainerAppConsoleLogs_CL custom table in the Log Analytics workspace. You can view logs through the Azure portal or via the CLI. There might be a small delay initially for the table to appear in the workspace.
Use the following command to view logs in Bash or PowerShell.
LOG_ANALYTICS_WORKSPACE_CLIENT_ID=`az containerapp env show --name $CONTAINERAPPS_ENVIRONMENT --resource-group $RESOURCE_GROUP --query properties.appLogsConfiguration.logAnalyticsConfiguration.customerId --out tsv`
az monitor log-analytics query \
  --workspace $LOG_ANALYTICS_WORKSPACE_CLIENT_ID \
  --analytics-query "ContainerAppConsoleLogs_CL | where ContainerAppName_s == 'nodeapp' and (Log_s contains 'persisted' or Log_s contains 'order') | project ContainerAppName_s, Log_s, TimeGenerated | take 5" \
  --out table
The following output demonstrates the type of response to expect from the command.
ContainerAppName_s    Log_s                            TableName      TimeGenerated
--------------------  -------------------------------  -------------  ------------------------
nodeapp               Got a new order! Order ID: 61    PrimaryResult  2021-10-22T21:31:46.184Z
nodeapp               Successfully persisted state.    PrimaryResult  2021-10-22T21:31:46.184Z
nodeapp               Got a new order! Order ID: 62    PrimaryResult  2021-10-22T22:01:57.174Z
nodeapp               Successfully persisted state.    PrimaryResult  2021-10-22T22:01:57.174Z
nodeapp               Got a new order! Order ID: 63    PrimaryResult  2021-10-22T22:45:44.618Z
Clean up resources
Since pythonapp continuously makes calls to nodeapp with messages that get persisted into your configured state store, it's important to complete these cleanup steps to avoid ongoing billable operations.
If you'd like to delete the resources created as a part of this walkthrough, run the following command.
az group delete \
  --resource-group $RESOURCE_GROUP
Tip
Having issues? Let us know on GitHub by opening an issue in the Azure Container Apps repo.