Note
Access to this page requires authorization. You can try signing in or changing directories.
Access to this page requires authorization. You can try changing directories.
Important
This article describes legacy patterns for configuring access to Azure Data Lake Storage. Databricks recommends using Unity Catalog. See Create a Unity Catalog metastore and Connect to cloud object storage using Unity Catalog.
This tutorial guides you through all the steps necessary to connect from Azure Databricks to Azure Data Lake Storage using OAuth 2.0 with a Microsoft Entra ID service principal.
Requirements
Complete these tasks before you begin this tutorial:
- Create an Azure Databricks workspace. See Deploy a workspace using the Azure Portal
- Create an Azure Data Lake Storage storage account. See Quickstart: Create an Azure Data Lake Storage storage account.
- Create an Azure Key Vault. See Quickstart: Create an Azure Key Vault
Step 1: Create a Microsoft Entra ID service principal
To use service principals to connect to Azure Data Lake Storage, an admin user must create a new Microsoft Entra ID application. If you already have a Microsoft Entra ID service principal available, skip ahead to Step 2: Create a client secret for your service principal.
To create a Microsoft Entra ID service principal, follow these instructions:
Sign in to the Azure portal.
Note
The portal to use is different depending on whether your Microsoft Entra ID application runs in the Azure public cloud or in a national or sovereign cloud. For more information, see National clouds.
If you have access to multiple tenants, subscriptions, or directories, click the Directories + subscriptions (directory with filter) icon in the top menu to switch to the directory in which you want to provision the service principal.
Search for and select <Microsoft Entra ID.
In Manage, click App registrations > New registration.
For Name, enter a name for the application.
In the Supported account types section, select Accounts in this organizational directory only (Single tenant).
Click Register.
Step 2: Create a client secret for your service principal
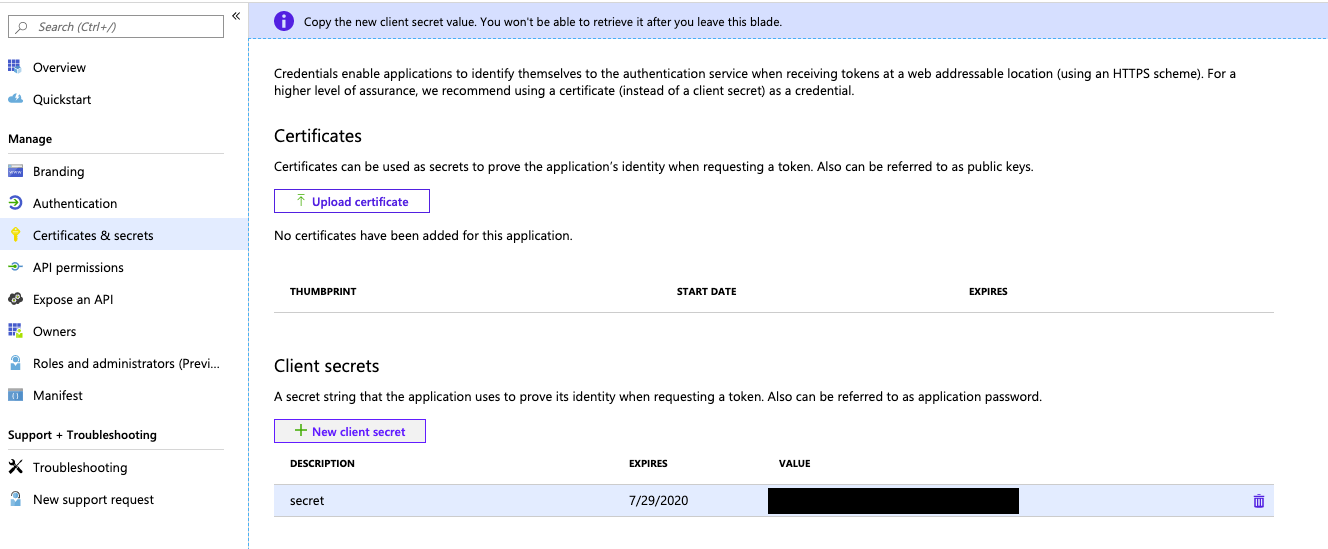
In Manage, click Certificates & secrets.
On the Client secrets tab, click New client secret.

In the Add a client secret pane, for Description, enter a description for the client secret.
For Expires, select an expiry time period for the client secret, and then click Add.
Copy and store the client secret's Value in a secure place, as this client secret is the password for your application.
On the application page's Overview page, in the Essentials section, copy the following values:
- Application (client) ID
- Directory (tenant) ID
Step 3: Grant the service principal access to Azure Data Lake Storage
You grant access to storage resources by assigning roles to your service principal. In this tutorial, you assign the Storage Blob Data Contributor to the service principal on your Azure Data Lake Storage account. You may need to assign other roles depending on specific requirements.
- In the Azure portal, go to the Storage accounts service.
- Select an Azure storage account to use.
- Click Access Control (IAM).
- Click + Add and select Add role assignment from the dropdown menu.
- Set the Select field to the Microsoft Entra ID application name that you created in step 1 and set Role to Storage Blob Data Contributor.
- Click Save.
Step 4: Add the client secret to Azure Key Vault
You can store the client secret from step 1 in Azure Key Vault.
- In the Azure portal, go to the Key vault service.
- Select an Azure Key Vault to use.
- On the Key Vault settings pages, select Secrets.
- Click on + Generate/Import.
- In Upload options, select Manual.
- For Name, enter a name for the secret. The secret name must be unique within a Key Vault.
- For Value, paste the Client Secret that you stored in Step 1.
- Click Create.
Step 5: Configure your Azure key vault instance for Azure Databricks
In the Azure Portal, go to the Azure key vault instance.
Under Settings, select the Access configuration tab.
Set Permission model to Vault access policy.
Note
Creating an Azure Key Vault-backed secret scope role grants the Get and List permissions to the application ID for the Azure Databricks service using key vault access policies. The Azure role-based access control permission model is not supported with Azure Databricks.
Under Settings, select Networking.
In Firewalls and virtual networks set Allow access from: to Allow public access from specific virtual networks and IP addresses.
Under Exception, check Allow trusted Microsoft services to bypass this firewall.
Note
You can also set Allow access from: to Allow public access from all networks.
Step 6: Create Azure Key Vault-backed secret scope in your Azure Databricks workspace
To reference the client secret stored in an Azure Key Vault, you can create a secret scope backed by Azure Key Vault in Azure Databricks.
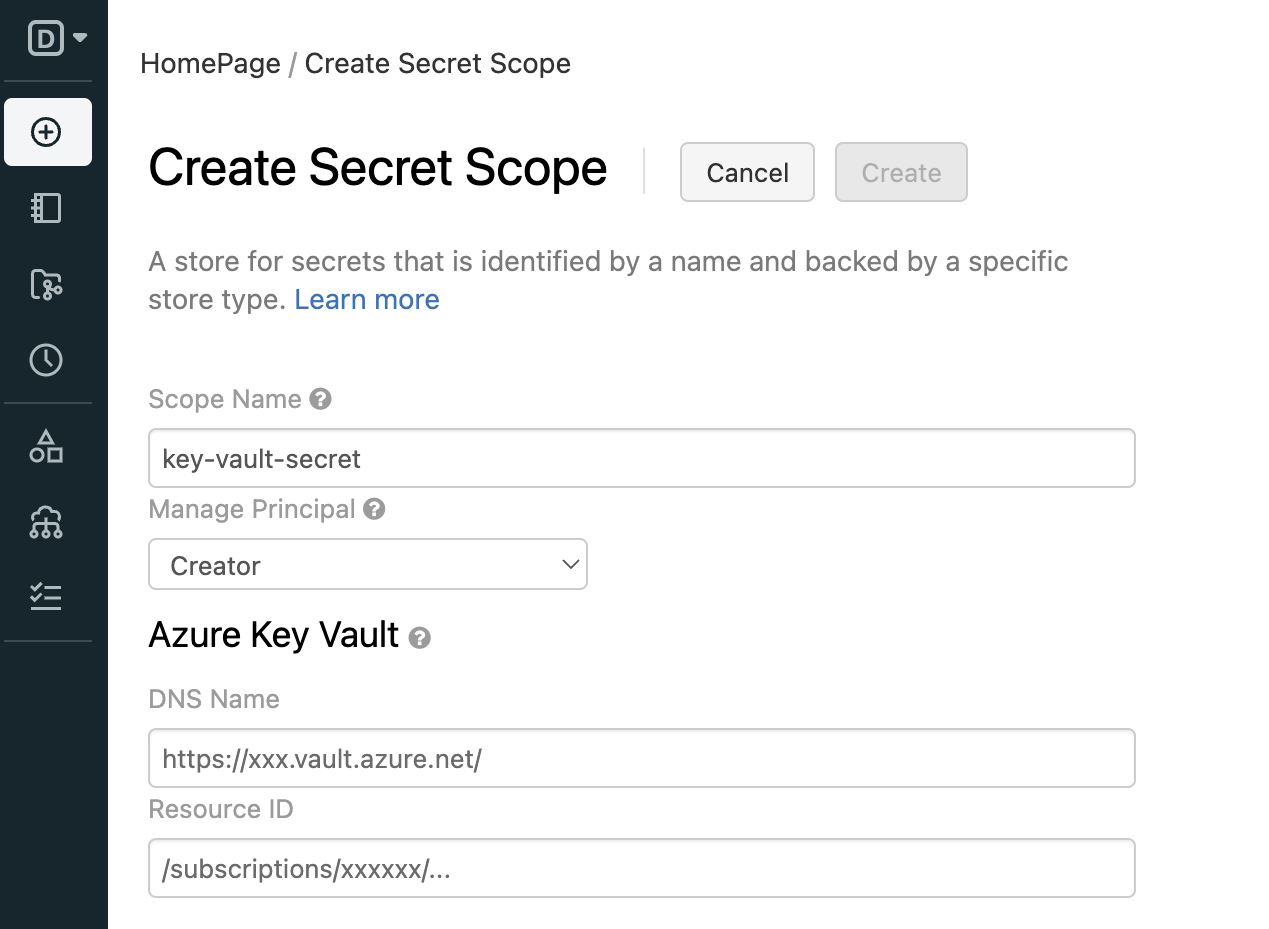
Go to
https://<databricks-instance>#secrets/createScope. This URL is case sensitive; scope increateScopemust be uppercase.
Enter the name of the secret scope. Secret scope names are case insensitive.
Use the Manage Principal dropdown menu to specify whether All Users have
MANAGEpermission for this secret scope or only the Creator of the secret scope (that is to say, you).Enter the DNS Name (for example,
https://databrickskv.vault.azure.net/) and Resource ID, for example:/subscriptions/xxxxxxxx-xxxx-xxxx-xxxx-xxxxxxxxxxxx/resourcegroups/databricks-rg/providers/Microsoft.KeyVault/vaults/databricksKVThese properties are available from the *Settings > Properties tab of an Azure Key Vault in your Azure portal.
Click the Create button.
Step 7: Connect to Azure Data Lake Storage using python
You can now securely access data in the Azure storage account using OAuth 2.0 with your Microsoft Entra ID application service principal for authentication from an Azure Databricks notebook.
Navigate to your Azure Databricks workspace and create a new python notebook.
Run the following python code, with the replacements below, to connect to Azure Data Lake Storage.
service_credential = dbutils.secrets.get(scope="<scope>",key="<service-credential-key>")

spark.conf.set("fs.azure.account.auth.type.<storage-account>.dfs.core.windows.net", "OAuth")
spark.conf.set("fs.azure.account.oauth.provider.type.<storage-account>.dfs.core.windows.net", "org.apache.hadoop.fs.azurebfs.oauth2.ClientCredsTokenProvider")
spark.conf.set("fs.azure.account.oauth2.client.id.<storage-account>.dfs.core.windows.net", "<application-id>")
spark.conf.set("fs.azure.account.oauth2.client.secret.<storage-account>.dfs.core.windows.net", service_credential)
spark.conf.set("fs.azure.account.oauth2.client.endpoint.<storage-account>.dfs.core.windows.net", "https://login.microsoftonline.com/<directory-id>/oauth2/token")
Replace
<scope>with the secret scope name from step 5.<service-credential-key>with the name of the key containing the client secret.<storage-account>with the name of the Azure storage account.<application-id>with the Application (client) ID for the Microsoft Entra ID application.<directory-id>with the Directory (tenant) ID for the Microsoft Entra ID application.
You have now successfully connected your Azure Databricks workspace to your Azure Data Lake Storage account.
Grant your Azure Databricks workspace access to Azure Data Lake Storage
If you configure a firewall on Azure Data Lake Storage, you must configure network settings to allow your Azure Databricks workspace to connect to Azure Data Lake Storage. First, ensure that your Azure Databricks workspace is deployed in your own virtual network following Deploy Azure Databricks in your Azure virtual network (VNet injection). You can then configure either private endpoints or access from your virtual network to allow connections from your subnets to your Azure Data Lake Storage account.
If you are using serverless compute like serverless SQL warehouses, you must grant access from the serverless compute plane to Azure Data Lake Storage. See Serverless compute plane networking.
Grant access using private endpoints
You can use private endpoints for your Azure Data Lake Storage account to allow your Azure Databricks workspace to securely access data over a private link.
To create a private endpoint by using the Azure Portal, see Tutorial: Connect to a storage account using an Azure Private Endpoint. Ensure to create the private endpoint in the same virtual network that your Azure Databricks workspace is deployed in.
Grant access from your virtual network
Virtual Network service endpoints allow you to secure your critical Azure service resources to only your virtual networks. You can enable a service endpoint for Azure Storage within the VNet that you used for your Azure Databricks workspace.
For more information, including Azure CLI and PowerShell instructions, see Grant access from a virtual network.
- Log in to the Azure Portal, as a user with the Storage Account Contributor role on your Azure Data Lake Storage account.
- Navigate to your Azure Storage account, and go to the Networking tab.
- Check that you've selected to allow access from Selected virtual networks and IP addresses.
- Under Virtual networks, select Add existing virtual network.
- In the side panel, under Subscription, select the subscription that your virtual network is in.
- Under Virtual networks, select the virtual network that your Azure Databricks workspace is deployed in.
- Under Subnets, pick Select all.
- Click Enable.
- Select Save to apply your changes.
Troubleshooting
Error: IllegalArgumentException: Secret does not exist with scope: KeyVaultScope and key
This error probably means:
- The Databricks-backed scope that is referred in the code is not valid.
Review the name of your secret from step 4 in this article.
Error: com.databricks.common.client.DatabricksServiceHttpClientException: INVALID_STATE: Databricks could not access keyvault
This error probably means:
- The Databricks-backed scope that is referred to in the code is not valid. or the secret stored in the Key Vault has expired.
Review step 3 to ensure your Azure Key Vault secret is valid. Review the name of your secret from step 4 in this article.
Error: ADAuthenticator$HttpException: HTTP Error 401: token failed for getting token from AzureAD response
This error probably means:
- The service principal's client secret key has expired.
Create a new client secret following step 2 in this article and update the secret in your Azure Key Vault.