Note
Access to this page requires authorization. You can try signing in or changing directories.
Access to this page requires authorization. You can try changing directories.
The Databricks IDE extension offers a Configuration view within the extension that allows you to easily configure and update settings for your Databricks project. These features include local folder settings, AI tools installation, a target workspace deployment selector, easy configuration of authentication and compute, workspace folder sync, and simple steps for activating the Python virtual environment necessary for debugging.
The Configuration view within the Databricks IDE extension is available once you have created or migrated a project to a Databricks project. See Create a new Databricks project.
Note
Earlier versions of the Databricks IDE extension defined configuration settings in a project JSON file and environment variables were set in the terminal. In the release version, project and environment configuration is found in the databricks.yml and databricks.env files.
If your project is a Databricks Asset Bundle, the Databricks extention UI also provides a Bundle Resource Explorer and a Bundle Variables View to manage your bundle resources and variables. See Bundle and explorer features.
Set the local folder
To select a different local folder for your Databricks project, click the gear icon associated with the Local Folder entry in the Configuration view.
Install and use AI tools
Important
This feature is in Beta.
The AI tools section of the Configuration view enables you to install AI tools so that your coding agents work effectively with Azure Databricks. The extension checks whether AI tools are installed at the global or project scope, including installations that you performed through the Azure Databricks CLI, and updates the displayed status. For more information about AI tools, see Agent skills for AI coding assistants and aitools command group.
To install AI tools:
- In the Configuration view of the extension, click Install AI tools.
- Follow the prompts to select a scope and tools to complete the installation.
When AI tools are installed, a green robot icon appears next to AI tools. AI tools automatically update to the latest version.
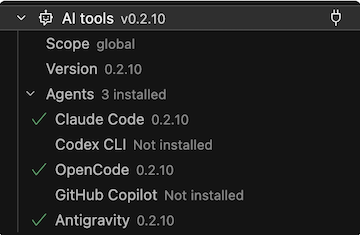
To uninstall AI tools, right-click AI tools and select Uninstall AI tools.
Change the target deployment workspace
To select or switch the deployment target for your Databricks project (for example, to switch from a dev target to a prod target):
In the Configuration view of the Databricks extension, click the gear icon (Select a Databricks Asset Bundle target) associated with Target.
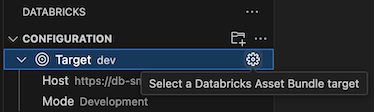
In the Command Palette, select the desired deployment target.
Once a target is configured, the Host and deployment Mode is displayed. For information about Declarative Automation Bundles deployment modes, see Declarative Automation Bundles deployment modes.
The workspace host can be changed by modifying the target workspace setting in the databricks.yml configuration file associated with the project. See targets.
Note
The following Databricks IDE extension features are only available when the target deployment mode is development:
- Use the attached development cluster for bundle jobs
- Sync workspace folder files
- Select an interactive development cluster
Configure the Databricks profile for the project
When you create a Databricks project or convert a project to be a Databricks project, you configure a profile that includes authentication settings used to connect to Databricks. If you want to change the authentication profile used, click the gear icon associated with AuthType in the Configuration view.
For more information Databricks IDE extension authentication, see Set up authorization for the Databricks IDE extension.
Select compute for running code and jobs
Using the Databricks IDE extension, you can select serverless, select an existing Azure Databricks cluster, or create a new Azure Databricks cluster, for running your code and jobs. Once you have connected to compute, a cluster's ID, Databricks Runtime version, creator, state, and access mode are displayed. You can also start and stop a cluster, and navigate directly to the cluster's page details.
Tip
If you don't want to wait for the jobs cluster to start up, check Override Jobs cluster in bundle just below the cluster selection to use the selected cluster for running bundle jobs in development mode. This is not available if you are using serverless compute.
Use serverless
Serverless compute is managed by Azure Databricks. When you run workloads on serverless compute, Azure Databricks automatically allocates and manages the necessary compute resources.
In the Configuration view, click Select compute or the gear (Configure compute) icon.
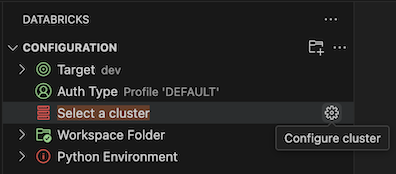
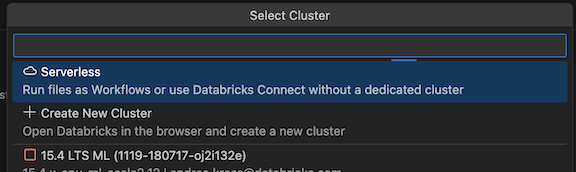
In the Command Palette, select Serverless.
Use an existing cluster
If you have an existing Azure Databricks cluster that you want to use:
In the Configuration view, click Select compute or the gear (Configure compute) icon.
In the Command Palette, select the cluster that you want to use.
Create a new cluster
If you do not have an existing Azure Databricks cluster, or you want to create a new one:
In the Configuration view, click Select compute or the gear (Configure compute) icon.
In the Command Palette, click Create New Cluster.
When prompted to open the external website (your Azure Databricks workspace), click Open.
If prompted, sign in to your Azure Databricks workspace.
Follow the instructions to create a cluster.
Note
Databricks recommends that you create a Personal Compute cluster. This enables you to start running workloads immediately, minimizing compute management overhead.
After the cluster is created and is running, go back to Visual Studio Code.
In the Configuration view, next to the cluster, click the gear (Configure compute) icon.

In the Command Palette, click the cluster that you want to use.
Sync your workspace folder with Databricks
You can sync the remote Databricks workspace folder associated with your Databricks project by clicking the sync icon (Start synchronization) associated with Remote Folder in the Configuration view of the Databricks extension.
Note
The Databricks IDE extension works only with workspace directories that it creates. You cannot use an existing workspace directory in your project unless it was created by the extension.
To navigate to the workspace view in Databricks, click the external link icon (Open link externally) icon associated with Remote Folder.
The extension determines the Azure Databricks workspace folder to use based on the file_path setting in the workspace mapping of the project's associated bundle configuration. See workspace.
Note
The Databricks IDE extension only performs one-way, automatic synchronization of file changes from your local Visual Studio Code project to the related workspace folder in your remote Azure Databricks workspace. The files in this remote workspace directory are intended to be transient. Do not initiate changes to these files from within your remote workspace, as these changes will not be synchronized back to your local project.
For usage details on the workspace directory sync feature for earlier versions of the Databricks IDE extension, see Select a workspace directory for the Databricks IDE extension.
Start an SSH tunnel
Important
This feature is in Beta.
You can start an SSH tunnel from the Databricks IDE extension to open a remote development session on Azure Databricks compute. This allows you to edit files and run code directly against remote compute from within Visual Studio Code.
To start an SSH tunnel, click the Start SSH Tunnel button in the SSH tunnel view in the extension.
Next, select classic or serverless compute to connect to:
- Cluster: The cluster picker shows only clusters that use dedicated (single-user) access mode. If you already have a single-user cluster selected in your local Visual Studio Code session, that cluster is pre-selected for the SSH connection.
- Serverless: If you do not select a cluster, the tunnel connects to serverless compute by default.
When you start a tunnel, a new Visual Studio Code instance opens in the same IDE that you are currently using. The remote session opens your home folder (users/username@databricks.com) by default and automatically displays the specific file that you were actively editing. Authentication is pre-configured, so you do not need to sign in again to connect to the remote session.
Set up your Python environment and Databricks Connect
The Python Environment section of the Configuration view enables easy setup of your Python virtual development environment and installation of Databricks Connect for running and debugging code and notebook cells. Python virtual environments make sure that your project is using compatible versions of Python and Python packages.
The extension uses a cluster's Databricks Runtime version or a serverless environment version to build a local .venv whose Python version and package set match the runtime. This avoids the common problem where code works locally but fails on Azure Databricks because of Python or package version differences.
Automated setup requires uv to create and manage the virtual environment. When you start setup, the extension installs uv automatically if it isn't already available. If uv can't be installed automatically, setup stops and prompts you to install uv manually, and then try again.
To automatically configure the Python virtual environment for your project, in the Configuration view of the extension:
- Click the red Set up Python environment.
- In the Command Palette, select the compute that you want to match.
For an existing project, setup merges its changes into your pyproject.toml and writes a pyproject.toml.bak backup, so you can review or revert the changes. If you later switch compute, the extension detects the drift and offers to re-run setup to match the new runtime.
Alternatively, you can use the Databricks CLI databricks environments setup-local command to set up a local environment. This requires uv on your PATH.
databricks environments setup-local --serverless-version 5
For projects that already use pip, Poetry, or conda, the extension shows a step-by-step Python Environment checklist instead of the automated uv setup. You can also point the extension at an existing Python interpreter by changing the active environment.
To change environments, click the gear icon (Change virtual environment) associated with Active Environment.
For information about running and debugging code and notebooks with Databricks Connect, see Debug code using Databricks Connect for the Databricks IDE extension.