Note
Access to this page requires authorization. You can try signing in or changing directories.
Access to this page requires authorization. You can try changing directories.
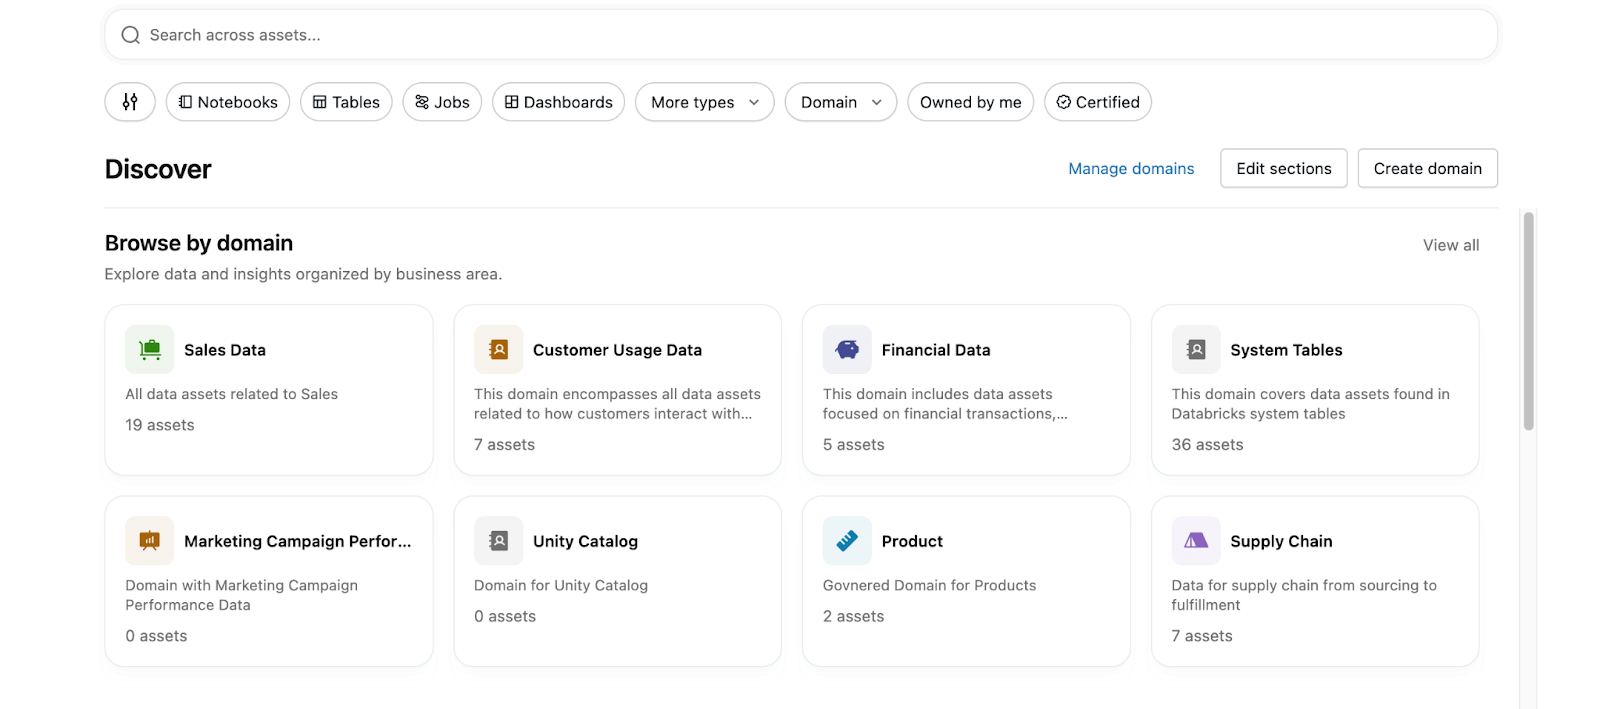
Domains and subdomains are organization layers that group data assets by business purpose. Curators create and manage domains to help consumers browse and find data in the Discover page in a way that's aligned with your business.
This page describes how curators create, manage, and customize domains. For the consumer experience of browsing data by domain, see Discover page.
What are domains?
Domains are an organization layer that groups data products and assets by governed tags. Domains help users find data that relates to their needs more easily. To add an asset to a domain, add the corresponding governed tag to the asset. Large domains can be further divided into subdomains to partition assets by more specific business areas.
Domains and subdomains also organize Pages by business area. Each domain has its own set of Pages, and a Page belongs to exactly one domain or subdomain.
What are subdomains?
A subdomain is a second level of hierarchy within a domain. Subdomains let you partition a large domain (for example, Finance) into more specific business areas (for example, Audit, Tax, or FP&A) without creating additional top-level domains.
The following rules apply when working with subdomains:
- One level of nesting. A domain can contain many subdomains, but subdomains cannot contain their own subdomains.
- One parent per subdomain. Each subdomain belongs to exactly one parent domain.
- Many-to-many for assets. An asset can belong to multiple domains and subdomains.
- Subdomain assets appear in the parent domain. Subdomains filter assets within their parent domain — they do not hide assets from it.
- Built on governed tags with a shared prefix. Subdomains use a
{parentDomainTag}/{subdomainName}naming convention (for example,Finance/Tax). The parent domain tag is a separate tag from the subdomain tag: tagging an asset withFinance/Taxdoes not automatically tag it withFinance.
Requirements
Note
Domains are an account-level concept that utilize governed tags. Domains that you configure apply to the whole account, not select workspaces.
On workspaces with the compliance security profile (CSP) enabled, Discover Page is disabled by default. To use domains on these workspaces, a workspace admin must enable Discover Page. See Manage Azure Databricks previews.
Curator permissions
Users interact with the Discover page as one of two personas: curators, who create and populate domains, manage Pages, and customize the Discover page, and consumers, who browse the results to search for the data they need.
Customizing the Discover page and managing domains and the Pages within them require curator permissions: MANAGE DISCOVER at the account level, or MANAGE on a specific domain or subdomain. Account admins and workspace admins have account-level MANAGE DISCOVER by default. Account admins can grant these permissions to other users.
Domains let consumers browse data in a way that's aligned with how they understand your business within your organization. Each domain page also allows curators to create custom collections on that page to further guide and emphasize the best assets in that domain.
Grant curator permissions
Account admins can grant users curator permissions. You can grant the permission at three scopes, from broadest to narrowest:
| Scope | Permission | A curator with this grant can manage |
|---|---|---|
| Account | MANAGE DISCOVER |
Every domain and subdomain in the account, and their Pages. |
| Domain | MANAGE |
A specific domain, all of its subdomains, and their Pages. |
| Subdomain | MANAGE |
A specific subdomain and its Pages. |
Account admins and workspace admins hold account-level MANAGE DISCOVER by default.
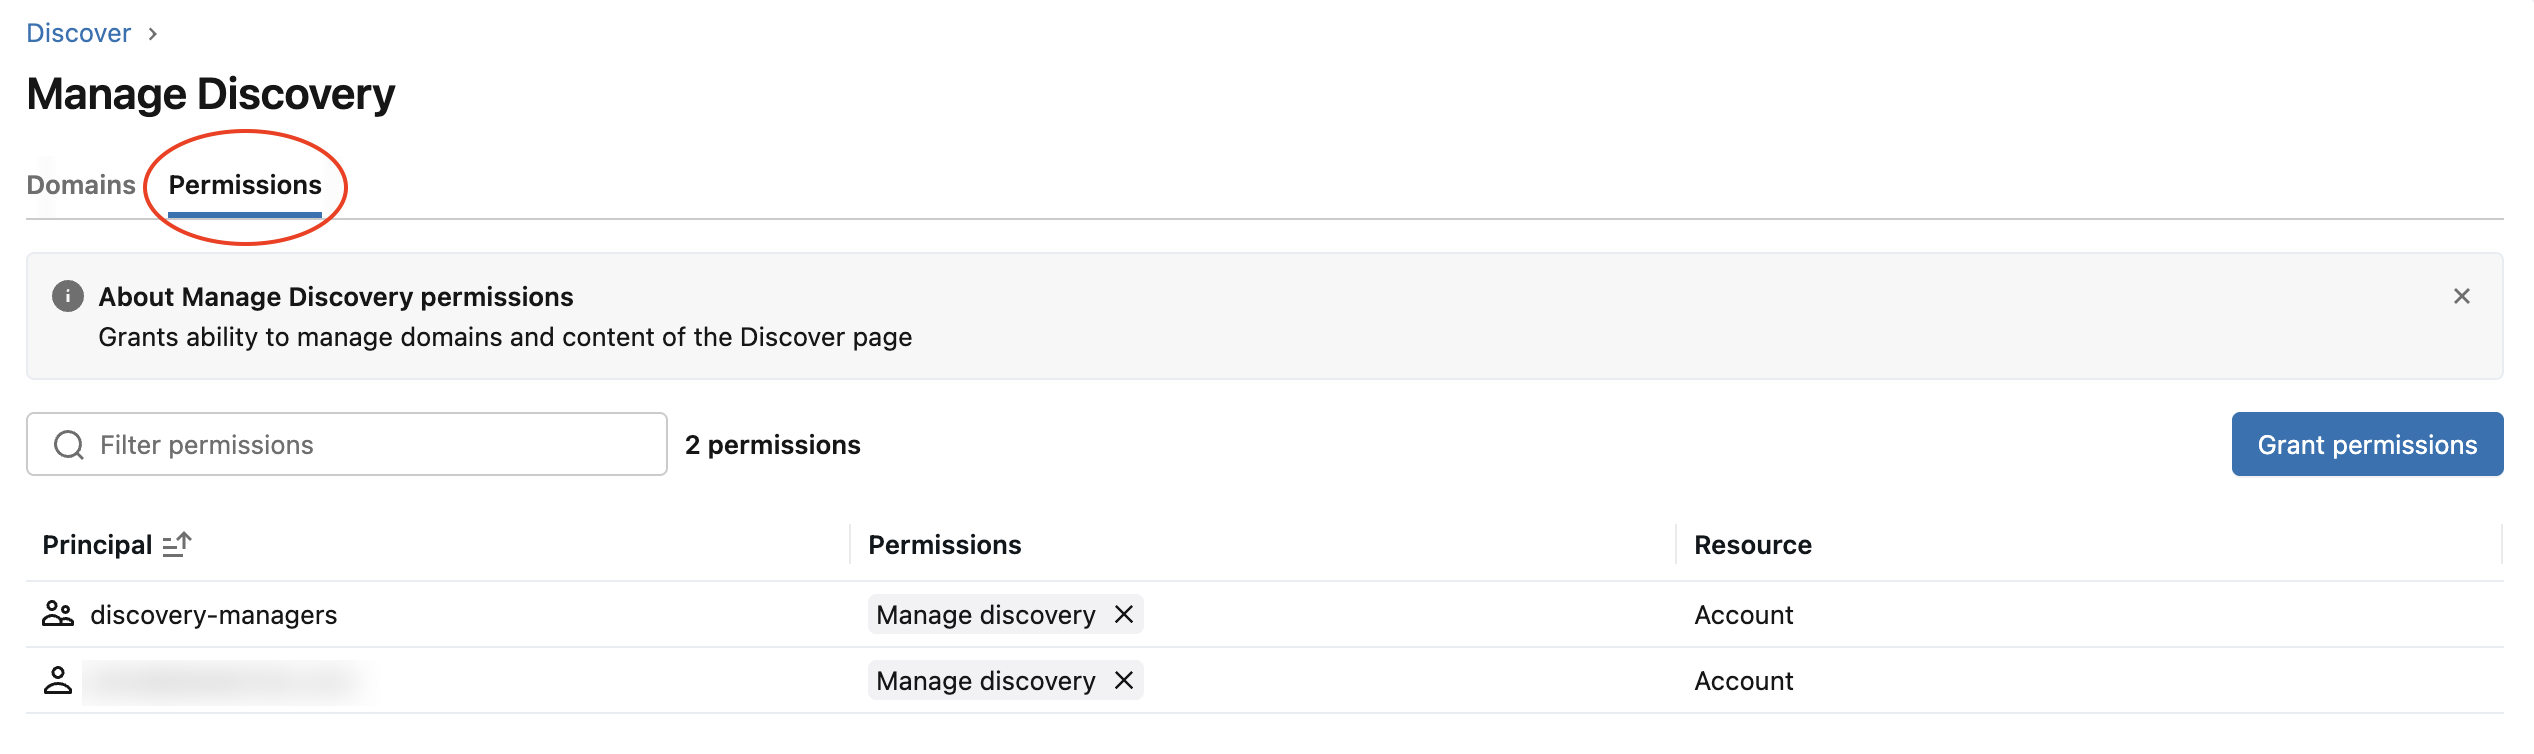
To grant MANAGE DISCOVER at the account level:
- On the Discover page, click the
 overflow menu and select Manage Domains.
 - Click the Permissions tab.
- Click Grant Permissions to grant the permission to the corresponding principal.
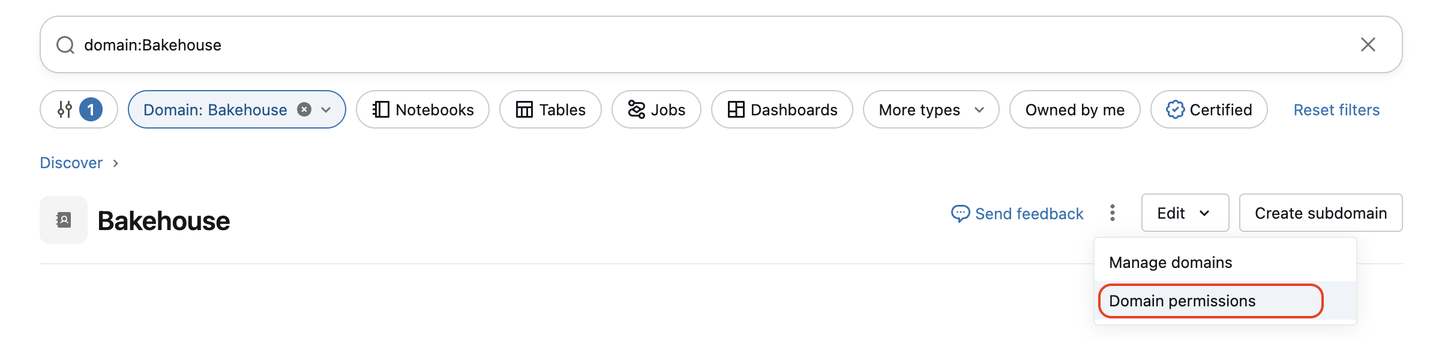
To grant MANAGE on a domain or subdomain:
- On the Discover page, open the domain. To scope the grant to a subdomain, open the subdomain from the domain page.
- Click the overflow menu and select Domain permissions.
- Click Grant Permissions to grant the permission to the corresponding principal.
Create a domain
Domains are built on governed tags. To create a domain, you can either map it to an existing tag or create a governed tag with the same name. For example, to create a "Marketing" domain, you must create a "Marketing" governed tag. Tags that contain a slash (/) can't be used to create a top-level domain; the slash is reserved for the subdomain naming convention. See Create a subdomain.
Warning
Tag data is stored as plain text and is replicated globally. Do not use tag names, values, or descriptors that can compromise the security of your resources. For example, do not use tag names, values, or descriptors that contain personal or sensitive information.
Domain metadata is also replicated globally. Do not use domain IDs, descriptions, subtitles, or other metadata that can compromise the security of your resources. For example, do not use domain IDs, descriptions, or subtitles that contain personal or sensitive information.
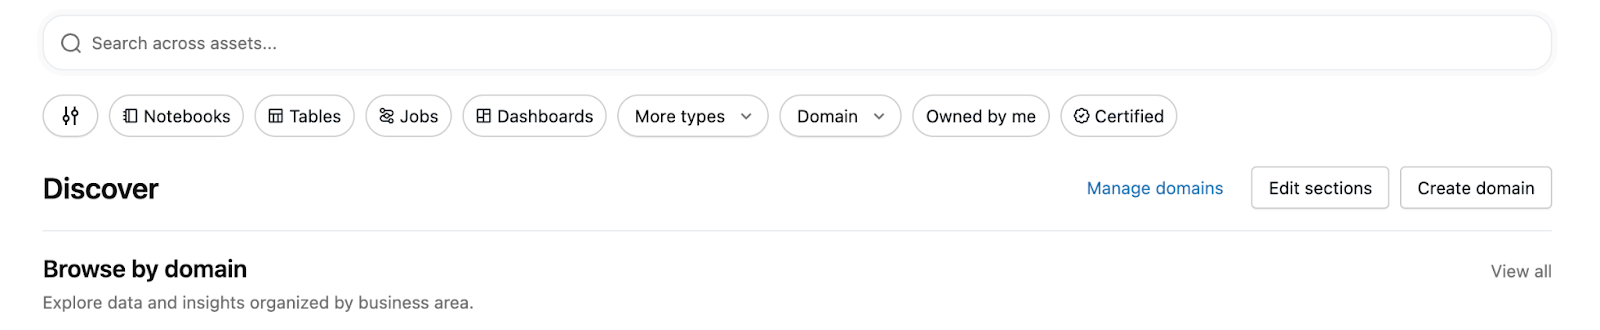
In the top-right corner of the Discover page, click Create domain.
In the Create domain modal, select an existing governed tag or create a new one, then fill out the following fields:
- Subtitle: Appears on the domain card.
- Description: The domain overview.
- Technical owner (optional): Who is responsible for technical aspects of the domain.
- Business owner (optional): Who is responsible for business aspects of the domain.
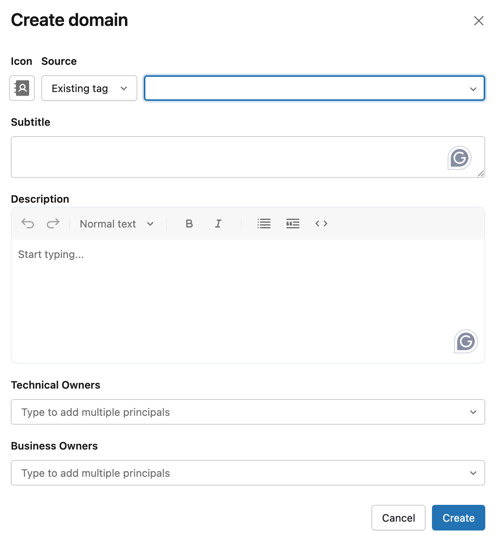
Click Create to create the domain and add a corresponding draft domain card on the Discover page.
When you create a domain, it is in the draft state. The draft state is indicated by an icon next to the title. Draft domains are only visible to curators.
Optionally, click Edit Sections to add assets and customize the domain layout.
To make the domain available to consumers, click Edit Sections on the domain page, then click Publish. After publishing, users can use the domain as a filter in the search experience.
Create a subdomain
Subdomains are built on the same governed-tag primitive as domains, but follow a required {parentDomainTag}/{subdomainName} naming pattern.
On the Discover page, open the parent domain page.
Click Create subdomain in the top-right corner.
In the Create subdomain modal, select one of:
- Create a tag: Enter the name you want to give your subdomain. Azure Databricks automatically prefixes the new tag with the parent domain's tag key (for example, entering
Taxunder the Finance domain creates the tagFinance/Tax). The subdomain name itself cannot contain a slash (/); subdomains support only one level of nesting. - Use an existing tag: Select a governed tag that already matches the
{parentDomainTag}/...pattern. The picker only shows tags that share the parent's prefix. A tag that is already designated as a domain or a subdomain cannot be reused.
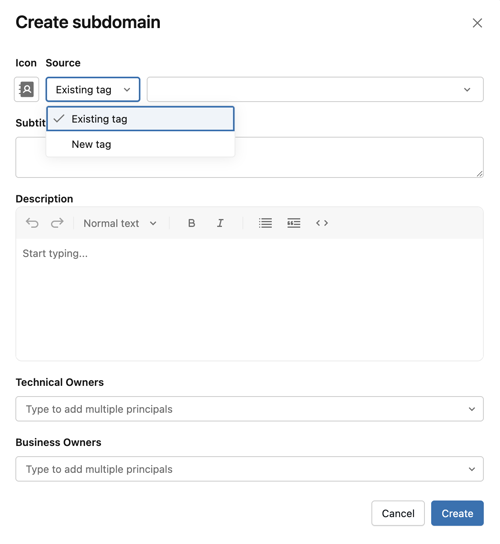
- Create a tag: Enter the name you want to give your subdomain. Azure Databricks automatically prefixes the new tag with the parent domain's tag key (for example, entering
Optionally, fill out the subdomain fields:
- Subtitle: Appears on the subdomain card.
- Description: The subdomain overview.
- Technical owner: Can differ from the parent domain's technical owner.
- Business owner: Can differ from the parent domain's business owner.
Click Create to create the subdomain in a draft state.
To make the subdomain available to consumers, click Edit Sections on the subdomain page, then click Publish.
Edit a domain or subdomain
- On the Discover page, click the overflow menu and select Manage Domains.
- For the domain or subdomain you'd like to edit, click the kebab menu on the right.
- Click Edit domain.

Delete a domain or subdomain
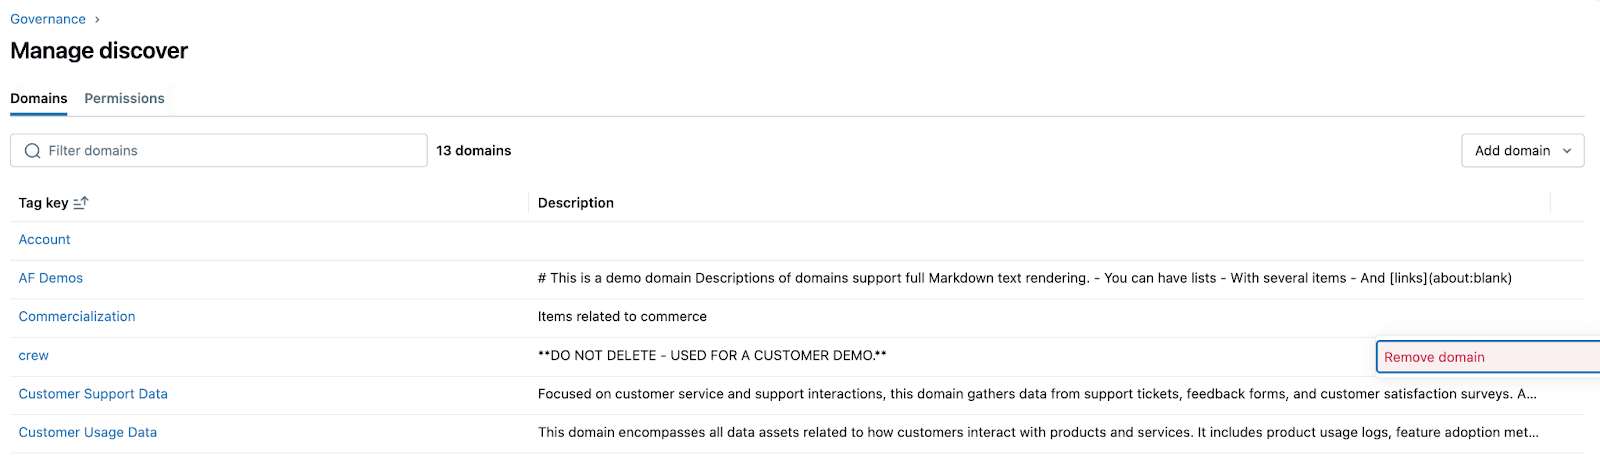
- On the Discover page, click the overflow menu and select Manage Domains.
- For the domain or subdomain you'd like to delete, click the kebab menu on the right.
- Click Remove domain.
Assign assets to a domain
There are multiple ways to add assets to a domain:
- Add them directly from the domain page.
- Apply the corresponding governed tag to the assets.
From the domain page
- Go to the Discover page and click the domain you want to add assets to.
- Click Add to Domain on the top right. You must have the permission to add the associated tag to the asset you are attempting to add to the domain.
- In the Asset Selector modal, select the asset you would like to add to the domain and click Add.
- The Asset Selector allows you to browse and search for assets across your workspace and catalog.
- Depending on the type of assets you want to add, you can switch between Workspace (for assets like dashboards and Genie Agents) and Catalog (for assets like tables and metric views).
- You can add one asset to a domain at a time.
- If successfully added, the asset is displayed in the Recently Added section.
By tagging assets
To assign an asset (for example, a catalog, schema, table, or dashboard) to a domain, you can also tag it with the governed tag that matches the domain. You can apply tags to tables, dashboards, and Genie Agents. See Apply tags to Unity Catalog securable objects.
When you tag a catalog or schema with a domain's governed tag, the tables and other data assets it contains inherit that tag and appear in the domain, so you don't have to tag each asset individually.
An inherited domain tag can't be removed from an individual asset. To change it, update the tag on the parent catalog or schema.
Assign assets to a subdomain
Assigning assets to a subdomain works the same way as assigning to a domain, but uses the subdomain's tag.
- From the subdomain page: Open the subdomain page and click Add to Domain. You must have permission to apply the subdomain tag to the asset.
- By tagging assets: Apply the subdomain's governed tag (for example,
Finance/Tax) to the asset.
Because the parent domain tag and the subdomain tag are independent tags, tagging an asset with Finance/Tax does not automatically tag it with Finance. However, assets in a subdomain still appear in the parent domain's browse and search results.
Customize the Discover page, domain, and subdomain layouts
Warning
Custom section data is replicated globally. Do not use titles, subtitles, or other metadata that could compromise the security of your resources. For example, do not use titles or subtitles that contain personal or sensitive information.
Click Edit Sections at the top-right of the Discover page, any domain page, or any subdomain page. This takes you to a draft state of the page where you can customize existing sections, create custom sections, delete custom sections, hide default sections, and reorder sections on the page.
To create a new section, click the + Section divider.
In the Create section modal, add a Title and a Subtitle, then select how to define the section's assets:
- Search query: The section auto-fills with assets matching the search query you define. Results are ranked automatically based on relevance and usage signals; you can pin specific assets to elevate them to the top. See Pin or reorder assets in a section.
- Manually selected: Select a fixed set of assets and order them yourself. See Pin or reorder assets in a section.
Users browsing the domain or Discover page must have either the
BROWSEorVIEWpermission to see the items in the section.
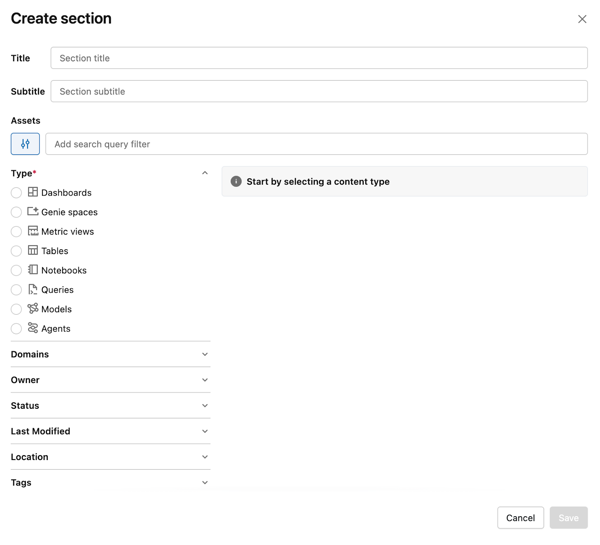
- Click Save, then click Publish to update the current Discover page, domain, or subdomain layout for your organization.
For a subdomain card to appear on its parent domain page, the parent must also be republished — open the parent domain, click Edit Sections, then Publish.
Pin or reorder assets in a section
How asset order works in a section depends on the section type. In a manually-selected section, you reorder the assets you've chosen. In a search-query section, you pin specific assets to elevate them above the auto-ranked results.
Reorder assets in a manually-selected section
In a manually-selected section, you select every asset that appears and define the order yourself.
Open the manually-selected section in edit mode, or create one.
In the section's edit modal, use the up and down chevrons next to each selected asset to define the order they appear in.
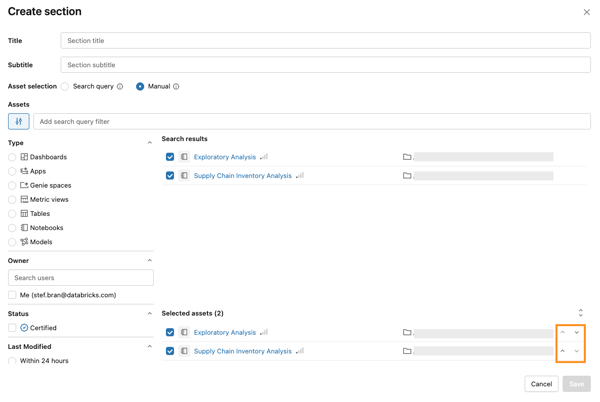
Click Save (or Save as draft), then Publish to make the section visible to consumers.
Pin assets in a search-query section
In a search-query section, assets are auto-selected by your query and ranked automatically. You can pin specific assets so they appear at the top, ahead of the auto-ranked results.
Open the search-query section in edit mode, or create one.
In the section's edit modal, you see all the assets matching the search query. On the asset card you want to pin, click the pin button in the bottom-right corner. The asset moves to the top of the section's results.
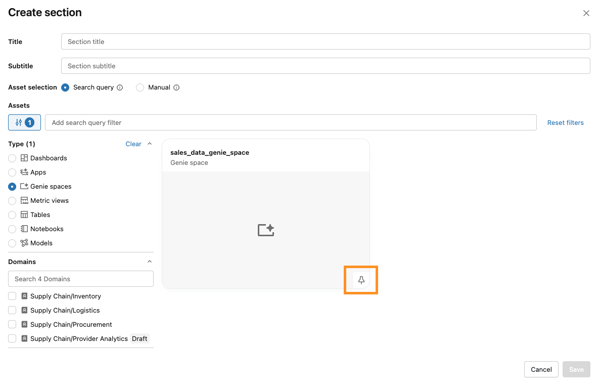
Click Save, then Publish.
Manage domains with the REST API
Important
This feature is in Beta.
Create, read, update, and delete domains with the UI or programmatically with the domains REST API. If your organization maintains many domains, use the API to manage domains as code and automate provisioning.
Managing domains with the API requires the MANAGE DISCOVER permission, the same permission required to manage domains in the UI. See Curator permissions. Authenticate your requests with a Databricks personal access token for your workspace user or OAuth.
For the list of API operations with the full request and response details, see the Domains REST API reference.
Manage domains with Terraform
Manage domains as code with the databricks_domain resource in the Azure Databricks Terraform provider. For example:
resource "databricks_domain" "finance" {
  tag_key     = "finance"
  subtitle    = "Financial data assets"
  description = "Curated finance datasets for the analytics org."

  icon = {
    name  = "BANK"
    color = "#1B5E20"
  }
}
The provider also includes data sources for reading existing domains.
Limitations
- For the limit on the total number of domains and subdomains you can create per account (combined), see Resource limits.
- For limitations on the number of tags you can apply, see Resource limits.
- Subdomains support only one level of nesting. A subdomain cannot contain its own subdomains.
- Subdomains must be created and managed from a workspace-level Manage Discover page. Account-level subdomain management is not available in this release.
- The REST API and Terraform provider don't support customizing Discover page or domain-page sections. To customize sections, use the UI. See Customize the Discover page, domain, and subdomain layouts.