Note
Access to this page requires authorization. You can try signing in or changing directories.
Access to this page requires authorization. You can try changing directories.
Azure DevOps Services | Azure DevOps Server | Azure DevOps Server 2022
Boards give your team a visual way to manage projects, track work items, and collaborate. Each team in a project gets one board automatically, so you can start using a board as soon as you create your project. To add another board, add another team to the project. For more information, see About teams and Agile tools.
This quickstart walks through the most common board tasks: adding work items, customizing columns, setting work-in-progress (WIP) limits, filtering, and reviewing flow metrics.
Tip
You can use AI to help with this task later in this article, or see Enable AI assistance with Azure DevOps MCP Server to get started.
Prerequisites
A board is created when you create a project or add a team. Each team has access to their own product and portfolio boards as described in About teams and Agile tools.
| Category | Requirements |
|---|---|
| Access levels | - Project member. - To add work items and use all board features: At least Basic access. - Users with Stakeholder access: - Public project: Full access to board features, similar to users with Basic access. - Private project: Can add work items and update status through drag-and-drop but can't update fields displayed on cards, and can add tasks and change task status. |
| Permissions | To view or modify work items: View work items in this node and Edit work items in this node permissions set to Allow. By default, the Contributors group has these permissions. For more information, see Set permissions and access for work tracking. |
| Category | Requirements |
|---|---|
| Access levels | - Project member. - To add work items and use all board features: At least Basic access. - Users with Stakeholder access for a private project can add work items and update status through drag-and-drop but can't update fields displayed on cards. They can add tasks and change task status. |
| Permissions | To view or modify work items: View work items in this node and Edit work items in this node permissions set to Allow. By default, the Contributors group has these permissions. For more information, see Set permissions and access for work tracking. |
Use Boards and Taskboards for different planning views:
- Use Boards to track requirement-level work across iterations and monitor flow with tools like the cumulative flow diagram (CFD).
- Use Taskboards to track sprint task execution, capacity, and burndown.
For Taskboard guidance, see Update and monitor your Taskboard.
Open your board from the web portal
Sign in to your project (
https://dev.azure.com/{Your_Organization}/{Your_Project}).Select Boards > Boards, and then select the correct team in the team selector.
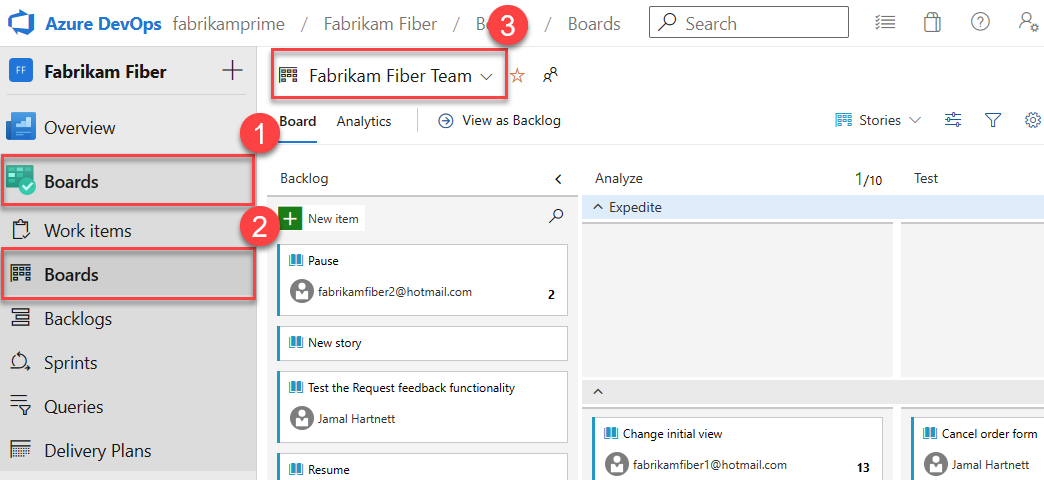
To switch to another team board, open the selector. Then choose another team, select
 Browse all team boards, or enter a keyword to filter the team backlog list.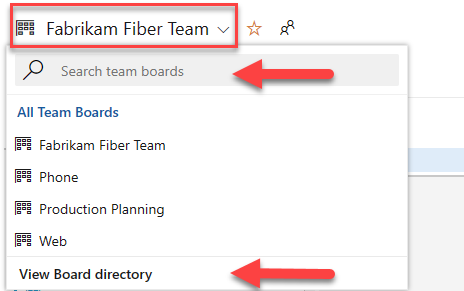
Tip
Select the
 star icon to make a team board a favorite. Favorited artifacts (
 favorite icon) appear at the top of the team selector list.
Select the correct backlog level: Backlog items for Scrum, Stories for Agile, or Requirements for CMMI.

To switch to the product backlog, select Stories backlog. To switch to a Taskboard, see Update and monitor your Taskboard.
Select your project, and then select Boards > Boards.
Select the correct team in the team selector.
To switch to another team board, open the selector. Then choose another team, select
Browse all team boards, or enter a keyword to filter the team backlog list.
Tip
Select the
star icon to make a team board a favorite. Favorited artifacts (
favorite icon) appear at the top of the team selector list.Select the correct backlog level: Backlog items for Scrum, Stories for Agile, or Requirements for CMMI.
To switch to the product backlog, select Stories backlog. To switch to a Taskboard, see Update and monitor your Taskboard.
Map the flow of how your team works
When you first open your board, Azure Boards creates one column for each workflow state. Your team can customize these columns based on the process your project uses.
Identify your team's actual workflow stages. These stages often differ from the default states. Configure the board to reflect the real handoffs your team uses.
For example, user stories usually move through New, Active, Resolved, and Closed from idea to completion.
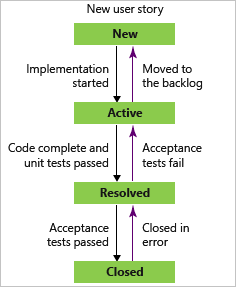
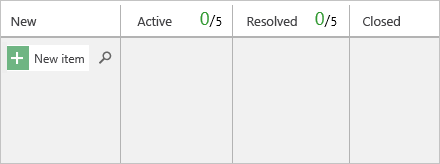
Manage your columns so they match your workflow stages. Keep the number of columns small, but include every key handoff.
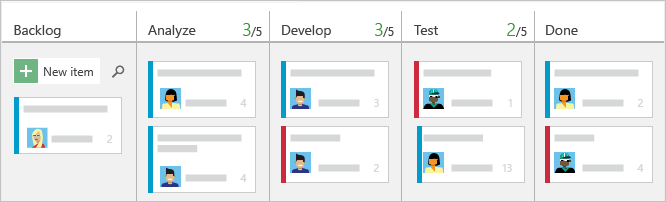
Set WIP limits
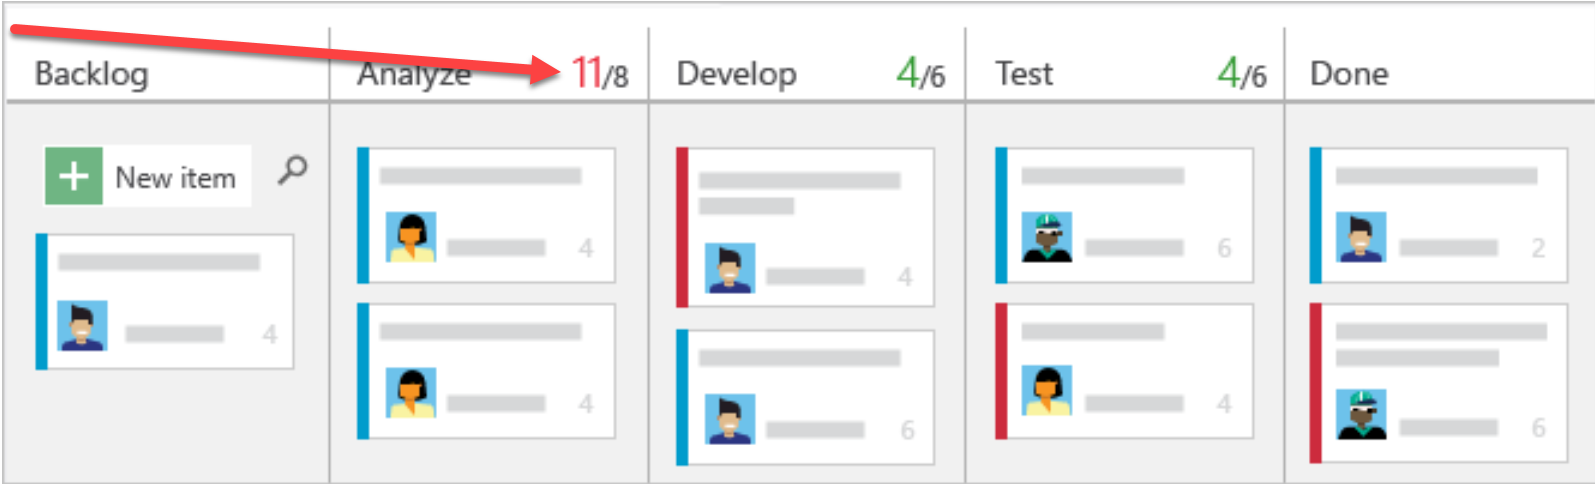
Set a work-in-progress (WIP) limit for each workflow stage. When a stage exceeds its limit, Azure Boards shows the column count in red. Use that signal to identify bottlenecks and rebalance work quickly. For more information, see Set WIP limits.
Track work in progress
Use the board to keep work moving and priorities clear:
- Add new items in the first column.
- Reorder items within a column as priorities change.
- Move cards to downstream columns as work progresses.
Each card shows the estimated work size at the lower-right corner.
Update the board frequently to keep the team in sync and make your value stream visible.
Important
If a work item appears on more than one team's board, updates can produce unexpected results. Each team can customize board columns and swimlanes, so Board Column, Board Column Done, and Board Lane values can change when another team updates the same item from its board. For more information, see Add, review, and update work items in Azure Boards.
Add work items
Add work items directly from the first column:
- Select the add icon (+).
- Enter a title.
- Press Enter to save.
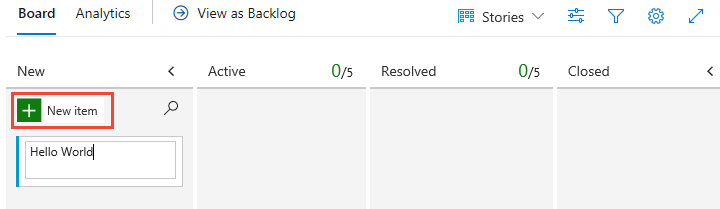
Repeat these steps to add as many work items as needed.
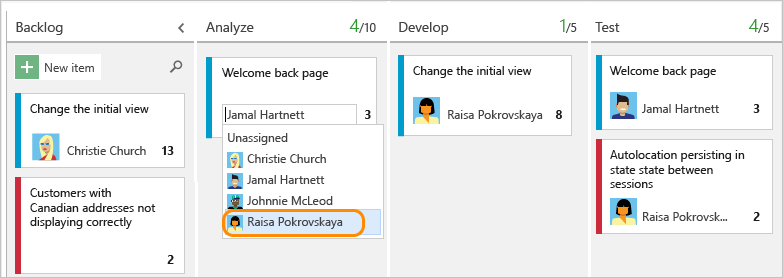
To edit details, select a work item title. You can also update fields shown on the card directly (for example, Assigned To). For field descriptions, see Create your backlog, Add details, and estimates. You can also add tasks or child items as checklists on your cards.
Note
- Assign each work item to only one user.
- When multiple people own the work, create one work item for each user and clarify ownership in the title and description.
- Add users to the project or team before you assign work. The Assigned To field only accepts accounts that are added to a project or team.
Update work item status
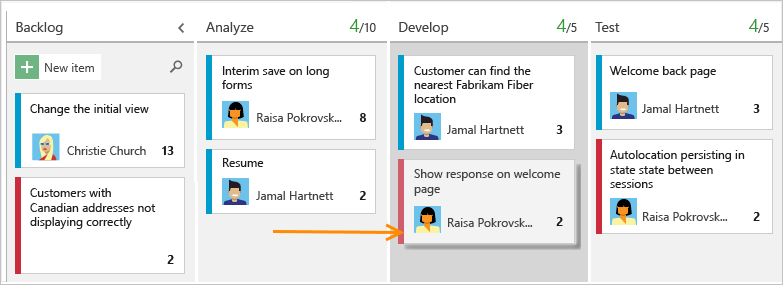
Update status directly on the board as work progresses:
- Select a card.
- Drag it to the next downstream column.
- Drop the card to save the new status.
Note
- Backlogs and boards hide completed or closed work items when their Changed Date is older than 183 days (about six months).
- Find hidden items by running a query.
- Show an item again on a backlog or board by making a minor update to refresh its Changed Date.
Note
- Backlogs and boards hide completed or closed work items when their Changed Date is older than one year.
- Find hidden items by running a query.
- Show an item again on a backlog or board by making a minor update to refresh its Changed Date.
Update card fields
Update fields and ownership directly from the board:
- Select the field on a card (for example, Assigned To).
- Enter a new value or select a different assignee.
- Confirm the update on the card.
If a field isn't visible, customize the card to show it. You can also show other work item types, such as change requests, incidents, issues, and custom types. For more information, see Customize cards and About configuring and customizing Azure Boards.
Filter your board with keywords, field values, or tags
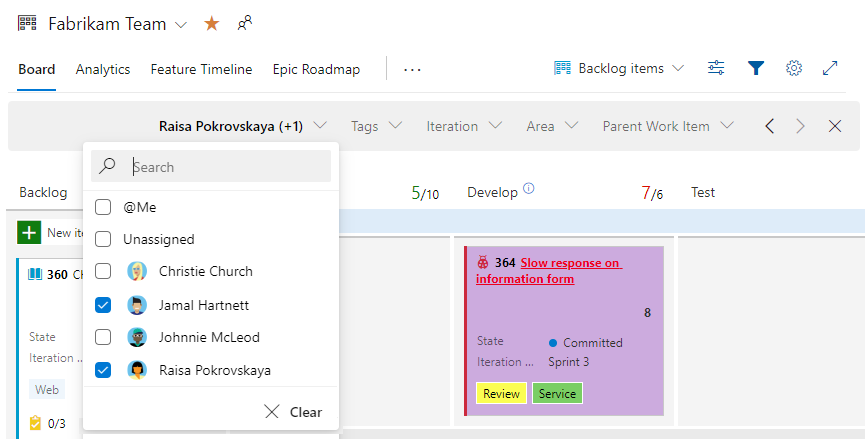
Filter the board to focus on the work you need to review:
- Select Filter
 .
. - Choose one or more filter values, such as keyword, assignee, or tag.
- Review the filtered board results.
For example, during a sprint, filter by Assigned To to review one team member's work. For more information, see Filter your backlogs, boards, and plans.
The following example image shows the board filtered to items assigned to Jamal and Raisa.
Invite others to work on your board
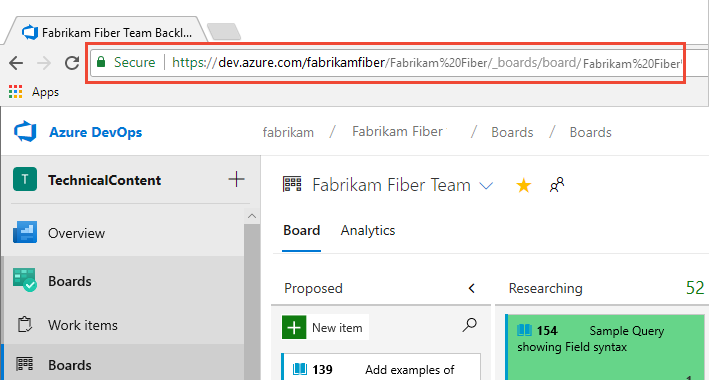
Invite teammates by sharing a direct link to your board:
- Open your board in Azure Boards.
- Copy the URL from your browser address bar.
- Share the URL with your teammates in chat or email.
Project members can open the link and contribute immediately based on their permissions.
If someone doesn't have access, add them to the project first. For details, see Add users to a project.
Monitor metrics
Use board metrics to spot bottlenecks and improve flow.
Review the Cumulative Flow Diagram (CFD) after your team uses the board for a few weeks:
- Select the Analytics tab.
- Select View full report on the CFD tile.
- Set the time range, swimlanes, and workflow states or board columns.
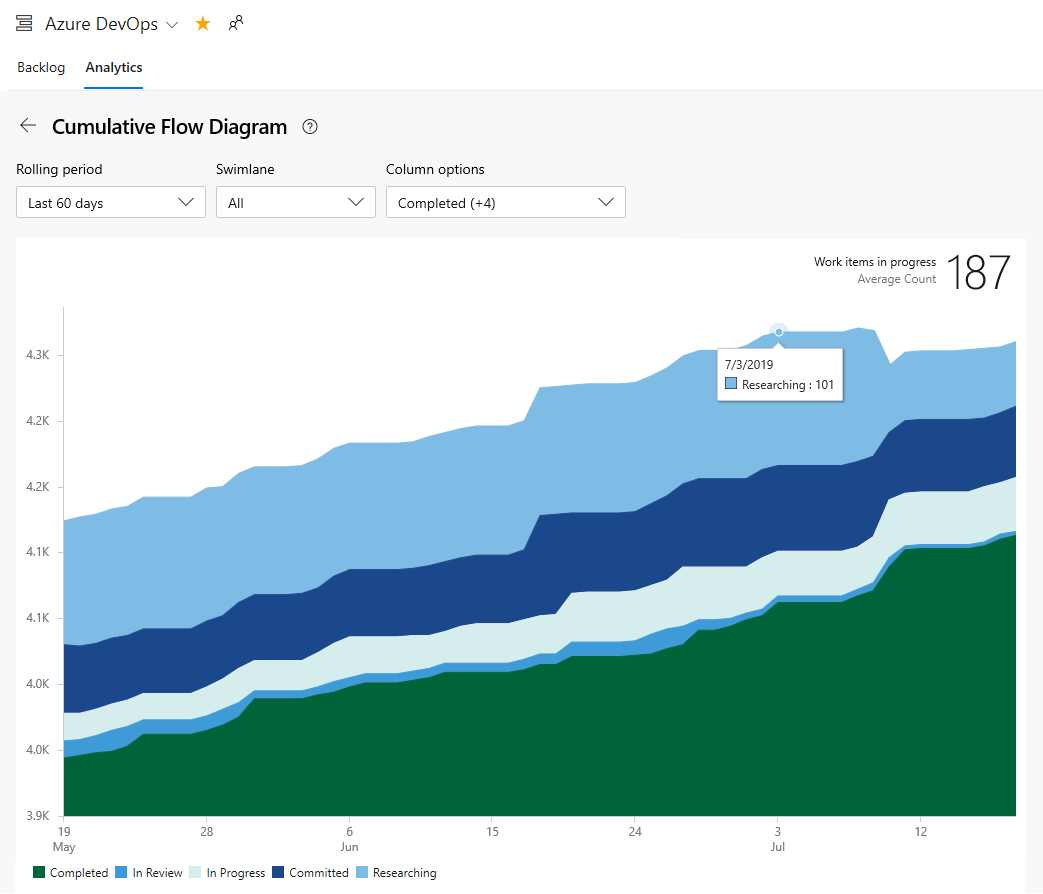
- Hover over a point on the chart to see how many items were in each state on that date.
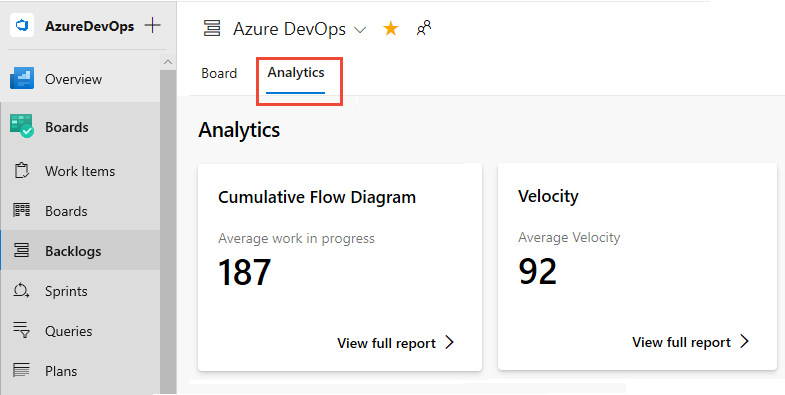
In the following example, hovering over a single day shows that 101 items were in the Researching state on that date.
Tip
Your selections persist across sessions until you change them.
Use these insights to decide where work is piling up, then adjust WIP limits, staffing, or handoffs to reduce lead time. For more information, see Configure a cumulative flow chart.
You can also add Analytics widgets to your dashboard:
View a board from a query
Use the Query Based Boards Marketplace extension to view a flat-list query as a board.
Use this option when you need one board view that spans:
- Multiple work item types
- Multiple projects
To get started, install the extension, open your flat-list query, and switch to the board view provided by the extension.
Use AI to manage your Kanban board
If you configure the Azure DevOps MCP Server, you can describe common Kanban board tasks in natural language instead of dragging cards through columns manually.
Use these prompts as scenario examples. Supported operations vary by connected tools, extension version, and your permissions.
| Task | Example prompt |
|---|---|
| Add a work item to the board | Add a new user story "Enable dark mode" to the board for team <Web> in project <Contoso> |
| Move a card across columns | Move user story 4321 to the "Doing" column on the board for team <Web> in project <Contoso> |
| Assign a card | Assign user story 4321 to <Raisa> on the board for team <Web> in project <Contoso> |
| Bulk move cards | Move all "Approved" user stories on the board for team <Web> to "Committed" in project <Contoso> |
| Filter the board | Show all cards on the board for team <Web> in project <Contoso> tagged "customer-request" |
| Add child tasks | Add 3 tasks under user story 4321 in project <Contoso> with the titles I provide |
| Update card details | Set Story Points to 5 on user story 4321 in project <Contoso> |
| Identify blocked cards | List all cards on the board for team <Web> in project <Contoso> that are blocked or at risk |
| Summarize board status | Summarize the board for team <Web> in project <Contoso> - count of items in each column and any blockers |
| Reassign in bulk | Reassign all "In Progress" cards from <Jamal> to <Raisa> on the board for team <Web> in project <Contoso> |
Note
If you're using Visual Studio Code, agent mode is especially helpful for complex Kanban board operations.