Use Azure Key Vault secrets in Azure Pipelines
Azure DevOps Services | Azure DevOps Server 2022 - Azure DevOps Server 2019
Azure Key Vault allows developers to securely store and manage sensitive information like API keys, credentials, or certificates. Azure Key Vault service supports two types of containers: vaults and managed HSM (Hardware Security Module) pools. Vaults can store both software and HSM-backed keys, secrets, and certificates, while managed HSM pools exclusively support HSM-backed keys.
In this tutorial, you will learn how to:
- Create an Azure Key Vault using Azure CLI
- Add a secret and configure access to Azure key vault
- Use secrets in your pipeline
Prerequisites
An Azure DevOps organization and a project. Create an organization or a project if you haven't already.
An Azure subscription. Create an Azure account for free if you don't have one already.
Create a repo
If you already have your own repository, proceed to the next step. Otherwise, follow the instructions below to initialize your repository. We will use this Azure Repo to set up our pipeline.
Sign in to your Azure DevOps organization, and then navigate to your project.
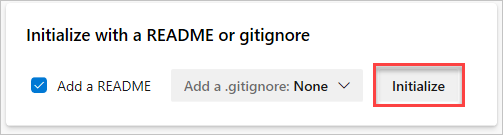
Select Repos, and then select Initialize to initialize the main branch with a README.
Create an Azure Key Vault
Sign in to the Azure Portal, and then select the Cloud Shell button in the upper-right corner.
If you have more than one Azure subscription associated with your account, use the command below to specify a default subscription. You can use
az account listto generate a list of your subscriptions.az account set --subscription <YOUR_SUBSCRIPTION_NAME_OR_ID>Set your default Azure region. You can use
az account list-locationsto generate a list of available regions.az config set defaults.location=<YOUR_REGION>Create a new resource group.
az group create --name <YOUR_RESOURCE_GROUP_NAME>Create a new Azure Key Vault.
az keyvault create \
  --name <YOUR_KEY_VAULT_NAME> \
  --resource-group <YOUR_RESOURCE_GROUP_NAME>
Create a new secret in your Azure key vault.
az keyvault secret set \
  --name <YOUR_SECRET_NAME> \
  --value <YOUR_ACTUAL_SECRET> \
  --vault-name <YOUR_KEY_VAULT_NAME>
Set up key vault access policies
To access our Azure Key Vault, we need to set up a service principal to grant access to Azure Pipelines. Follow this guide to create a service principal with Azure CLI, and then continue with the next steps in this section.
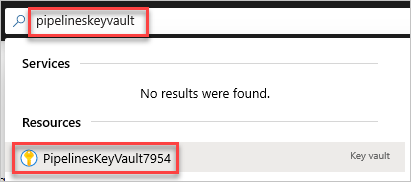
Navigate to Azure portal, and then use the search bar to find the key vault you created earlier.
Select Access policies, and then select Create to create a new policy.
Under Secret permissions, select Get and List.
Select Next, and then select the service principal you created earlier. A service principal is an object that represents an application or service that's requesting access to Azure resources.
Select Next, and then Next once more.
Review your policies, and then select Create when you're done.
Note
Azure Key Vaults that use Azure role-based access control (Azure RBAC) are not supported.
Add role assignment
In the next step, we'll create an ARM service connection using service principal. Before we can verify the connection, we need to grant the service principal Read access at the subscription level:
Navigate to Azure portal
Select Subscriptions from the left navigation panel, and then find and select your subscription.
Select Access control, and then select Add > Add role assignment.
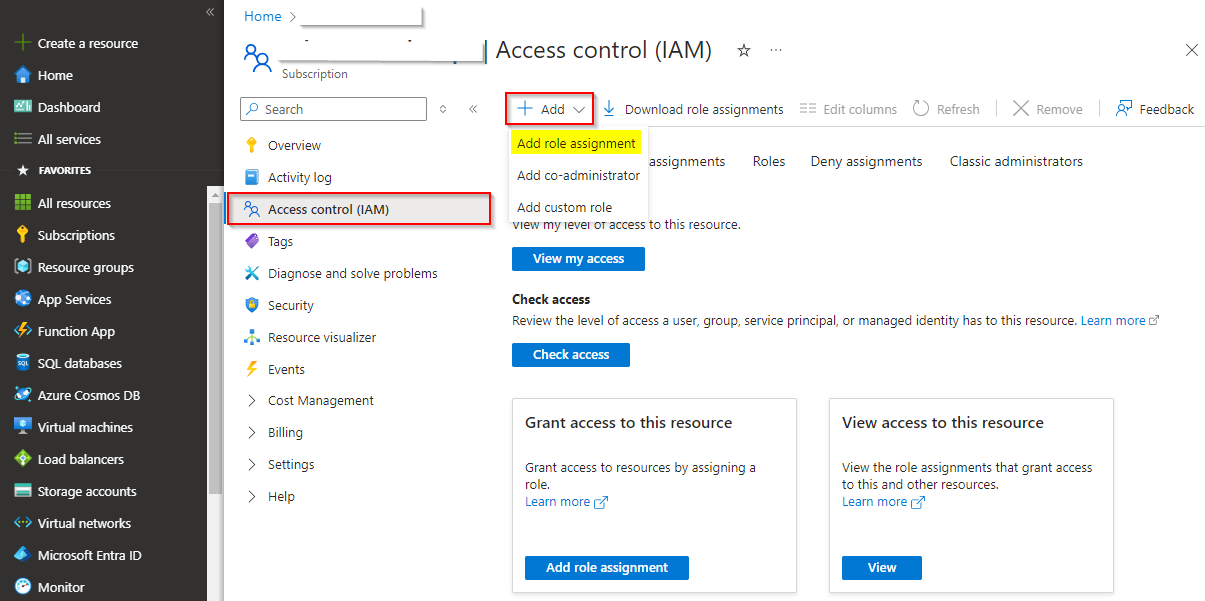
Select Reader under the Role tab, and then select Next.
Select User, group, or service principal, and then select Select members.
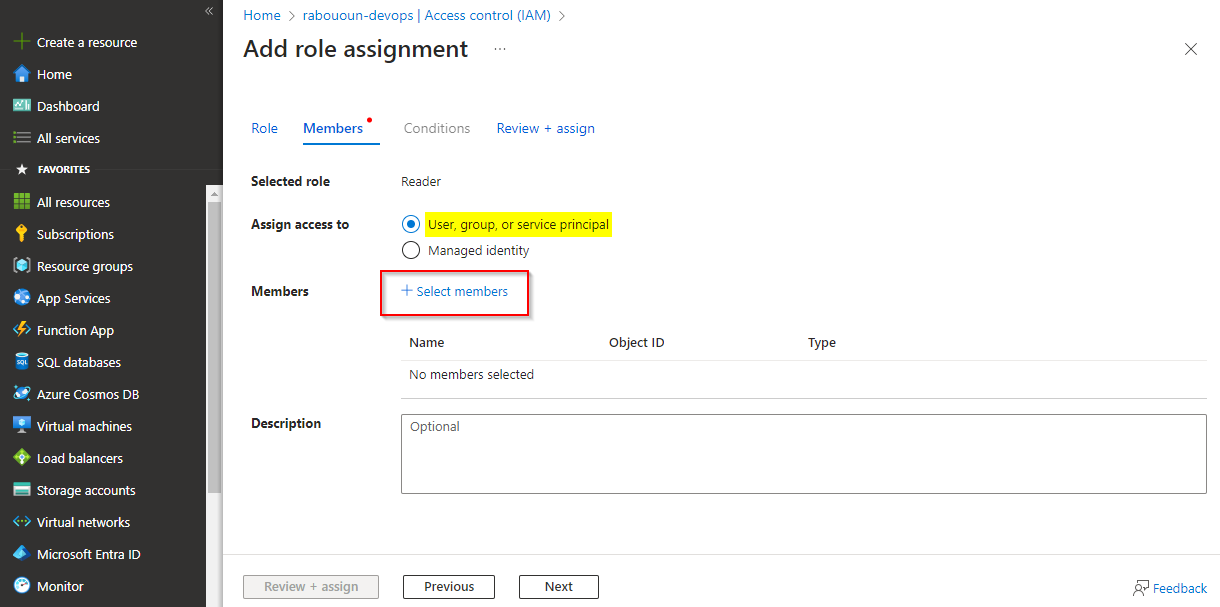
Use the search bar to find your service principal, and then select the "+" sign to select it, then click on the Select button.
Select Review + assign, review your settings, and then select Review + assign once more to confirm your choices and add the role assignment.
Create a service connection
Sign in to your Azure DevOps organization, and then navigate to your project.
Select Project settings > Service connections, and then select New service connection to create a new service connection.
Select Azure Resource Manager, and then select Next.
Select Service principal (manual), and then select Next.
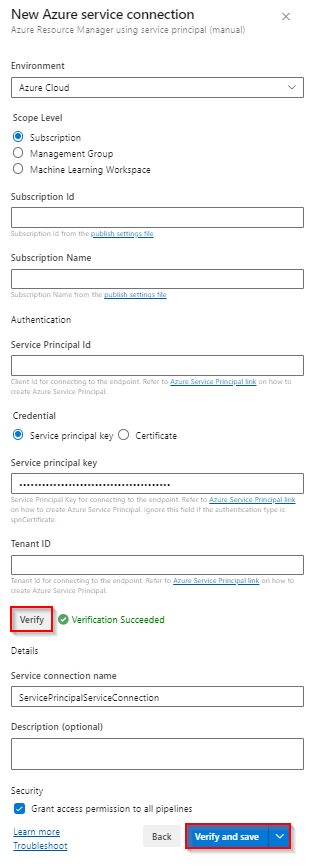
Select Azure Cloud for Environment and Subscription for the Scope Level, then enter your Subscription Id and your Subscription Name.
Fill out the following fields with the information you obtained when creating the service principal, and then select Verify when you're done:
- Service Principal Id: Your service principal appId.
- Service Principal key: Your service principal password.
- Tenant ID: Your service principal tenant.
Once the verification has succeeded, provide a name and description (optional) for your service connection, and then check the Grant access permission to all pipelines checkbox.
Select Verify and save when you're done.
Sign in to your Azure DevOps collection, and then navigate to your project.
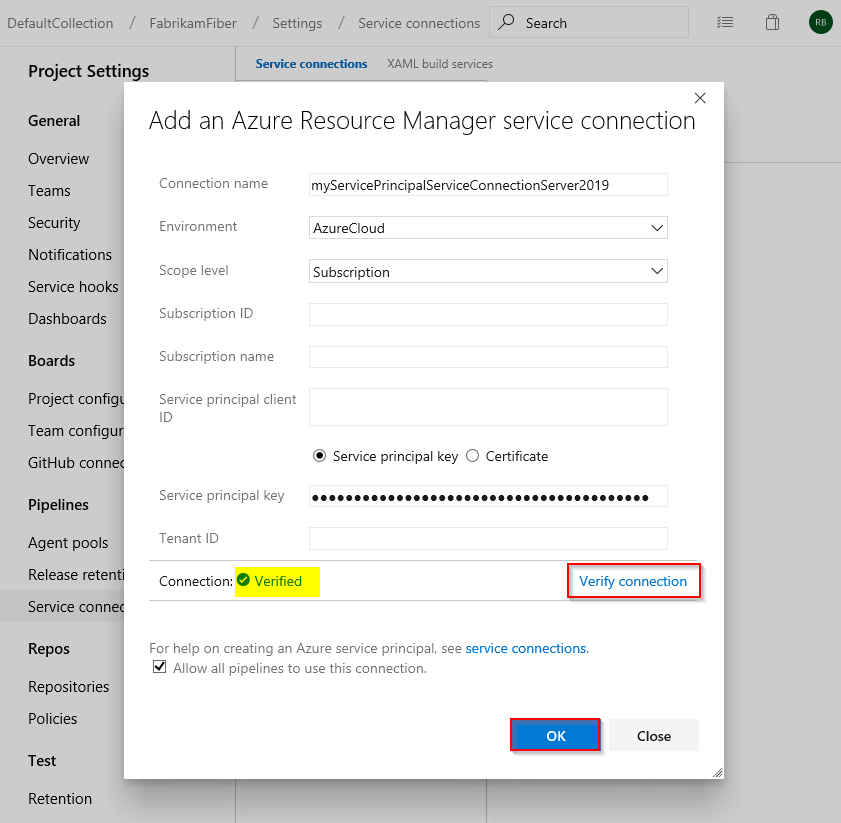
Select Project settings > Service connections > New service connection and then select Azure Resource Manager to create a new ARM service connection.
Give your service connection a name, and then select Azure Cloud for Environment and Subscription for the Scope Level.
Enter your Subscription Id and your Subscription Name.
Fill out the following fields with the information you obtained when creating the service principal, and then select Verify connection when you're done:
- Service Principal client Id: Your service principal appId.
- Service Principal key: Your service principal password.
- Tenant ID: Your service principal tenant.
Check the Allow all pipelines to use this connection checkbox, and then select Ok when you're done.
Create a new pipeline
Sign in to your Azure DevOps organization, and then navigate to your project.
Select Pipelines, and then select New Pipeline.
Select Use the classic editor to create a classic pipeline.
Select Azure Repos Git, select your repository and default branch, and then select Continue.
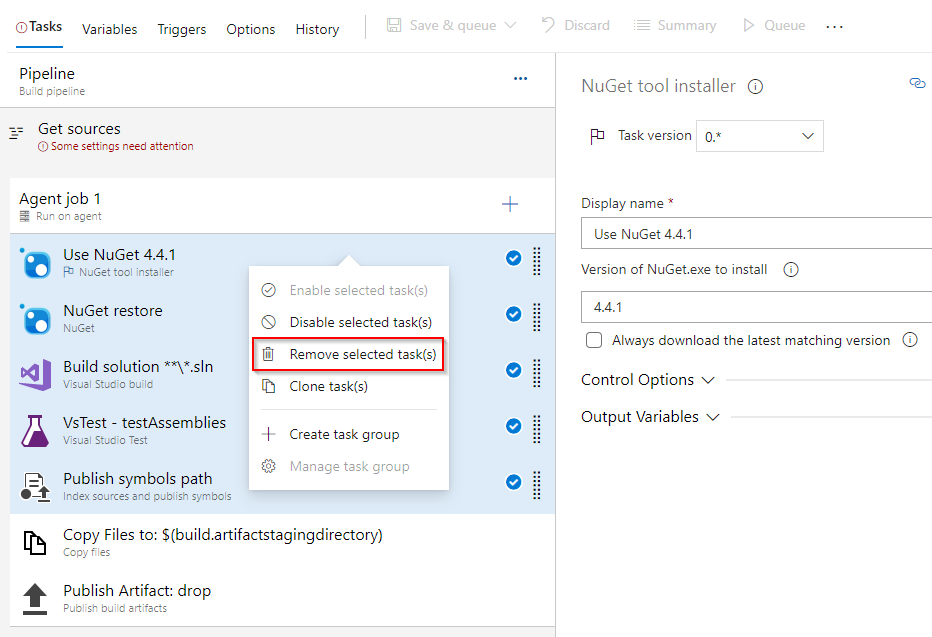
Select the .Net Desktop pipeline template.
For this example, we will only need the last two tasks. Press CTRL and then select the first five tasks, right-click and choose Remove selected tasks(s) to delete them.
Select + to add a new task. Search for the Command line task, select it, and then select Add to add it to your pipeline. Once added, configure it as follows:
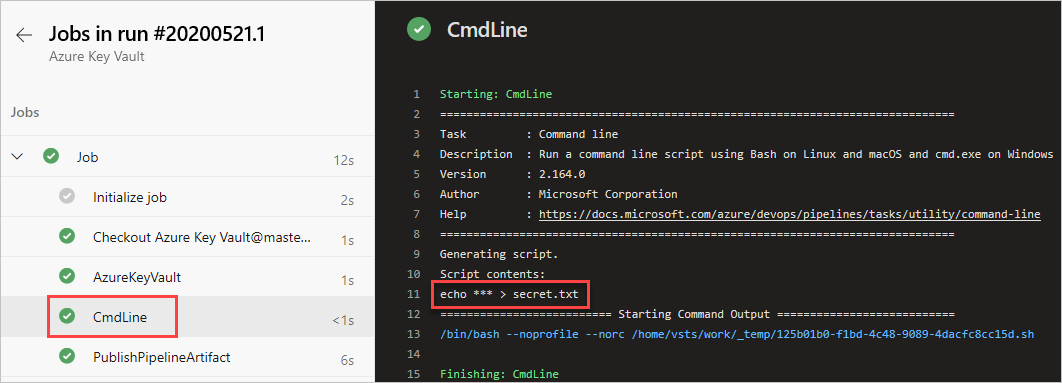
- Display name: Create file
- Script:
echo $(YOUR_SECRET_NAME) > secret.txt

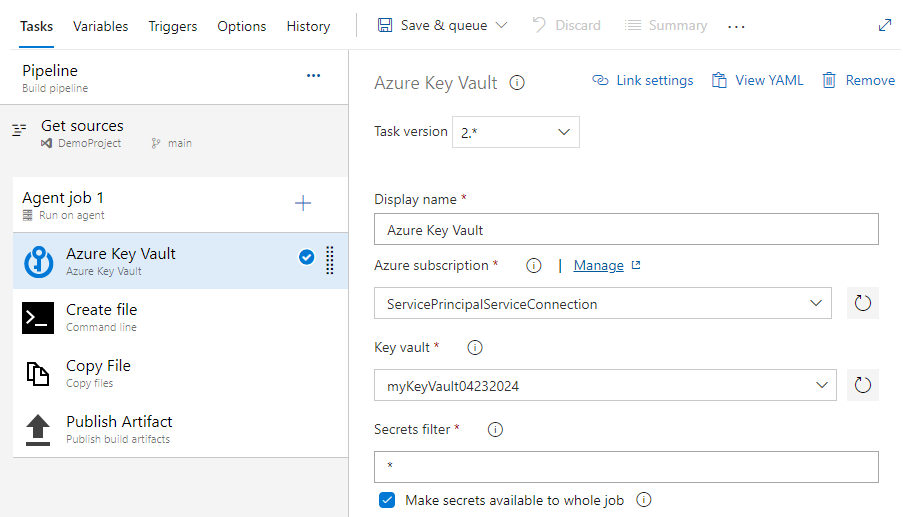
Select + to add a new task. Search for the Azure Key Vault task, select it, and then select Add* to add it to your pipeline. Once added, configure it as follows:
- Display name: Azure Key Vault
- Azure subscription: select your service principal service connection you created earlier
- Key vault: select your key vault
- Secret filter: A comma separated list of secret names or leave * to download all secrets from the selected key vault
Select the Copy files task and fill out the required fields as follows:
- Display name: Copy File
- Contents: secret.txt
- Target Folder: $(build.artifactstagingdirectory)

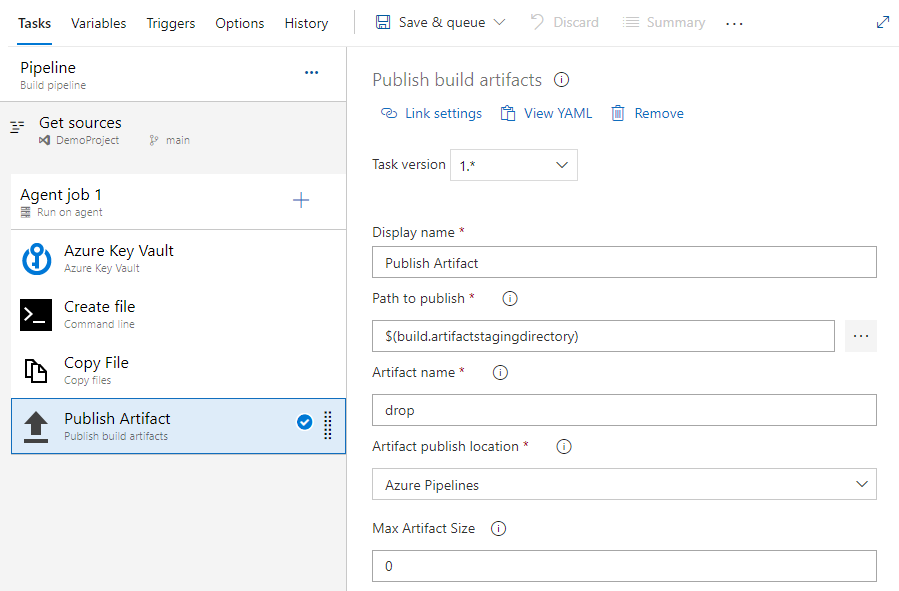
Select the Publish Artifacts task and fill out the required fields as follows:
- Display name: Publish Artifact
- Path to publish: $(build.artifactstagingdirectory)
- Artifact name: drop
- Artifact publish location: Azure Pipelines
Select Save and queue, and then select Run to run your pipeline.
Once the pipeline run is complete, return to the pipeline summary and select the published artifact.
Select drop > secret.txt to download the published artifact.
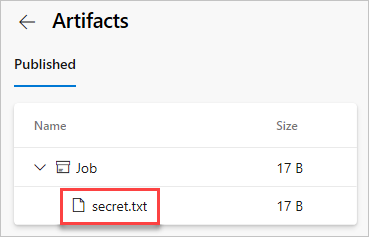
Open the text file you just downloaded, the text file should contain the secret from your Azure key vault.

Sign in to your Azure DevOps collection, and then navigate to your project.
Select Pipelines, and then select Builds.
Select New > New build pipeline.
Select Use the classic editor to create a new classic build pipeline.
Select Azure Repos Git, select your repository and your default branch, and then select Continue.
Select the .Net Desktop pipeline template, and then select Apply.
For this example, we will only need the last two tasks. Press CTRL and then select the first five tasks, right-click and choose Remove selected tasks(s) to delete them.
Select + to add a new task. Search for the Command line task, select it, and then select Add to add it to your pipeline. Once added, configure it as follows:
- Display name: Create file
- Script:
echo $(YOUR_SECRET_NAME) > secret.txt
Select + to add a new task. Search for the Azure Key Vault task, select it, and then select Add* to add it to your pipeline. Once added, configure it as follows:
- Display name: Azure Key Vault
- Azure subscription: select your service principal service connection you created earlier
- Key vault: select your key vault
- Secret filter: A comma separated list of secret names or leave * to download all secrets from the selected key vault

Select the Copy files task and fill out the required fields as follows:
- Display name: Copy File
- Contents: secret.txt
- Target Folder: $(build.artifactstagingdirectory)
Select the Publish Artifacts task and fill out the required fields as follows:
- Display name: Publish Artifact
- Path to publish: $(build.artifactstagingdirectory)
- Artifact name: drop
- Artifact publish location: Azure Pipelines
Select Save & queue, and then select Save & queue to run your build pipeline.
Once the pipeline run is complete, select Artifacts and then select drop.
In the newly opened window, select drop > secret.txt, select the ellipsis icon (...), and then select download to save the text file.
Open the text file you just downloaded, it should contain the secret from your Azure key vault.
Warning
This tutorial is for educational purposes only. For security best practices and how to safely work with secrets, see Manage secrets in your server apps with Azure Key Vault.
Clean up resources
Follow the steps below to delete the resources you created:
If you've created a new organization to host your project, see how to delete your organization, otherwise delete your project.
All Azure resources created during this tutorial are hosted under a single resource group. Run the following command to delete your resource group and all of its resources.
az group delete --name <YOUR_RESOURCE_GROUP_NAME>
FAQ
Q: I'm getting the following error: "the user or group does not have secrets list permission" what should I do?
A: If you encounter an error indicating that the user or group does not have secrets list permission on key vault, run the following commands to authorize your application to access the key or secret in the Azure Key Vault:
$ErrorActionPreference="Stop";
$Credential = Get-Credential;
Connect-AzAccount -SubscriptionId <YOUR_SUBSCRIPTION_ID> -Credential $Credential;
$spn=(Get-AzureRmADServicePrincipal -SPN <YOUR_SERVICE_PRINCIPAL_ID>);
$spnObjectId=$spn.Id;
Set-AzureRmKeyVaultAccessPolicy -VaultName key-vault-tutorial -ObjectId $spnObjectId -PermissionsToSecrets get,list;
Related articles
Feedback
Coming soon: Throughout 2024 we will be phasing out GitHub Issues as the feedback mechanism for content and replacing it with a new feedback system. For more information see: https://aka.ms/ContentUserFeedback.
Submit and view feedback for