Tutorial: Migrate SQL Server to Azure SQL Database (offline)
You can use Azure Database Migration Service via the Azure SQL Migration extension for Azure Data Studio, or the Azure portal, to migrate databases from an on-premises instance of SQL Server to Azure SQL Database (offline).
In this tutorial, learn how to migrate the sample AdventureWorks2019 database from an on-premises instance of SQL Server to an instance of Azure SQL Database, by using Database Migration Service. This tutorial uses offline migration mode, which considers an acceptable downtime during the migration process.
In this tutorial, you learn how to:
- Open the Migrate to Azure SQL wizard in Azure Data Studio
- Run an assessment of your source SQL Server databases
- Collect performance data from your source SQL Server instance
- Get a recommendation of the Azure SQL Database SKU that will work best for your workload
- Create an instance of Azure Database Migration Service
- Start your migration and monitor progress to completion
Tip
In Azure Database Migration Service, you can migrate your databases offline or while they are online. In an offline migration, application downtime starts when the migration starts. To limit downtime to the time it takes you to cut over to the new environment after the migration, use an online migration. We recommend that you test an offline migration to determine whether the downtime is acceptable. If the expected downtime isn't acceptable, do an online migration.
Important
Currently, online migrations for Azure SQL Database targets aren't available.
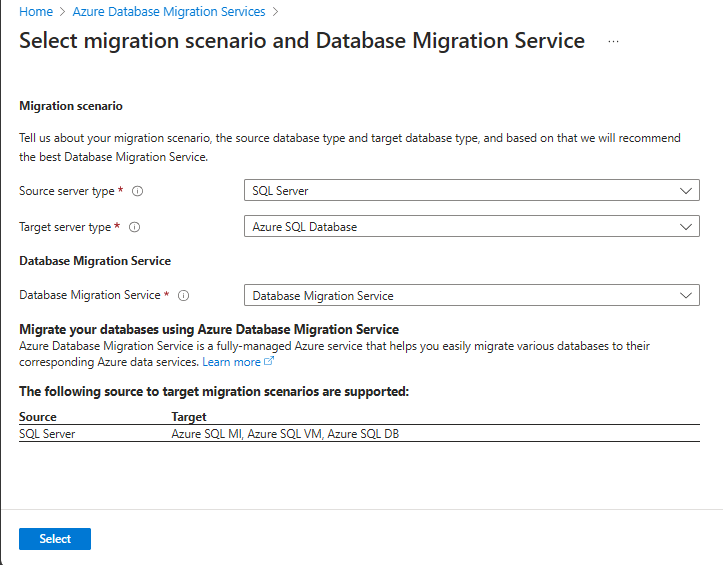
Migration options
The following section describes how to use Azure Database Migration Service with the Azure SQL Migration extension, or in the Azure portal.
Prerequisites
Before you begin the tutorial:
Install the Azure SQL Migration extension from Azure Data Studio Marketplace.
Have an Azure account that's assigned to one of the following built-in roles:
- Contributor for the target instance of Azure SQL Database
- Reader role for the Azure resource group that contains the target instance of Azure SQL Database
- Owner or Contributor role for the Azure subscription (required if you create a new instance of Azure Database Migration Service)
As an alternative to using one of these built-in roles, you can assign a custom role.
Important
An Azure account is required only when you configure the migration steps. An Azure account isn't required for the assessment or to view Azure recommendations in the migration wizard in Azure Data Studio.
Create a target instance of Azure SQL Database.
Make sure that the SQL Server login that connects to the source SQL Server instance is a member of the db_datareader role and that the login for the target SQL Server instance is a member of the db_owner role.
To migrate the database schema from source to target Azure SQL DB by using the Database Migration Service, the minimum supported SHIR version required is 5.37 or above.
If you're using Database Migration Service for the first time, make sure that the Microsoft.DataMigration resource provider is registered in your subscription.
Note
Now, you can migrate database Schema and data both using Database Migration Service. Also, you can use tools like the SQL Server dacpac extension or the SQL Database Projects extension in Azure Data Studio to migrate schema before selecting the list of tables to migrate.
If no table exist on the Azure SQL Database target, or no tables are selected before starting the migration, the Next button isn't available to select to initiate the migration task. If no table exists on target then you must select the Schema migration option to move forward.
Open the Migrate to Azure SQL wizard in Azure Data Studio
To open the Migrate to Azure SQL wizard:
In Azure Data Studio, go to Connections. Select and connect to your on-premises instance of SQL Server. You also can connect to SQL Server on an Azure virtual machine.
Right-click the server connection and select Manage.

In the server menu under General, select Azure SQL Migration.
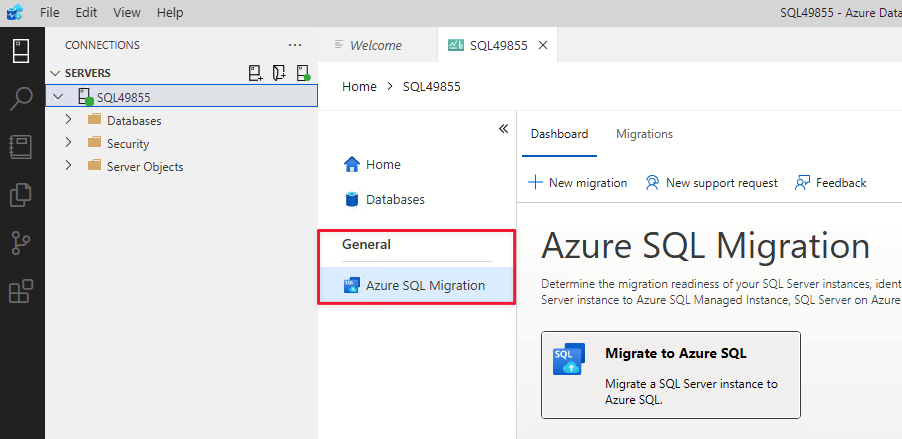
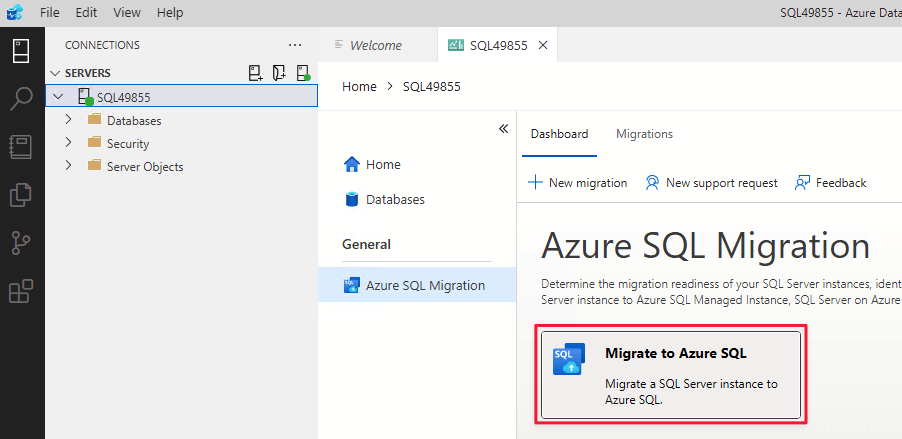
In the Azure SQL Migration dashboard, select Migrate to Azure SQL to open the migration wizard.
On the first page of the wizard, start a new session or resume a previously saved session.

Run database assessment, collect performance data, and get Azure recommendations
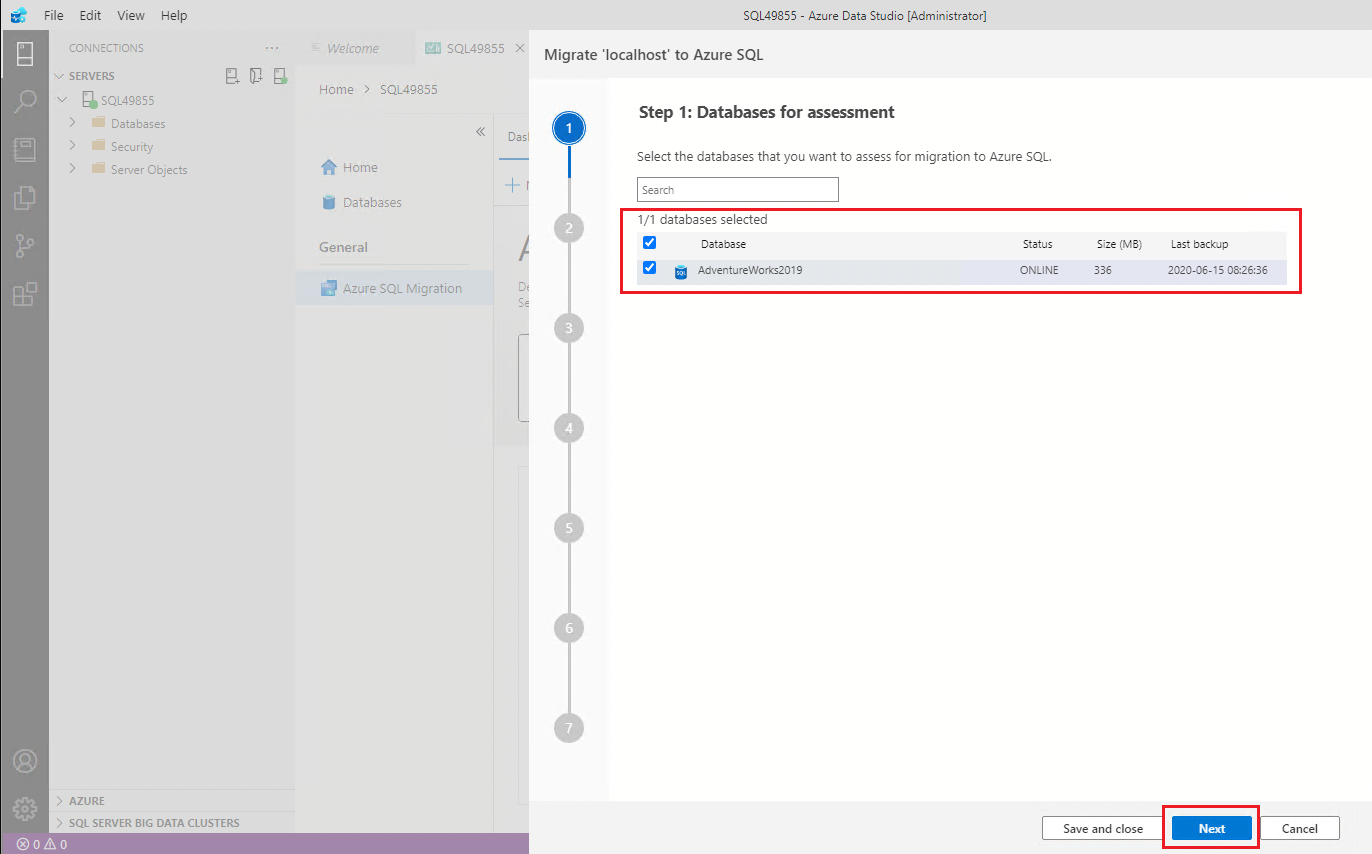
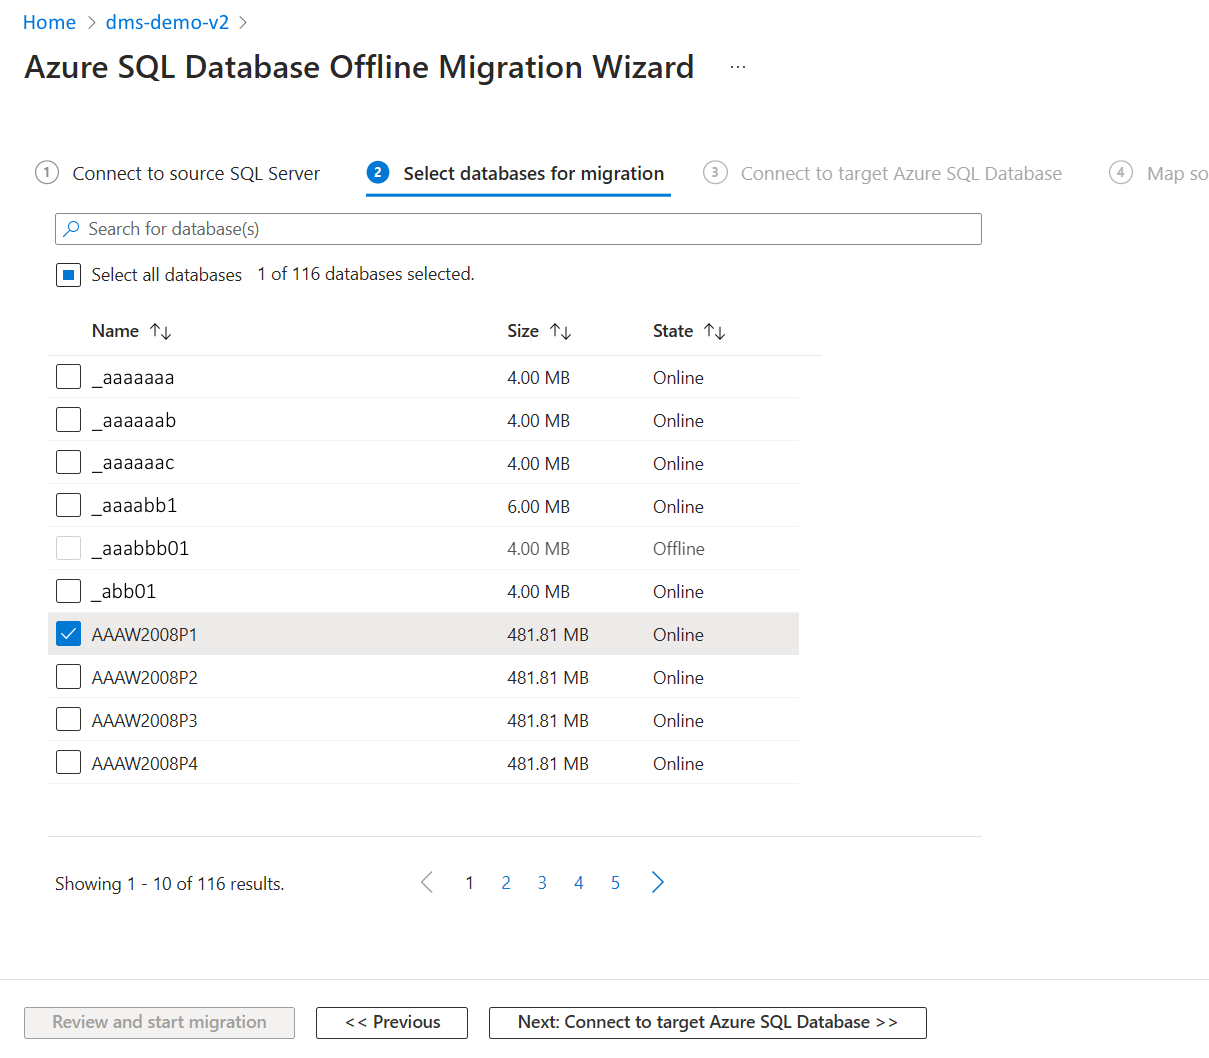
In Step 1: Databases for assessment in the Migrate to Azure SQL wizard, select the databases you want to assess. Then, select Next.
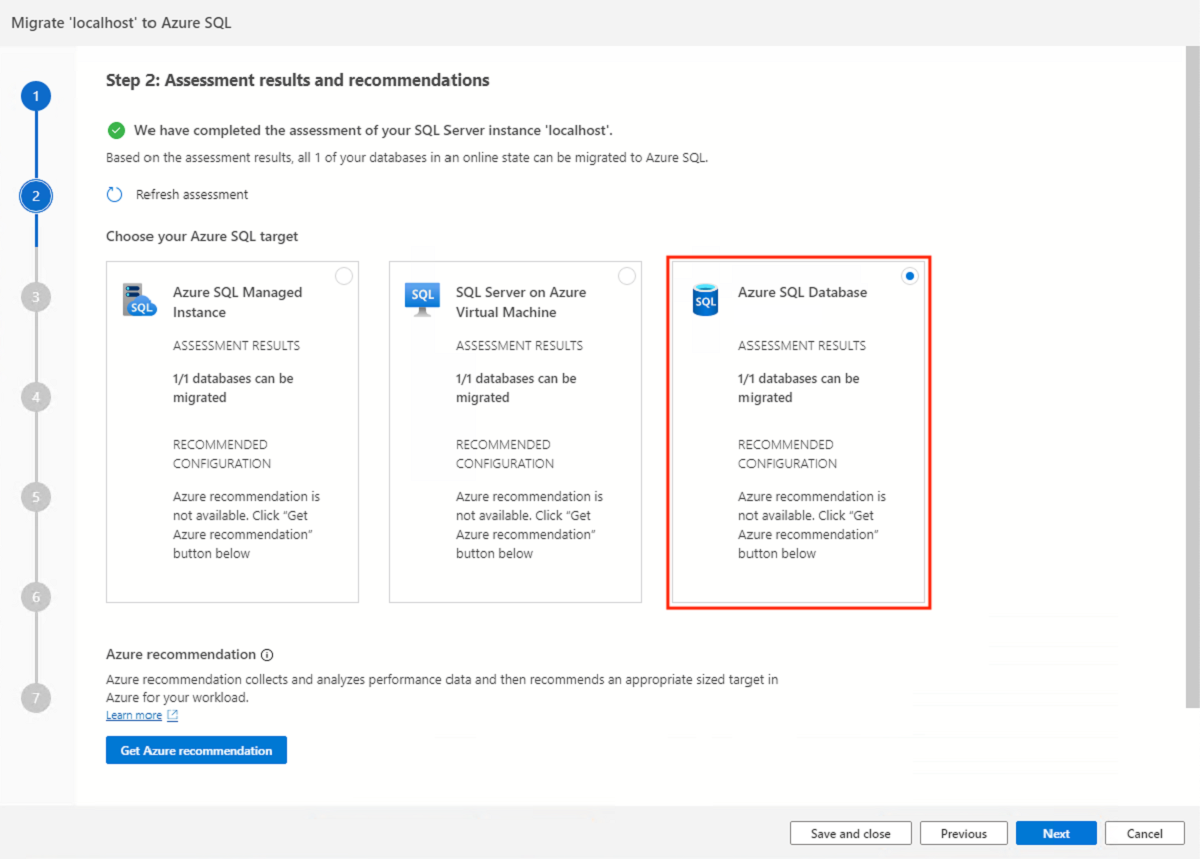
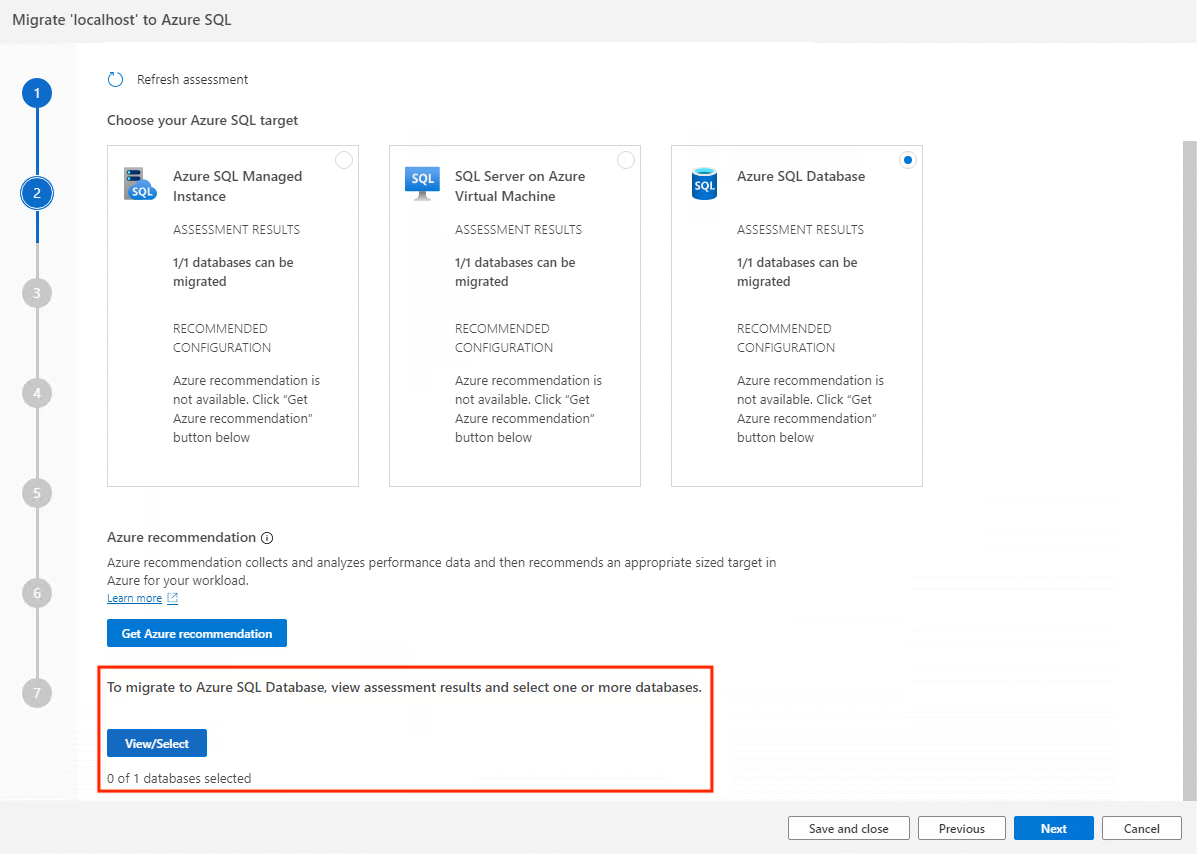
In Step 2: Assessment results and recommendations, complete the following steps:
In Choose your Azure SQL target, select Azure SQL Database.
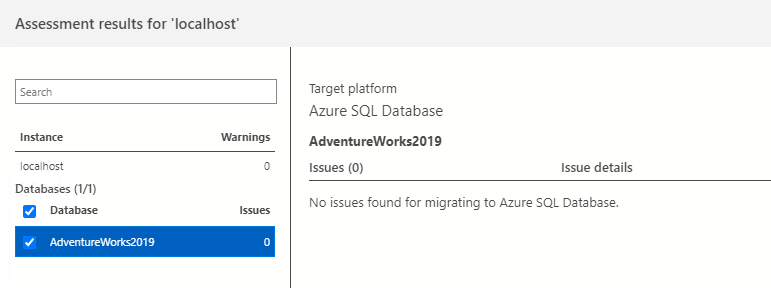
Select View/Select to view the assessment results.
In the assessment results, select the database, and then review the assessment report to make sure no issues were found.
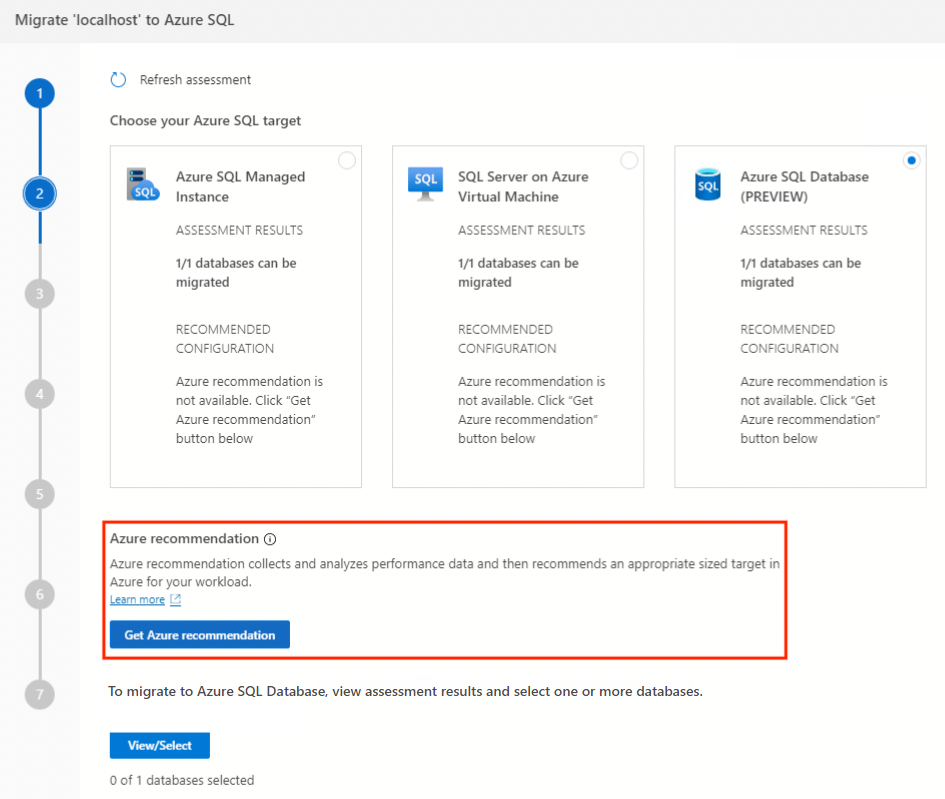
Select Get Azure recommendation to open the recommendations pane.
Select Collect performance data now. Select a folder on your local computer to store the performance logs, and then select Start.
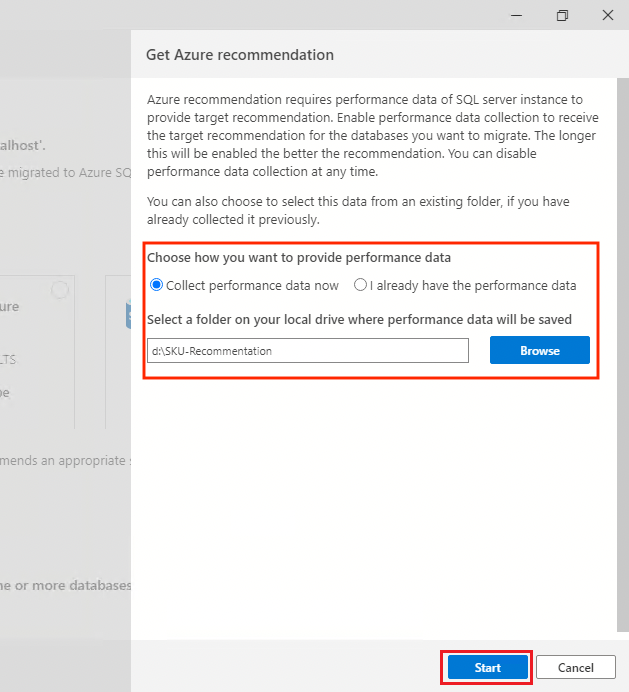
Azure Data Studio collects performance data until you either stop data collection or you close Azure Data Studio.
After 10 minutes, Azure Data Studio indicates that a recommendation is available for Azure SQL Database. After the first recommendation is generated, you can select Restart data collection to continue the data collection process and refine the SKU recommendation. An extended assessment is especially helpful if your usage patterns vary over time.
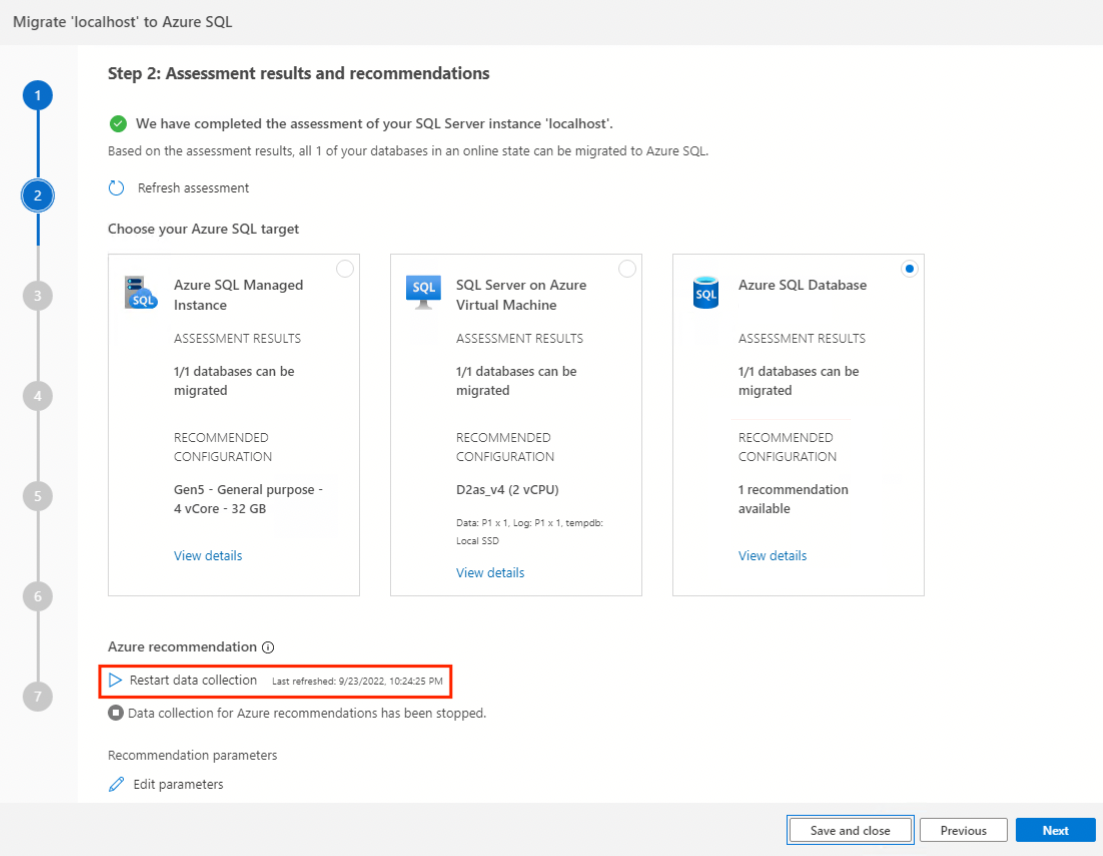
In the selected Azure SQL Database target, select View details to open the detailed SKU recommendation report:
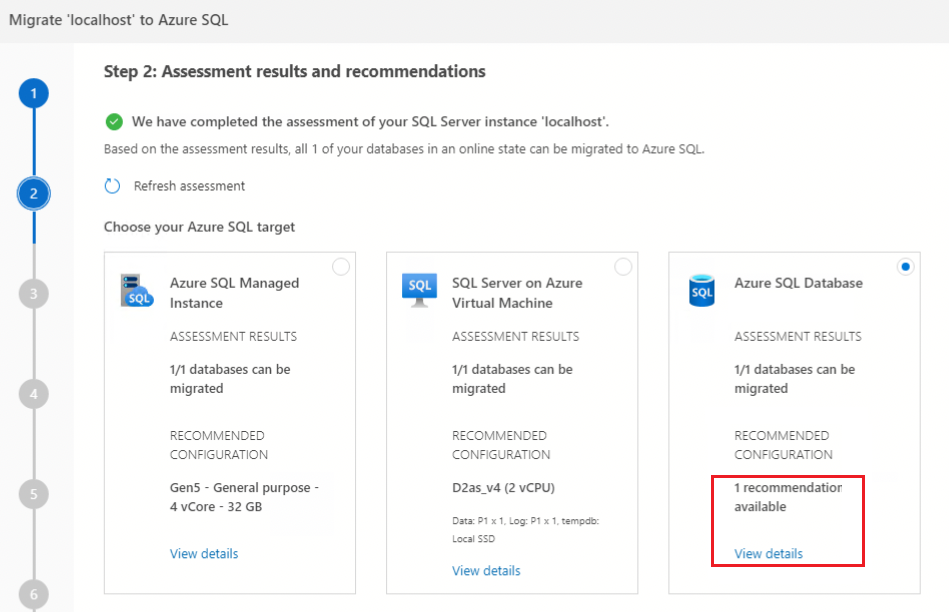
In Review Azure SQL Database Recommendations, review the recommendation. To save a copy of the recommendation, select Save recommendation report.

Select Close to close the recommendations pane.
Select Next to continue your database migration in the wizard.
Configure migration settings
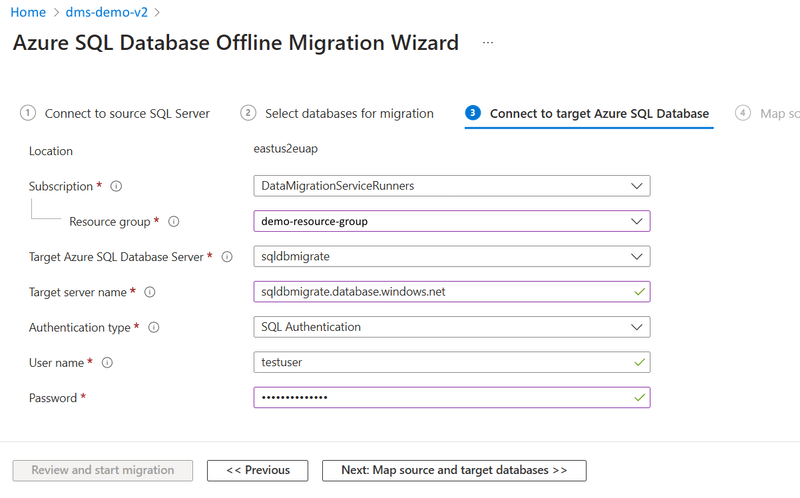
In Step 3: Azure SQL target in the Migrate to Azure SQL wizard, complete these steps for your target Azure SQL Database instance:
Select your Azure account, Azure subscription, the Azure region or location, and the resource group that contains the Azure SQL Database deployment.
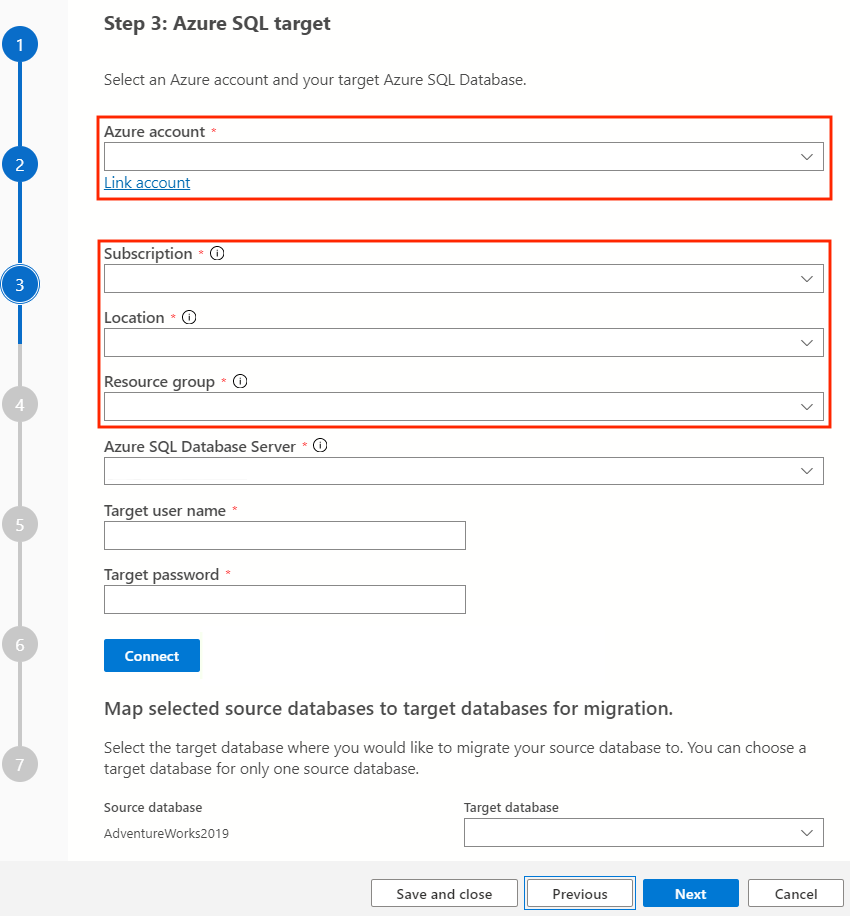
For Azure SQL Database Server, select the target Azure SQL Database server (logical server). Enter a username and password for the target database deployment. Then, select Connect. Enter the credentials to verify connectivity to the target database.
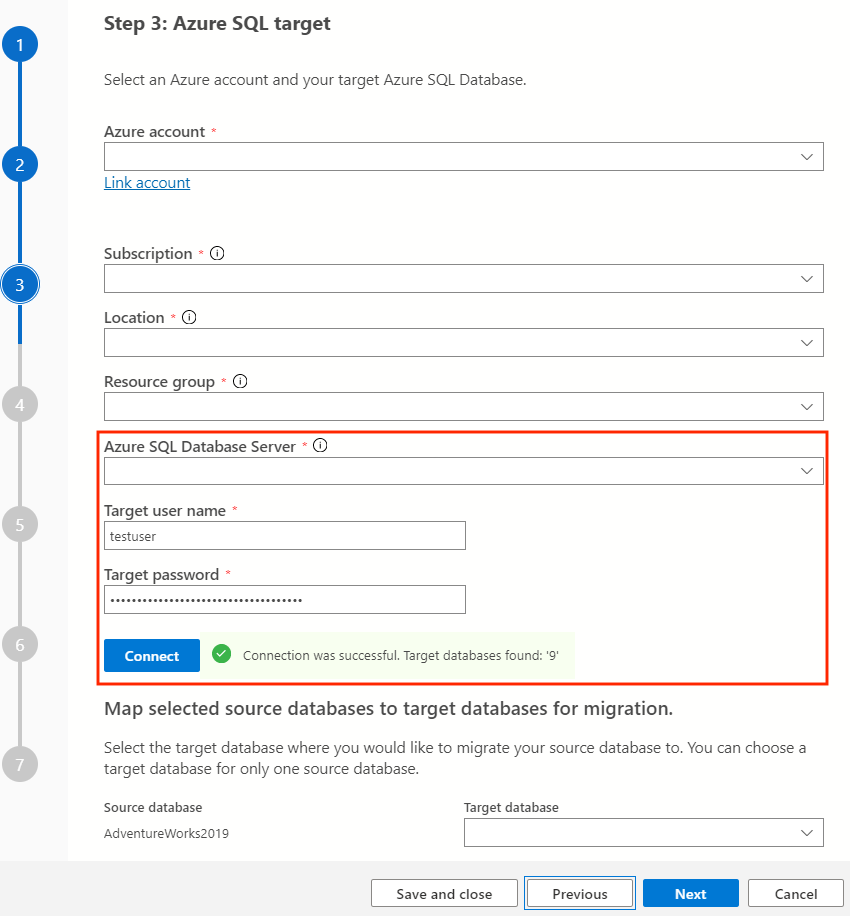
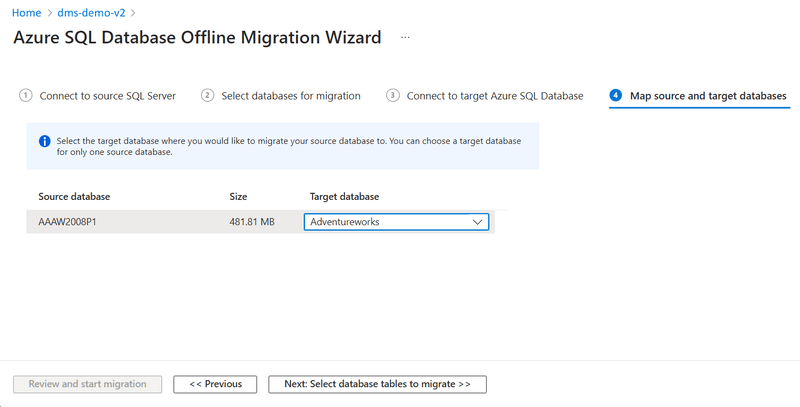
Next, map the source database and the target database for the migration. For Target database, select the Azure SQL Database target. Then, select Next to move to the next step in the migration wizard.

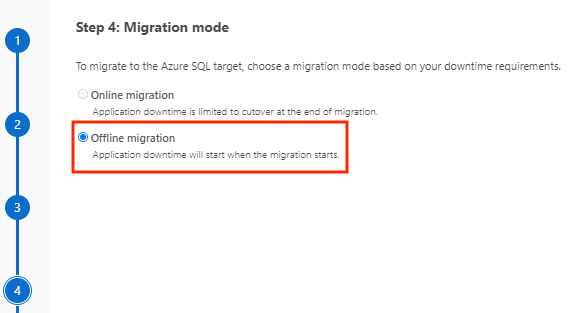
In Step 4: Migration mode, select Offline migration, and then select Next.
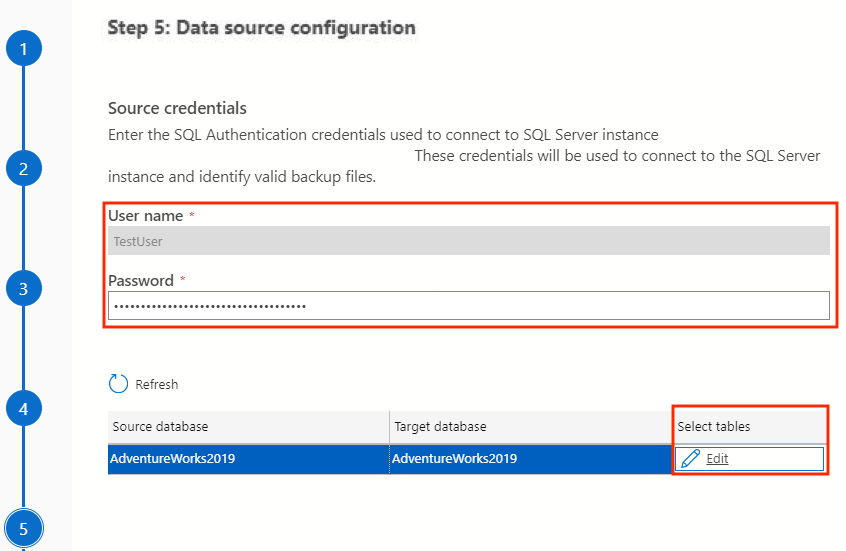
In Step 5: Data source configuration, complete the following steps:
Under Source credentials, enter the source SQL Server credentials.
Under Select tables, select the Edit pencil icon.
In Select tables for <database-name>, select the tables to migrate to the target. The Has rows column indicates whether the target table has rows in the target database. You can select one or more tables. Then, select Update.
You can update the list of selected tables anytime before you start the migration.
In the following example, a text filter is applied to select tables that contain the word
Employee. Select a list of tables based on your migration needs.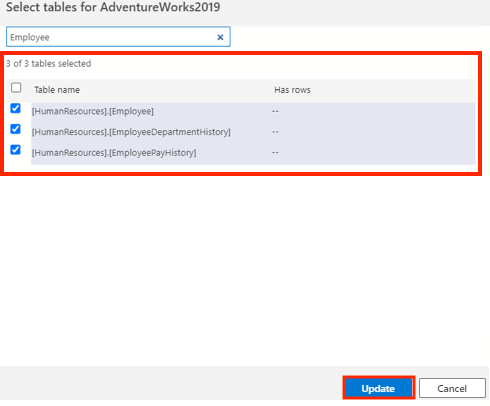
Review your table selections, and then select Next to move to the next step in the migration wizard.

Note
If no tables are selected or if a username and password aren't entered, the Next button isn't available to select.
Now, you can migrate database Schema and data both using Database Migration Service. Also, you can use tools like the SQL Server dacpac extension or the SQL Database Projects extension in Azure Data Studio to migrate Schema before selecting the list of tables to migrate.
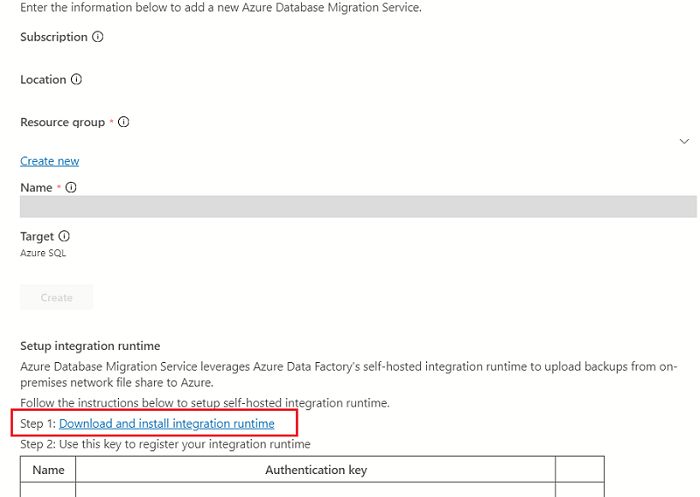
Create a Database Migration Service instance
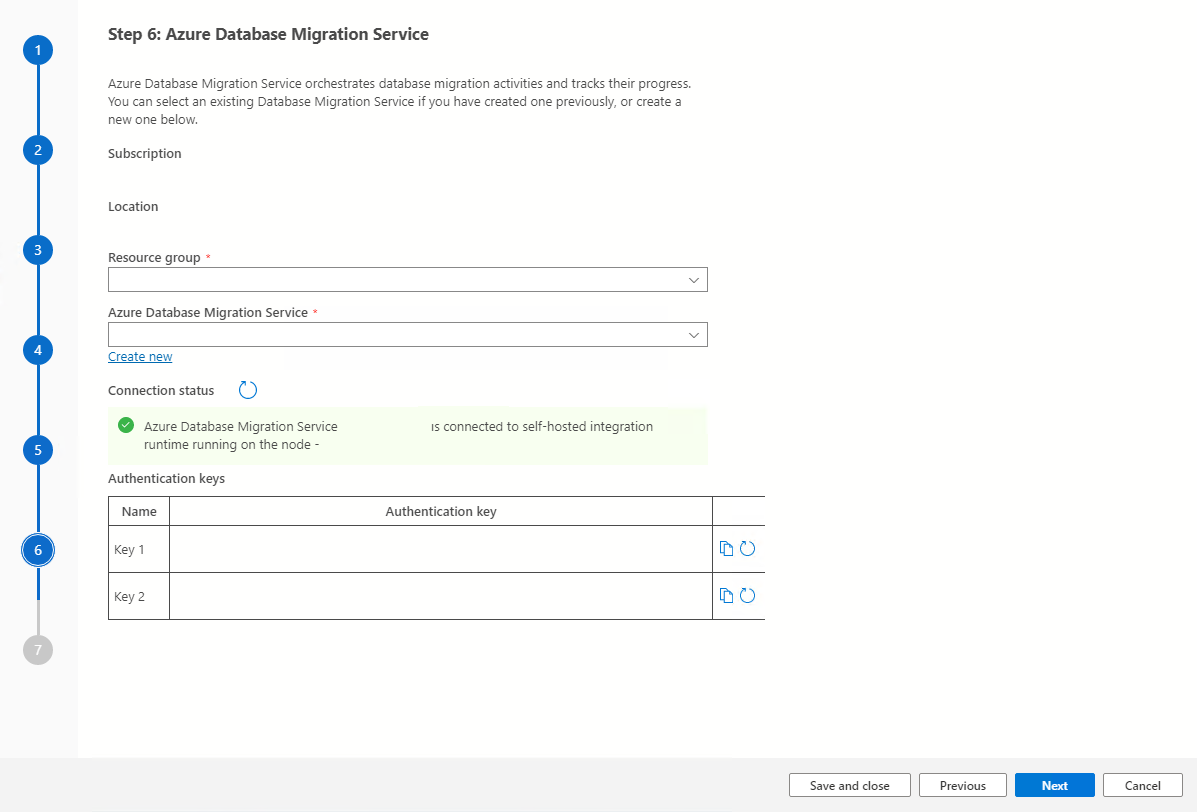
In Step 6: Azure Database Migration Service in the Migrate to Azure SQL wizard, create a new instance of Database Migration Service, or reuse an existing instance that you created earlier.
Note
If you previously created a Database Migration Service instance by using the Azure portal, you can't reuse the instance in the migration wizard in Azure Data Studio. You can reuse an instance only if you created the instance by using Azure Data Studio.
Use an existing instance of Database Migration Service
To use an existing instance of Database Migration Service:
In Resource group, select the resource group that contains an existing instance of Database Migration Service.
In Azure Database Migration Service, select an existing instance of Database Migration Service that's in the selected resource group.
Select Next.
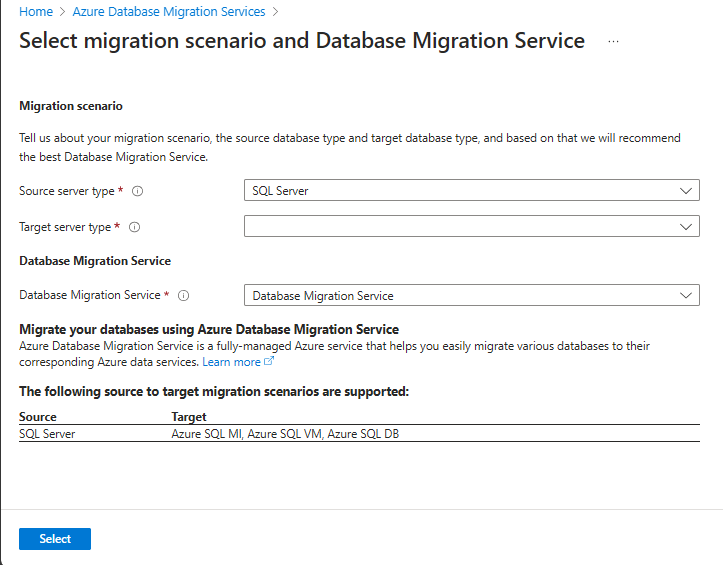
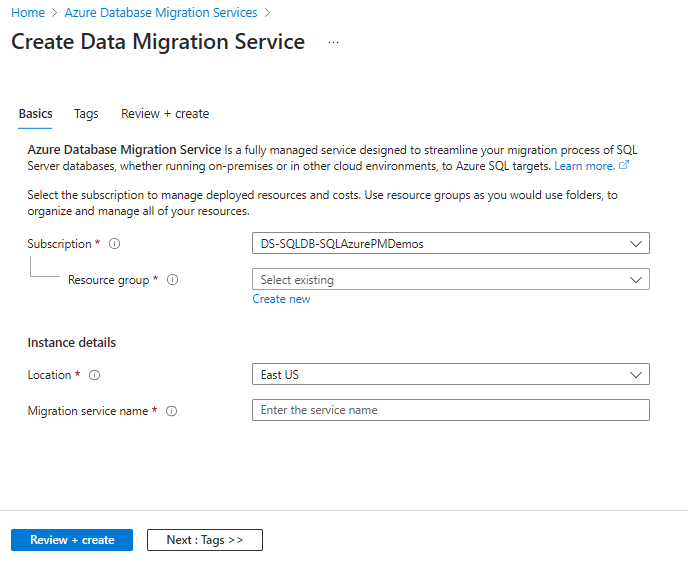
Create a new instance of Database Migration Service
To create a new instance of Database Migration Service:
In Resource group, create a new resource group to contain a new instance of Database Migration Service.
Under Azure Database Migration Service, select Create new.
In Create Azure Database Migration Service, enter a name for your Database Migration Service instance, and then select Create.
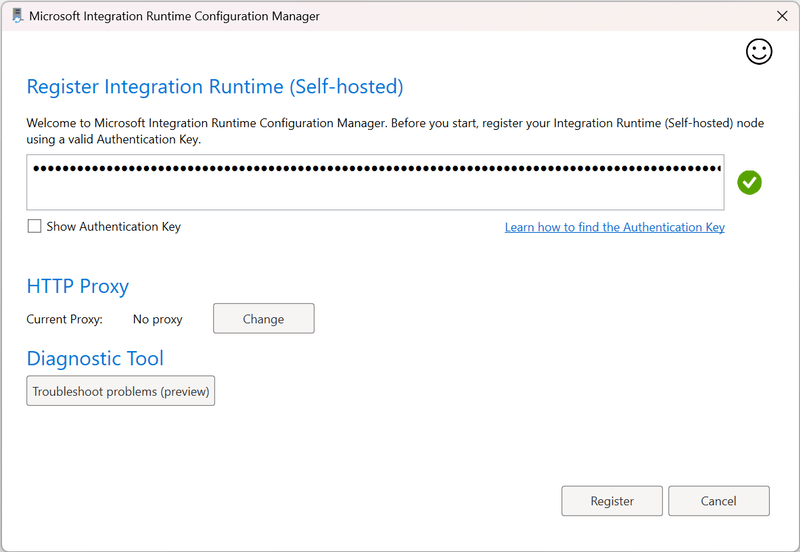
Under Set up integration runtime, complete the following steps:
Select the Download and install integration runtime link to open the download link in a web browser. Download the integration runtime, and then install it on a computer that meets the prerequisites for connecting to the source SQL Server instance.
When installation is finished, Microsoft Integration Runtime Configuration Manager automatically opens to begin the registration process.
In the Authentication key table, copy one of the authentication keys that are provided in the wizard and paste it in Azure Data Studio.
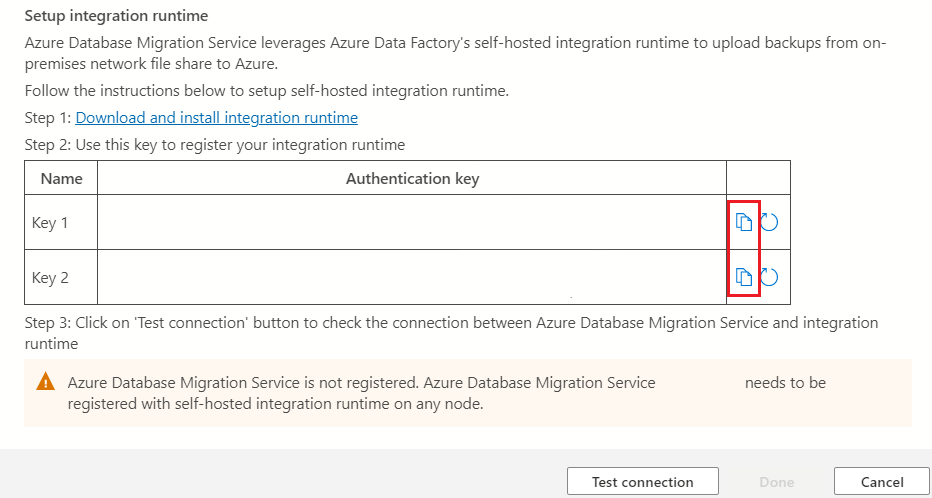
If the authentication key is valid, a green check icon appears in Integration Runtime Configuration Manager. A green check indicates that you can continue to Register.
After you register the self-hosted integration runtime, close Microsoft Integration Runtime Configuration Manager.
Note
For more information about the self-hosted integration runtime, see Create and configure a self-hosted integration runtime.
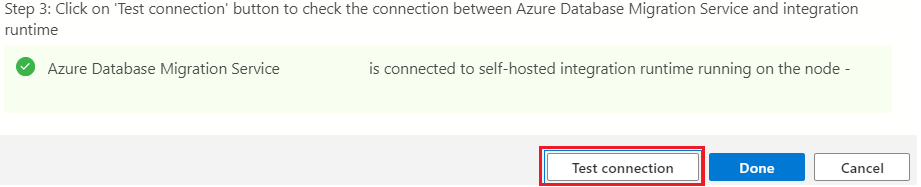
In Create Azure Database Migration Service in Azure Data Studio, select Test connection to validate that the newly created Database Migration Service instance is connected to the newly registered self-hosted integration runtime.
Return to the migration wizard in Azure Data Studio.
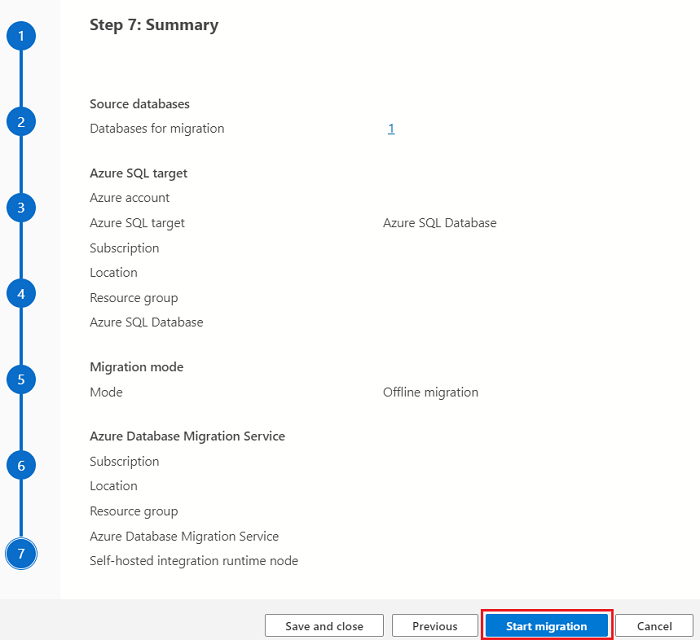
Start the database migration
In Step 7: Summary in the Migrate to Azure SQL wizard, review the configuration you created, and then select Start migration to start the database migration.
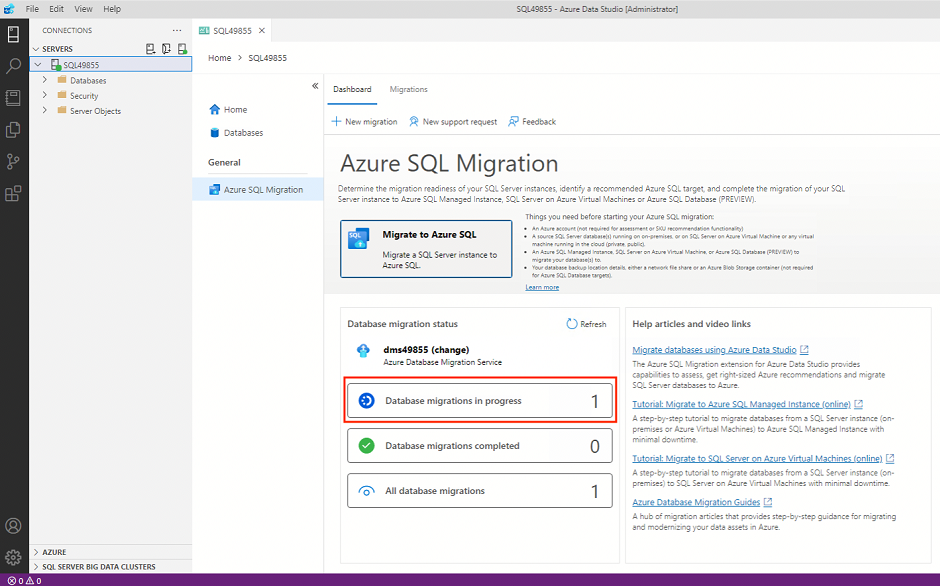
Monitor the database migration
In Azure Data Studio, in the server menu under General, select Azure SQL Migration to go to the dashboard for your Azure SQL Database migrations.
Under Database migration status, you can track migrations that are in progress, completed, and failed (if any), or you can view all database migrations.

Select Database migrations in progress to view active migrations.
To get more information about a specific migration, select the database name.
Database Migration Service returns the latest known migration status each time migration status refreshes. The following table describes possible statuses:
Status Description Preparing for copy The service is disabling autostats, triggers, and indexes in the target table. Copying Data is being copied from the source database to the target database. Copy finished Data copy is finished. The service is waiting on other tables to finish copying to begin the final steps to return tables to their original schema. Rebuilding indexes The service is rebuilding indexes on target tables. Succeeded All data is copied and the indexes are rebuilt. Check the migration details page to view the current status for each database.
Here's an example of the
AdventureWorks2019database migration with the status Creating:
In the menu bar, select Refresh to update the migration status.
After migration status is refreshed, the updated status for the example
AdventureWorks2019database migration is In progress:
Select a database name to open the table view. In this view, you see the current status of the migration, the number of tables that currently are in that status, and a detailed status of each table.

When all table data is migrated to the Azure SQL Database target, Database Migration Service updates the migration status from In progress to Succeeded.


Note
Database Migration Service optimizes migration by skipping tables with no data (0 rows). Tables that don't have data don't appear in the list, even if you select the tables when you create the migration.
You've completed the migration to Azure SQL Database. We encourage you to go through a series of post-migration tasks to ensure that everything functions smoothly and efficiently.
Important
Be sure to take advantage of the advanced cloud-based features of Azure SQL Database. The features include built-in high availability, threat detection, and monitoring and tuning your workload.


Limitations
Azure SQL Database offline migration utilizes Azure Data Factory (ADF) pipelines for data movement and thus abides by ADF limitations. A corresponding ADF is created when a database migration service is also created. Thus factory limits apply per service.
- The machine where the SHIR is installed acts as the compute for migration. Make sure this machine can handle the cpu and memory load of the data copy. To learn more, review SHIR recommendations.
- 100,000 table per database limit.
- 10,000 concurrent database migrations per service.
- Migration speed heavily depends on the target Azure SQL Database SKU and the self-hosted Integration Runtime host.
- Azure SQL Database migration scales poorly with table numbers due to ADF overhead in starting activities. If a database has thousands of tables, the startup process of each table might take a couple of seconds, even if they're composed of one row with 1 bit of data.
- Azure SQL Database table names with double-byte characters currently aren't supported for migration. Mitigation is to rename tables before migration; they can be changed back to their original names after successful migration.
- Tables with large blob columns may fail to migrate due to timeout.
- Database names with SQL Server reserved are currently not supported.
- Database names that include semicolons are currently not supported.
- Computed columns don't get migrated.
Next steps
Feedback
Coming soon: Throughout 2024 we will be phasing out GitHub Issues as the feedback mechanism for content and replacing it with a new feedback system. For more information see: https://aka.ms/ContentUserFeedback.
Submit and view feedback for