Note
Access to this page requires authorization. You can try signing in or changing directories.
Access to this page requires authorization. You can try changing directories.
Azure DevOps Services | Azure DevOps Server 2022 - Azure DevOps Server 2019
You can use an Azure DevOps pipeline to automate the machine learning lifecycle. Some of the operations you can automate are:
- Data preparation (extract, transform, load operations).
- Training machine learning models with on-demand scale-out and scale-up.
- Deployment of machine learning models as public or private web services.
- Monitoring deployed machine learning models (such as for performance or data-drift analysis).
This article describes how to create an Azure pipeline that builds a machine learning model and deploys it to Azure Machine Learning.
This tutorial uses Azure Machine Learning Python SDK v2 and Azure CLI ML extension v2.
Prerequisites
- Complete the Create resources to get started tutorial to:
- Create a workspace.
- Create a cloud-based compute cluster to use for training your model.
- Python 3.10 or later installed for running Azure ML SDK v2 scripts locally.
- Install the Azure Machine Learning extension for Azure Pipelines. You can install this extension from the Visual Studio marketplace.
Step 1: Get the code
Fork the following repo from GitHub:
https://github.com/azure/azureml-examples
Step 2: Create a project
Sign in to Azure. Search for and select Azure DevOps organizations. Select View my organizations. Select the organization that you want to use.
Within your selected organization, create a project. If you don't have any projects in your organization, you see a Create a project to get started screen. Otherwise, select the New Project button in the upper-right corner of the dashboard.
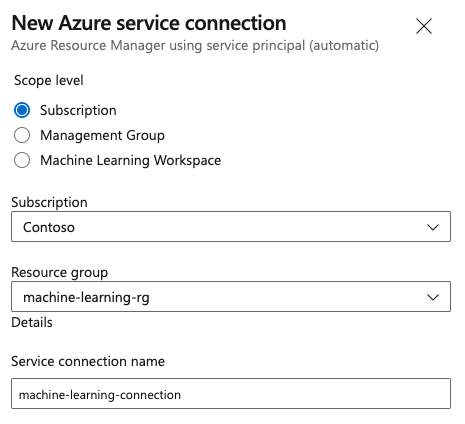
Step 3: Create a service connection
You can use an existing service connection.
You need an Azure Resource Manager connection to authenticate with the Azure portal.
In Azure DevOps, select Project settings, and then select Service connections.
Select Create service connection, select Azure Resource Manager, and then select Next.
Use the default values for Identity type and Credential.
Create your service connection. Set your preferred scope level, subscription, resource group, and connection name.
Step 4: Create a pipeline
Go to Pipelines, and then select Create Pipeline.
Select GitHub as the location of your source code.
You might be redirected to GitHub to sign in. If you are, enter your GitHub credentials.
When you see the list of repositories, select your repository.
You might be redirected to GitHub to install the Azure Pipelines app. If you are, select Approve & install.
Select the Starter pipeline. You update the starter pipeline template.
Step 5: Create a YAML pipeline to submit the Azure Machine Learning job
Delete the starter pipeline and replace it with the following YAML code. In this pipeline, you:
- Use the Python version task to set up Python 3.10 and install the SDK requirements.
- Use the Bash task to run bash scripts for the Azure Machine Learning SDK and CLI.
- Use the Azure CLI task to submit an Azure Machine Learning job.
Select one of the following tabs, depending on whether you're using an Azure Resource Manager service connection or a generic service connection. In the pipeline YAML, replace the values of variables with values that correspond to your resources.
name: submit-azure-machine-learning-job

trigger:
- none

variables:
  service-connection: 'machine-learning-connection' # replace with your service connection name
  resource-group: 'machinelearning-rg' # replace with your resource group name
  workspace: 'docs-ws' # replace with your workspace name

jobs:
- job: SubmitAzureMLJob
  displayName: Submit AzureML Job
  timeoutInMinutes: 300
  pool:
    vmImage: ubuntu-latest
  steps:
  - task: UsePythonVersion@0
    displayName: Use Python >=3.10
    inputs:
      versionSpec: '>=3.10'

  - bash: |
      set -ex

      az version
      az extension add -n ml
    displayName: 'Add AzureML Extension'

  - task: AzureCLI@2
    name: submit_azureml_job_task
    displayName: Submit AzureML Job Task
    inputs:
      azureSubscription: $(service-connection)
      workingDirectory: 'cli/jobs/pipelines-with-components/nyc_taxi_data_regression'
      scriptLocation: inlineScript
      scriptType: bash
      inlineScript: |

        # submit component job and get the run name
        job_name=$(az ml job create --file single-job-pipeline.yml -g $(resource-group) -w $(workspace) --query name --output tsv)

        # set output variable for next task
        echo "##vso[task.setvariable variable=JOB_NAME;isOutput=true;]$job_name"
Step 6: Wait for the Azure Machine Learning job to complete
In step 5, you added a job to submit an Azure Machine Learning job. In this step, you add another job that waits for the Azure Machine Learning job to complete.
Important
Both wait mechanisms in this step (the AzureMLJobWaitTask@1 task on the Azure Resource Manager tab and the InvokeRESTAPI@1 webhook registration on the Generic tab) depend on Azure Machine Learning sending a RunTerminated notification back to Azure DevOps when the job finishes. This notification path is currently under investigation and might not complete as expected, causing the WaitFor* server job to time out instead of reflecting the Azure Machine Learning job status. If you encounter this behavior, poll the job status from an agent job by using az ml job show --query status until a terminal state (Completed, Failed, or Canceled) is returned, and exit the task with a matching status.
If you're using a Resource Manager service connection, you can use the Machine Learning extension. You can search for this extension in the Azure DevOps extensions Marketplace or go directly to the extension page. Install the Machine Learning extension.
Important
Don't install the Machine Learning (classic) extension. It's an older extension that doesn't provide the same functionality.
In the Pipeline review window, add a Server Job. In the steps part of the job, select Show assistant, and then search for AzureML. Select the AzureML Job Wait task, and then provide the information for the job.
The task has four inputs: Service Connection, Azure Resource Group Name, AzureML Workspace Name, and AzureML Job Name. Provide these inputs. The resulting YAML for these steps is similar to the following example:
Note
- The Azure Machine Learning job wait task runs on a server job, which doesn't use expensive agent pool resources and requires no additional charges. Server jobs (indicated by
pool: server) run on the same machine as your pipeline. For more information, see Server jobs. - One Azure Machine Learning job wait task can only wait for one job. You need to set up a separate task for each job that you want to wait for.
- The Azure Machine Learning job wait task can wait for a maximum of two days. This limit is a hard limit set by Azure DevOps pipelines.
- job: WaitForAzureMLJobCompletion
  displayName: Wait for AzureML Job Completion
  pool: server
  timeoutInMinutes: 0
  dependsOn: SubmitAzureMLJob
  variables:
    # Save the name of the azureMl job submitted in the previous step to a variable. It will be used as an input to the AzureML Job Wait task.
    azureml_job_name_from_submit_job: $[ dependencies.SubmitAzureMLJob.outputs['submit_azureml_job_task.JOB_NAME'] ]
  steps:
  - task: AzureMLJobWaitTask@1
    inputs:
      serviceConnection: $(service-connection)
      resourceGroupName: $(resource-group)
      azureMLWorkspaceName: $(workspace)
      azureMLJobName: $(azureml_job_name_from_submit_job)
Step 7: Submit the pipeline and verify your pipeline run
Select Save and run. When the wait mechanism in Step 6 works as designed, the pipeline waits for the Azure Machine Learning job to complete and ends the task under WaitForJobCompletion with the same status as the Azure Machine Learning job. For example:
Azure Machine Learning job
Succeeded== Azure DevOps Task underWaitForJobCompletionjobSucceededAzure Machine Learning job
Failed== Azure DevOps Task underWaitForJobCompletionjobFailedAzure Machine Learning job
Cancelled== Azure DevOps Task underWaitForJobCompletionjobCancelled
Note
Because of the issue called out in Step 6, the WaitFor* job might time out rather than reflect the Azure Machine Learning job status. Use Azure Machine Learning studio to confirm the actual job outcome until the notification path is restored.
Tip
You can view the complete Azure Machine Learning job in Azure Machine Learning studio.
Clean up resources
If you don't plan to continue using your pipeline, delete your Azure DevOps project. In the Azure portal, delete your resource group and Azure Machine Learning instance.