Note
Access to this page requires authorization. You can try signing in or changing directories.
Access to this page requires authorization. You can try changing directories.
In this tutorial, you'll learn how to build and deploy a static website to Azure Storage. When you're finished, you will have a static website that users can access publicly.
In this tutorial, you learn how to:
- Configure static website hosting
- Deploy a Hello World website
Static websites have some limitations. For example, If you want to configure headers, you'll have to use Azure Content Delivery Network (Azure CDN). There's no way to configure headers as part of the static website feature itself. Also, AuthN and AuthZ are not supported.
If these features are important for your scenario, consider using Azure Static Web Apps. It's a great alternative to static websites and is also appropriate in cases where you don't require a web server to render content. You can configure headers and AuthN / AuthZ is fully supported. Azure Static Web Apps also provides a fully managed continuous integration and continuous delivery (CI/CD) workflow from GitHub source to global deployment.
This video shows you how to host a static website on Blob Storage.
The steps in the video are also described in the following sections.
Prerequisites
To access Azure Storage, you'll need an Azure subscription. If you don't already have a subscription, create a free account before you begin.
All access to Azure Storage takes place through a storage account. For this quickstart, create a storage account using the Azure portal, Azure PowerShell, or Azure CLI. For help creating a storage account, see Create a storage account.
Note
Static websites are now available for general-purpose v2 Standard storage accounts as well as storage accounts with hierarchical namespace enabled.
This tutorial uses Visual Studio Code, a free tool for programmers, to build the static website and deploy it to an Azure Storage account.
After you install Visual Studio Code, install the Azure Storage preview extension. This extension integrates Azure Storage management functionality with Visual Studio Code. You will use the extension to deploy your static website to Azure Storage. To install the extension:
Launch Visual Studio Code.
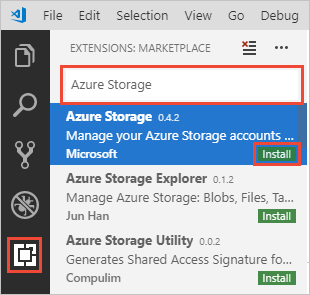
On the toolbar, click Extensions. Search for Azure Storage, and select the Azure Storage extension from the list. Then click the Install button to install the extension.
Configure static website hosting
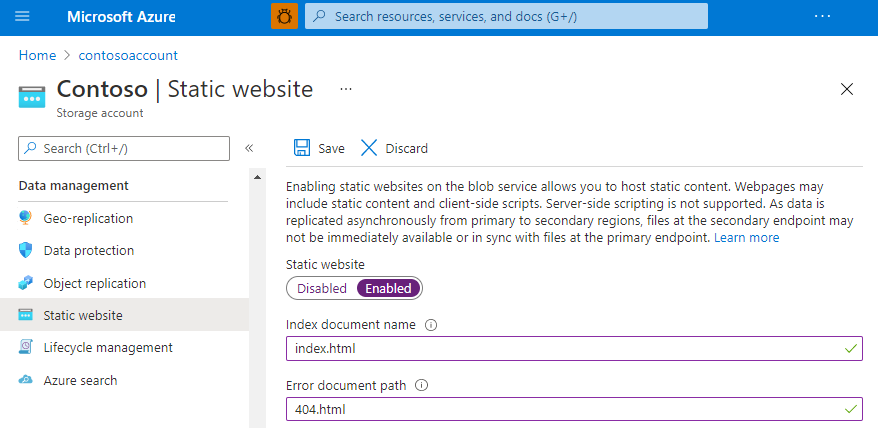
The first step is to configure your storage account to host a static website in the Azure portal. When you configure your account for static website hosting, Azure Storage automatically creates a container named $web. The $web container will contain the files for your static website.
Sign in to the Azure portal in your web browser.
Locate your storage account and display the account overview.
Select Static website to display the configuration page for static websites.
Select Enabled to enable static website hosting for the storage account.
In the Index document name field, specify a default index page of index.html. The default index page is displayed when a user navigates to the root of your static website.
In the Error document path field, specify a default error page of 404.html. The default error page is displayed when a user attempts to navigate to a page that does not exist in your static website.
Click Save. The Azure portal now displays your static website endpoint.
Deploy a Hello World website
Next, create a Hello World web page with Visual Studio Code and deploy it to the static website hosted in your Azure Storage account.
Create an empty folder named mywebsite on your local file system.
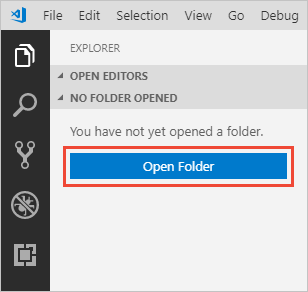
Launch Visual Studio Code, and open the folder that you just created from the Explorer panel.
Create the default index file in the mywebsite folder and name it index.html.

Open index.html in the editor, paste the following text into the file, and save it:
<!DOCTYPE html>
<html>
  <body>
    <h1>Hello World!</h1>
  </body>
</html>
Create the default error file and name it 404.html.
Open 404.html in the editor, paste the following text into the file, and save it:
<!DOCTYPE html>
<html>
  <body>
    <h1>404</h1>
  </body>
</html>
Right-click under the mywebsite folder in the Explorer panel and select Deploy to Static Website... to deploy your website. You will be prompted to log in to Azure to retrieve a list of subscriptions.
Select the subscription containing the storage account for which you enabled static website hosting. Next, select the storage account when prompted.
Visual Studio Code will now upload your files to your web endpoint, and show the success status bar. Launch the website to view it in Azure.
You've successfully completed the tutorial and deployed a static website to Azure.
Feature support
Support for this feature might be impacted by enabling Data Lake Storage Gen2, Network File System (NFS) 3.0 protocol, or the SSH File Transfer Protocol (SFTP). If you've enabled any of these capabilities, see Blob Storage feature support in Azure Storage accounts to assess support for this feature.
Next steps
In this tutorial, you learned how to configure your Azure Storage account for static website hosting, and how to create and deploy a static website to an Azure endpoint.
Next, learn how to configure a custom domain with your static website.