Note
Access to this page requires authorization. You can try signing in or changing directories.
Access to this page requires authorization. You can try changing directories.
Applies to: ✔️ Linux VMs ✔️ Flexible scale sets
This article shows you how to attach both new and existing disks to a Linux virtual machine through the Azure portal. You can also attach a data disk to a Windows VM in the Azure portal.
Find the Linux VM in the Azure portal
Follow these steps:
Go to the Azure portal to find the VM. Search for and select Virtual machines.
Select the VM you'd like to attach the disk to from the list.
In the Virtual machines page, under Settings, select Disks.
Attach a new managed data disk in the Azure portal
Follow these steps:
On the Disks pane, under Data disks, select Create and attach a new disk.
Enter a name for your managed disk. Review the default settings, and update the Storage type, Size (GiB), Encryption and Host caching as necessary.

When you're done, select Save at the top of the page to create the managed disk and update the VM configuration.
Attach an existing managed data disk in the Azure portal
Follow these steps:
On the Disks pane, under Data disks, select Attach existing disks.
Select the drop-down menu for Disk name and select a disk from the list of available managed disks.
Select Save to attach the existing managed disk and update the VM configuration.
Connect to the Linux VM to mount the new disk
To partition, format, and mount your new disk so your Linux VM can use it, SSH into your VM. For more information, see How to use SSH with Linux on Azure. The following example connects to a VM with the public IP address of 10.123.123.25 with the username azureuser:
ssh azureuser@10.123.123.25
Find the attached data disk in Linux
Azure Linux VMs can expose managed disks through SCSI or NVMe controllers. Select the controller type that your VM uses. For details about the controller types, see SCSI to NVMe conversion.
Use lsblk to list disks on a VM with a SCSI controller:
lsblk -o NAME,HCTL,SIZE,MOUNTPOINT | grep -i "sd"
The output is similar to the following example:
sda     0:0:0:0      30G
├─sda1             29.9G /
├─sda14               4M
└─sda15             106M /boot/efi
sdb     1:0:1:0      14G
└─sdb1               14G /mnt
sdc     3:0:0:0       4G
In this example, the disk that you added is sdc. It uses LUN 0 and has a capacity of 4 GiB.
For a more complex example, here's what multiple data disks look like in the portal:
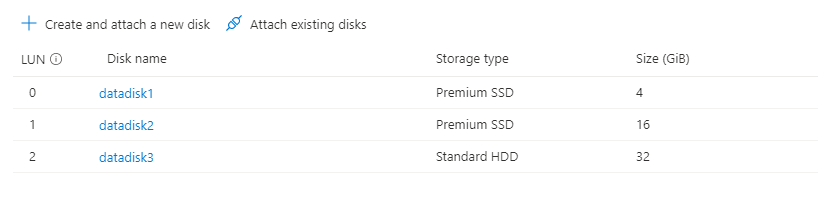
In the image, you can see three data disks: 4 GiB on LUN 0, 16 GiB on LUN 1, and 32 GiB on LUN 2.
From the output of lsblk, you can see that the 4-GiB disk at LUN 0 is sdc, the 16-GiB disk at LUN 1 is sdd, and the 32-GiB disk at LUN 2 is sde.
sda     0:0:0:0      30G
├─sda1             29.9G /
├─sda14               4M
└─sda15             106M /boot/efi
sdb     1:0:1:0      14G
└─sdb1               14G /mnt
sdc     3:0:0:0       4G
sdd     3:0:0:1      16G
sde     3:0:0:2      32G
Prepare a new empty data disk in Linux
Important
If you're using an existing disk that contains data, skip to mounting the disk. The following instructions delete data on the disk. Verify that you identified the correct disk before you format it.
If you're attaching a new disk, you need to partition the disk.
Use the parted utility to partition a data disk and mkfs.xfs to format the partition with the XFS file system.
- Use the latest version of
partedthat's available for your distribution. - If the disk size is 2 tebibytes (TiB) or larger, you must use GPT partitioning. If disk size is under 2 TiB, then you can use either MBR or GPT partitioning.
The following example uses parted on /dev/sdc, which is where the first data disk typically is on most VMs. Replace sdc with the correct option for your disk. The example formats the partition by using the XFS file system.
sudo parted /dev/sdc --script mklabel gpt mkpart xfspart xfs 0% 100%
sudo partprobe /dev/sdc
sudo mkfs.xfs /dev/sdc1
Use the partprobe utility to ensure the kernel recognizes the new partition table. If you don't use partprobe, the blkid or lsblk commands might not return the UUID for the new file system right away.
Mount the data disk in Linux
Create a directory to mount the file system by using mkdir:
sudo mkdir /datadrive
Use mount to mount the file system.
Replace /dev/sdc1 with the partition for the data disk that you identified on the VM with a SCSI controller.
sudo mount /dev/sdc1 /datadrive
Add the drive to the /etc/fstab file to ensure the drive is automatically added after a reboot.
Ensure that the UUID (Universally Unique Identifier) is used in /etc/fstab to refer to the drive rather than a device name, such as /dev/sdc1 or /dev/nvme0n2p1. If the OS detects a disk error during boot, using the UUID avoids the incorrect disk being mounted to a given location. Remaining data disks would then be assigned those same device IDs. To find the UUID of the new drive, use the blkid utility.
sudo blkid
The following output is from a VM with a SCSI controller. On a VM with an NVMe controller, the managed data disk partition appears as an NVMe path such as /dev/nvme0n2p1 instead of /dev/sdc1.
/dev/sda1: LABEL="cloudimg-rootfs" UUID="11111111-1b1b-1c1c-1d1d-1e1e1e1e1e1e" TYPE="ext4" PARTUUID="1a1b1c1d-11aa-1234-1a1a1a1a1a1a"
/dev/sda15: LABEL="UEFI" UUID="BCD7-96A6" TYPE="vfat" PARTUUID="1e1g1cg1h-11aa-1234-1u1u1a1a1u1u"
/dev/sdb1: UUID="22222222-2b2b-2c2c-2d2d-2e2e2e2e2e2e" TYPE="ext4" PARTUUID="1a2b3c4d-01"
/dev/sda14: PARTUUID="2e2g2cg2h-11aa-1234-1u1u1a1a1u1u"
/dev/sdc1: UUID="33333333-3b3b-3c3c-3d3d-3e3e3e3e3e3e" TYPE="xfs" PARTLABEL="xfspart" PARTUUID="c1c2c3c4-1234-cdef-asdf3456ghjk"
Configure automatic mounting in /etc/fstab
Note
Improperly editing the /etc/fstab file could result in an unbootable system. If unsure, refer to the distribution's documentation for information on how to properly edit this file. You should create a backup of the /etc/fstab file is created before editing.
Next, open the /etc/fstab file in a text editor. Add a line to the end of the file, using the UUID value for the partition that you created in the previous steps, and the mount point of /datadrive. If you used the example from this article, the new line would look like the following sample.
UUID=33333333-3b3b-3c3c-3d3d-3e3e3e3e3e3e /datadrive xfs defaults,nofail 1 2
When you're done editing the file, save and close the editor.
Note
Later removing a data disk without editing fstab could cause the VM to fail to boot. Most distributions provide either the nofail and/or nobootwait fstab options. These options allow a system to boot even if the disk fails to mount at boot time. Consult your distribution's documentation for more information on these parameters.
The nofail option ensures that the VM starts even if the file system is corrupt or the disk doesn't exist at boot time. Without this option, you might encounter behavior as described in Cannot SSH to Linux VM due to FSTAB errors
Verify the mounted data disk in Linux
Use lsblk again to verify that the data disk is mounted at /datadrive.
lsblk -o NAME,HCTL,SIZE,MOUNTPOINT | grep -i "sd"
sda     0:0:0:0      30G
├─sda1             29.9G /
├─sda14               4M
└─sda15             106M /boot/efi
sdb     1:0:1:0      14G
└─sdb1               14G /mnt
sdc     3:0:0:0       4G
└─sdc1                4G /datadrive
TRIM/UNMAP support for Linux in Azure
Some Linux kernels support TRIM/UNMAP operations to discard unused blocks on the disk. This feature is primarily useful to inform Azure that deleted pages are no longer valid and can be discarded. This feature can save money on disks that are billed based on the amount of consumed storage, such as unmanaged standard disks and disk snapshots.
There are two ways to enable TRIM support in your Linux VM. As usual, consult your distribution for the recommended approach:
Use the
discardmount option in /etc/fstab, for example:UUID=33333333-3b3b-3c3c-3d3d-3e3e3e3e3e3e /datadrive xfs defaults,discard 1 2In some cases, the
discardoption may have performance implications. Alternatively, you can run thefstrimcommand manually from the command line, or add it to your crontab to run regularly:Ubuntu
sudo apt-get install util-linux
sudo fstrim /datadrive
RHEL
sudo yum install util-linux
sudo fstrim /datadrive
SUSE
sudo zypper install util-linux
sudo fstrim /datadrive