Note
Access to this page requires authorization. You can try signing in or changing directories.
Access to this page requires authorization. You can try changing directories.
This article explains how to create cross-tenant connections in Azure Virtual Network Manager using the Azure portal. Cross-tenant connections let you centrally manage virtual networks across different tenants and their subscriptions, streamlining network management and policy enforcement.
First, create the cross-tenant connection from the network manager. Then, create the cross-tenant connection from the target tenant and verify the connection. Finally, add virtual networks from the target tenant to your network group and verify the membership of cross-tenant virtual networks. After you complete all the tasks, you can centrally manage the resources of other tenants from a single network manager.
Prerequisites
Two Azure tenants with virtual networks that you want to manage through Azure Virtual Network Manager. This article refers to the tenants as follows:
- Central management tenant: The tenant where a network manager is already deployed and from where you want to centrally manage the cross-tenant virtual networks.
- Target managed tenant: The tenant that contains virtual networks to be managed. This tenant is connected to the central management tenant.
Azure Virtual Network Manager instance, or network manager, deployed in the central management tenant.
These permissions:
- The administrator of the central management tenant has a guest account in the target managed tenant.
- The administrator guest account has Network Contributor permissions applied at the appropriate scope level (management group, subscription, or virtual network).
Need help setting up permissions? See how to Add guest users in the Azure portal and how to assign user roles to resources in the Azure portal.
Create a cross-tenant connection from the network manager
Creation of the cross-tenant connection begins in the central management tenant with a network manager deployed. This network manager is what you want to use to manage all of your resources across tenants.
In this task, you set up a cross-tenant connection from the network manager to add a subscription from a target tenant:
Sign in to the Azure portal on the central management tenant.
Search for Network managers and select your network manager from the list.
Under Settings, select Cross-tenant connections, then select Create cross-tenant connection.
On the Create a connection page, enter the connection name and target managed tenant information, then select Create.
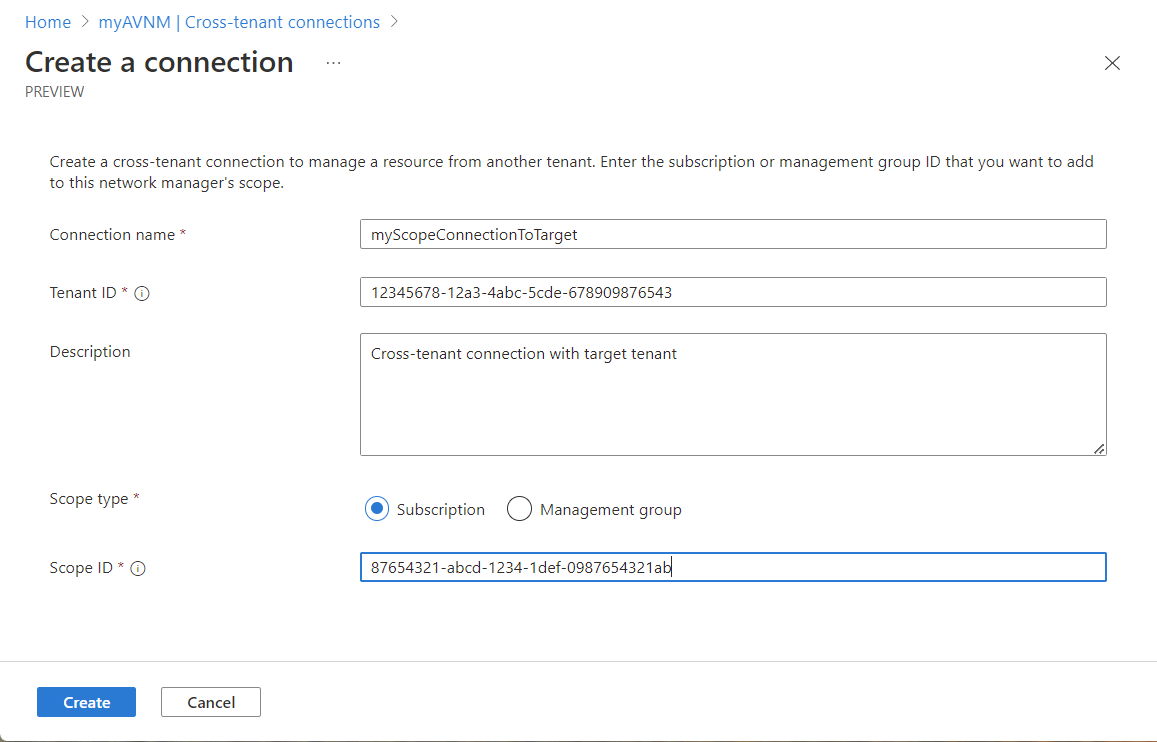
Verify the cross-tenant connection is listed under Cross-tenant connections and the status is Pending.
Create a cross-tenant connection on a subscription from the target managed tenant
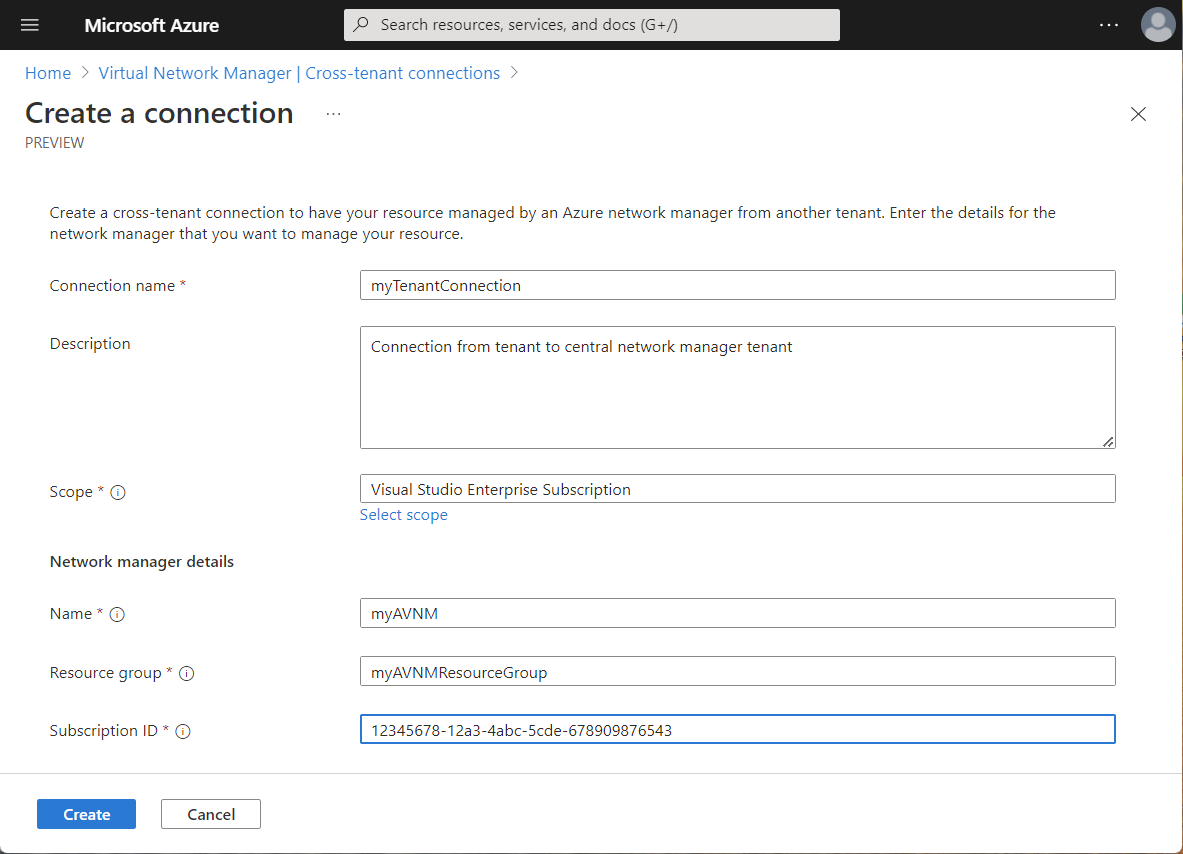
After you create the cross-tenant connection from the central management tenant, switch to the target managed tenant. Connect to the target managed tenant by creating another cross-tenant connection in the Virtual Network Manager hub:
In the target tenant, search for Virtual network manager and select Virtual Network Managers.
Under Virtual Network Manager, select Cross-tenant connections.
Select + Create or Create a connection.
On the Create a connection page, enter the connection name and central management tenant information, then select Create.
Note
The cross-tenant connections from both the central management tenant and the target managed tenant must have the same scope. The scope includes the cross-tenant subscriptions and management groups that you want to manage from your network manager.
Verify the connection status
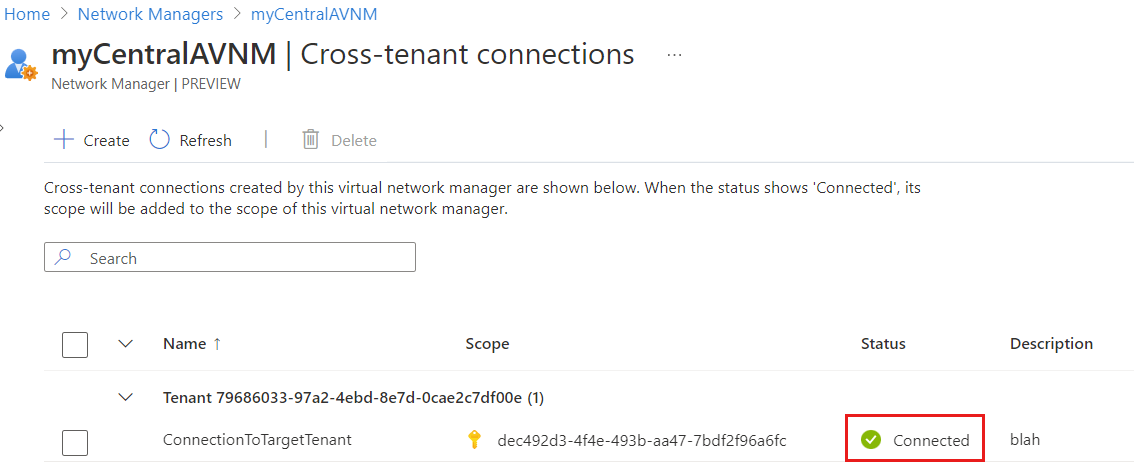
After you create both cross-tenant connections, verify the connection on the central management tenant:
On your central management tenant, select your network manager.
Select Cross-tenant connections under Settings and verify your cross-tenant connection's status is Connected.
Add cross-tenant members to a network group
Now, manually add virtual networks from both the central management tenant and the target managed tenant into a network group.
Note
Currently, cross-tenant virtual networks can only be added to network groups manually. Adding cross-tenant virtual networks to network groups conditionally through Azure Policy is a future capability.
In your network manager, add a network group if needed.
Select your network group, then select Add virtual networks under Manually add members.
On the Manually add members pane, select Tenant:... next to the search box, select the desired linked tenant from the list, then select Apply.
To view the available virtual networks from the target managed tenant, select Authenticate and complete the authentication process. If you have multiple Azure accounts, select the one you're currently signed in with that has permissions to the target managed tenant.
Select the desired cross-tenant virtual networks to include in the network group, then select Add.
Verify group members
In the final step, you verify the cross-tenant virtual networks are now members of the network group.
On the Overview page of the network group, select View group members. Verify the cross-tenant virtual networks that you added manually are listed.

You can now manage the cross-tenant virtual networks from your central management tenant's network manager. You can view, deploy configurations upon, and complete other network management tasks across the cross-tenant virtual networks.
Next steps
In this article, you configured a cross-tenant connection between two Azure tenants. To learn more about using Azure Virtual Network Manager, see: