Note
Access to this page requires authorization. You can try signing in or changing directories.
Access to this page requires authorization. You can try changing directories.
When working with Virtual WAN virtual hub routing, there are quite a few available scenarios. In a custom isolation scenario for VNets, the goal is to prevent a specific set of VNets from being able to reach other specific set of VNets. However, the VNets are required to reach all branches (VPN/ER/User VPN). For more information about virtual hub routing, see About virtual hub routing.
Design
In order to figure out how many route tables are needed, you can build a connectivity matrix. For this scenario it looks like the following, where each cell represents whether a source (row) can communicate to a destination (column):
| From | To: | Blue VNets | Red VNets | Branches |
|---|---|---|---|---|
| Blue VNets | → | Direct | Direct | |
| Red VNets | → | Direct | Direct | |
| Branches | → | Direct | Direct | Direct |
Each of the cells in the previous table describes whether a Virtual WAN connection (the "From" side of the flow, the row headers) communicates with a destination (the "To" side of the flow, the column headers in italics). In this scenario, there are no firewalls or Network Virtual Appliances, so communications flows directly over Virtual WAN (hence the word "Direct" in the table).
The number of different row patterns are the number of route tables we need in this scenario. In this case, three route tables that we call are RT_BLUE and RT_RED for the virtual networks, and Default for the branches. Remember, the branches always have to be associated to the Default routing table.
The branches need to learn the prefixes from both Red and Blue VNets, so all VNets needs to propagate to Default (additionally to either RT_BLUE or RT_RED). Blue and Red VNets need to learn the branches' prefixes, so branches propagate to both route tables RT_BLUE and RT_RED too. As a result, this is the final design:
- Blue virtual networks:
- Associated route table: RT_BLUE
- Propagating to route tables: RT_BLUE and Default
- Red virtual networks:
- Associated route table: RT_RED
- Propagating to route tables: RT_RED and Default
- Branches:
- Associated route table: Default
- Propagating to route tables: RT_BLUE, RT_RED and Default
Note
Since all branches need to be associated to the Default route table, as well as to propagate to the same set of routing tables, all branches will have the same connectivity profile. In other words, the Red/Blue concept for VNets cannot be applied to branches.
Note
If your Virtual WAN is deployed over multiple hubs, you need to create the RT_BLUE and RT_RED route tables in every hub, and routes from each VNet connection need to be propagated to the route tables in every virtual hub using propagation labels.
For more information about virtual hub routing, see About virtual hub routing.
Workflow
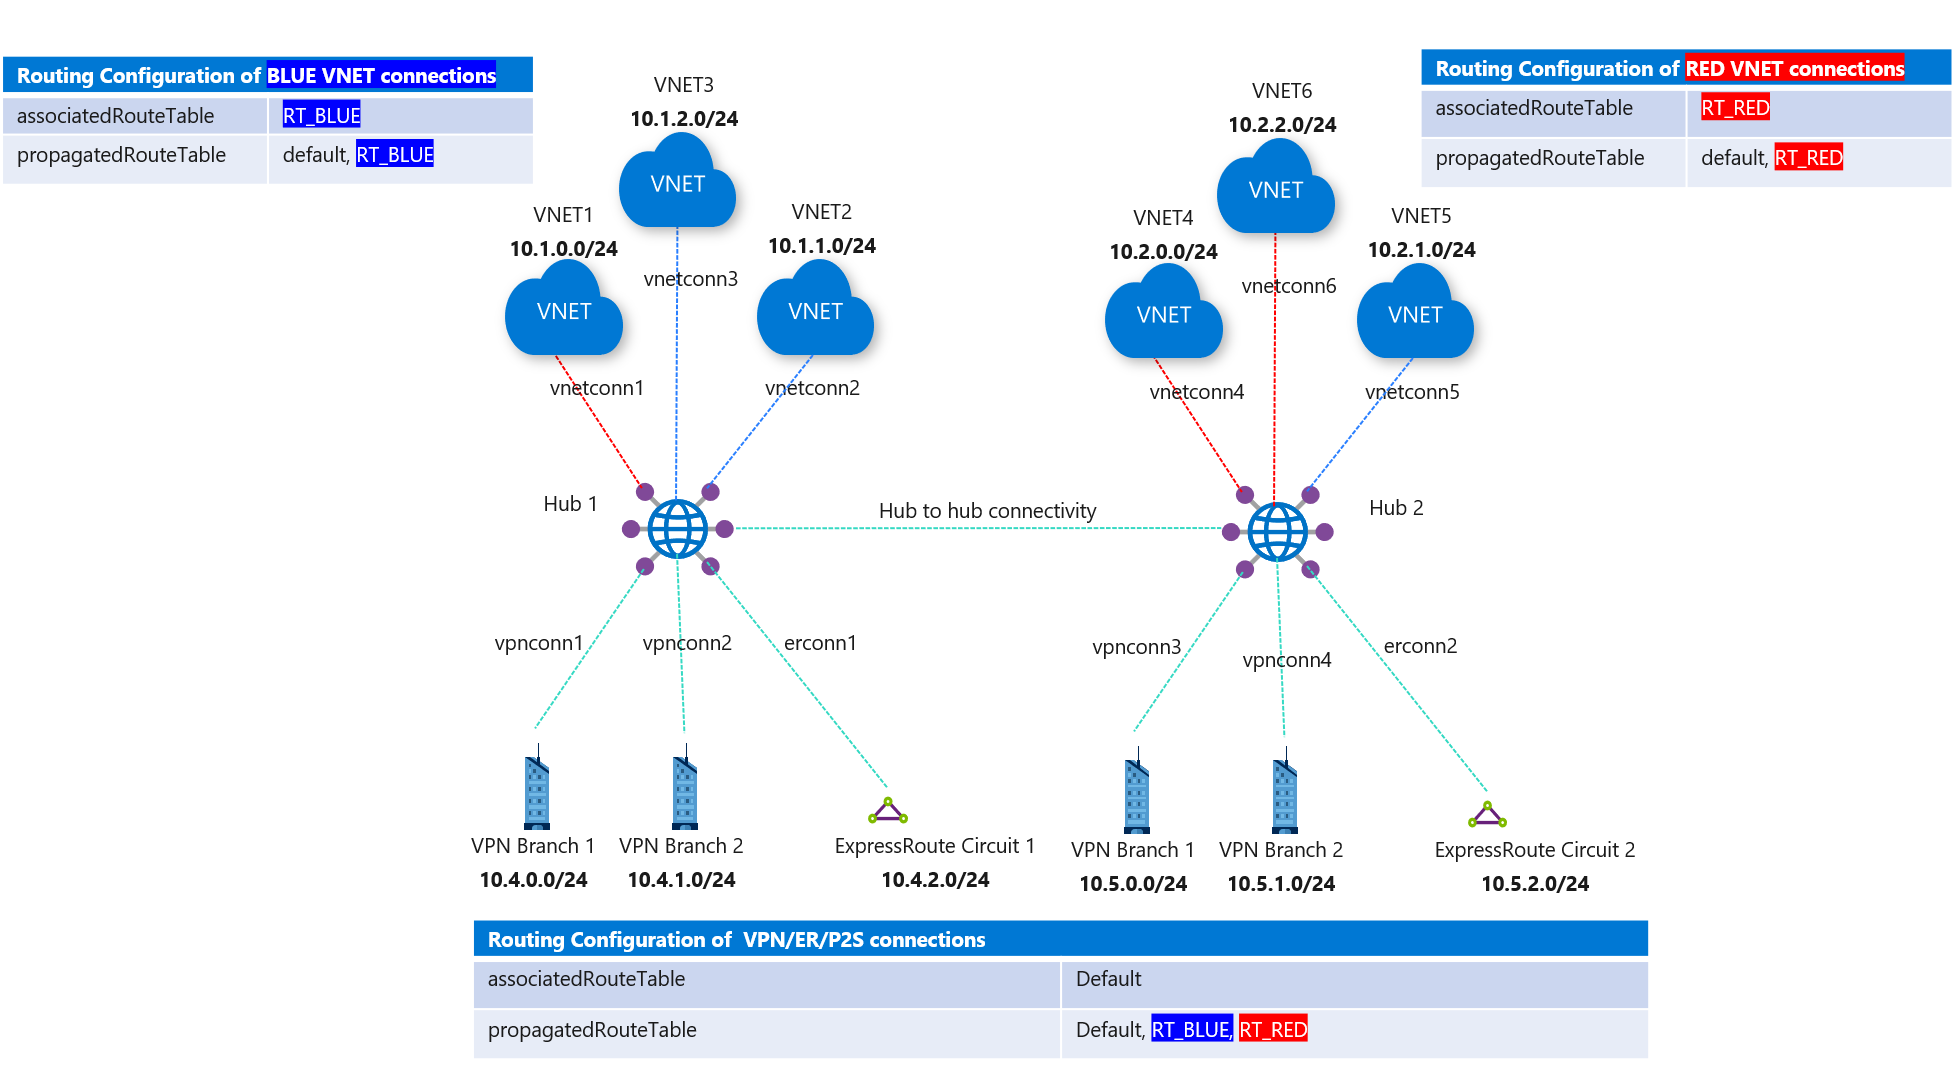
In Figure 1, there are Blue and Red VNet connections.
- Blue-connected VNets can reach each other and reach all branches (VPN/ER/P2S) connections.
- Red VNets can reach each other and reach all branches (VPN/ER/P2S) connections.
Consider the following steps when setting up routing.
- Create two custom route tables in the Azure portal, RT_BLUE and RT_RED.
- For route table RT_BLUE, for the following settings:
- Association: Select all Blue VNets.
- Propagation: For Branches, select the option for branches, implying branch(VPN/ER/P2S) connections propagate routes to this route table.
- Repeat the same steps for RT_RED route table for Red VNets and branches (VPN/ER/P2S).
This results in the routing configuration change as seen in the following figure.
Figure 1
Next steps
- For more information about Virtual WAN, see the FAQ.
- For more information about virtual hub routing, see About virtual hub routing.