Up to date cards
You can now provide latest information to your users on Adaptive Cards. Include a combination of refresh and message edits in Teams. Update the User Specific Views dynamically to its latest state as and when there's a change on your service. For example, for project management or ticketing cards, update comments and the task status. For approvals, the latest state is reflected while also providing differentiated information and actions.
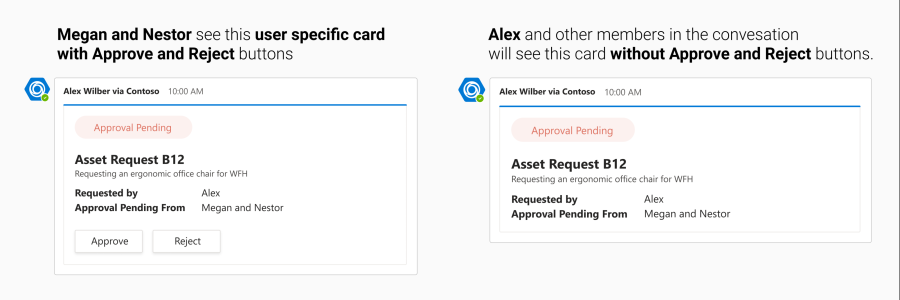
For example, a user can create an asset approval request in a Teams conversation. Alex creates an approval request and assigns it to Megan and Nestor. The following are the two parts to create the approval request:
User Specific Views can be applied using the
refreshproperty of the Adaptive Cards. Using User Specific Views one can show a card with Approve or Reject buttons to a set of users, and show a card without these buttons to other users.To keep the card state always updated, Teams message edit mechanism can be used. For example, for every approval, bot can trigger a message edit to all users. This bot message edit triggers an
adaptiveCard/actioninvoke request for all automatic refresh users, to which the bot can respond with the updated user specific card.
For more information, see how to do a bot message edit.
Approval base card
The following code provides an example of an approval base card:
{
  "$schema": "http://adaptivecards.io/schemas/adaptive-card.json",
  "type": "AdaptiveCard",
  "version": "1.4",
  "refresh": {
    "action": {
      "type": "Action.Execute",
      "title": "Refresh",
      "verb": "acceptRejectView"
    },
    "userIds": ["<Megan's user MRI>", "<Nestor's user MRI>"]
  },
  "body": [
    {
      "type": "TextBlock",
      "text": "Asset Request B12"
    },
    {
      "type": "TextBlock",
      "text": "Submitted by **Alex**"
    },
    {
      "type": "TextBlock",
      "text": "Approval pending from **Megan and Nestor**"
    }
  ]
}
Approval card with Approve and Reject buttons
The following code provides an example of an approval card with Approve and Reject buttons:
{
  "$schema": "http://adaptivecards.io/schemas/adaptive-card.json",
  "type": "AdaptiveCard",
  "version": "1.4",
  "refresh": {
    "action": {
      "type": "Action.Execute",
      "title": "Refresh",
      "verb": "acceptRejectView"
    },
    "userIds": ["<Nestor's user MRI>", "<Megan's user MRI>"]
  },
  "body": [
    {
      "type": "TextBlock",
      "text": "Approval Request B12"
    },
    {
      "type": "TextBlock",
      "text": "Submitted by **Alex**"
    },
    {
      "type": "TextBlock",
      "text": "Approval pending from **Megan and Nestor**"
    }
  ],
  "actions": [
    {
      "type": "Action.Execute",
      "title": "Approve",
      "verb": "approve",
      "data": {
            "more info": "<more info>"
      }
    },
    {
      "type": "Action.Execute",
      "title": "Reject",
      "verb": "reject",
      "data": {
            "more info": "<more info>"
      }
    }
  ]
}
Following are the two roles that are shown to users depending on the approval request:
- Approval base card: Shown to users not part of approvers list and the request isn't yet approved or rejected, and not part of
userIdslist inrefreshproperty of the Adaptive Card JSON. - Approval card with Approve or Reject buttons: Shown to the users who are part of the approvers list and the
userIdslist in therefreshproperty of the Adaptive Card JSON.
To send the asset approval request:
Alex raises an asset approval request in a Teams conversation and assigns it to Megan and Nestor.
Bot sends the approval base card in the conversation.
All other users in the conversation see the card sent by the bot. Automatic refresh is triggered for Megan and Nestor, who now see the user specific card with Approve or Reject buttons as their user MRIs are added to the
userIdslist in therefreshproperty of the Adaptive Card.
Nestor selects the Approve button, which is powered with
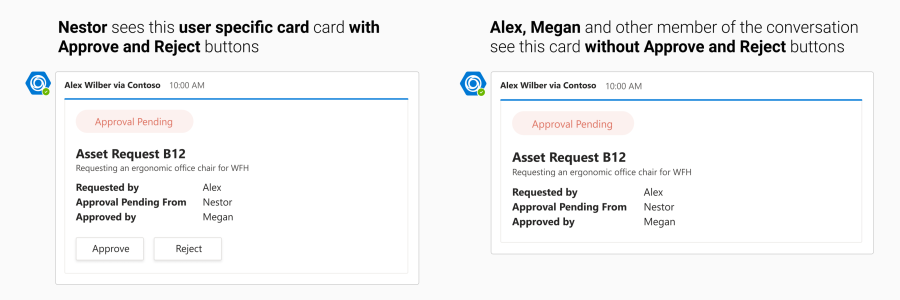
Action.Execute. The bot gets anadaptiveCard/actioninvoke request to which it can return an Adaptive Card in response.The bot triggers a message edit with an updated card, which says Nestor has approved the request while Megan's approval is pending.
Bot message edit triggers an automatic refresh for Megan and she sees the updated user specific card, which says Nestor has approved the request, but also sees the Approve or Reject buttons. Nestor's user MRI is removed from the
userIdslist inrefreshproperty of this Adaptive Card JSON in steps 4 and 5. Now, automatic refresh is only triggered for Megan.
Now, Megan selects the Approve button, which is powered with
Action.Execute. The bot gets anadaptiveCard/actioninvoke request to which it can return an Adaptive Card in response.The bot triggers a message edit with an updated card, which says Nestor and Megan have approved the request.
Bot message edit doesn't trigger any automatic refresh. Megan's user MRI is also removed from the
userIdslist inrefreshproperty of this Adaptive Card JSON in steps 7 and 8.
Adaptive Card sent as response of adaptiveCard/action and message edit
The following code provides an example of Adaptive Cards sent as response of adaptiveCard/action and message edit for steps 4 and 5:
{
  "$schema": "http://adaptivecards.io/schemas/adaptive-card.json",
  "type": "AdaptiveCard",
  "version": "1.4",
  "refresh": {
    "action": {
      "type": "Action.Execute",
      "title": "Refresh",
      "verb": "acceptRejectView"
    },
    "userIds": ["<Megan's user MRI>"]
  },
  "body": [
    {
      "type": "TextBlock",
      "text": "Asset Request B12"
    },
    {
      "type": "TextBlock",
      "text": "Submitted by **Alex**"
    },
    {
      "type": "TextBlock",
      "text": "Approval pending from **Megan**"
    },
    {
      "type": "TextBlock",
      "text": "Approved by **Nestor**"
    }
  ]
}
The following code provides an example of Adaptive Cards sent as response of adaptiveCard/action invoke through automatic refresh for step 6:
{
  "$schema": "http://adaptivecards.io/schemas/adaptive-card.json",
  "type": "AdaptiveCard",
  "version": "1.4",
  "refresh": {
    "action": {
      "type": "Action.Execute",
      "title": "Refresh",
      "verb": "acceptRejectView"
    },
    "userIds": ["<Megan's user MRI>"]
  },
  "body": [
    {
      "type": "TextBlock",
      "text": "Approval Request B12"
    },
    {
      "type": "TextBlock",
      "text": "Submitted by **Alex**"
    },
    {
      "type": "TextBlock",
      "text": "Approval pending from **Megan**"
    },
    {
      "type": "TextBlock",
      "text": "Approved by **Nestor**"
    }
  ],
  "actions": [
    {
      "type": "Action.Execute",
      "title": "Approve",
      "verb": "approve",
      "data": {
            "more info": "<more info>"
      }
    },
    {
      "type": "Action.Execute",
      "title": "Reject",
      "verb": "reject",
      "data": {
            "more info": "<more info>"
      }
    }
  ]
}
The following code provides an example of Adaptive Cards sent as response of adaptiveCard/action and message edit for steps 7 and 8:
{
  "$schema": "http://adaptivecards.io/schemas/adaptive-card.json",
  "type": "AdaptiveCard",
  "version": "1.4",
  "refresh": {
    "action": {
      "type": "Action.Execute",
      "title": "Refresh",
      "verb": "acceptRejectView"
    },
    "userIds": []
  },
  "body": [
    {
      "type": "TextBlock",
      "text": "Asset Request B12"
    },
    {
      "type": "TextBlock",
      "text": "Submitted by **Alex**"
    },
    {
      "type": "TextBlock",
      "text": "Approved by **Nestor and Megan**"
    }
  ]
}
Code sample
| Sample name | Description | .NET | Node.js | Manifest |
|---|---|---|---|---|
| Sequential Workflows Adaptive Cards | This sample demonstrates the implementation of Sequential Workflows, User Specific Views, and current Adaptive Cards in bots. | View | View | View |