Develop and share code in TFVC with Visual Studio
Azure DevOps Services | Azure DevOps Server 2022 - Azure DevOps Server 2019
Visual Studio 2019 | Visual Studio 2022
Whether your software project is large, small, or brand new, it's best to use version control as early as possible. This article shows you how to get started with Team Foundation Version Control (TFVC), a centralized version control system.
If you want to work in a distributed version control system, you can instead use Git with Azure Repos.
If you have code you want to migrate into Azure DevOps Services, see the Migration overview.
Prerequisites
Connect to your project
In Visual Studio, from the Home page of Team Explorer, select the Manage Connections icon.
On the Connect page of Team Explorer, right-click the project that contains your repository, and select Connect.

If the project you want isn't listed, select Manage Connections, select Connect to a Project, and then select the project you want. For more information, see Connect from Visual Studio or Team Explorer.
Note
Some TFVC menu options aren't displayed in Visual Studio until you connect to TFVC.
Configure your workspace
On the Home page of Visual Studio Team Explorer, select Configure your workspace to map the project to a folder on your dev machine.
Confirm your workspace path, and select Map & Get to map the workspace and get your code.

Now you can check in source, queue builds, and manage work.

If you don't see the Configure your workspace link, you might already have a workspace on your computer. To see existing workspaces, open Source Control Explorer, or look under Solutions in Team Explorer. For more information, see Use Source Control Explorer to manage files in TFVC and Create and work with workspaces.

Note
TFVC doesn't support workspaces on network drives or UNC paths.
Add your code to version control
To create a new code project to put under TFVC source control, select New under Solutions in the Home page of Team Explorer. Put the new solution in your mapped workspace folder, such as c:\Users\<YourName>\Source\Workspaces\YourTeamProject\.

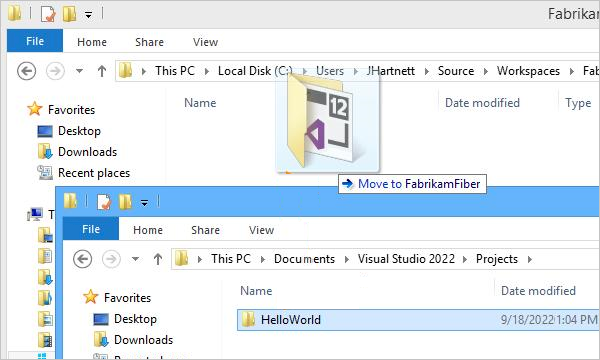
Or, if you already have an app in progress that you want to put under TFVC source control, move the solution into your workspace folder in Windows File Explorer.

Open your solution in Visual Studio.

Press Ctrl+Alt+L to open Solution Explorer, and in Solution Explorer, right-click the solution and select Add Solution to Source Control.

In the Add Solution to Source Control dialog box, review the details, and then select OK.
Check in the solution
When you're ready to check in your code, right-click your solution in Solution Explorer and select Check In.

On the Pending Changes page of Team Explorer, add a check-in comment and then select Check in.

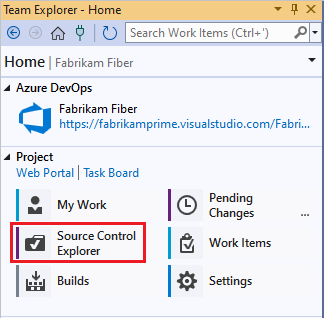
From the Home page of Team Explorer, select Source Control Explorer.

In Source Control Explorer, you can see the solution in TFVC.

Your whole team can work on the code now. All changes are tracked in version control.
Check in changes
When you edit code in Visual Studio that's under TFVC source control, the changed file is automatically checked out. For example, site.css is checked out after the
font-sizehas been changed to16px.
To compare the modified file with the latest version in source control, right-click the file in Solution Explorer and select Compare.

The Diff window opens, and you can see the difference between the two versions.

In Solution Explorer, right-click the file and select Check In to check in the change.

You can also check in from the code editor or from Team Explorer.
If you're working on a task or fixing a bug that's tracked as a work item, you can associate that work item with your pending changes. TFVC resolves the bug, closes the task, or links the changeset to the work item.

Add a comment and check in.

In Source Control Explorer, right-click the file you changed and select View History to view its history.

The History window lists all the changesets that include this file.
