Use Blender to prepare 3D objects for use in Dynamics 365 Guides and in mixed-reality components included in apps created with Power Apps
This tutorial provides step-by-step instructions that show you how to:
Reduce the polygon count of a 3D object so that it matches the performance needs specific to performance targets for Microsoft Dynamics 365 Guides and for mixed-reality components included in apps created with Microsoft Power Apps.
Combine the 3D object's multiple materials (colors) into a single texture that can be applied to the model.
Export the optimized 3D object as a GLB file that can be used in Dynamics 365 Guides and Power Apps.
The combination of reducing polygons and turning multiple materials into a single texture can transform a complex and resource-intensive 3D object into a 3D object that performs well in Dynamics 365 Guides and Power Apps.
Important
This document is created strictly for informative purposes to demonstrate how Blender works with Dynamics 365 Guides and Power Apps. Your use of third-party applications is subject to terms between you and the third party. Microsoft Corporation is not affiliated with, is not a partner to, and does not endorse or sponsor Blender or any of Blender's products. There are other content-creation apps you can use to prepare your 3D objects.
What is Blender?
Blender is a free, open-source 3D creation suite. It supports the entirety of the 3D pipeline: modeling, rigging, animation, simulation, rendering, compositing and motion tracking, and video editing and game creation.
If Blender is the software that you decide to use to prepare your 3D objects, review Blender's website and download the most current stable version for Windows.
Overall steps for preparing a 3D object with Blender
Preparing a 3D object for mixed reality with Blender includes the following steps:
Import the model into Blender.
Decimate the model.
Unwrap the model (UV unwrapping).
Assign materials.
Bake the textures.
Export the model as a GLB file.
Import the model into Blender
Open Blender. When you open the app, a new scene is automatically created.
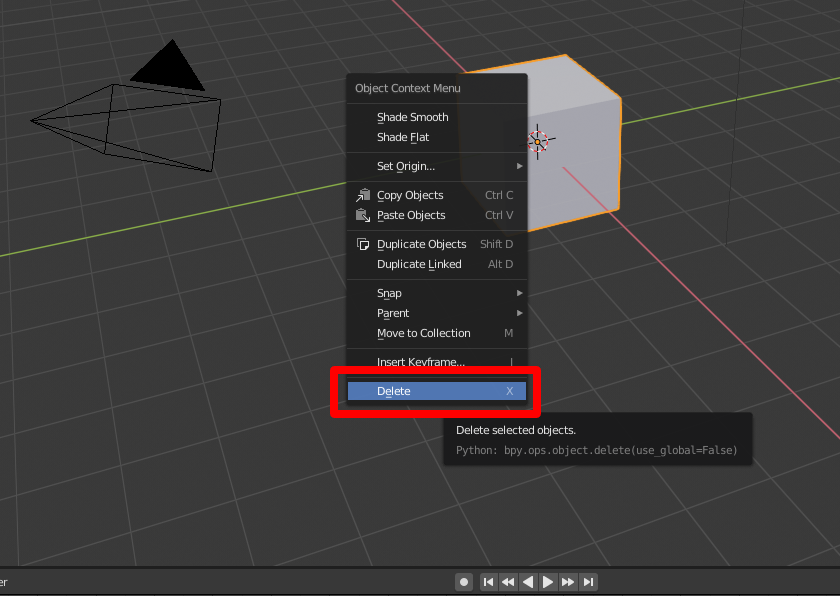
Right-click the cube, and then select Delete to delete it.
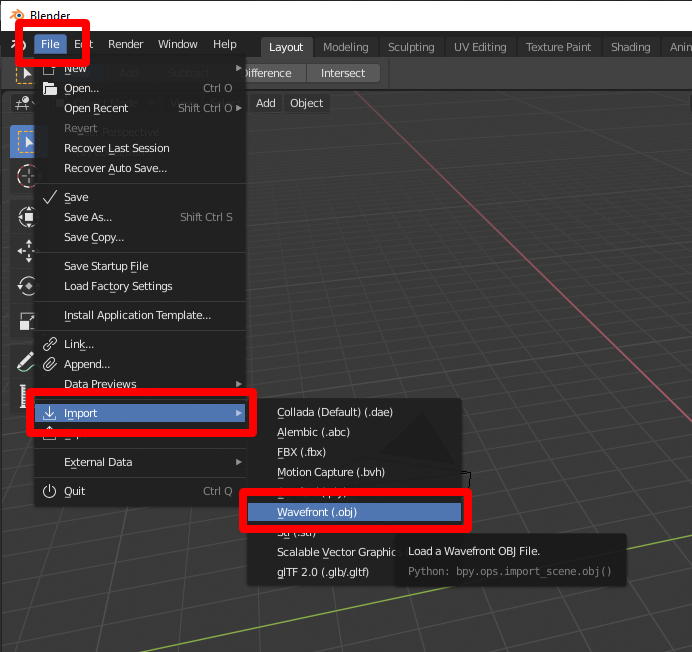
Select File > Import > Wavefront (.obj) to import the OBJ file.
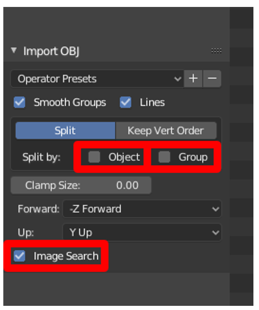
Under Import OBJ, do the following:
a. Clear the Object and Group check boxes, and select the Image Search check box.
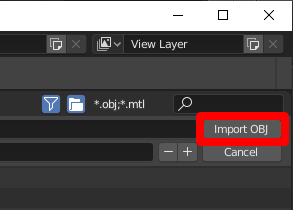
b. Select Import OBJ on the right side of the screen. This imports the 3D object as one item, and searches in the subfolder for any materials.
When you select Import OBJ, you'll see the 3D object with the imported materials.
Tip
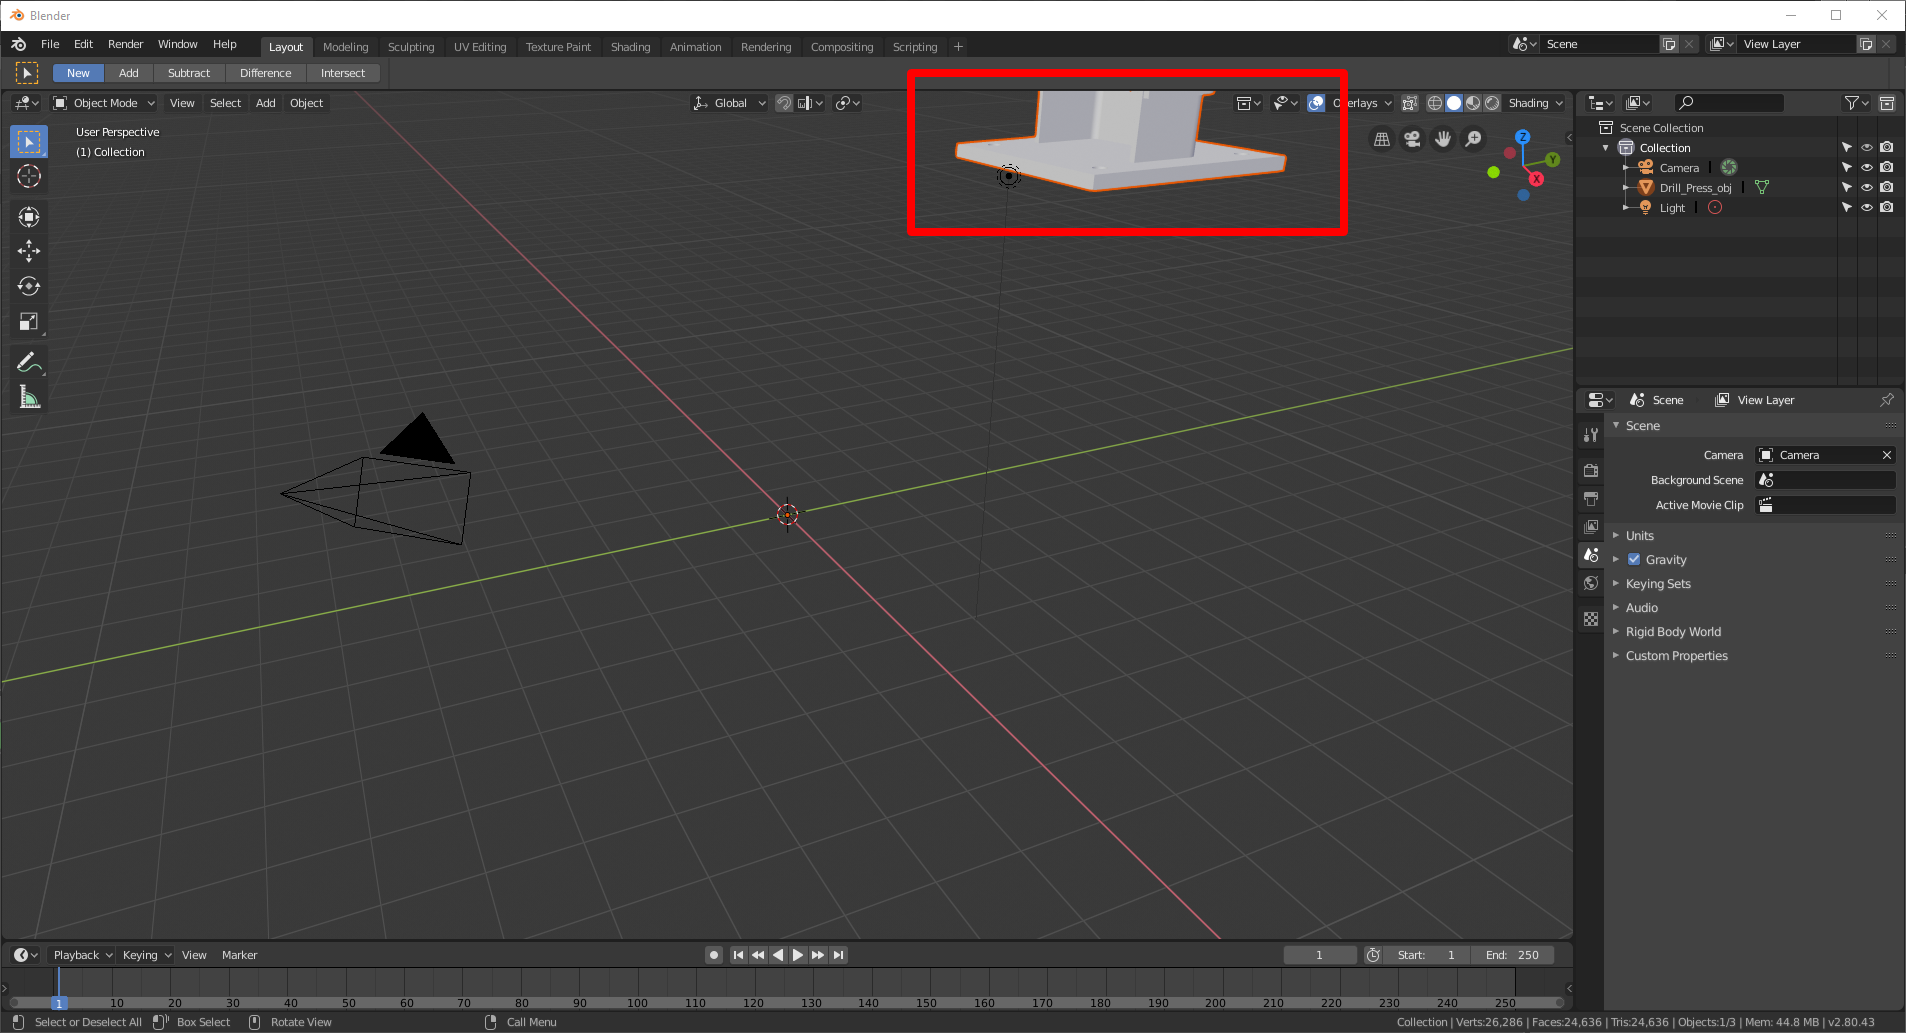
If the 3D object is extremely large or small, or hard to see, or is possibly off-screen as shown in the following graphic, you can use the mouse wheel to zoom the camera in or out until the model is visible.
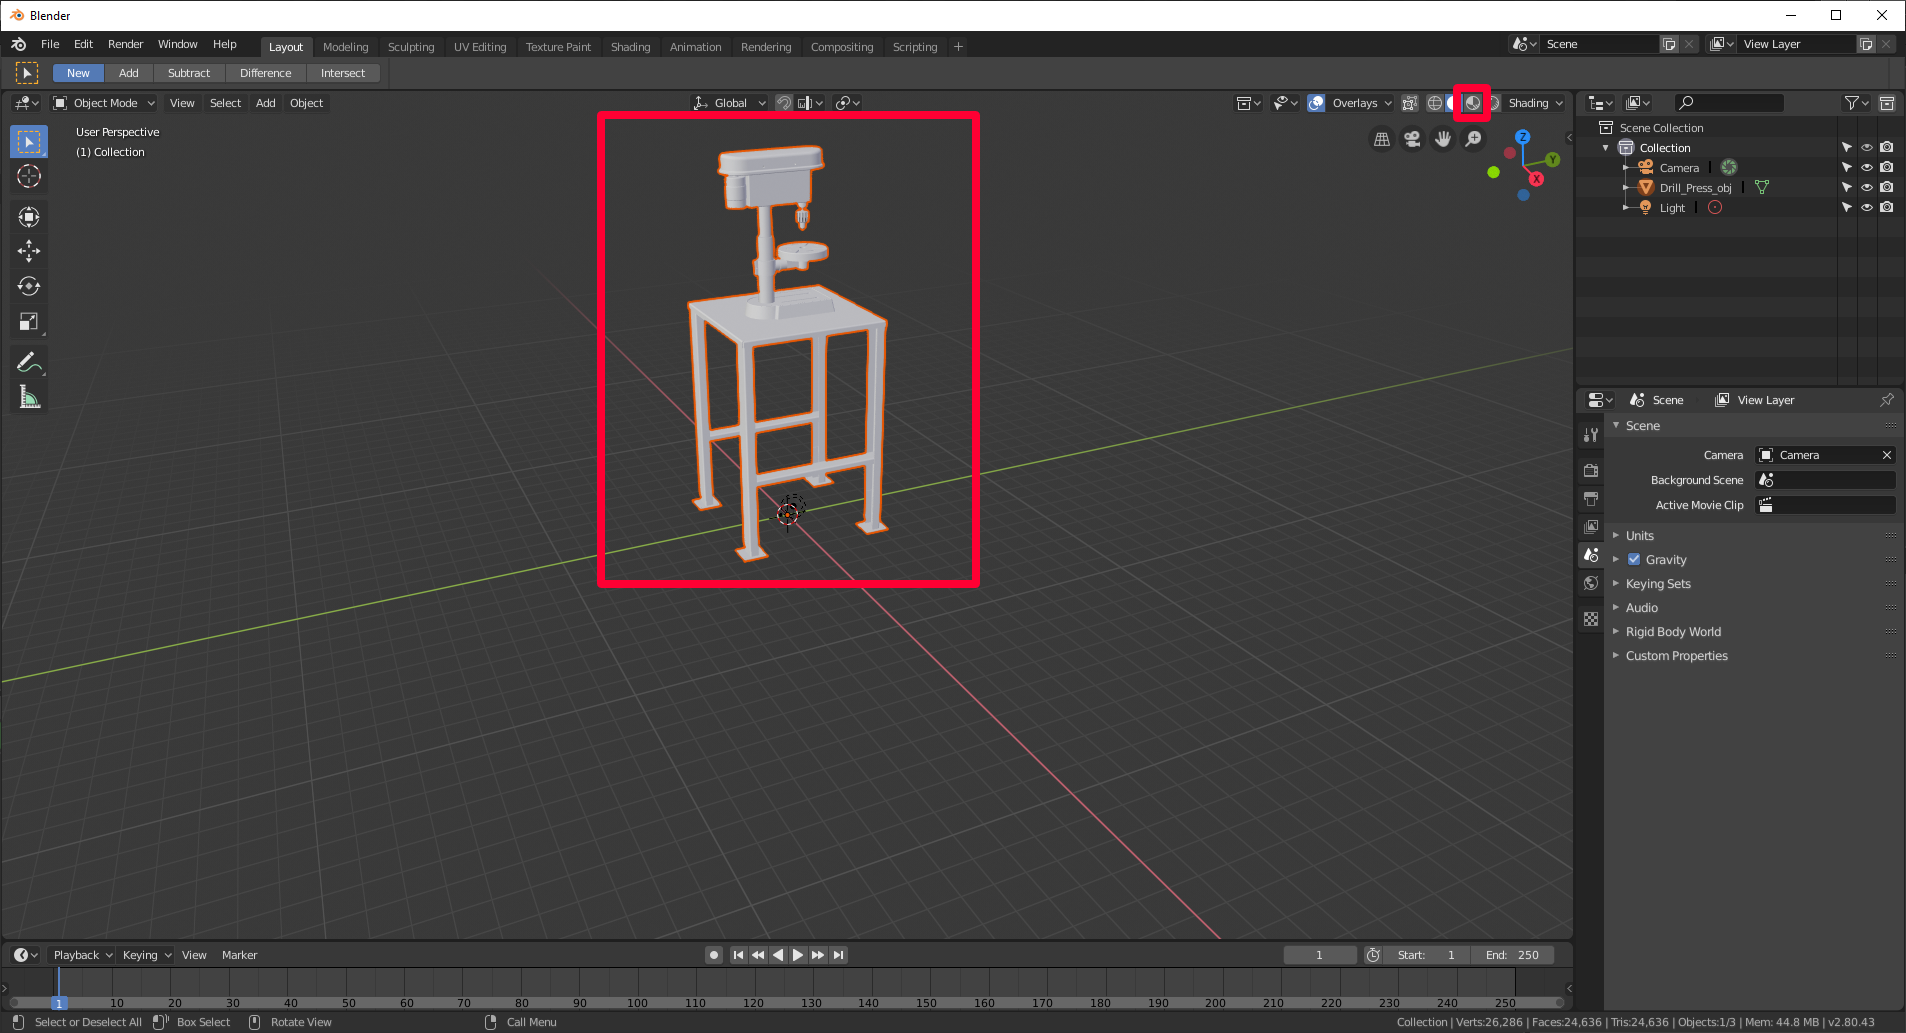
If the 3D object appears gray, select the Look Dev shading option to show the colors.
c. Review the Tris count (number of polygons) at the bottom right of the screen.
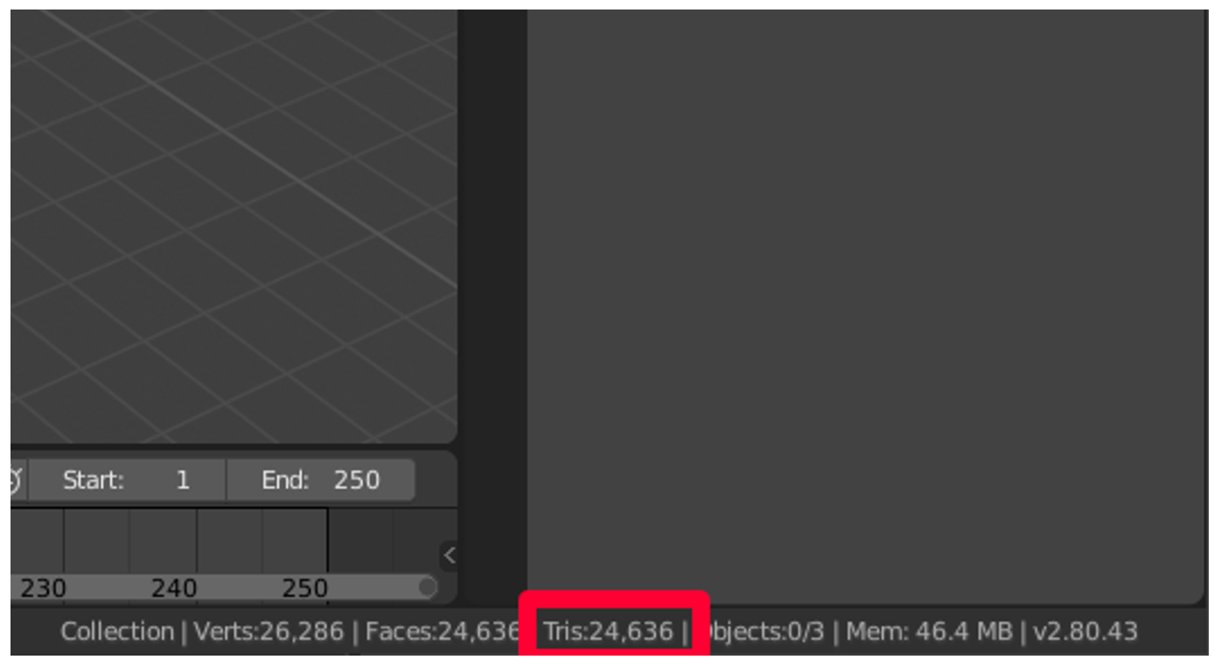
If this number meets the performance target resolution, you can skip the decimation step and go directly to Unwrap the model later in this tutorial. If it doesn't meet the target resolution, continue to the next section to decimate the model.
Decimate the model
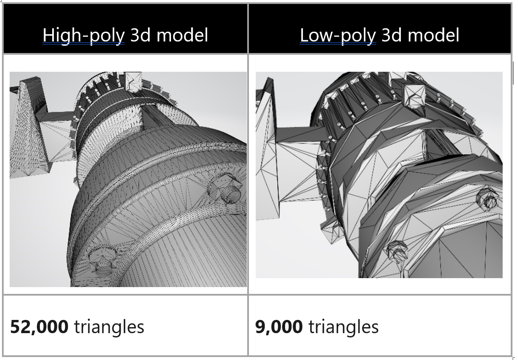
To reach application-specific performance goals, you might need to "decimate" the model. Decimation is the process of recomputing the surface polygons of the model to create a similar shape with fewer polygons. This reduces visual fidelity, but increases performance. The example images below show a high-fidelity model that can be used when you're viewing one or two 3D objects at a time on Microsoft HoloLens, and a low-quality 3D object used when you're viewing ten or more objects at a time on HoloLens.
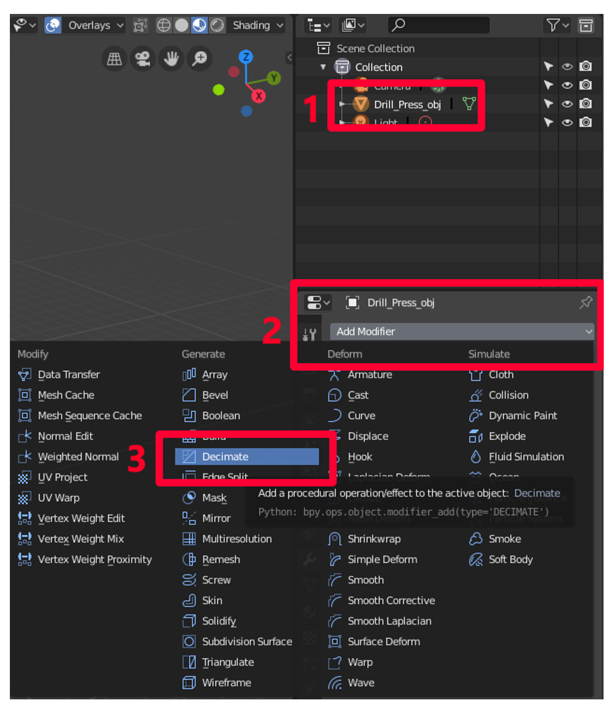
Select the model, and then go to the Modifiers menu
 in the tool column on the right.
On the Modifiers menu, in the Add Modifier list, select Decimate.
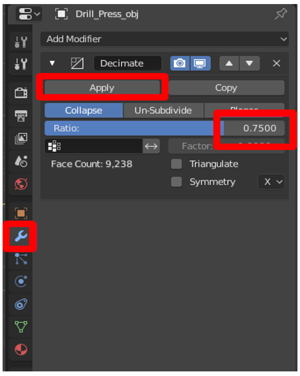
With the model selected, change the Ratio value to a number between 0.0 and 1.0. This setting determines the percentage of polygons (triangles) that are removed. For example, a value of 0.5 reduces the original polygon count to 50%. You'll see the Tris value in the bottom right of the Blender window decrease as you change the ratio. When the number reaches a value that matches your performance goal and looks good, select Apply.
Unwrap the model (UV unwrapping)
You can skip this step if your model has only one color.
To visualize the concept of UV unwrapping, imagine cutting out every surface of a 3D object and placing those surfaces flat on a piece of paper. The U and V dimensions represent the vertical and horizontal axes of the piece of paper in the same way that X, Y, and Z represent the three-dimensional axes of a 3D object. Unwrapping the UVs enables you to paint the flattened pieces with the material colors of the model. This painted paper is called a texture, and it's later wrapped back on top of the model, giving it the illusion of being made from different-colored pieces when it's actually one item with a colorful texture wrapped around it. This process is called texture baking, which is covered later in this tutorial.
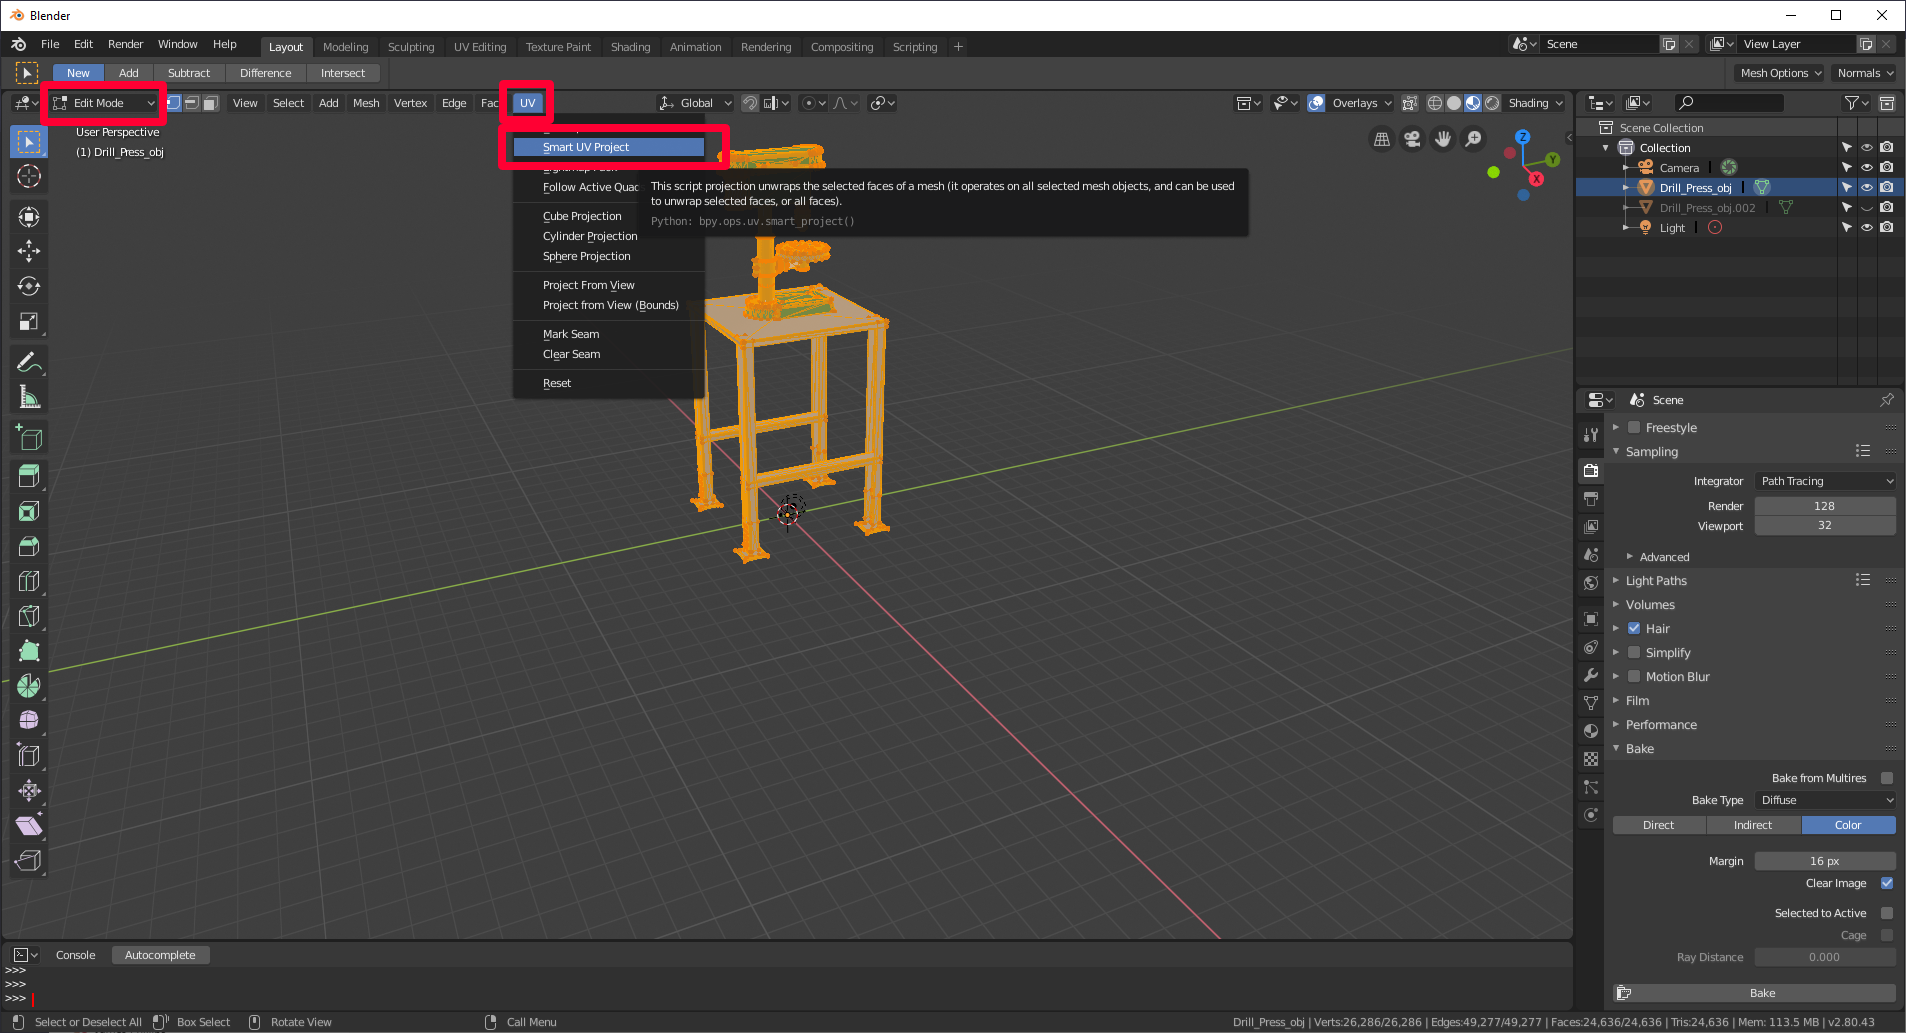
Select the model, hover over the main menu, press the Tab key to enter Edit Mode, press a to select all, and then on the UV menu, select Smart UV Project.
Tip
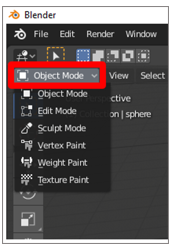
Enter Edit Mode by selecting the Edit Mode list in the upper-left corner, or press the Tab key. Pressing the Tab key while already in Edit Mode returns you to Object Mode, as shown in the following graphic.
Keep the default settings for the properties, and then select OK.
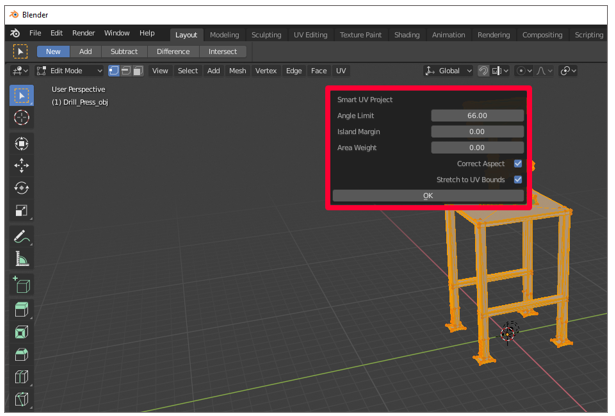
Make sure that you're in Edit Mode (press the Tab key), and that the entire model is still selected (press a). When the entire model is selected, it's orange.
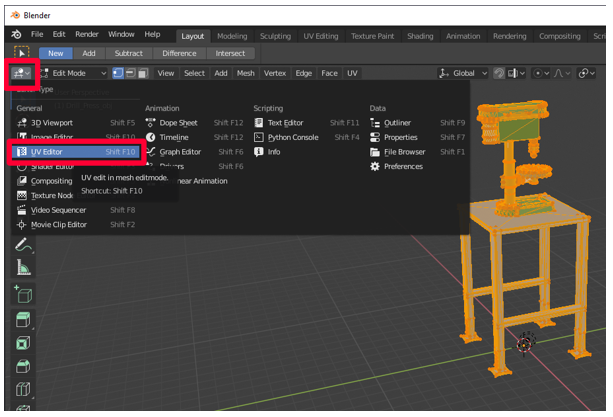
Select the UV Editor menu (or press Shift+F10).
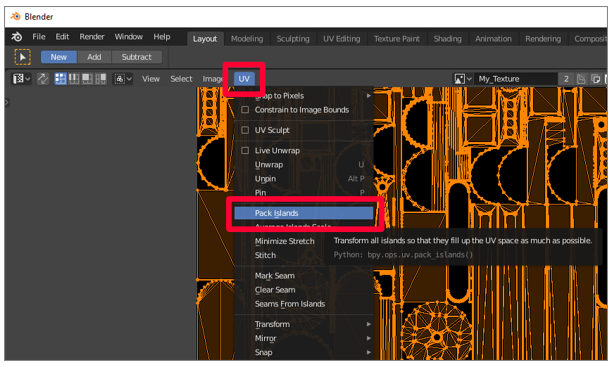
On the UV menu, select Pack Islands.
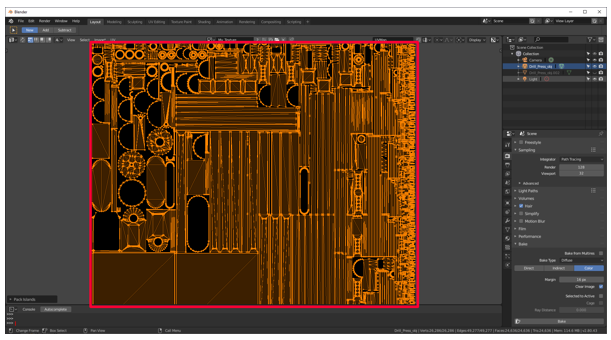
The outlined pieces are reorganized to represent the surface of the model as efficiently as possible. After packing the islands, the UVs look like this:
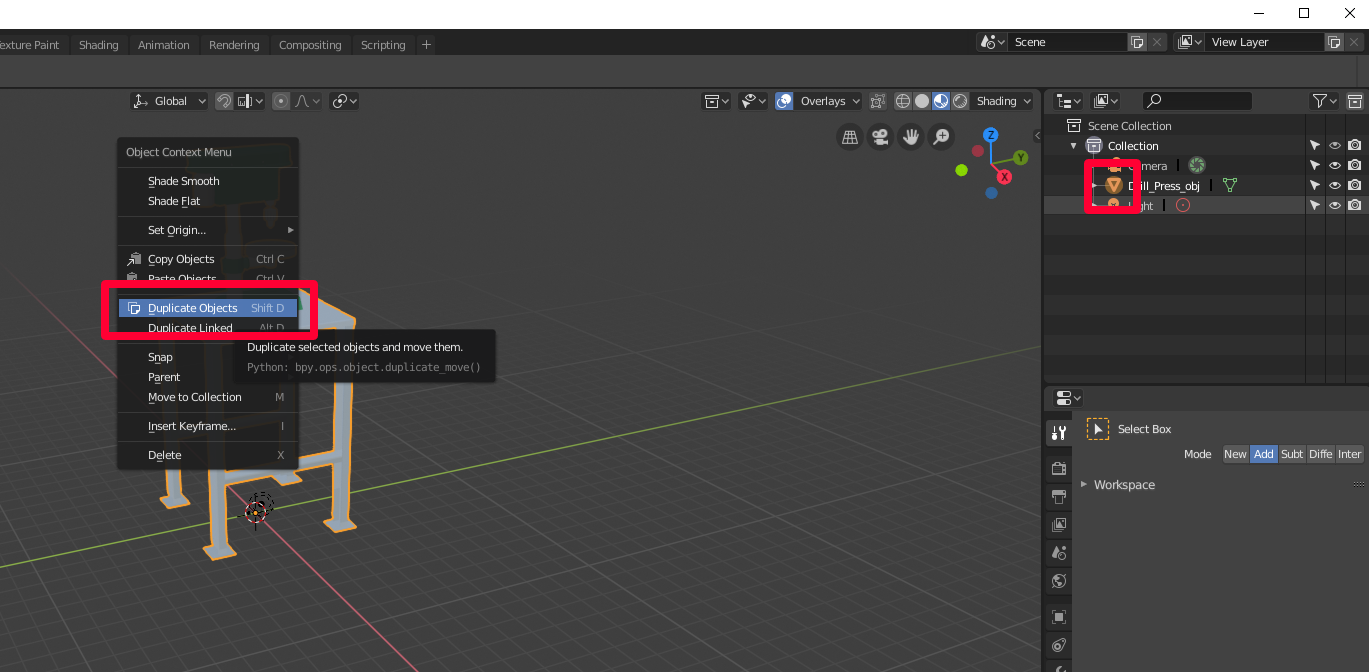
Create a copy of the mesh to bake the texture onto. To do this:
a. Select the model.
b. Right-click the model to open the menu.
c. Select Duplicate Objects.
d. Press Spacebar.
Prepare materials for texture baking
Select the duplicate model, and then select the Materials tab
 to go the Materials panel.
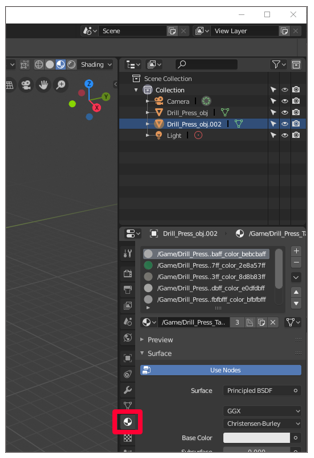
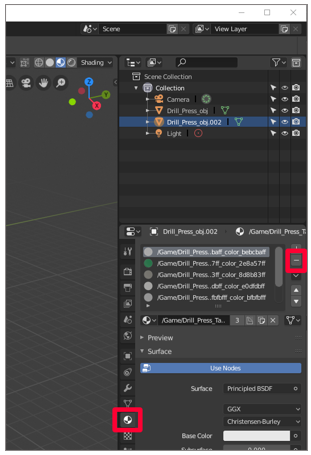
Delete all the materials for the duplicate 3D object by selecting the minus sign to the right of the materials.
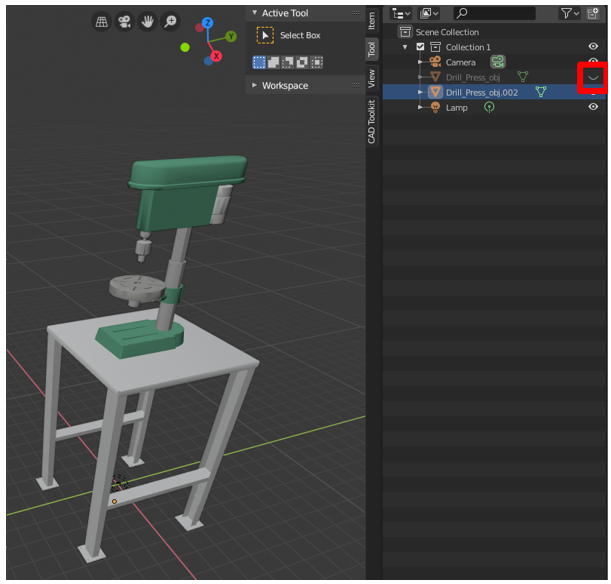
To hide the original 3D object and show just the duplicate, select the "eye" to the right of the original 3D object name. Notice that there are no materials on the duplicate 3D object.
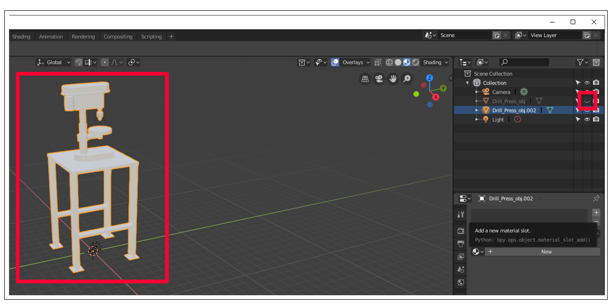
Select the plus sign in the Materials panel to add a new material to the duplicate.
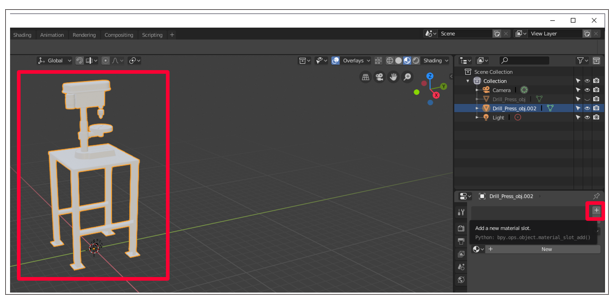
Select New to add a new material to the material slot.
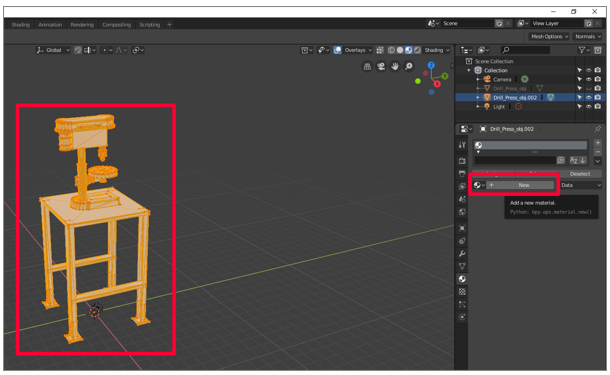
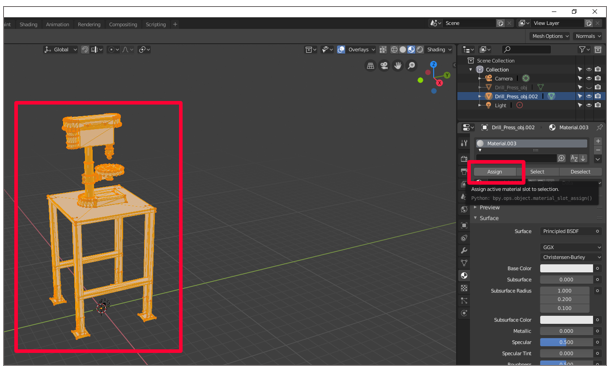
Hover over the viewport (the main window where the 3D object is shown), press the Tab key to enter Edit Mode, press a to select all, and then select Assign from the Materials tab
 .
.
Select the icon to the left of Object Mode, and then select Image Editor.
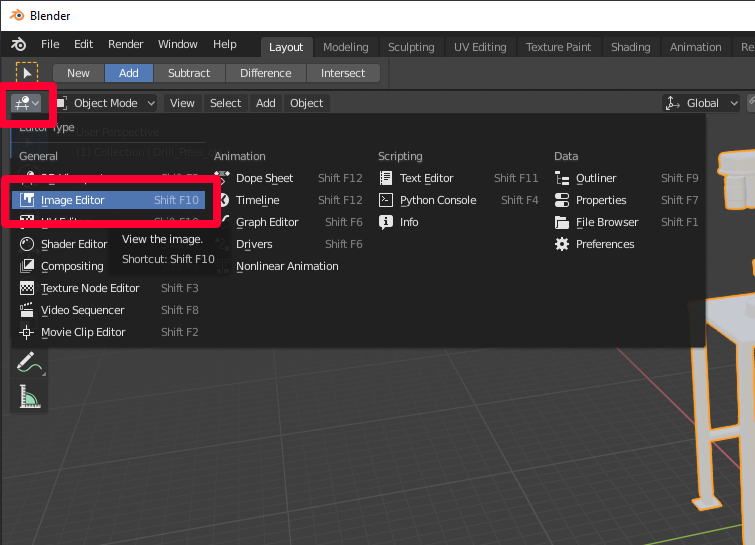
Create a new image (select Add > Image > New).
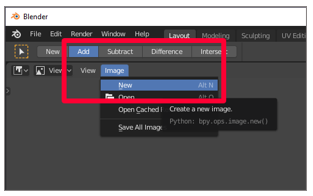
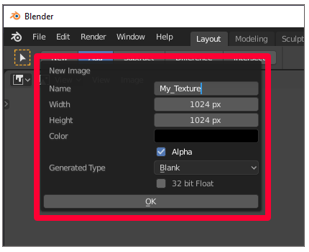
Save the new image as My_Texture or a similar name that's easy to remember, and then set the width and height to 1024 × 1024 pixels. Keep the default values for the other options.
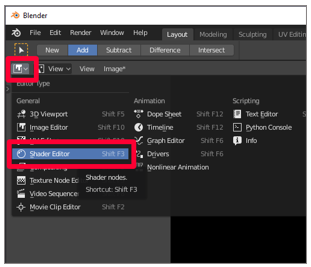
Select the icon to the left of View, and then select the Shader Editor.
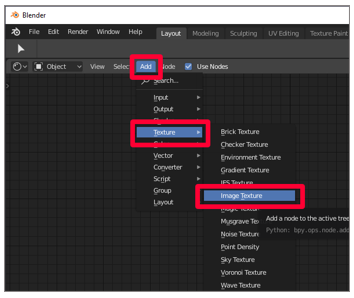
With the duplicate 3D object selected, select Add > Texture > Image Texture. Select or click to place the image texture node in the window.
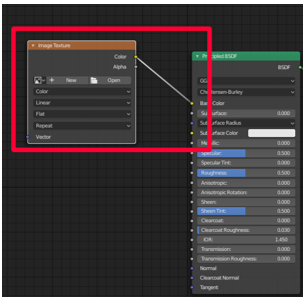
Drag the yellow node link (the yellow dot) labeled Color in the image texture window to the Base Color yellow node on the Principled BSDF node, to connect them.
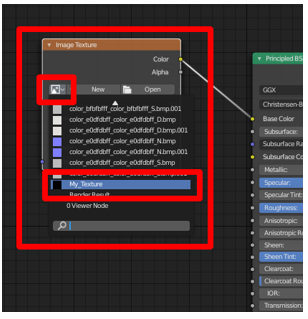
In the drop-down menu on the image texture node, find the texture you just created and select it.
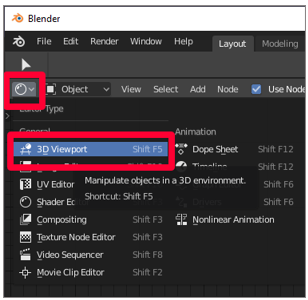
Select 3D Viewport at the upper left to go to the 3D Viewport menu.
Bake the materials onto the texture
After the texture and material are set up on the duplicate 3D object, it's time to bake the materials from the original 3D object onto that texture. The texture will be wrapped around the duplicate 3D object, which makes it higher performing while using the original colors.
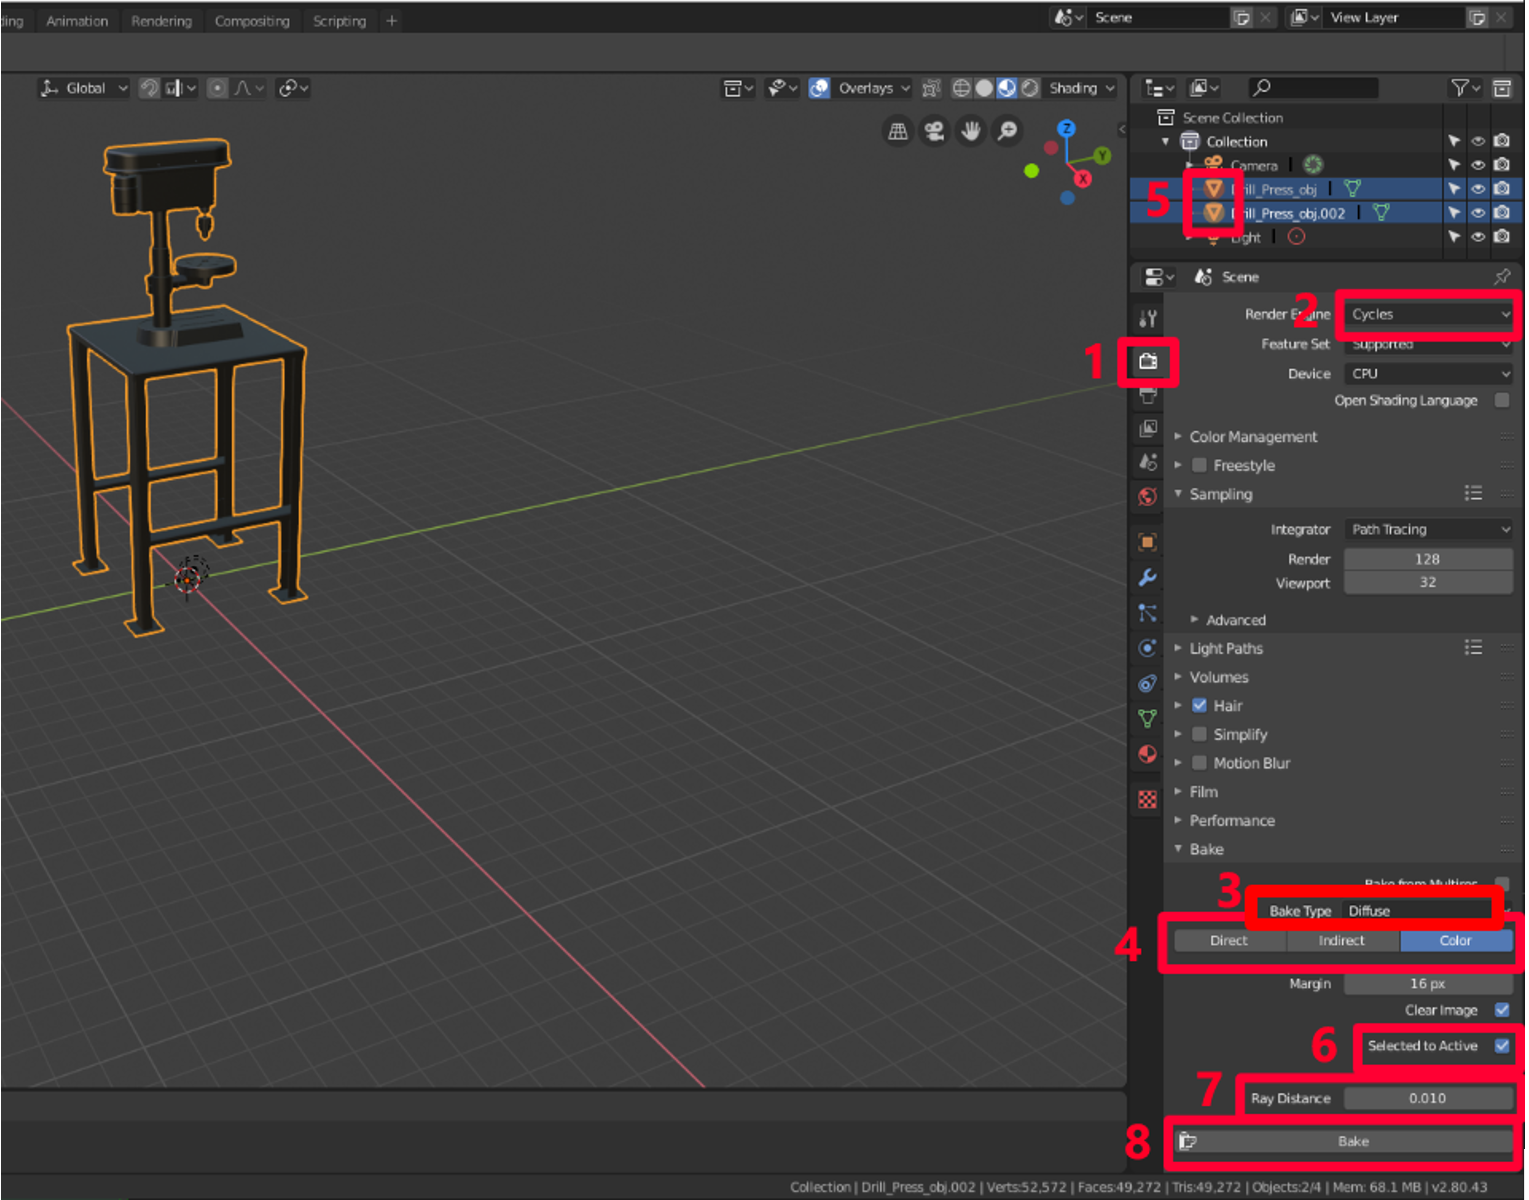
Select the Render tab

Select Cycles as the render engine.
In the Bake menu, set Bake Type to Diffuse.
Clear the Direct and Indirect check boxes.
Select the original 3D object, and then hold Shift while selecting the duplicate 3D object.
Select the Selected to Active check box.
Add a Ray Distance value. Start with .01, and then increase it if the result is missing patches of color.
Select Bake.
The duplicate 3D object now has the same coloring as the original, but with only one material instead of several. This can significantly reduce draw calls and increase performance.
To confirm that the bake was successful, you can select the eye icon
 next to the original model to hide it. Now only the duplicate with one material and texture is visible.
Export the model to a GLB file
The last step is to export the model to a GLB file so it can be used with Dynamics 365 Guides and Power Apps.
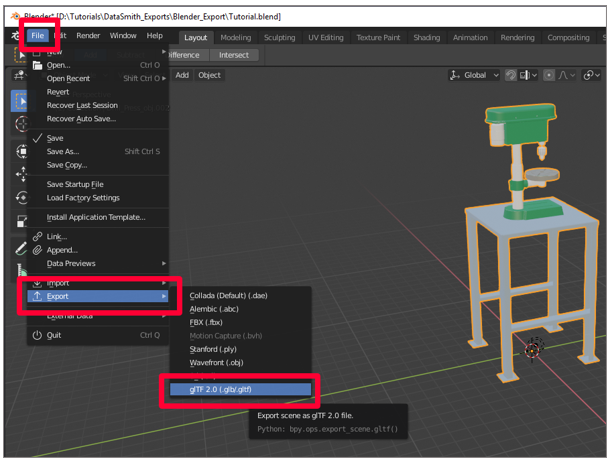
In Blender, select File > Export > glTF 2.0.
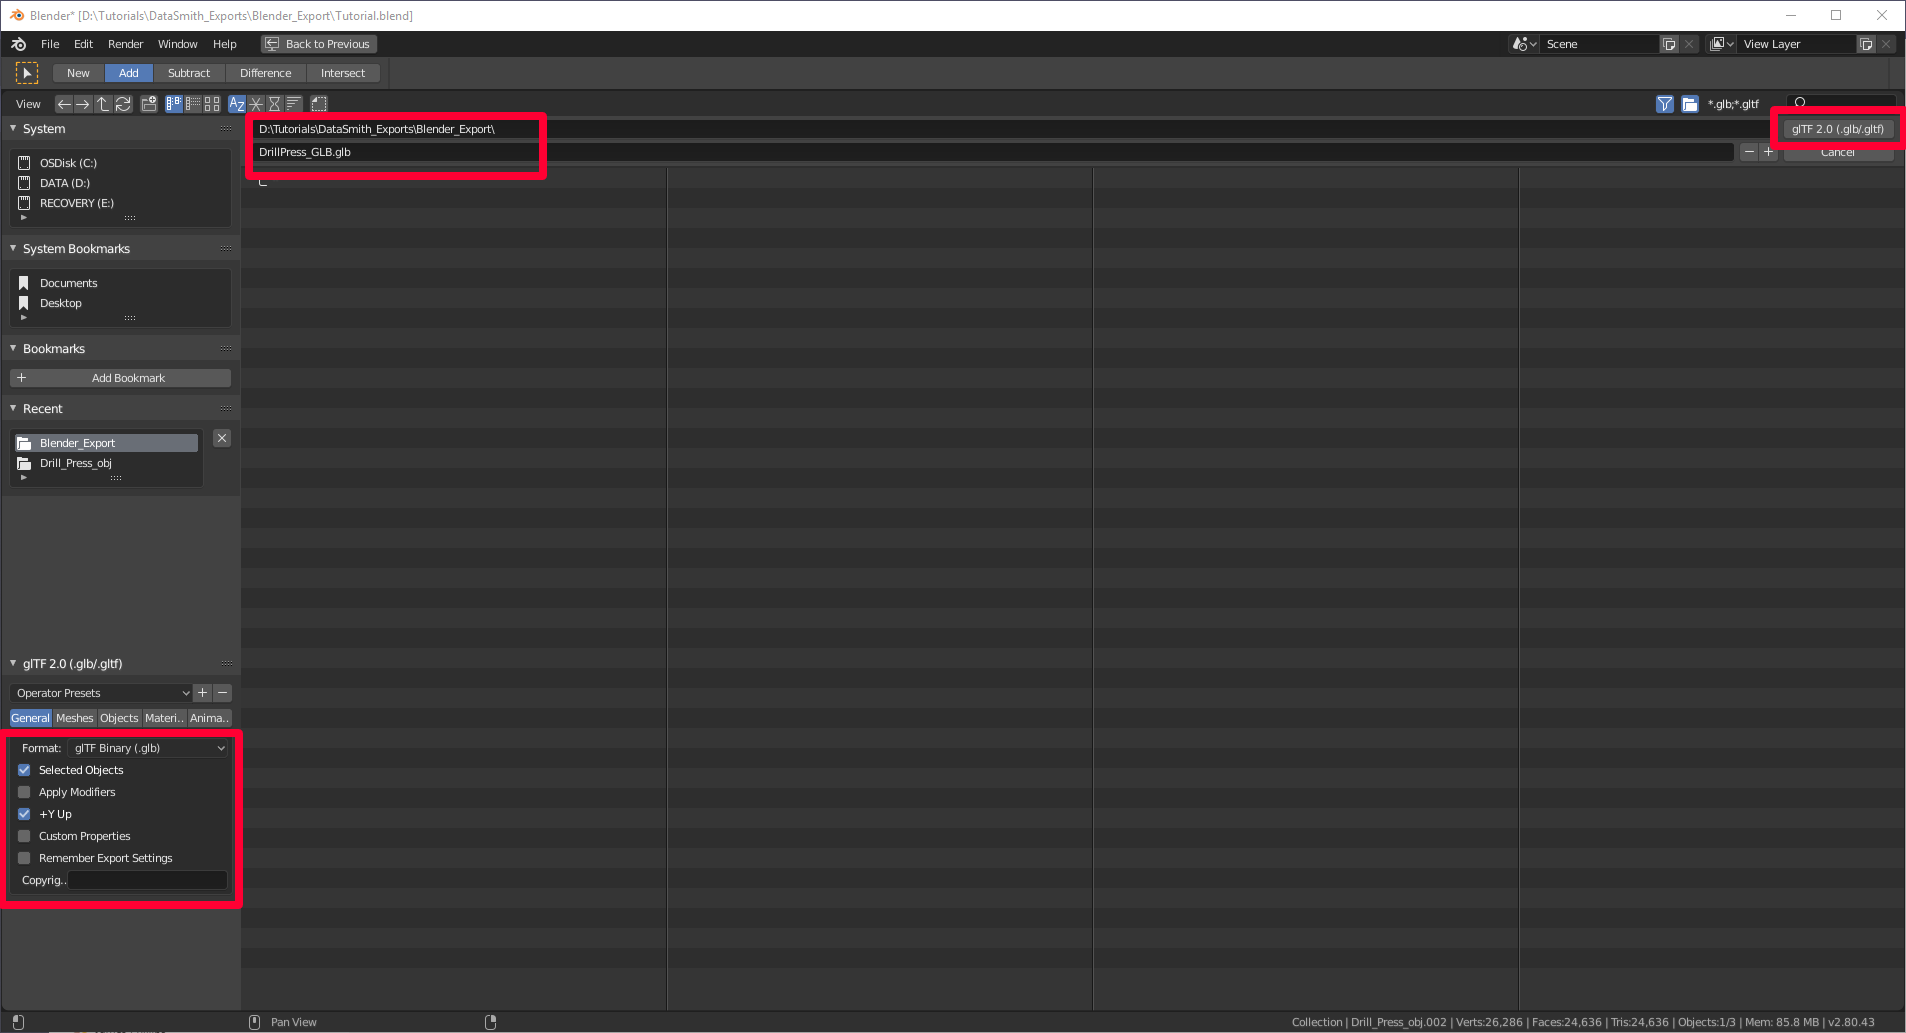
On the Export menu, make sure that the GLB format is selected and that the Selected Objects check box is selected. Name your file, and then select glTF 2.0 (.glb/.gltf).
View a 3D object in Dynamics 365 Guides or Power Apps
After you've prepared a 3D object, use the following links to learn more about using the model in Dynamics 365 Guides or Power Apps:
More information
Several screenshots in this document were taken from the Blender software program in order to provide clear instructions on how to use Blender's software. Learn more about the Blender Foundation.
Microsoft Corporation is not responsible for, and expressly disclaims all liability for damages of any kind arising out of the use of Blender, or reliance on these instructions. This document is created only to provide general information to our customers and does not take into consideration any individualized business plans or specifications. Read about license terms for Blender at: Creative Commons Attribution ShareAlike.
The use in this document of trademarked names and images is strictly for informative and descriptive purposes, and no commercial claim to their use, or suggestion of sponsorship or endorsement, is made by Microsoft.