Share items in Microsoft Fabric
Workspaces are the central places where you collaborate with your colleagues in Microsoft Fabric. Besides assigning workspace roles, you can also use item sharing to grant and manage item-level permissions in scenarios where:
- You want to collaborate with colleagues who don't have a role in the workspace.
- You want to grant additional item level-permissions for colleagues who already have a role in the workspace.
This document describes how to share an item and manage its permissions.
Share an item via link
In the list of items, or in an open item, select the Share button
 .
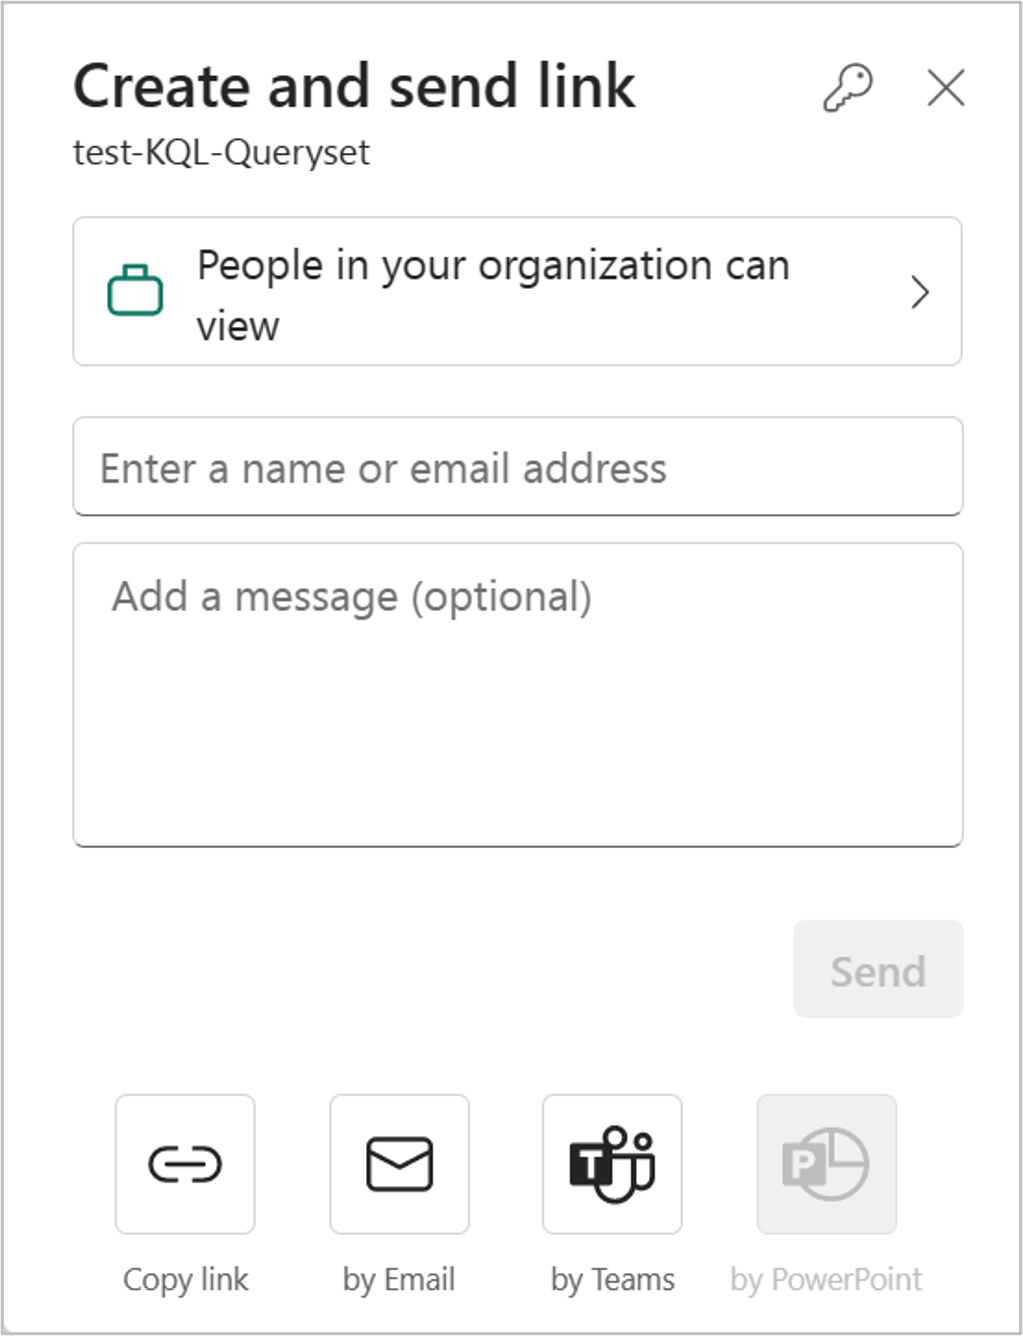
.The Create and send link dialog opens. Select People in your organization can view.

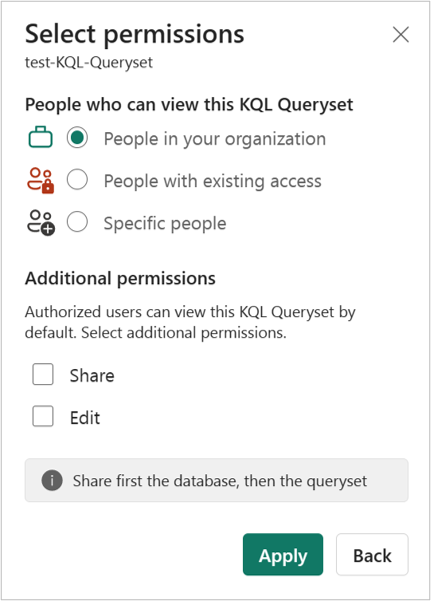
The Select permissions dialog opens. Choose the audience for the link you're going to share.

You have the following options:
People in your organization This type of link allows people in your organization to access this item. It doesn't work for external users or guest users. Use this link type when:
- You want to share with someone in your organization.
- You're comfortable with the link being shared with other people in your organization.
- You want to ensure that the link doesn't work for external or guest users.
People with existing access This type of link generates a URL to the item, but it doesn't grant any access to the item. Use this link type if you just want to send a link to somebody who already has access.
Specific people This type of link allows specific people or groups to access the report. If you select this option, enter the names or email addresses of the people you wish to share with. This link type also lets you share to guest users in your organization's Microsoft Entra ID. You can't share to external users who aren't guests in your organization.
Note
If your admin has disabled shareable links to People in your organization, you can only copy and share links using the People with existing access and Specific people options.
Choose the permissions you want to grant via the link.

Links that give access to People in your organization or Specific people always include at least read access. However, you can also specify if you want the link to include additional permissions as well.
Note
The Additional permissions settings vary for different items. Learn more about the item permission model.
Links for People with existing access don't have additional permission settings because these links don't give access to the item.
Select Apply.
In the Create and send link dialog, you have the option to copy the sharing link, generate an email with the link, or share it via Teams.

Copy link: This option automatically generates a shareable link. Select Copy in the Copy link dialog that appears to copy the link to your clipboard.

by Email: This option opens the default email client app on your computer and creates an email draft with the link in it.
by Teams: This option opens Teams and creates a new Teams draft message with the link in it.
You can also choose to send the link directly to Specific people or groups (distribution groups or security groups). Enter their name or email address, optionally type a message, and select Send. An email with the link is sent to your specified recipients.

When your recipients receive the email, they can access the report through the shareable link.
Manage item links
To manage links that give access to the item, in the upper right of the sharing dialog, select the Manage permissions icon:

The Manage permissions pane opens, where you can copy or modify existing links or grant users direct access. To modify a given link, select Edit.

In the Edit link pane, you can modify the permissions included in the link, people who can use this link, or delete the link. Select Apply after your modification.
This image shows the Edit link pane when the selected audience is People in your organization can view and share.

This image shows the Edit link pane when the selected audience is Specific people can view and share. Note that the pane enables you to modify who can use the link.

For more access management capabilities, select the Advanced option in the footer of the Manage permissions pane. On the management page that opens, you can:
- View, manage, and create links.
- View and manage who has direct access and grant people direct access.
- Apply filters or search for specific links or people.
Grant and manage access directly
In some cases, you need to grant permission directly instead of sharing link, such as granting permission to service account, for example.
Select Manage permission from the context menu.

Select Direct access.
Select Add user.
Enter the names of people or accounts that you need to grant access to directly. Select the permissions that you want to grant. You can also optionally notify recipients by email.
Select Grant.

You can see all the people, groups, and accounts with access in the list on the permission management page. You can also see their workspace roles, permissions, and so on. By selecting the context menu, you can modify or remove the permissions.
Note
You can't modify or remove permissions that are inherited from a workspace role in the permission management page. Learn more about workspace roles and the item permission model.
Item permission model
Depending on the item being shared, you may find a different set of permissions that you can grant to recipients when you share. Read permission is always granted during sharing, so the recipient can discover the shared item in the OneSource data hub and open it.
| Permission granted while sharing | Effect |
|---|---|
| Read | Recipient can discover the item in the data hub and open it. Connect to the Warehouse or SQL analytics endpoint of the Lakehouse. |
| Edit | Recipient can edit the item or its content. |
| Share | Recipient can share the item and grant permissions up to the permissions that they have. For example, if the original recipient has Share, Edit, and Read permissions, they can at most grant Share, Edit, and Read permissions to the next recipient. |
| Read All with SQL analytics endpoint | Read data from the SQL analytics endpoint of the Lakehouse or Warehouse data through TDS endpoints. |
| Read all with Apache Spark | Read Lakehouse or Data warehouse data through OneLake APIs and Spark. Read Lakehouse data through Lakehouse explorer. |
| Build | Build new content on the semantic model. |
| Execute | Execute or cancel execution of the item. |
Considerations and limitations
When a user's permission on an item is revoked through the manage permissions experience, it can take up to two hours for the change to take effect if the user is signed-in. If the user is not signed in, their permissions will be evaluated the next time they sign in, and any changes will only take effect at that time.
The Shared with me option in the Browse pane currently only displays Power BI items that have been shared with you. It doesn't show you non-Power BI Fabric items that have been shared with you.


