Azure Blob Storage
Summary
| Item | Description |
|---|---|
| Release State | General Availability |
| Products | Excel Power BI (Semantic models) Power BI (Dataflows) Fabric (Dataflow Gen2) Power Apps (Dataflows) Dynamics 365 Customer Insights Analysis Services |
| Authentication Types Supported | Anonymous Account key Organizational account Shared access signature (SAS) Service principal |
| Function Reference Documentation | AzureStorage.BlobContents AzureStorage.Blobs |
Note
The service principal authentication type isn't supported when using an on-premises data gateway or a virtual network (VNet) data gateway.
Note
Some capabilities may be present in one product but not others due to deployment schedules and host-specific capabilities.
Prerequisites
An Azure subscription. Go to Get Azure free trial.
An Azure Blob Storage account. Follow the instructions at Create a storage account. This article assumes that you already created an Azure Blob Storage account, and uploaded data files to it.
Capabilities supported
- Import
Connect to Azure Blob Storage from Power Query Desktop
To connect to Azure Blob Storage:
Select Azure Blob Storage in the get data experience. The get data experience in Power Query Desktop varies between apps. For more information about the Power Query Desktop get data experience for your app, go to Where to get data.
In Azure Blob Storage, enter the account name or URL of your Azure Blob Storage account. Then select OK.

If you're connecting to this account for the first time, select either the Anonymous, Organizational account, Account key, or Shared access signature (SAS) authentication method to sign into the Azure Blob Storage account. More information: Copy your account key from Azure Blob Storage

For more information about using and managing authentication, go to Authentication in desktop apps.
Select Connect.
The Navigator dialog box shows the files that you uploaded to your Azure Blob Storage account. Select the containers you want to use, and then select either Transform Data to transform the data in Power Query or Load to load the data.
Connect to Azure Blob Storage from Power Query Online
To connect to Azure Blob Storage:
Select the Azure Blobs option in the get data experience. Different apps have different ways of getting to the Power Query Online get data experience. For more information about how to get to the Power Query Online get data experience from your app, go to Where to get data.
In Connection settings, enter the account name or URL of your Azure Blob Storage account.
Optionally, enter the name of the on-premises data gateway you require.
Select the Authentication kind used to access your blob storage.
- Anonymous: Your blob storage is set up for anonymous access. Select Next to continue.
- Account key: Your blob storage is set up to require an account key. Enter the account key in the provided text box and select Next to continue. More information: Copy your account key from Azure Blob Storage
- Organizational account: Select Sign in to sign into your storage account. You're redirected to your organization's sign-in page. Follow the prompts to sign into the account. Once you're signed in, select Next to continue.
- Shared Access Signature (SAS): To retrieve your SAS token, go to portal.azure.com, navigate to your resource, and, under Security + networking, select Shared access signature and scroll down to view the SAS token. Paste the value into the SAS token box and select Next.
- Service principal: Enter the tenant ID, service principal client ID, and service principal key, and then select Next.
For more information about using and managing authentication, go to Connections and authentication in Power Query Online.
Select Next.
The Navigator screen shows the files that you uploaded to your Azure Blob Storage account. Select the containers you want to use, and then select Transform data.
Copy your account key from Azure Blob Storage
To retrieve your Azure Blob Storage account key to use while authenticating your account in Power Query:
Sign in to the Azure portal.
Locate your Azure Blob Storage account.
In the storage account menu pane, under Security + networking, select Access keys.
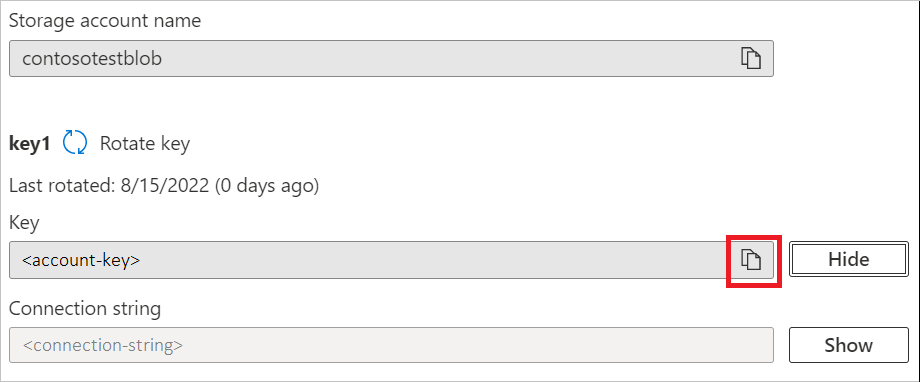
In the key1 section, locate the Key value. Select Show next to the key value.
Select the Copy to clipboard icon to copy the Key value.

Limitations
The following limitations apply to the Power Query Azure Blob Storage connector.
Power Query Online and Azure Storage are in the same region
Direct access to an Azure Storage account with the firewall enabled and in the same region as Power Query Online isn't supported. This limitation arises because Power Query services, when deployed in the same region as the Azure storage account, use private Azure IP addresses for communication. For further details, refer to the Azure documentation on storage network security.
To work around this limitation and enable access to Azure Storage from Power Query Online in the same region, use one of the following methods:
- Utilize an On-premises data gateway, which serves as a bridge between Power Query Online and Azure Storage.
- Use a Virtual Network (VNet) data gateway.


