Setup data source connection to connect data sources for data quality assessment
Data source connections set up the authentication needed to profile your data for statistical snapshot, or scan your data for data quality anomalies and scoring.
Setting up data source connections is the fourth step in the data quality life cycle for a data asset. Previous steps are:
- Assign users(s) data quality steward permissions in Unified Catalog to use all data quality features.
- Register and scan a data source in your Microsoft Purview Data Map.
- Add your data asset to a data product
Prerequisites
- To create connections to data assets, your users must be in the data quality steward role.
- You need at least read access to the data source for which you are setting up the connection.
Supported multicloud data sources
- Azure Data Lake Storage Gen2
- File Types: Delta Parquet and Parquet
- Azure SQL Database
- Fabric data estate in OneLake including shortcut and mirroring data estate. Data Quality scanning is supported only for Lakehouse delta tables and parquet files.
- Mirroring data estate: Cosmos DB, Snowflake, Azure SQL
- Shortcut data estate: AWS S3, GCS, AdlsG2
- Azure Synapse serverless and data warehouse
- Azure Databricks Unity Catalog
- Snowflake
- Google Big Query (Private Preview)
Currently, Microsoft Purview can only run data quality scans using Managed Identity as authentication option. Data Quality services run on Apache Spark 3.4 and Delta Lake 2.4.
Important
To access these sources, either you need to set your Azure Storage sources to have an open firewall, to Allow Trusted Azure Services, or to use private endpoints follow the guideline documented in the data quality managed virtual network configuration guide.
Setup data source connection
In Unified Catalog, select Health management, then select Data quality.
Select a governance domain from the list.
From the Manage dropdown list, select Connections to open connections page.

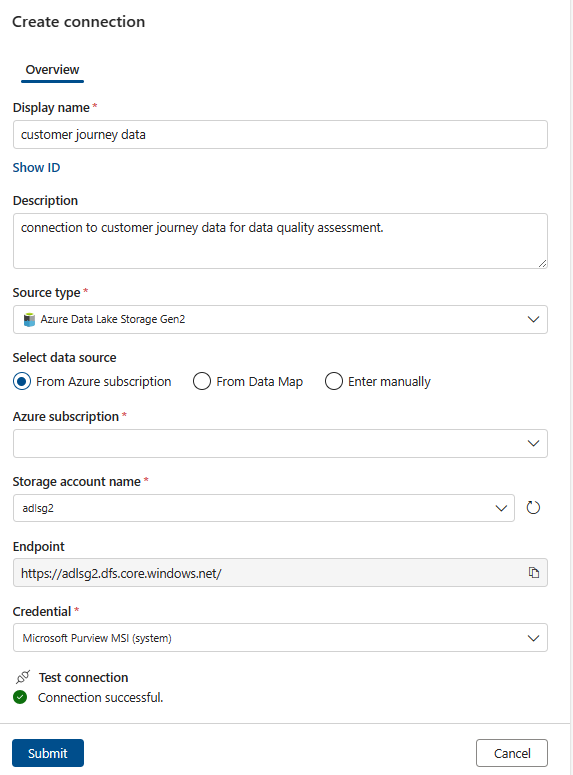
Select New to create a new connection for the data products and data assets of your governance domain.

In the right panel, enter the following information:
- Display name
- Description
Select Source type, and select one of the data sources.
Depending on the data source, enter the access details.
If the test connection is successful, then Submit the connection configuration to complete the connection setup.
Tip
You can also create a connection to your resources using private endpoints and a Microsoft Purview Data Quality managed virtual network. For more information, see the managed virtual network article.
Connection setup steps varies for native connectors. Check the connection setup steps from native connectors documents to setup connection for Azure Databricsks, Snowflake, GoogBigQuery, and synapse connectors.
Grant Microsoft Purview permissions on the source
Now that the connection is created, to be able to scan data sources, your Microsoft Purview managed identity will need permissions on your data sources:
To scan Azure Data Lake Storage Gen2, the storage blob data reader role must be assigned to Microsoft Purview Managed Identity. You can follow the steps on the source page to assign managed identity permissions..
To scan an Azure SQL database, assign db_datareader role to the Microsoft Purview Managed Identity. You can follow the steps on the source page to assign managed identity permissions..
Related contents
- Data Quality for Fabric Data estate
- Data Quality for Fabric Mirrored data sources
- Data Quality for Fabric shortcut data sources
- Data Quality for Azure Synapse serverless and data warehouses
- Data Quality for Azure Databricks Unity Catalog
- Data Quality for Snowflake data sources
- Data Quality for Google Big Query
Next steps
- Configure and run data profiling for an asset in your data source.
- Set up data quality rules based on the profiling results, and apply them to your data asset.
- Configure and run a data quality scan on a data product to assess the quality of all supported assets in the data product.
- Review your scan results to evaluate your data product's current data quality.