What are Extended Security Updates for SQL Server?
Applies to: ![]() SQL Server 2012 (11.x)
SQL Server 2012 (11.x)
This article provides information how to receive Extended Security Updates (ESUs) for versions of SQL Server that are out of extended support.
Extended Security Updates (ESUs) are available for SQL Server 2012 (11.x).
The following table contains a list of the latest ESUs, if any.
| Version | KB article | Date |
|---|---|---|
| SQL Server 2012 | KB 5021123 | 14 February 2023 |
ESUs are made available if needed, once a security vulnerability is discovered and is rated as Critical by the Microsoft Security Response Center (MSRC). Therefore, there's no regular release cadence for SQL Server ESUs.
ESUs don't include:
- New features
- Functional improvements
- Customer-requested fixes
For information about ESU pricing, see Plan your Windows Server and SQL Server end of support.
For more information about other options, see SQL Server end of support options.
You can also review the Frequently asked questions.
Overview
When SQL Server reaches the end of its support lifecycle, you can sign up for an Extended Security Update (ESU) subscription. The subscription protects your servers for up to three years after the support lifecycle ends. Keep the subscription until you're ready to upgrade to a newer version of SQL Server or migrate to Azure SQL.
The method of receiving Extended Security Updates depends on where your SQL Server is running.
Azure
If you migrate to an Azure service (for more information, see the Overview section), you'll have access to ESUs for SQL Server 2012 (11.x) and SQL Server 2014 (12.x) for up to three years after the end of support, at no additional charge above the cost of running the Azure service.
Azure services running SQL Server receive ESUs automatically through existing SQL Server update channels or Windows Update. You don't need to install the SQL Server IaaS Agent extension to download ESU patches on an Azure SQL Virtual Machine.
Services include:
- SQL Server on Azure VMs
- Azure VMware Solution (AVS)
- Azure Stack Hub
- Azure Stack HCI
On-premises or hosted environments
If you deploy your SQL Server instances to an Azure service, you can access ESUs for SQL Server 2012 (11.x) and SQL Server 2014 (12.x) for up to three years after the end of support, at no additional charge above the cost of running the Azure service. This applies to SQL Server on Azure VMs, Azure VMware Solution, Azure Stack Hub, or Azure Stack HCI.
Note
Azure Stack HCI customers must enable Azure benefits to receive free ESUs.
To configure ESUs in Azure VMware Solution, review ESUs for SQL Server and Windows Server in Azure VMware Solution VMs.
In all other cases, you can purchase Extended Security Updates if you qualify. To qualify for receiving Extended Security Updates (ESU), you must have Software Assurance under one of the following agreements:
- Enterprise Agreement (EA)
- Enterprise Agreement Subscription (EAS)
- Server and Cloud Enrollment (SCE)
- Enrollment for Education Solutions (EES)
You can also qualify by connecting your SQL Server 2012 (11.x) and SQL Server 2014 (12.x) instances to Azure Arc, and enable a pay-as-you-go billing option. For more information, see Automatically connect your SQL Server to Azure Arc.
There are two ways to purchase ESUs:
You can purchase an Extended Security Update plan for up to three years after the end of support date directly from Microsoft or a Microsoft licensing partner. For more information, see Register Extended Security Updates purchased through volume licensing.
If your SQL Server 2012 (11.x) and SQL Server 2014 (12.x) instances are connected to Azure Arc, you can enable ESUs as a subscription. For more information, see Subscribe to Extended Security Updates enabled by Azure Arc.
The following table shows the differences between the two options:
| Option | How to purchase | Key features |
|---|---|---|
| ESU plan | Volume licensing center | - Supports SQL Server instances both connected and not connected to Azure Arc - Each year of coverage must be purchased separately, must be paid in full, and is differently priced - Requires registration on Azure portal - Supports manual installation of patches |
| ESU subscription | Microsoft Azure | - The covered SQL Server instances must be connected to Azure Arc - Continuous coverage until canceled - Billed by Azure on an hourly basis - Can be manually canceled at any time - Automatic cancellation when migrated to Azure or upgraded to a supported version - Supports automatic and manual installation of patches |
Note
Connecting or registering instances is free of charge. Both connected and registered instances don't incur additional charges when downloading ESUs, which are delivered through the Azure portal.
For more information, see the Extended Security Updates frequently asked questions.
Support
ESUs don't include technical support for either on-premises or hosted environments. For on-premises environments, you can receive technical support on workloads covered by ESUs through additional active support contracts such as Software Assurance or Premier/Unified Support. Alternatively, if you're hosting on Azure, you can use an Azure Support plan to get technical support.
Subscribe to Extended Security Updates enabled by Azure Arc
SQL Server enabled by Azure Arc supports a method of receiving ESUs as a subscription billed through Azure. For details, see SQL Server ESU subscriptions enabled by Azure Arc.
Register Extended Security Updates purchased through volume licensing
If you purchased an ESU product through volume licensing (VL) for the SQL Server instances that aren't connected to Azure Arc, you must first register these servers on the Azure portal and link the ESU invoice as proof of purchase.
Register disconnected SQL Server instances on Azure portal
If your on-premises or hosted environment SQL Server instances can't be connected to Azure Arc, you can manually register your SQL Server instances in the Azure portal to enable access to the ESUs. If you prefer to take advantage of the flexibility of Extended Security Updates enabled by Azure Arc, connect your server to Azure Arc. To connect, follow the steps in Automatically connect your SQL Server to Azure Arc.
The following example shows how to manually register your SQL Server instances in a disconnected state, in the Azure portal.
Prerequisites
If you don't already have an Azure subscription, you can create an account using one of the following methods:
The user creating disconnected Arc-enabled SQL Server resources must have the following permissions:
Microsoft.AzureArcData/sqlServerInstances/readMicrosoft.AzureArcData/sqlServerInstances/write
Users can be assigned to the
Azure Connected SQL Server Onboardingrole to get those specific permissions, or they can be assigned to built-in roles such as Contributor or Owner that have these permissions. For more information, see Assign Azure roles using the Azure portal.Register the
Microsoft.AzureArcDataresource provider in your Azure subscription:Sign in to the Azure portal.
Navigate to your subscription, and select Resource providers.
If the
Microsoft.AzureArcDataresource provider isn't listed, you can add it to your subscription using the Register option.
If you use Azure policies that only allow the creation of specific resource types, you need to allow the
Microsoft.AzureArcData/sqlServerInstancesresource type. If it isn't allowed, theSQLServerInstances_Updateoperation fails with a 'deny' Policy action log entry in the activity log of the subscription.
You can either register a single SQL Server instance, or upload a CSV file to register multiple SQL Server instances in bulk.
Single SQL Server instance
Sign into the Azure portal.
Navigate to Azure Arc and select Infrastructure > SQL Servers.
To register a disconnected machine, select Add from the menu at the top of the screen.

Select Register Servers to add a disconnected SQL Server instance.
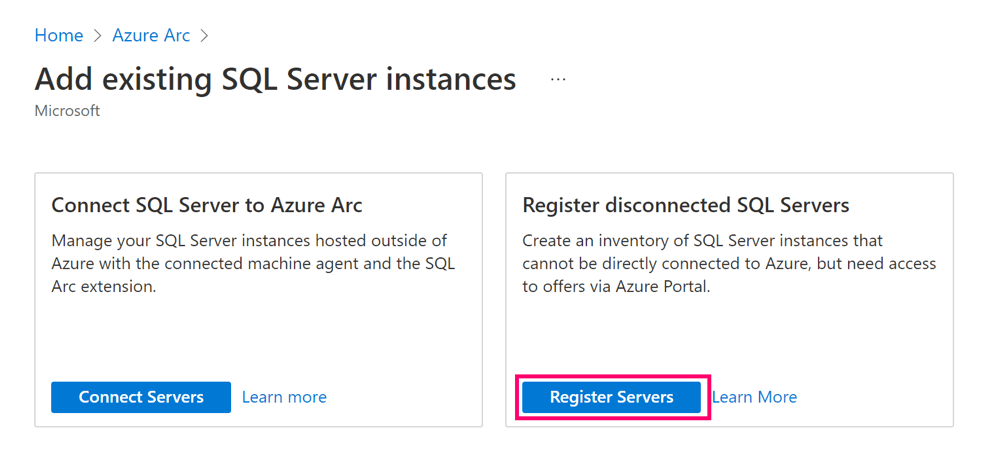
On the next screen, you can choose to add a single or multiple SQL Server instances. The option for Single SQL Instance is selected by default.

Choose the Subscription and Resource group for your registered SQL Server instance.
Provide the required information as is detailed in this table, and then select Next:
Value Description Additional information Instance Name Enter the output of command SELECT @@SERVERNAME, such asMyServer\Instance01.If you have a named instance, you must replace the backslash ( \) with a hyphen (-). For example,MyServer\Instance01becomesMyServer-Instance01.SQL Server Version Select your version from the dropdown list. Edition Select the applicable edition from the dropdown list: Datacenter, Developer (free to deploy if purchased ESUs), Enterprise, Standard, Web, Workgroup. Cores Enter the number of cores for this instance Host Type Select the applicable host type from the dropdown list: Virtual machine (on-premises), Physical Server (on-premises), Azure Virtual Machine, Amazon EC2, Google Compute Engine, Other. You must confirm that you have the rights to receive Extended Security Updates, using the checkbox provided. The ESU checkbox is only visible when you select SQL Server 2012 (11.x).


Multiple SQL Server instances in bulk
Multiple SQL Server instances can be registered in bulk by uploading a .CSV file. Once your .CSV file is formatted correctly, you can follow these steps to bulk register your SQL Server instances with Azure Arc:
Sign into the Azure portal.
Navigate to Azure Arc and select Infrastructure > SQL Servers.
To register a disconnected machine, select Add from the menu at the top of the screen.
Select Register Servers to add a disconnected SQL Server instance.
On this screen, you can choose to add a single or multiple SQL Server instances. Select the option for Multiple SQL Instances.
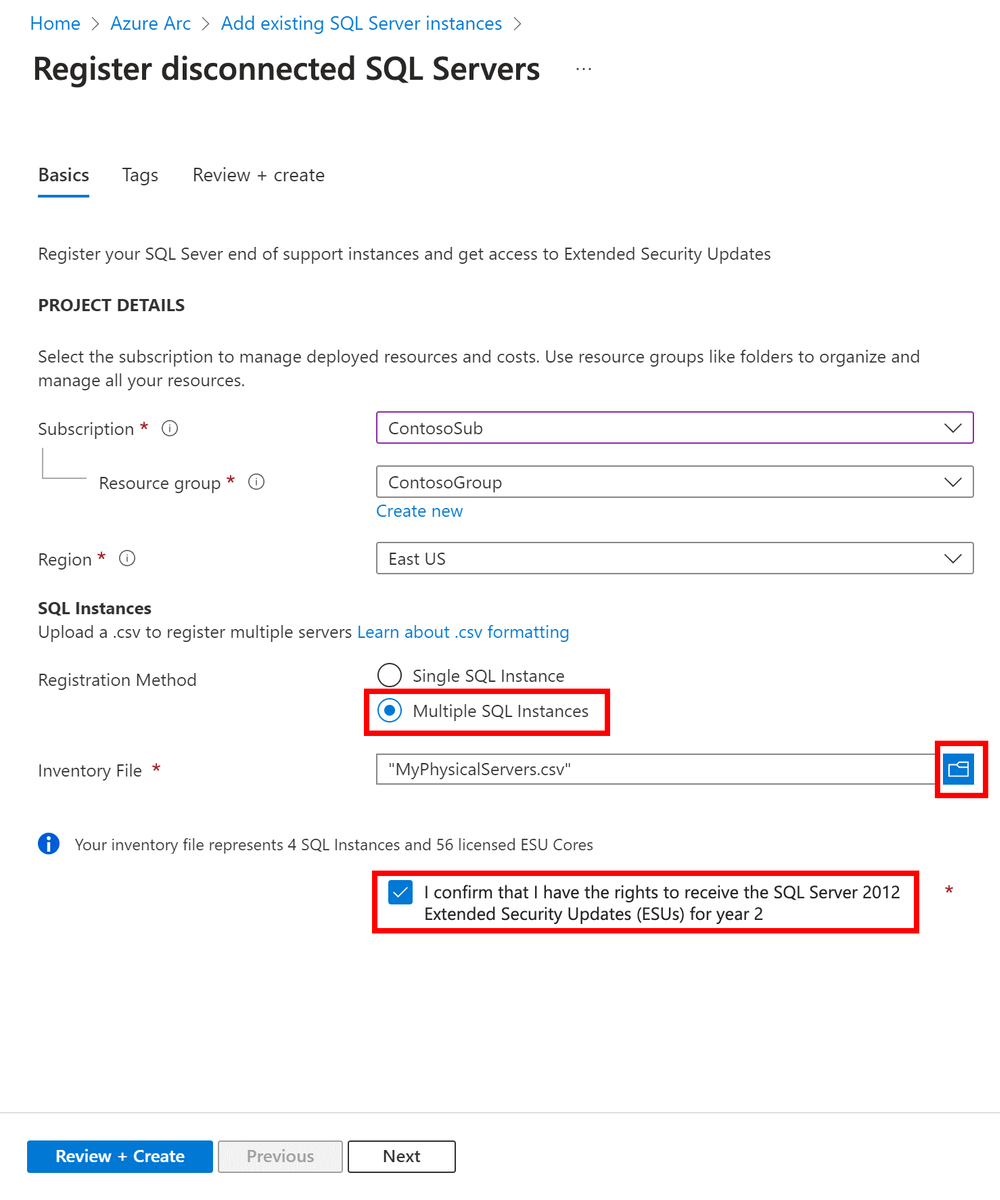
Select the Browse icon to upload the CSV file containing multiple disconnected SQL Server instances.
You must confirm that you have the rights to receive Extended Security Updates, using the checkbox provided.

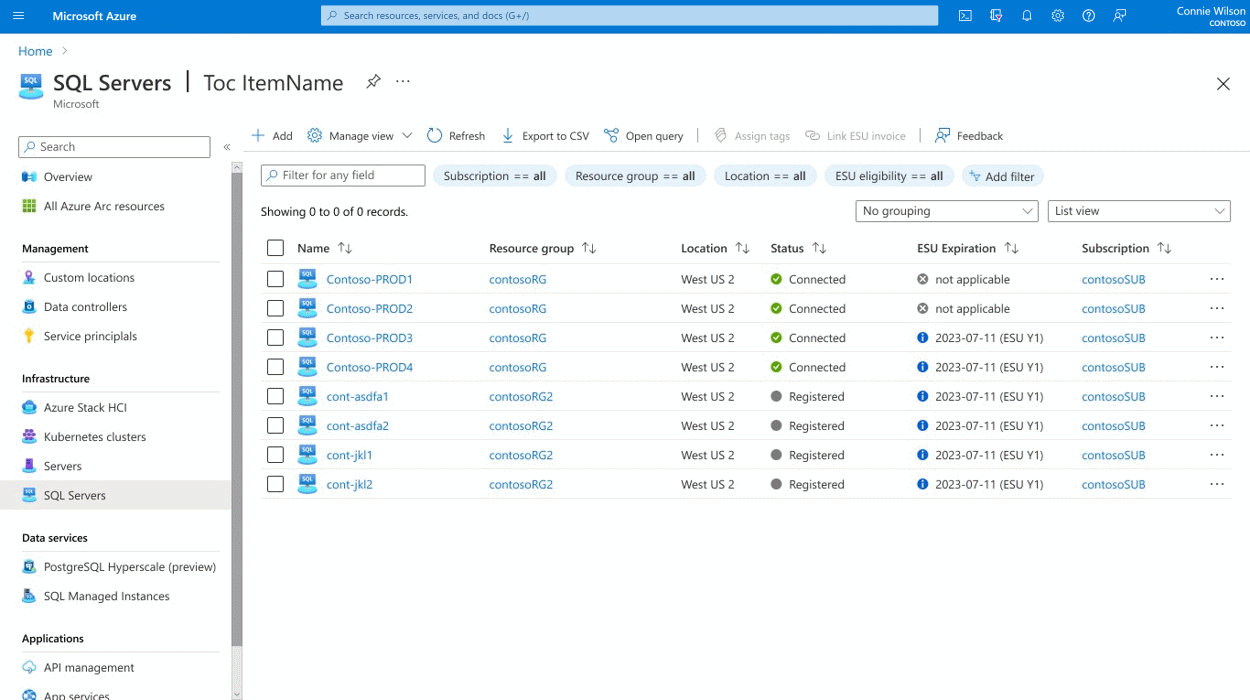
Once you add your SQL Server instances, you'll see them in the portal after a few minutes. Because they were added manually, they always show in a disconnected state, with the description Registered.

Formatting requirements for CSV file
Values are comma-separated
Values aren't single or double-quoted
Values can include letters, numbers, hyphens (
-), and underscores (_). No other special characters can be used. If you have a named instance, you must replace the backslash (\) with a hyphen (-). For example,MyServer\Instance01becomesMyServer-Instance01.Column names are case-sensitive and must be named as follows:
- name
- version
- edition
- cores
- hostType
Example CSV file
The CSV file should look like this:
name,version,edition,cores,hostType
Server1-SQL2012,SQL Server 2012,Enterprise,12,Other Physical Server
Server2-SQL2012,SQL Server 2012,Enterprise,24,Other Physical Server
Server3-SQL2012,SQL Server 2012,Enterprise,12,Azure Virtual Machine
Server4-SQL2012,SQL Server 2012,Standard,8,Azure VMware Solution
Link ESU invoice
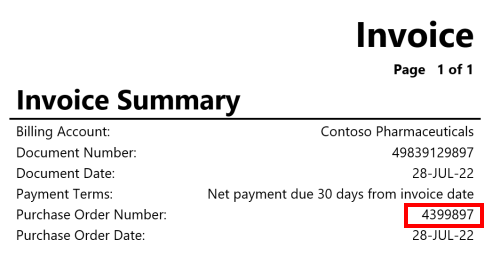
You can use the Purchase Order Number under Invoice Summary in their Microsoft invoice (as shown in the following screenshot) for the Invoice ID value to link the ESU purchase with the SQL Server instances.
Follow these steps to link an ESU invoice to your Azure Arc SQL Server instances to get access to extended updates. This example includes both Connected and Registered servers.
Sign into the Azure portal.
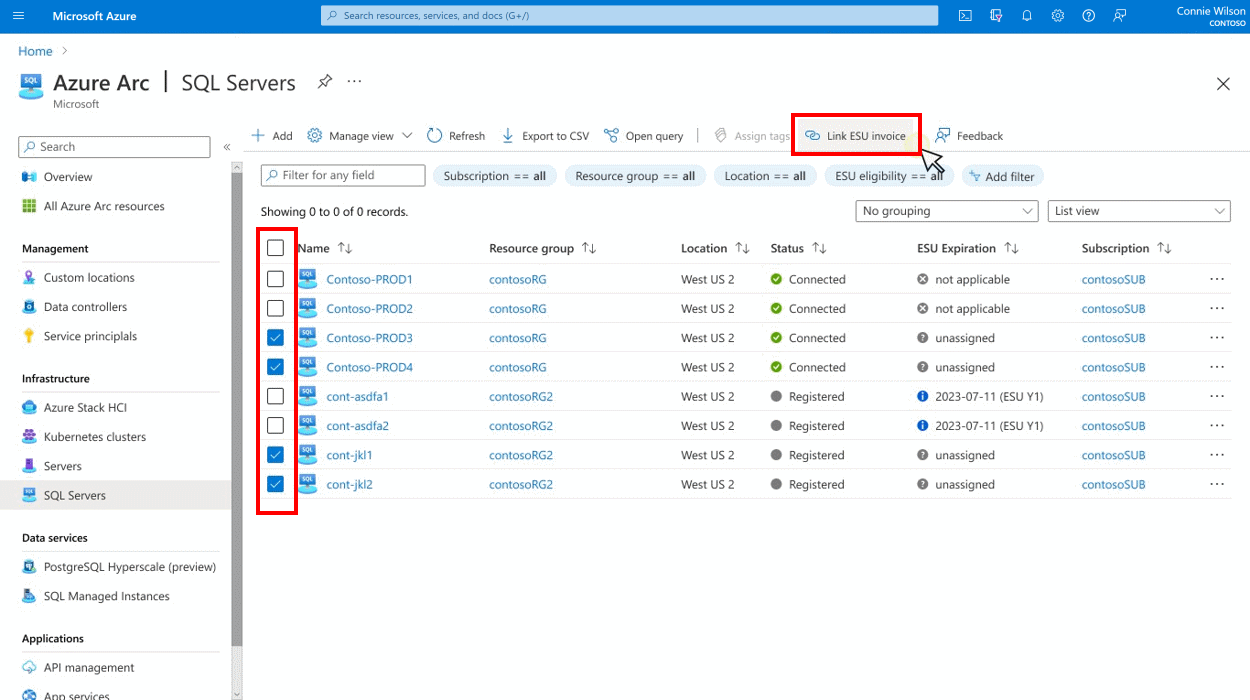
Navigate to Azure Arc and select SQL Server instances.
Use the checkboxes next to each SQL Server instance you would like to link, and then select Link ESU invoice.
Fill in the ESU invoice number in the Invoice ID section, and then select Link invoice.

The servers you linked to the ESU invoice now show a valid ESU expiration date.


Important
When registering an ESU VL product for disconnected SQL Server servers, you should only select the instances with the Status of Registered.
Download ESUs
Once your SQL Server instances are registered with Azure Arc, you can download the Extended Security Update packages using the link found in the Azure portal, if and when they're made available.
To download ESUs, follow these steps:
Sign into the Azure portal.
Navigate to Azure Arc and select SQL Server instances.
Select a server from the list.
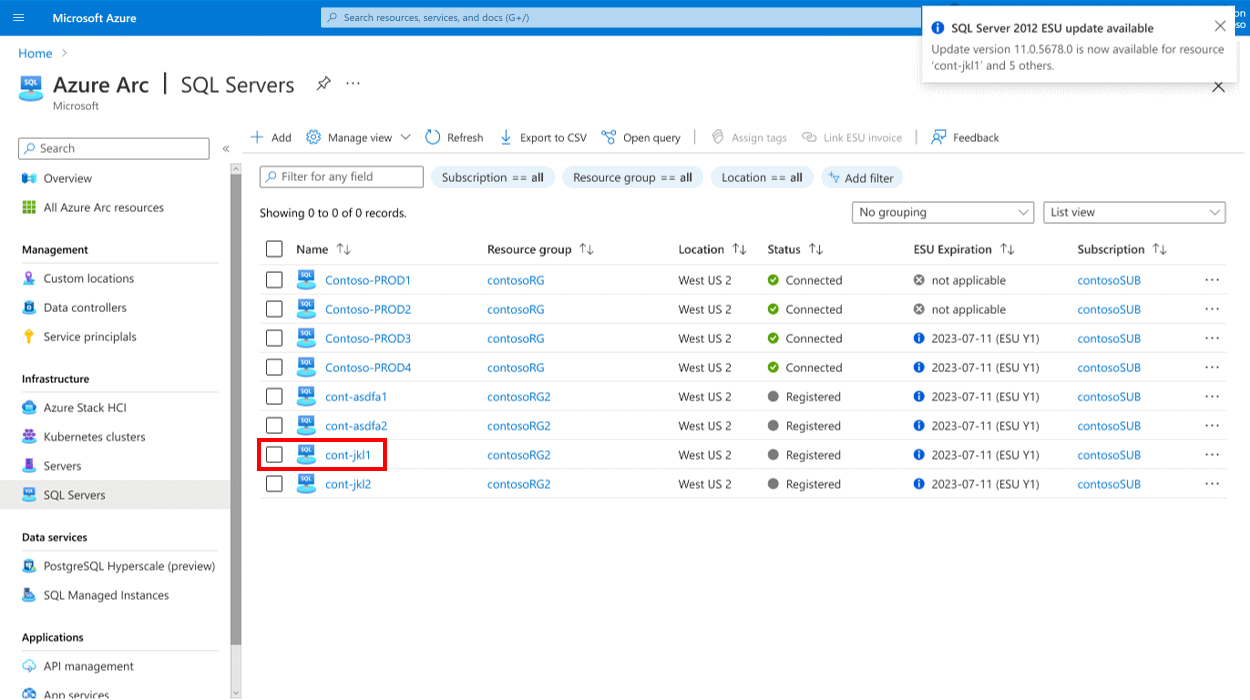
Download security updates from here, if and when they're made available.


Supported regions
Arc-enabled SQL Server is available in the following regions:
- East US
- East US 2
- West US
- West US 2
- West US 3
- Central US
- North Central US
- South Central US
- West Central US
- Canada Central
- Canada East
- UK South
- UK West
- France Central
- West Europe
- North Europe
- Switzerland North
- Central India
- Brazil South
- South Africa North
- UAE North
- Japan East
- Korea Central
- Southeast Asia
- Australia East
- Sweden Central
- Norway East
Important
For successful onboarding and functioning, assign the same region to both Arc-enabled Server and Arc-enabled SQL Server.
Government regions aren't supported. For more information, see Can customers get free Extended Security Updates on Azure Government regions?
Frequently asked questions
For the full list of frequently asked questions, review the Extended Security Updates: Frequently asked questions.
Related content
- SQL Server 2012 lifecycle page
- SQL Server 2014 lifecycle page
- SQL Server end of support page
- Extended Security Updates frequently asked questions (FAQ)
- Microsoft Security Response Center (MSRC)
- Update Management overview
- Automated Patching for SQL Server on Azure virtual machines
- Microsoft Data Migration Guide
- Azure migrate: lift-and-shift options to move your current SQL Server into an Azure VM
- Cloud adoption framework for SQL migration
- ESU-related scripts on GitHub
Обратна връзка
Очаквайте скоро: През цялата 2024 г. постепенно ще отстраняваме проблемите в GitHub като механизъм за обратна връзка за съдържание и ще го заменим с нова система за обратна връзка. За повече информация вижте: https://aka.ms/ContentUserFeedback.
Подаване и преглед на обратна връзка за