Note
Access to this page requires authorization. You can try signing in or changing directories.
Access to this page requires authorization. You can try changing directories.
This article is about building and importing header units with Visual Studio 2022. To learn how to import C++ standard library headers as header units, see Walkthrough: Import STL libraries as header units. For an even faster and more robust way to import the standard library, see Tutorial: Import the C++ standard library using modules.
Header units are the recommended alternative to precompiled header files (PCH). Header units are easier to set up and use, are significantly smaller on disk, provide similar performance benefits, and are more flexible than a shared PCH.
To contrast header units with other ways to include functionality in your programs, see Compare header units, modules, and precompiled headers.
Prerequisites
To use header units, you need Visual Studio 2019 16.10 or later.
What is a header unit
A header unit is a binary representation of a header file. A header unit ends with an .ifc extension. The same format is used for named modules.
An important difference between a header unit and a header file is that a header unit isn't affected by macro definitions outside of the header unit. That is, you can't define a preprocessor symbol that causes the header unit to behave differently. By the time you import the header unit, the header unit is already compiled. That's different from how an #include file is treated. An included file can be affected by a macro definition outside of the header file because the header file goes through the preprocessor when you compile the source file that includes it.
Header units can be imported in any order, which isn't true of header files. Header file order matters because macro definitions defined in one header file might affect a subsequent header file. Macro definitions in one header unit can't affect another header unit.
Everything visible from a header file is also visible from a header unit, including macros defined within the header unit.
A header file must be translated into a header unit before it can be imported. An advantage of header units over precompiled header files (PCH) is that they can be used in distributed builds. As long as you compile the .ifc and the program that imports it with the same compiler, and target the same platform and architecture, a header unit produced on one computer can be consumed on another. Unlike a PCH, when a header unit changes, only it and what depends on it are rebuilt. Header units can be up to an order of magnitude smaller in size than a .pch.
Header units impose fewer constraints on the required similarities of compiler switch combinations used to create the header unit and to compile the code that consumes it than a PCH does. However, some switch combinations and macro definitions might create violations of the one definition rule (ODR) between various translation units.
Finally, header units are more flexible than a PCH. With a PCH, you can't choose to bring in only one of the headers in the PCH--the compiler processes all of them. With header units, even when you compile them together into a static library, you only bring the contents of the header unit you import into your application.
Header units are a step in between header files and C++20 modules. They provide some of the benefits of modules. They're more robust because outside macro definitions don't affect them--so you can import them in any order. And the compiler can process them faster than header files. But header units don't have all of the advantages of modules because header units expose the macros defined within them (modules don't). Unlike modules, there's no way to hide private implementation in a header unit. To indicate private implementation with header files, different techniques are employed like adding leading underscores to names, or putting things in an implementation namespace. A module doesn't expose private implementation in any form, so you don't need to do that.
Consider replacing your precompiled headers with header units. You get the same speed advantage, but with other code hygiene and flexibility benefits as well.
Ways to compile a header unit
There are several ways to compile a file into a header unit:
Build a shared header unit project. We recommend this approach because it provides more control over the organization and reuse of the imported header units. Create a static library project that contains the header units that you want, and then reference it to import the header units. For a walkthrough of this approach, see Build a header unit static library project for header units.
Choose individual files to translate into header units. This approach gives you file-by-file control over what is treated as a header unit. It's also useful when you must compile a file as a header unit that, because it doesn't have the default extension (
.ixx,.cppm,.h,.hpp), wouldn't normally be compiled into a header unit. This approach is demonstrated in this walkthrough. To get started, see Approach 1: Translate a specific file into a header unit.Automatically scan for and build header units. This approach is convenient, but is best suited to smaller projects because it doesn't guarantee optimal build throughput. For details about this approach, see Approach 2: Automatically scan for header units.
As mentioned in the introduction, you can build and import STL header files as header units, and automatically treat
#includefor STL library headers asimportwithout rewriting your code. To see how, visit Walkthrough: Import STL libraries as header units.
Approach 1: Translate a specific file into a header unit
This section shows how to choose a specific file to translate into a header unit. Compile a header file as a header unit using the following steps in Visual Studio:
Create a new C++ console app project.
Replace the source file content as follows:
#include "Pythagorean.h"

int main()
{
    PrintPythagoreanTriple(2,3);
    return 0;
}
Add a header file called
Pythagorean.hand then replace its content with this code:#ifndef PYTHAGOREAN #define PYTHAGOREAN #include <iostream> inline void PrintPythagoreanTriple(int a, int b) { std::cout << "Pythagorean triple a:" << a << " b:" << b << " c:" << a*a + b*b << std::endl; } #endif
Set project properties
To enable header units, first set the C++ Language Standard to /std:c++20 or later with the following steps:
- In Solution Explorer, right-click the project name and choose Properties.
- In the left pane of the project property pages window, select Configuration Properties > General.
- In the C++ Language Standard dropdown, select ISO C++20 Standard (/std:c++20) or later. Choose Ok to close the dialog.
Compile the header file as a header unit:
In Solution Explorer, select the file you want to compile as a header unit (in this case,
Pythagorean.h). Right-click the file and choose Properties.Set the Configuration properties > General > Item Type dropdown to C/C++ compiler and choose Ok.
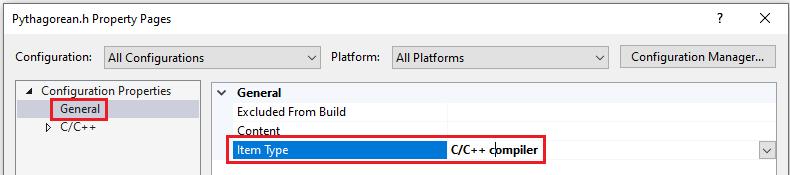
When you build this project later in this walkthrough, Pythagorean.h will be translated into a header unit. It's translated into a header unit because the item type for this header file is set to C/C++ compiler, and because the default action for .h and .hpp files set this way is to translate the file into a header unit.
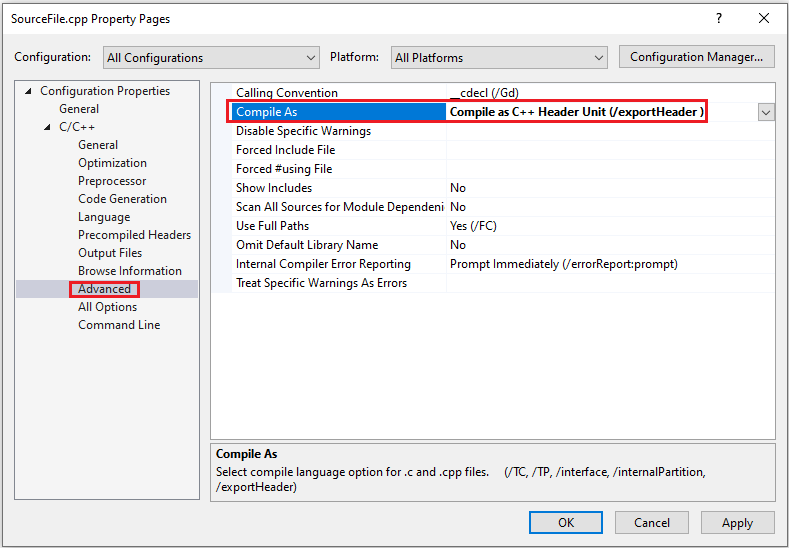
Note
This isn't required for this walkthrough, but is provided for your information. To compile a file as a header unit that doesn't have a default header unit file extension, like .cpp for example, set Configuration properties > C/C++ > Advanced > Compile As to Compile as C++ Header Unit (/exportHeader):
Change your code to import the header unit
In the source file for the example project, change
#include "Pythagorean.h"toimport "Pythagorean.h";Don't forget the trailing semicolon. It's required forimportstatements. Because it's a header file in a directory local to the project, we used quotes with theimportstatement:import "file";. In your own projects, to compile a header unit from a system header, use angle brackets:import <file>;Build the solution by selecting Build > Build Solution on the main menu. Run it to see that it produces the expected output:
Pythagorean triple a:2 b:3 c:13
In your own projects, repeat this process to compile the header files you want to import as header units.
If you want to convert only a few header files to header units, this approach is good. But if you have many header files that you want to compile, and the potential loss of build performance is outweighed by the convenience of having the build system handle them automatically, see the following section.
If you're interested in specifically importing STL library headers as header units, see Walkthrough: Import STL libraries as header units.
Approach 2: Automatically scan for and build header units
Because it takes time to scan all of your source files for header units, and time to build them, the following approach is best suited for smaller projects. It doesn't guarantee optimal build throughput.
This approach combines two Visual Studio project settings:
- Scan Sources for Module Dependencies causes the build system to call the compiler to ensure that all imported modules and header units are built before compiling the files that depend on them. When combined with Translate Includes to Imports, any header files included in your source that are also specified in a
header-units.jsonfile located in the same directory as the header file, are compiled into header units. - Translate Includes to Imports treats a header file as an
importif the#includerefers to a header file that can be compiled as a header unit (as specified in aheader-units.jsonfile), and a compiled header unit is available for the header file. Otherwise, the header file is treated as a normal#include. Theheader-units.jsonfile is used to automatically build header units for each#include, without symbol duplication.
You can turn on these settings in the properties for your project. To do so, right-click the project in the Solution Explorer and choose Properties. Then choose Configuration Properties > C/C++ > General.

Scan Sources for Module Dependencies can be set for all of the files in the project in Project Properties as shown here, or for individual files in File Properties. Modules and header units are always scanned. Set this option when you have a .cpp file that imports header units that you want built automatically and might not be built yet.
These settings work together to automatically build and import header units under these conditions:
- Scan Sources for Module Dependencies scans your sources for the files and their dependencies that can be treated as header units. Files that have the extension
.ixx, and files that have their File properties > C/C++ > Compile As property set to Compile as C++ Header Unit (/export), are always scanned regardless of this setting. The compiler also looks forimportstatements to identify header unit dependencies. If/translateIncludeis specified, the compiler also scans for#includedirectives that are also specified in aheader-units.jsonfile to treat as header units. A dependency graph is built of all the modules and header units in your project. - Translate Includes to Imports When the compiler encounters an
#includestatement, and a matching header unit file (.ifc) exists for the specified header file, the compiler imports the header unit instead of treating the header file as an#include. When combined with Scan for dependencies, the compiler finds all of the header files that can be compiled into header units. An allowlist is consulted by the compiler to decide which header files can compile into header units. This list is stored in aheader-units.jsonfile that must be in the same directory as the included file. You can see an example of aheader-units.jsonfile under the installation directory for Visual Studio. For example,%ProgramFiles%\Microsoft Visual Studio\2022\Enterprise\VC\Tools\MSVC\14.30.30705\include\header-units.jsonis used by the compiler to determine whether a Standard Template Library header can be compiled into a header unit. This functionality exists to serve as a bridge with legacy code to get some benefits of header units.
The header-units.json file serves two purposes. In addition to specifying which header files can be compiled into header units, it minimizes duplicated symbols to increase build throughput. For more information about symbol duplication, see C++ header-units.json reference.
These switches and the header-unit.json provide some of the benefits of header units. The convenience comes at the cost of build throughput. This approach might not be the best for larger projects because it doesn't guarantee optimal build times. Also, the same header files might be reprocessed repeatedly, which increases build time. However, the convenience might be worth it depending on the project.
These features are designed for legacy code. For new code, move to modules instead of header units or #include files. For a tutorial on using modules, see Name modules tutorial (C++).
For an example of how this technique is used to import STL header files as header units, see Walkthrough: Import STL libraries as header units.
Preprocessor implications
The standard C99/C++11 conforming preprocessor is required to create and use header units. The compiler enables the new C99/C++11 conforming preprocessor when compiling header units by implicitly adding /Zc:preprocessor to the command line whenever any form of /exportHeader is used. Attempting to turn it off will result in a compilation error.
Enabling the new preprocessor affects the processing of variadic macros. For more information, see the Variadic macros remarks section.
See also
/translateInclude
/exportHeader
/headerUnit
header-units.json
Compare header units, modules, and precompiled headers
Overview of modules in C++
Tutorial: Import the C++ standard library using modules
Walkthrough: Import STL libraries as header units