Actions overview
In Business Central, actions are displayed at the top of each page, referred to as the action bar. In this article, you learn about different types of actions, and how you can enable users to quickly locate the actions they want to use.
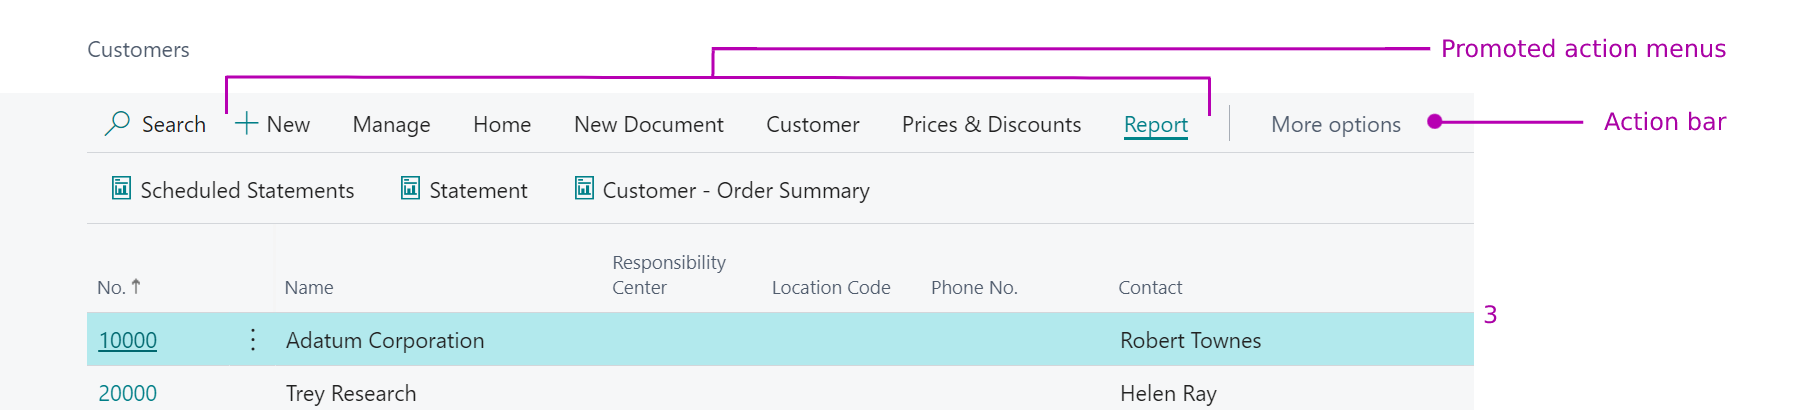
The actions can be displayed in different menus on the action bar.
You can choose from the following action menus to place the actions in the specified area.
| Area | Syntax | Used on | Description | Example |
|---|---|---|---|---|
| Actions menu | area(processing) |
Role Center, list, card, and task pages | User tasks | Post a sales order |
| New document group in Actions menu | area(creation) |
List, card, Role Center pages, and task pages | Actions that appear under the New group. Opens a new Business Central document. | New sales invoice |
| Navigate menu | area(navigation) |
List, card, and task pages | Links to other pages in Business Central. | Prices |
| Report menu | area(reporting) |
Role Center, list, card, and task pages | A list of available reports. | Customer Top 10 List |
The following actions are related to the Role Center page.
| Area | Syntax | Used on | Description | Example |
|---|---|---|---|---|
| Navigation menus | area(sections) |
Role Center pages | The top-level navigation consists of one or more root items that expand to display a submenu of links to other pages. | Posted sales invoices |
| Navigation bar | area(embedding) |
Role Center pages | The second-level navigation displays a flat list of links to other pages. | Customers |
For more information about actions used on the role center page, see Designing Role Centers.
Types of actions
Each page has a different set of actions depending on the page type, and the processes that the page supports. In order to create the appropriate set of actions for a particular page, you should have a good understanding of your customer's business processes.
Each process in an organization has several actions associated with it. You should try to create a full set of actions that mirror all tasks and processes that are performed.
For example, the Sales Orders list page at CRONUS International contains all actions related to processing sales orders. During user configuration and personalization, some of these actions might be hidden or promoted to the ribbon. Therefore, you must create a full set of actions for the customer.
Note
With Business Central 2022 release wave 2, the way that you promote actions on pages or page extensions has changed. Promoting actions is defined in a specific section of the page definition and contains a reference to the action. For more information, see Promoted Actions.
Pages can have the following actions as described in each section below.
Actions menu
The Actions menu is a displayed in the action bar on all page types, and contains relevant tasks for the current page. Typically, you add processing tasks and creation tasks in the Actions menu. To add processing actions such as posting a sales order, you must use the processing action area. They're regular daily tasks. Therefore, they must be on the Actions menu. For examples on how to add actions to the Actions menu, see Adding actions to a page.
Some examples from the Customer page are as follows:
- Sales Quote
- Sales Order
- Sales Invoice
- Sales Credit Memo
You can add actions to the Actions menu, group actions together under action sub menus, or promote them to the ribbon. For examples of how to use actions, see Page object and Page extension object.
New Document menu
The New Document menu is often displayed both as a top-level menu in the actions bar and as a sub menu in the Actions menu. You can use this menu to open new documents within Business Central. You can add an action to create a new document such as creating a new sales invoice. This action displays in a separate menu called New document in the Actions menu. To add to the New document menu, you must use the creation action area.
For example, on the Customers page, if the order processor wants to create a new invoice, the order processor can open the new page directly from the Actions menu, which is useful when creating new sales invoices daily.
Navigate menu
The Navigate menu provides additional information by taking the user to a specific page in Business Central. To add a page link in the Navigate menu, you must use the navigation action area. These actions act like a bookmark to enable quick access to view a page.
Note
You shouldn't add a Navigation action to a Role Center page.
Report menu
The Report menu lists the reports most relevant to a page. If a user doesn't require a Report menu, then the menu is hidden. Sometimes it's relevant to promote the most important reports to the top-level in the action bar to save the user from too many clicks. To create an action in the Report menu, you must use the reporting action area.
Promoted actions
Note
With Business Central 2022 release wave 2, the way that you promote actions on pages or page extensions has changed. Promoting actions is defined in a specific section of the page definition and contains a reference to the action. For more information, see Promoted Actions.
Promoted actions are actions that are set up on the Actions, Navigate, or Reports menus in the action bar, but are also configured to display in custom menus in the action bar. Although the actions are set up on the Actions, Navigate, or Report menus, you can choose to hide them on these menus and only show them in custom menus. Promoted actions can be used on Card, Document, List, ListPlus, and Worksheet pages to provide quick access to common tasks that appear under the Home tab.
Run Power Automate flows from page actions
APPLIES TO: Business Central 2022 release wave 2 and later
With Business Central 2022 release wave 2, it's possible to define page actions that trigger a Power Automate instant flow by using custom actions. Custom actions are defined next to other actions, but use the customaction keyword instead. The syntax is as follows:
customaction(MyFlowAction)
{
    CustomActionType = Flow;
    FlowId = '<the-GUID-identifying-the-Power-Automate-Flow>';
    FlowEnvironmentId = '<the-GUID-identifying-the-Power-Automate-environment>';

}
For a customaction, the CustomActionType property must be set to Flow. The FlowId property and the FlowEnvironmentId property must specify the IDs of the flow and the environment of the flow. These properties make up the target flow identity, allowing the client to trigger the flow when the custom action is invoked.
Tip
You can get the flow and environment IDs in Power Automate. Sign in to Power Automate and open the flow for editing. Then, get the environment ID and flow ID from the URL in the browser address, which has a format like: https://make.powerautomate.com/environments/<environment ID>/flows/<environment ID>.
To learn more about Power Automate flows with Business Central, see Power Automate integration overview.
Grouping actions in submenus
Within the different areas, you can create submenus to a group of actions and improve navigation. You create a submenu by adding a group() control, as shown in the following example:
actions
{
    area(Report)
    {
        action(Report 1)
        {
            RunObject = report "Report1";
        }

        // Adds a submenu called "Group1" to the Report menu.
        group(Group1)
        {
            // Adds the action "Report 2" to the My Label submenu.
            action(Action2)
            {
                RunObject = report "Report2";
            }
            // Adds a submenu called "Group2" to the Group1 submenu.
            group(Group2)
            {
                // Adds the action "Report 3" to the Group1 submenu.
                action(Action3)
                {
                    RunObject = report "Report3";
                }
            }
        }
    }
}
Note
Prior to Business Central 2019 Wave 2, in the client, submenus were automatically placed before single actions on the same level. This means, for example, group Group2 appears before the action Report 2.
Actions at runtime
An action can trigger code to run, such as posting a document or otherwise modifying a record in a table. When a user chooses an action, one of the following pieces of logic happens in addition to the code that the action itself triggers:
- If the page is empty and no longer shows any records, the page is reinitialized with default values.
- If the page shows records, and the current state is within the page filters boundary, the OnAfterGetRecord trigger is run on the page.
- If the current record that the page showed is now outside the filter but there are other records within the filter, the OnFindRecord trigger is called, and the OnAfterGetRecord trigger is run on the next record with the given filters.
The logic runs in the transaction that the action triggered. This can cause the application code to result in users locking the whole table when they thought they were only modifying one record.
To avoid users accidentally locking tables, you can use the SetSelectionFilter method before your code passes the record variable to the processing codeunit, for example. The following code example illustrates the code on the OnAction trigger on an action on a page.
if confirm('Are you sure you want to call this codeunit?', true) then begin
    CurrPage.SetSelectionFilter(Rec);
    codeunit.Run(50000, Rec);
end;
See also
AL development environment
Developing extensions in AL
Pages overview
Promoted actions
Feedback
Bald verfügbar: Im Laufe des Jahres 2024 werden wir GitHub-Tickets als Feedbackmechanismus für Inhalte auslaufen lassen und es durch ein neues Feedbacksystem ersetzen. Weitere Informationen finden Sie unter: https://aka.ms/ContentUserFeedback.
Einreichen und Feedback anzeigen für