Submit a VAT return in XML format to the Danish Tax Agency
This article describes how to prepare your Microsoft Dynamics 365 Finance environment to generate a value-added tax (VAT) return in XML format and submit it to the Danish Tax Agency (Skattestyrelsen).
Prerequisites
Set up application-specific parameters of the ER format for the VAT declaration
To automatically generate a VAT declaration in Excel or XML format, first create enough sales tax codes to keep a separate VAT accounting for each box of the VAT declaration. Additionally, in the application-specific parameters of the Electronic reporting (ER) format for the VAT declaration, associate sales tax codes with the lookup results for the boxes on the VAT declaration. For more information about the structure of the VAT declaration of Denmark and lookup results for boxes of the VAT declaration, see VAT declaration of Denmark overview.
Before you start to prepare your Finance environment for direct submission of VAT returns in XML format to the Danish Tax Agency, complete the required setup in Preview a VAT declaration in Excel format.
Delegate rights to an accounting system provider at skat.dk
To submit your VAT return directly to the Danish Tax Agency, you must delegate rights to an accounting system provider (Regnskabssystemsudbyder [RSU]) at skat.dk. A guide that explains how to delegate rights to an RSU is published in the skat.dk portal. You can also access it at https://info.skat.dk/data.aspx?oid=2339573&chk=219318. To submit your VAT returns directly from Dynamics 365 Finance to NemVirksomhed APIs, delegate the NemVirksomhed - adgang for regnskabssystemudbyder RSU to the following Danish Central Business Register (Centrale Virksomhedsregister [CVR]) number: 13612870.
Set up Power Platform Integration for the environment in Lifecycle Services and install the Electronic Invoicing add-in
Before you start to prepare your Finance environment for direct submission of VAT returns, you must set up Power Platform Integration for the environment in Microsoft Dynamics Lifecycle Services and install the Electronic Invoicing add-in.
For information about how to set up Power Platform Integration for your Finance environment, see Connect finance and operations apps with a new Microsoft Dataverse instance.
For information about how to install the Electronic Invoicing add-in, see Install the add-in for microservices in Lifecycle Services.
Upgrade Finance
Before you start to prepare your Finance environment for direct submission of VAT returns, make sure that your Finance environment has the required application build number or later, as shown in the following table.
| Finance version | Build |
|---|---|
| 10.0.39 | 10.0.1848.0 |
| 10.0.38 | 10.0.1777.91 |
| 10.0.37 | 10.0.1725.136 |
Set up electronic messages
Enable the [EM] Executable class action type feature
To submit your VAT return directly to the Danish Tax Agency from Finance, you must enable the [EM] Executable class action type feature in Feature management.
- Go to Workspaces > Feature management.
- On the All tab, find and select the [EM] Executable class action type feature in the list.
- Select Enable now.
Get the data package that contains example settings for electronic messages
A data package is available that contains example settings for electronic message functionality that enables the following three scenarios in your Finance environment.
Scenario 1: Preview a VAT declaration in Excel without collecting sales tax payments (for any open period that has any from and to dates)
This scenario consists of the following actions.
| Action | Description |
|---|---|
| DK VAT create preview in Excel | This action creates a new electronic message and lets you generate a VAT declaration in Excel format for a specified period. |
| DK VAT preview declaration | This action lets you generate a VAT declaration in Excel format for a period that's defined by the From date and To date values of the electronic message by running an ER format that's specified for this action. (By default, the VAT Declaration Excel (DK) ER format is used.) The generated report is attached to the electronic message. |

Scenario 2: Request information from the Danish Tax Agency about VAT obligation periods for the period that's specified in an electronic message
This scenario consists of the following actions.
| Action | Description |
|---|---|
| DK VAT create calendar request | This action creates a new electronic message and lets you generate a request about VAT obligation periods (calendar) of the legal entity for a specified period and send it to the Danish Tax Agency. |
| DK VAT calendar request | This action lets you request information about VAT obligation periods of the legal entity directly from the Danish Tax Agency for a period that's defined by the From date and To date values of the electronic message by running the EMVATSendCalendar_DK executable class. The response from the Danish Tax Agency can be viewed in a web browser as an HTML file that's attached to the electronic message. |

Scenario 3: Generate a VAT return electronic file and submit it to the Danish Tax Agency
This scenario consists of the following actions.
| Action | Description |
|---|---|
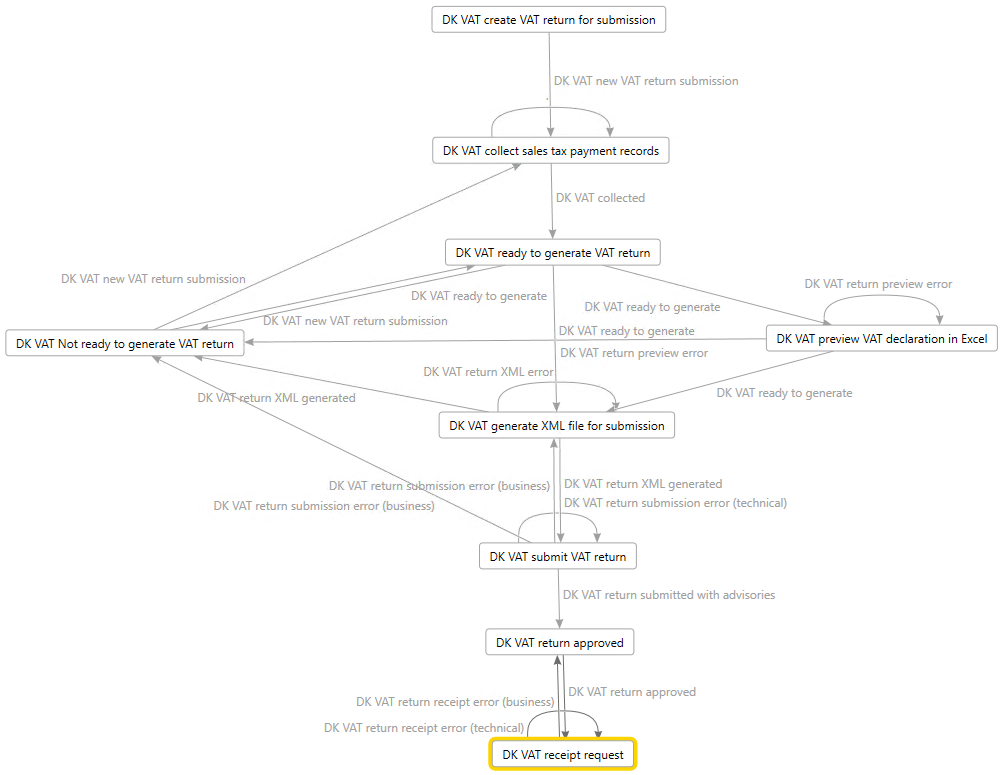
| DK VAT create VAT return for submission | This action creates a new electronic message and lets you generate a VAT return of the legal entity for a specified period and send it to the Danish Tax Agency. |
| DK VAT collect sales tax payment records | This action runs the DK VAT collect sales tax payment records populate records action to collect the sales tax payment transactions that must be included in the VAT return. |
| DK VAT ready to generate VAT return | This action changes the status of the electronic message to Ready to generate so that an electronic file for the VAT return can be generated. |
| DK VAT Not ready to generate VAT return | This action changes the status of the electronic message back to DK VAT new VAT return submission so that sales tax payment records can be collected again. |
| DK VAT preview VAT declaration in Excel | This action lets you generate a VAT declaration in Excel format, based on collected sales tax payment transactions for selected electronic message, by running an ER format that's specified for this action. (By default, the VAT Declaration Excel (DK) ER format is used.) |
| DK VAT generate XML file for submission | This action lets you generate a VAT return in XML format, based on collected sales tax payment transactions for the selected electronic message, by running an ER format that's specified for this action. (By default, the VAT Declaration XML (DK) format is used.) |
| DK VAT submit VAT return | This action sends the generated VAT return in XML format to the Danish Tax Agency by running the EMVATSendReturnController_DK executable class. It then receives a link for further approval of the information that was sent. The received link is attached to the electronic message in HTML format. |
| DK VAT return approved | This action changes the status of the electronic message to DK VAT return approved so that receipt information can be received from the Danish Tax Agency. |
| DK VAT receipt request | This action lets you send a request about the receipt for the previously approved period directly to the Danish Tax Agency by running the EMVATSendReceiptController_DK executable class. The response from the Danish Tax Agency can be viewed in a web browser as an HTML file that's attached to the electronic message. |
For more information about how to work with electronic messaging and create your own settings, see Electronic messaging.
Import the data package
Follow these steps to import the data package that contains example settings for electronic message functionality that enables the three preceding scenarios in your Finance environment.
In Microsoft Dynamics Lifecycle Services, in the Shared asset library, select Data package as the asset type, and then download DK VAT return - Skattestyrelsen EM package. The downloaded file is named DK VAT return - Skattestyrelsen EM package v#.zip.
In Finance, in the Data management workspace, select Import.
On the Import FastTab, in the Group name field, enter a name for the job.
On the Selected entities FastTab, select Add file.
In the Add file dialog box, verify that the Source data format field is set to Package, select Upload and add, and then select the file that you downloaded from Lifecycle Services.
Select Close.
After the data entities are uploaded, on the Action Pane, select Import or Import now.

Go to Tax > Inquiries and reports > Electronic messages > Electronic messages, and validate the electronic message processing that you imported (DK VAT return).
Define a sales tax settlement period
- Go to Tax > Setup > Electronic messages > Populate records actions.
- Select the line for DK VAT collect sales tax payment records, and then select Edit query.
- Use the filter to specify the settlement periods to include on the report.
Save the executable class parameters for Electronic messaging
The DK VAT return electronic message processing uses three executable classes. These executable classes enable a connection to the three web services of the Danish Tax Agency.
VirksomhedKalenderHent(Company Calendar Download) – Return dates that the legal entity must submit VAT returns by. These dates are required when VAT returns are submitted.ModtagMomsangivelseForeloebig(Receive Provisional VAT declaration) – Submit a draft of the VAT returns to Skat.dk, together with the required field information. The web service returns a deep link to Skat.dk. The legal entity can use this link to access and approve the submitted VAT returns.MomsangivelseKvitteringHent(VAT declaration Receipt Download) – Provide a receipt for the VAT returns, if the legal entity has approved them. This web service also includes information about how to pay an outstanding balance.
Before you use these classes for the first time, you must save the parameters.
Go to Tax > Setup > Electronic messaging > Executable class settings.
Specify the parameters of each of the following executable classes by selecting Parameters on the Action Pane.
Select OK in the dialog box for each executable class to save the specified parameters.
Important
By selecting OK, you access a third-party service and agree to the following terms:
- You will be sharing your data with an external system that's governed by the third party's terms and privacy policy with you.
- Any data that's imported from the external system into Dynamics 365 is subject to Microsoft's privacy statement.
For more information about this feature, consult the technical documentation for it.
Set up security roles for electronic message processing
Different groups of users might require access to the DK VAT return electronic message processing. You can limit access to the processing, based on security groups that are defined in the system.
Follow these steps to limit access to the DK VAT return electronic message processing.
- Go to Tax > Setup > Electronic messages > Electronic message processing.
- Select the DK VAT return electronic message processing, and then, on the Security roles FastTab, add the security groups that must work with it. If no security group is defined for the processing, only a system admin can view it on the Electronic messages page.
Set up a tax registration number
The DK VAT return - Skattestyrelsen EM package setup file provides the Tax registration number field for the DK VAT return electronic message processing. This field enables a VAT registration number that's independent of the legal entity's primary address and the registration ID that has been defined for companies that must report VAT returns by using the DK VAT return electronic message processing. Therefore, legal entities that have multiple VAT registrations can easily submit VAT returns that are specific to their VAT registration in Denmark. For more information about how to support filing for multiple VAT registrations, see Multiple VAT registration numbers.
Follow these steps to define the VAT registration number that the DK VAT return electronic message processing must use to submit VAT returns.
- Go to Tax > Setup > Electronic messages > Electronic messages processing.
- Select the DK VAT return electronic message processing, and then, on the Message additional fields FastTab, in the Tax registration number field, define the VAT registration number that should be used to send the VAT return.
- Save your changes.
If the VAT registration number isn't specified in the Tax registration number additional field of the DK VAT return electronic message processing, the system retrieves it from the registration ID that's defined in the properties of the legal entity that's associated with the VAT ID registration category. For more information, see Registration type and Registration category.
Generate a VAT declaration from electronic messages and submit it to the Danish Tax Agency
When you use electronic messages to generate the report, you can collect tax data from multiple legal entities. For more information, see the Generate a VAT declaration for multiple legal entities section later in this article.
The following procedures apply to the example DK VAT return electronic message processing that you imported earlier from the Shared asset library in Lifecycle Services. This processing supports the following scenarios:
- Preview a VAT declaration in Excel without collecting sales tax payments (for any open period that has any from and to dates).
- Request information from the Danish Tax Agency about VAT obligation periods for the period that's specified in an electronic message.
- Generate a VAT return electronic file and submit it to the Danish Tax Agency.
Preview a VAT declaration in Excel without collecting sales tax payments
- Go to Tax > Inquiries and reports > Electronic messages > Electronic messages.
- In the left pane, select DK VAT return.
- On the Messages FastTab, select New.
- In the Run processing dialog box, in the Action field, select DK VAT create preview in Excel. Then select OK. A new message in DK VAT new preview status is created.
- Select the message line that's created, enter a description, and then specify the start and end dates for the declaration.
- Select Generate report.
- To preview the VAT declaration amounts, in the Run processing dialog box, in the Action field, select DK VAT preview declaration. Then select OK.
- In the Electronic reporting parameters dialog box, set the fields as described in Preview the VAT declaration in Excel, and then select OK.
- Select the Attachments button (paperclip symbol), and then select Open to open the file. Review the amounts in the Excel document.
Request information about VAT obligation periods from the Danish Tax Agency
- Go to Tax > Inquiries and reports > Electronic messages > Electronic messages.
- In the left pane, select DK VAT return.
- On the Messages FastTab, select New.
- In the Run processing dialog box, in the Action field, select DK VAT create calendar request. Then select OK. A new message in DK VAT new calendar request status is created.
- Select the message line that's created, enter a description, and then specify the start and end dates for the declaration.
- Select Send report.
- In the Run processing dialog box, in the Action field, select DK VAT calendar request. Then select OK. The request is sent to the Danish Tax Agency, and the response that includes information about obligation periods is attached to the electronic message in HTML format.
- Select the Attachments button (paperclip symbol), and then select Open to open the file. Review the information from the response in your web browser.

Generate a VAT return electronic file and submit it to the Danish Tax Agency
Go to Tax > Inquiries and reports > Electronic messages > Electronic messages.
In the left pane, select DK VAT return.
On the Messages FastTab, select New.
In the Run processing dialog box, in the Action field, select DK VAT create VAT return for submission. Then select OK. A new message in DK VAT new VAT return submission status is created.
Select the message line that's created, enter a description, and then specify the start and end dates for the declaration.
On the Messages FastTab, select Collect data, and then select OK. The sales tax payments that were generated earlier are added to the message. For more information, see Settle and post sales tax.
On the Message items FastTab, review the sales tax payments that were transferred for processing. By default, all sales tax payments of the selected period that weren't included in any other message of the same processing are included.
Optional: Select Original document to review the sales tax payments, or select Delete to exclude sales tax payments from processing.
On the Messages FastTab, select Update status.
In the Update status dialog box, in the Action field, select DK VAT ready to generate VAT return. Then select OK. Verify that the message status is changed to Ready to generate.
Optional: Follow these steps:
- Select Generate report.
- To preview the VAT declaration amounts, in the Run processing dialog box, select DK VAT preview VAT declaration in Excel, and then select OK.
- In the Electronic reporting parameters dialog box, set the fields as described in Preview the VAT declaration in Excel, and then select OK.
- Select the Attachments button (paperclip symbol), and then select Open to open the file. Review the amounts in the Excel document.
Select Generate report to generate the VAT return in XML format that can be submitted to the Danish Tax Agency.
In the Run processing dialog box, select DK VAT generate XML file for submission, and then select OK.
In the Electronic reporting parameters dialog box, set the fields as described in Preview the VAT declaration in Excel, and then select OK.
Select the Attachments button (paperclip symbol), and then select Open to open the file. Review your VAT return in XML format.
Select Send report to submit the VAT return in XML format to the Danish Tax Agency.
In the Run processing dialog box, in the Action field, select DK VAT submit VAT return. Then select OK. Your VAT return is transferred to the Danish Tax Agency, and the response is attached to the electronic message as an HTML file (DK VAT return_pending_approval.html). In the response, the Danish Tax Agency sends you a link that you must use to approve your VAT return.
Select the Attachments button (paperclip symbol), and then select Open to open the HTML file in your browser. The HTML file contains a link to approve your VAT return in the Godkendelsesportal for momsangivelse (VAT return approval portal) section. Select this link to approve the VAT return.

After the VAT return is approved, on the Messages FastTab, select Update status.
In the Update status dialog box, in the Action field, select DK VAT return approved. Then select OK. Verify that the message status is changed to DK VAT return approved.
For an approved VAT return, you can request receipt information from the Danish Tax Agency. In the Run processing dialog box, select Send report, and then, in the Action field, select DK VAT receipt request. Then select OK. The receipt request is sent to the Danish Tax Agency, and the response is attached to the electronic message as an HTML file (DK VAT return payment.html).
Select the Attachments button (paperclip symbol), and then select Open to open the file. Review the information from the response in your web browser.
To request the receipt information again, select Update status to change the electronic message status back to DK VAT return approved. Then select Send report to repeat the DK VAT receipt request action.
Generate a VAT declaration for multiple legal entities
To use the formats to report the VAT declaration for a group of legal entities, first set up the application-specific parameters of the ER formats for sales tax codes from all required legal entities.
Set up electronic messages to collect tax data from several legal entities
Follow these steps to set up electronic messages to collect data from multiple legal entities.
In the Feature management workspace, find and select the Cross-company queries for the populate records actions feature in the list, and then select Enable now.
Go to Tax > Setup > Electronic messages > Populate records actions.
On the Populate records action page, select the line for DK VAT collect sales tax payment records.
In the Datasources setup grid, a new Company field is available. For existing records, this field shows the identifier of the current legal entity.
In the Datasources setup grid, add a line for each additional legal entity that must be included in reporting. For each new line, set the following fields.
Field Description Name Enter a value that will help you understand where this record comes from. For example, enter VAT payment of Subsidiary 1. Message item type Select VAT return. This value is the only value that's available for all the records. Account type Select All. Master table name Specify TaxReportVoucher for all the records. Document number field Specify Voucher for all the records. Document date field Specify TransDate for all the records. Document account field Specify TaxPeriod for all the records. Company Select the ID of the legal entity. User query This checkbox is automatically selected when you define criteria by selecting Edit query. For each new line, select Edit query, and specify a related settlement period for the legal entity that's specified in the Company field on the line.
When the setup is completed, the Collect data function on the Electronic messages page collects sales tax payments from all legal entities that you defined.
Feedback
Bald verfügbar: Im Laufe des Jahres 2024 werden wir GitHub-Tickets als Feedbackmechanismus für Inhalte auslaufen lassen und es durch ein neues Feedbacksystem ersetzen. Weitere Informationen finden Sie unter: https://aka.ms/ContentUserFeedback.
Einreichen und Feedback anzeigen für