Create your first pipeline
TFS 2017
Note
In Microsoft Team Foundation Server (TFS) 2018 and previous versions, build and release pipelines are called definitions, runs are called builds, service connections are called service endpoints, stages are called environments, and jobs are called phases.
Note
This guidance applies to TFS version 2017.3 and newer.
We'll show you how to use the classic editor in TFS to create a build and a release that prints "Hello world".
Prerequisites
Initialize your repository
If you already have a repository in your project, you can skip to the next step: Skip to adding a script to your repo
Navigate to your repository by clicking Code in the top navigation.
If your project is empty, you will be greeted with a screen to help you add code to your repository. Choose the bottom choice to initialize your repo with a
readmefile: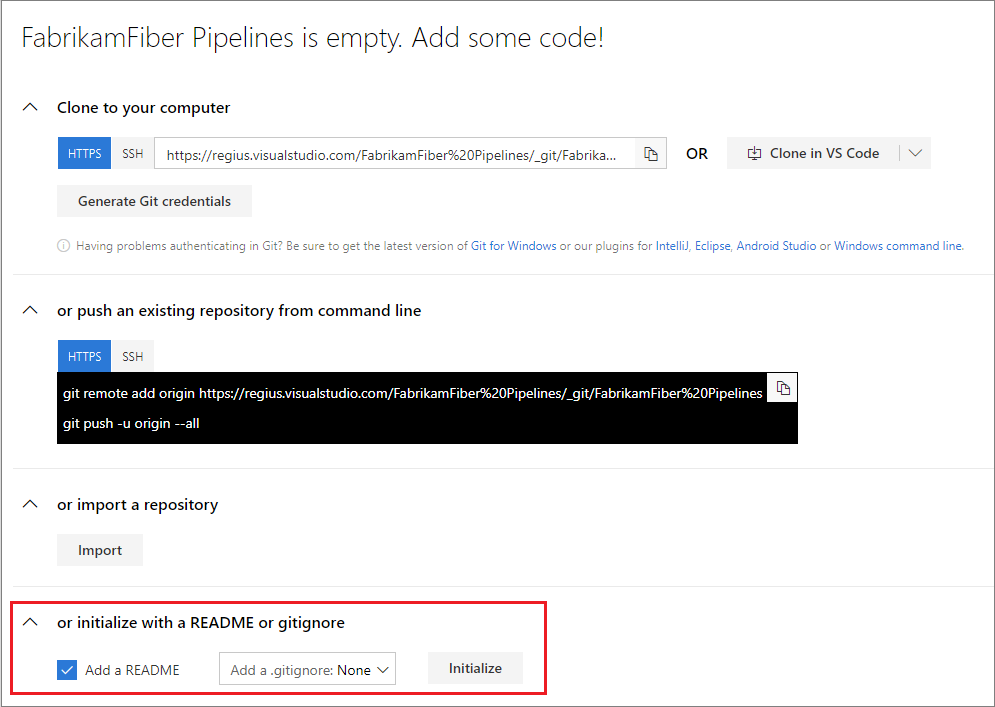
Add a script to your repository
Create a PowerShell script that prints Hello world.
Go to the Code hub.
Add a file.
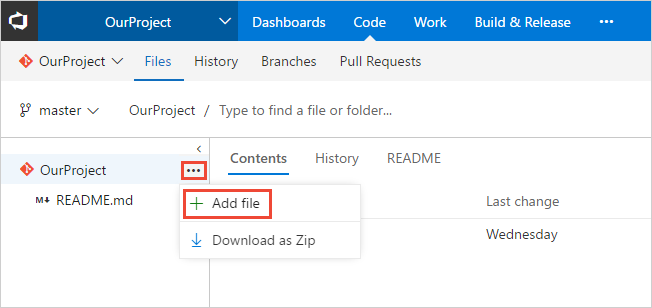
In the dialog box, name your new file and create it.
HelloWorld.ps1Copy and paste this script.
Write-Host "Hello world"Commit (save) the file.
In this tutorial, our focus is on CI/CD, so we're keeping the code part simple. We're working in an Azure Repos Git repository directly in your web browser.
When you're ready to begin building and deploying a real app, you can use a wide range of version control clients and services with Azure Pipelines CI builds. Learn more.
Create a build pipeline
Create a build pipeline that prints "Hello world."
Select Azure Pipelines, and then the Builds tab.
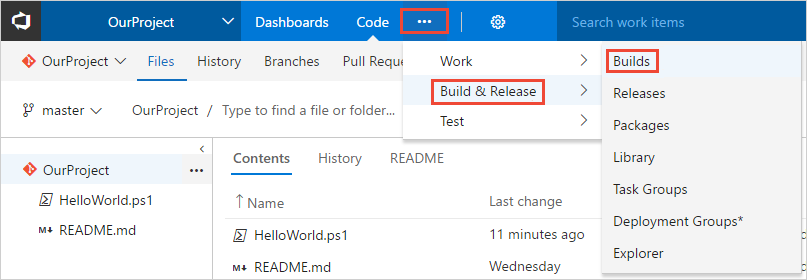
Create a new pipeline.

Start with an empty pipeline.
Select Pipeline and specify whatever Name you want to use.
On the Options tab, select Default for the Agent pool, or select whichever pool you want to use that has Windows build agents.
On the Tasks tab, make sure that Get sources is set with the Repository and Branch in which you created the script.
On the left side select Add Task, and then on the right side select the Utility category, select the PowerShell task, and then select Add.
On the left side, select your new PowerShell script task.
For the Script Path argument, select the
 button to browse your repository and select the script you created.
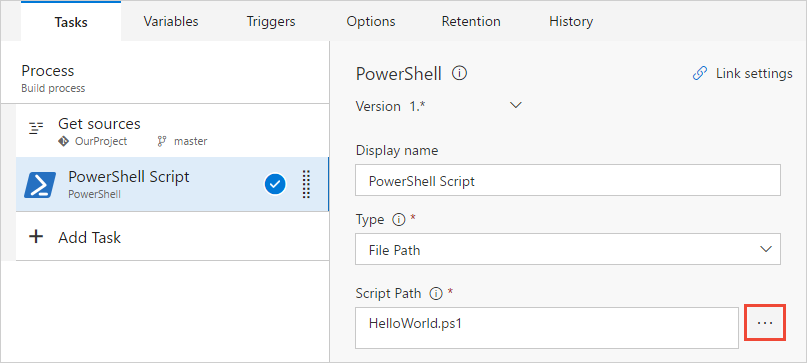
Select Save & queue, and then select Save.
A build pipeline is the entity through which you define your automated build pipeline. In the build pipeline, you compose a set of tasks, each of which perform a step in your build. The task catalog provides a rich set of tasks for you to get started. You can also add PowerShell or shell scripts to your build pipeline.
Publish an artifact from your build
A typical build produces an artifact that can then be deployed to various stages in a release. Here to demonstrate the capability in a simple way, we'll simply publish the script as the artifact.
On the Tasks tab, select Add Task.
Select the Utility category, select the Publish Build Artifacts task, and then select Add.
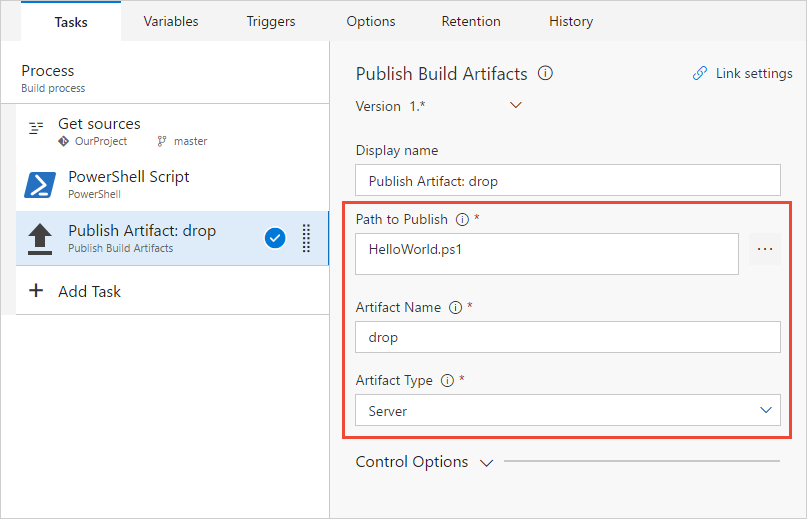
Path to Publish: Select the
 button to browse and select the script you created.
Artifact Name: Enter
drop.Artifact Type: Select Server.
Artifacts are the files that you want your build to produce. Artifacts can be nearly anything your team needs to test or deploy your app. For example, you've got a .DLL and .EXE executable files and .PDB symbols file of a C# or C++ .NET Windows app.
To enable you to produce artifacts, we provide tools such as copying with pattern matching, and a staging directory in which you can gather your artifacts before publishing them. See Artifacts in Azure Pipelines.
Enable continuous integration (CI)
Select the Triggers tab.
Enable Continuous integration.
A continuous integration trigger on a build pipeline indicates that the system should automatically queue a new build whenever a code change is committed. You can make the trigger more general or more specific, and also schedule your build (for example, on a nightly basis). See Build triggers.
Save and queue the build
Save and queue a build manually and test your build pipeline.
Select Save & queue, and then select Save & queue.
On the dialog box, select the Queue button.
This queues a new build on the agent. Once the agent is allocated, you'll start seeing the live logs of the build. Notice that the PowerShell script is run as part of the build, and that "Hello world" is printed to the console.
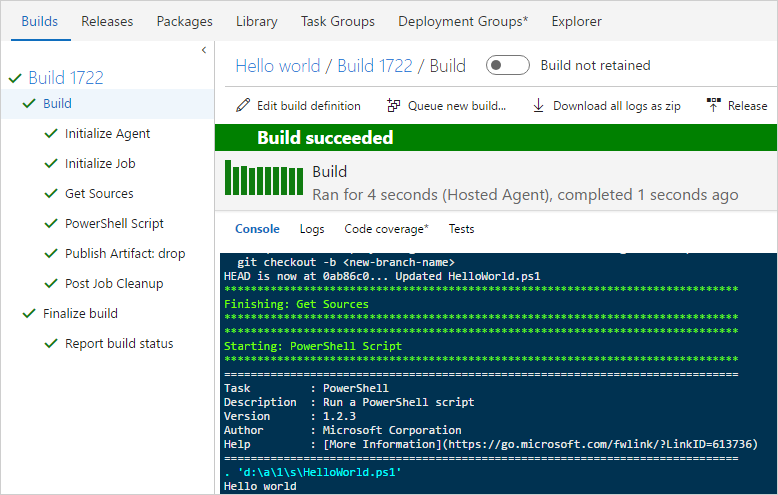
Go to the build summary.

On the Artifacts tab of the build, notice that the script is published as an artifact.
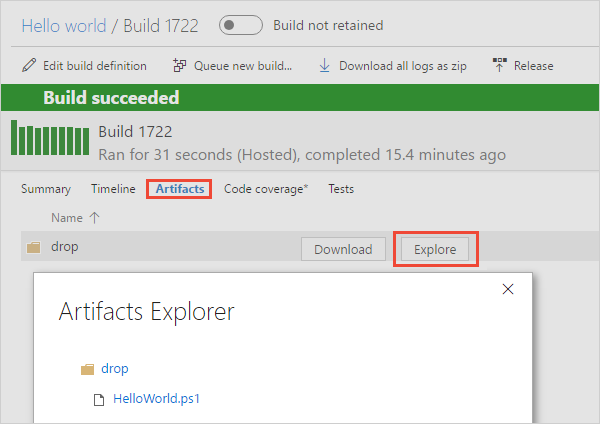
You can view a summary of all the builds or drill into the logs for each build at any time by navigating to the Builds tab in Build and Release. For each build, you can also view a list of commits that were built and the work items associated with each commit. You can also run tests in each build and analyze the test failures.
Add some variables and commit a change to your script
We'll pass some build variables to the script to make our pipeline a bit more interesting. Then we'll commit a change to a script and watch the CI pipeline run automatically to validate the change.
Edit your build pipeline.
On the Tasks tab, select the PowerShell script task.
Add these arguments.
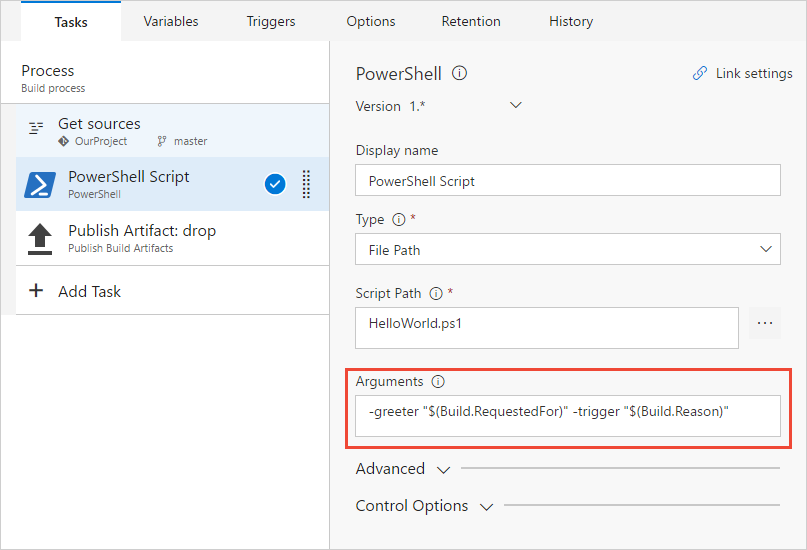
Arguments
-greeter "$(Build.RequestedFor)" -trigger "$(Build.Reason)"
Finally, save the build pipeline.
Next you'll add the arguments to your script.
Go to your Files in Azure Repos (the Code hub in the previous navigation and TFS).
Select the HelloWorld.ps1 file, and then Edit the file.
Change the script as follows:
Param(
[string]$greeter,
[string]$trigger
)
Write-Host "Hello world" from $greeter
Write-Host Trigger: $trigger
Commit (save) the script.
Now you can see the results of your changes. Go to the Build and Release page and select Queued. Notice under the Queued or running section that a build is automatically triggered by the change that you committed.
Select the new build that was created and view its log.
Notice that the person who changed the code has their name printed in the greeting message. You also see printed that this was a CI build.
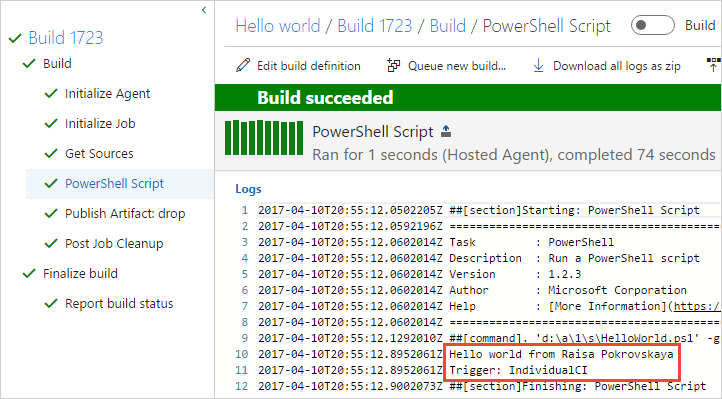
We just introduced the concept of build variables in these steps. We printed the value of a variable that is automatically predefined and initialized by the system. You can also define custom variables and use them either in arguments to your tasks, or as environment variables within your scripts. To learn more about variables, see Build variables.
You've got a build pipeline. What's next?
You've created a build pipeline that automatically builds and validates whatever code is checked in by your team. At this point, you can continue to the next section to learn about release pipelines. Or, if you prefer, you can skip ahead to create a build pipeline for your app.
Create a release pipeline
Define the process for running the script in two stages.
Go to Azure Pipelines, and then to the Releases tab.
Select the action to create a New pipeline.
On the dialog box, select the Empty template and select Next.
Make sure that your Hello world build pipeline that you created above is selected. Select Continuous deployment, and then select Create.
Select Add tasks in the stage.
On the Task catalog dialog box, select Utility, locate the PowerShell task, and then select its Add button. Select the Close button.
For the Script Path argument, select the
 button to browse your artifacts and select the script you created.
Add these Arguments:
-greeter "$(Release.RequestedFor)" -trigger "$(Build.DefinitionName)"Rename the stage QA.
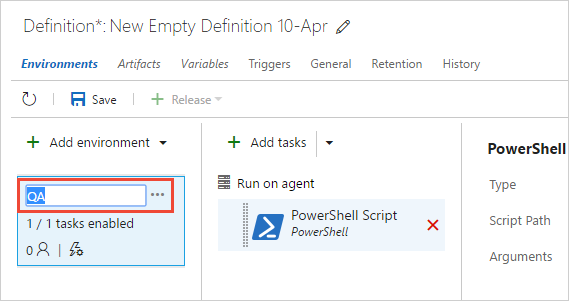
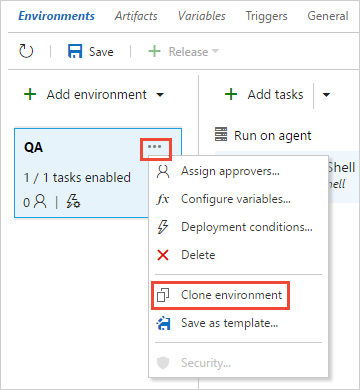
Clone the QA stage.
Leave Automatically approve and Deploy automatically... selected, and select Create.
Rename the new stage Production.
Rename the release pipeline Hello world.
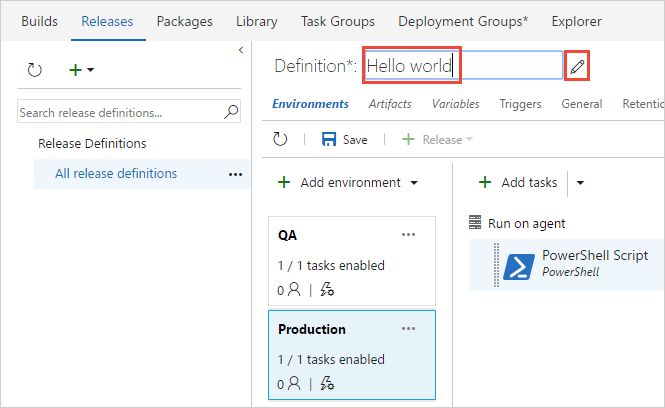
Save the release pipeline.
A release pipeline is a collection of stages to which the application build artifacts are deployed. It also defines the actual deployment pipeline for each stage, as well as how the artifacts are promoted from one stage to another.
Also, notice that we used some variables in our script arguments. In this case, we used release variables instead of the build variables we used for the build pipeline.
Deploy a release
Run the script in each stage.
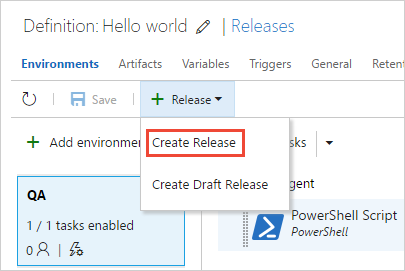
Create a new release.
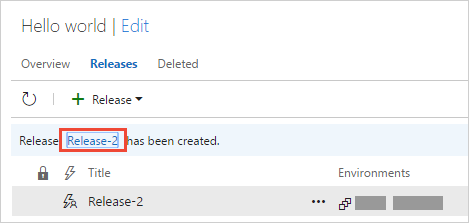
Open the release that you created.
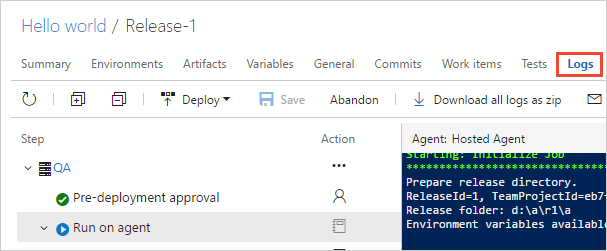
View the logs to get real-time data about the release.
You can track the progress of each release to see if it has been deployed to all the stages. You can track the commits that are part of each release, the associated work items, and the results of any test runs that you've added to the release pipeline.
Change your code and watch it automatically deploy to production
We'll make one more change to the script. This time it will automatically build and then get deployed all the way to the production stage.
Go to the Code hub, Files tab, edit the HelloWorld.ps1 file, and change it as follows:
Param(
[string]$greeter,
[string]$trigger
)
Write-Host "Hello world" from $greeter
Write-Host Trigger: $trigger
Write-Host "Now that you've got CI/CD, you can automatically deploy your app every time your team checks in code."
Commit (save) the script.
Select the Builds tab to see the build queued and run.
After the build is completed, select the Releases tab, open the new release, and then go to the Logs.
Your new code automatically is deployed in the QA stage, and then in the Production stage.
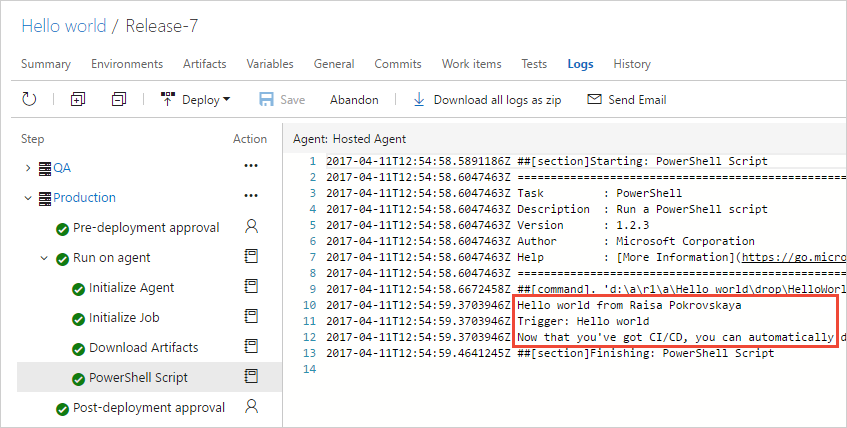
In many cases, you probably would want to edit the release pipeline so that the production deployment happens only after some testing and approvals are in place. See Approvals and gates overview.
Next steps
You've learned the basics of creating and running a pipeline. Now you're ready to configure your build pipeline for the programming language you're using. Go ahead and create a new build pipeline, and this time, use one of the following templates.
| Language | Template to use |
|---|---|
| .NET | ASP.NET |
| .NET Core | ASP.NET Core |
| C++ | .NET Desktop |
| Go | Go |
| Java | Gradle |
| JavaScript | Node.js |
| Xcode | Xcode |
FAQ
Where can I read articles about DevOps and CI/CD?
What is Continuous Integration?
What version control system can I use?
When you're ready to get going with CI/CD for your app, you can use the version control system of your choice:
Clients
Services
- Azure Pipelines
- Git service providers such as GitHub and Bitbucket Cloud
- Subversion
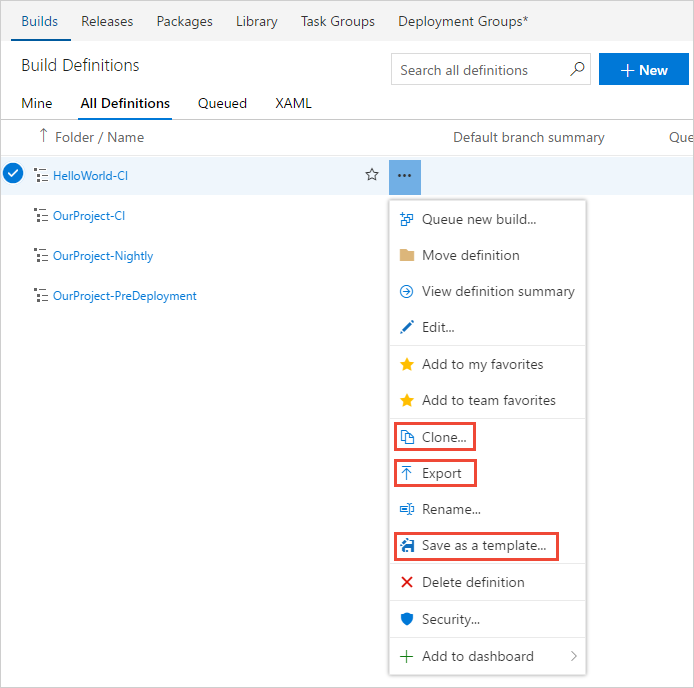
After you clone a pipeline, you can make changes and then save it.
After you export a pipeline, you can import it from the All pipelines tab.
After you create a template, your team members can use it to follow the pattern in new pipelines.
Tip
If you're using the New Build Editor, then your custom templates are shown at the bottom of the list.
How do I work with drafts?
If you're editing a build pipeline and you want to test some changes that are not yet ready for production, you can save it as a draft.
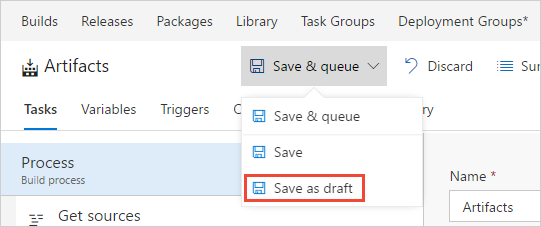
You can edit and test your draft as needed.
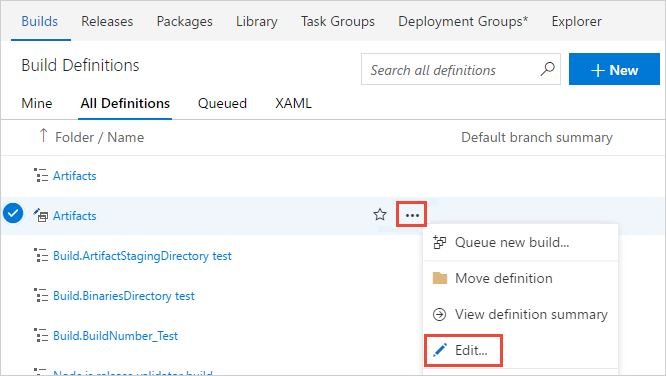
When you're ready, you can publish the draft to merge the changes into your build pipeline.

Or, if you decide to discard the draft, you can delete it from the All Pipeline tab shown above.
How can I delete a pipeline?
To delete a pipeline, navigate to the summary page for that pipeline, and choose Delete from the ... menu in the top-right of the page. Type the name of the pipeline to confirm, and choose Delete.
What else can I do when I queue a build?
You can queue builds automatically or manually.
When you manually queue a build, you can, for a single run of the build:
Specify the pool into which the build goes.
Add and modify some variables.
Add demands.
In a Git repository
In a TFVC repository
Run a private build of a shelveset. (You can use this option on either a Microsoft-hosted agent or a self-hosted agent.)
Where can I learn more about build pipeline settings?
To learn more about build pipeline settings, see:
How do I programmatically create a build pipeline?
REST API Reference: Create a build pipeline
Note
You can also manage builds and build pipelines from the command line or scripts using the Azure Pipelines CLI.