Update code with fetch and pull
TFS 2017 | TFS 2015 | TFS 2013
Visual Studio 2019 | Visual Studio 2017 | Visual Studio 2015
Update the code in your local repo with the changes from other members of your team using the following commands:
fetch, which downloads the changes from your remote repo but doesn't apply them to your code.merge, which applies changes taken fromfetchto a branch on your local repo.pull, which is a combined command that does afetchand then amerge.
In this tutorial you learn how to:
- Download changes with fetch
- Update branches with merge
- Fetch and merge with pull
- Update your local branch with the latest changes from main
Tip
If there's a merge conflict between a commit you haven't pushed yet and a commit you're merging or pulling, resolve those conflicts before you finish updating your code.
Download changes with fetch
You download changes to your local branch from the remote through fetch. Fetch asks the remote repo for all commits and new branches that others have pushed but you don't have and downloads them into your repo, creating local branches as needed.
Fetch doesn't merge any changes into your local branches. It only downloads the new commits for your review.
Tip
To help keep your branches list clean and up to date, configure Git to prune remote branches during fetch. You can configure this setting from the command line or from within Visual Studio.
Note
Visual Studio 2019 version 16.8 and later versions provide a new Git menu for managing the Git workflow with less context switching than Team Explorer. Procedures provided in this article under the Visual Studio 2019 tab provide information for using the Git experience as well as Team Explorer. To learn more, see Side-by-side comparison of Git and Team Explorer.
Visual Studio uses the Sync view in Team Explorer to fetch changes.
Changes downloaded by fetch aren't applied until you Pull or Sync the changes.
In Team Explorer, select the Home button and choose Sync.

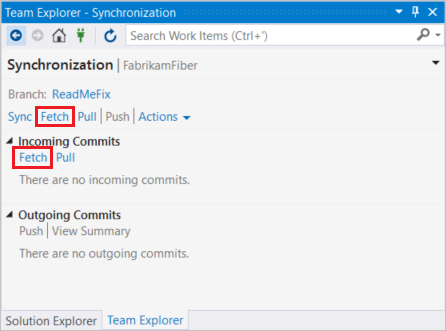
In Synchronization, select Fetch to update the incoming commits list.

There are two Fetch links, one near the top and one in the Incoming Commits section. You can use either one.
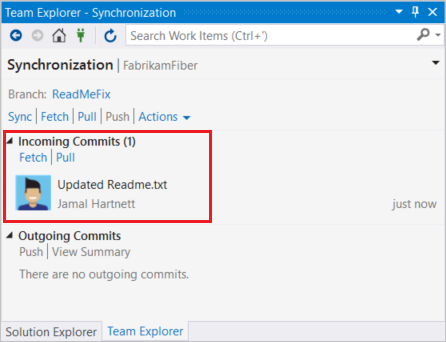
Review the results of the fetch operation in under Incoming Commits.

Update branches with merge
Apply changes downloaded through fetch using the merge command. Merge takes the commits retrieved from fetch and tries to add them to your local branch.
The merge keeps the commit history of your local changes. When you share your branch with push, Git knows how others should merge your changes.
The challenge with merge is when a commit taken from fetch conflicts with an existing unpushed commit on your branch.
Git is generally very smart about resolving merge conflicts automatically, but sometimes you must resolve merge conflicts manually and complete the merge with a new merge commit.
Note
Visual Studio 2019 version 16.8 and later versions provide a new Git menu for managing the Git workflow with less context switching than Team Explorer. Procedures provided in this article under the Visual Studio 2019 tab provide information for using the Git experience as well as Team Explorer. To learn more, see Side-by-side comparison of Git and Team Explorer.
Team Explorer merges when you do a Pull or a Sync from the Changes view.
Sync is a combined operation of pulling remote changes and then pushing local ones. This operation synchronizes the commits on the local and remote branch.
In Team Explorer, select the Home button and choose Sync.

In Synchronization, select Sync.

Review the confirmation message when the sync operation completes.

Fetch and merge with pull
Pull does a fetch and then a merge to download the commits and update your local branch in one command instead of two.
Use pull to make your branch current with the remote when you aren't worried about reviewing the changes before merging them into your own branch.
Note
Visual Studio 2019 version 16.8 and later versions provide a new Git menu for managing the Git workflow with less context switching than Team Explorer. Procedures provided in this article under the Visual Studio 2019 tab provide information for using the Git experience as well as Team Explorer. To learn more, see Side-by-side comparison of Git and Team Explorer.
Open the Team Explorer and open the Sync view. Then click the Pull link under Incoming Commits to pull remote changes and merge them into your local branch. Pulling
updates files in your open project, so make sure to commit your changes before pulling.
In Team Explorer, select the Home button and choose Sync.

In Synchronization, choose Pull to fetch remote changes and merge them into your local branch.

There are two Pull links, one near the top and one in the Incoming Commits section. You can use either one.
Review the confirmation message when the pull operation completes.

Update your branch with the latest changes from main
When working in a branch, you may want to incorporate the latest changes from the main branch into your branch. There are two approaches you can use: rebase or merge.
- Rebase takes the changes made in the commits in your current branch and replays them on the history of another branch. Rebasing rewrites the commit history of your current branch. The history starts from the most recent commit in the target branch of the rebase.
- Merge merges the changes from the source branch to the target branch using a merge commit, which becomes part of the commit history.
Note
This article demonstrates the merge approach. For more information on rebase and guidance on which method is right for your scenario, see Apply changes with Rebase - When to rebase vs. merge and Rebase vs merge from the Pro Git book.
Note
Visual Studio 2019 version 16.8 and later versions provide a new Git menu for managing the Git workflow with less context switching than Team Explorer. Procedures provided in this article under the Visual Studio 2019 tab provide information for using the Git experience as well as Team Explorer. To learn more, see Side-by-side comparison of Git and Team Explorer.
Note
The git pull origin main command combines git fetch and git merge commands. To do this properly in Visual Studio integration, you will need to Sync in Team Explorer to do the fetch part. This ensures your local git repository is up to date with its remote origin.
To merge the latest changes from the main branch to your branch:
In Team Explorer, select the Home button and choose Branches.
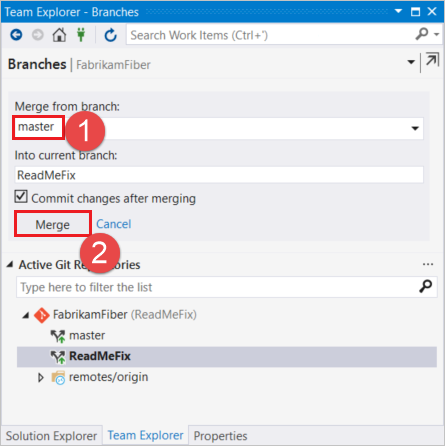
Check out your target branch. Right-click the target branch, and choose Merge From.

Specify a Merge from branch, which is
mainin this example, and then select Merge.
If there are any merge conflicts, Team Explorer tells you now. Resolve the merge commits before the next step.
Enter a commit message and select Commit Staged.

When you're ready to push your local commits, including your new merge commit, to the remote server, choose Push from the Synchronization view.
