AD FS 2.0 RelayState
Hi guys, Joji Oshima here again with some great news! AD FS 2.0 Rollup 2 adds the capability to send RelayState when using IDP initiated sign on. I imagine some people are ecstatic to hear this while others are asking “What is this and why should I care?”
What is RelayState and why should I care?
There are two protocol standards for federation (SAML and WS-Federation). RelayState is a parameter of the SAML protocol that is used to identify the specific resource the user will access after they are signed in and directed to the relying party’s federation server.
Note:
If the relying party is the application itself, you can use the loginToRp parameter instead. Example: https://adfs.contoso.com/adfs/ls/idpinitiatedsignon.aspx?loginToRp=rpidentifier |
Without the use of any parameters, a user would need to go to the IDP initiated sign on page, log in to the server, choose the relying party, and then be directed to the application. Using RelayState can automate this process by generating a single URL for the user to click and be logged in to the target application without any intervention. It should be noted that when using RelayState, any parameters outside of it will be dropped.
When can I use RelayState?
We can pass RelayState when working with a relying party that has a SAML endpoint. It does not work when the direct relying party is using WS-Federation.
The following IDP initiated flows are supported when using Rollup 2 for AD FS 2.0:
- Identity provider security token server (STS) -> relying party STS (configured as a SAML-P endpoint) -> SAML relying party App
- Identity provider STS -> relying party STS (configured as a SAML-P endpoint) -> WIF (WS-Fed) relying party App
- Identity provider STS -> SAML relying party App
The following initiated flow is not supported:
- Identity provider STS -> WIF (WS-Fed) relying party App
Manually Generating the RelayState URL
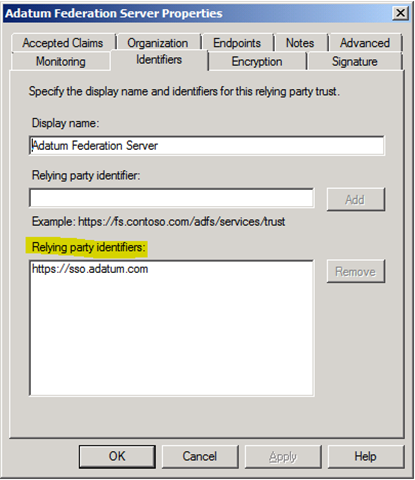
There are two pieces of information you need to generate the RelayState URL. The first is the relying party’s identifier. This can be found in the AD FS 2.0 Management Console. View the Identifiers tab on the relying party’s property page.
The second part is the actual RelayState value that you wish to send to the Relying Party. It could be the identifier of the application, but the administrator for the Relying Party should have this information. In this example, we will use the Relying Party identifier of https://sso.adatum.com and the RelayState of https://webapp.adatum.com
Starting values:
RPID: https://sso.adatum.com
RelayState: https://webapp.adatum.com
Step 1: The first step is to URL Encode each value. |
RPID: https%3a%2f%2fsso.adatum.com RelayState: https%3a%2f%2fwebapp.adatum.com |
Step 2: The second step is to take these URL Encoded values, merge it with the string below, and URL Encode the string. |
String: RPID= <URL encoded RPID> &RelayState= <URL encoded RelayState> String with values: RPID= https%3a%2f%2fsso.adatum.com &RelayState= https%3a%2f%2fwebapp.adatum.com URL Encoded string: RPID%3dhttps%253a%252f%252fsso.adatum.com%26RelayState%3dhttps%253a%252f%252fwebapp.adatum.com |
Step 3: The third step is to take the URL Encoded string and add it to the end of the string below. |
String: ?RelayState= String with value: ?RelayState=RPID%3dhttps%253a%252f%252fsso.adatum.com%26RelayState%3dhttps%253a%252f%252fwebapp.adatum.com |
Step 4: The final step is to take the final string and append it to the IDP initiated sign on URL. |
IDP initiated sign on URL: https://adfs.contoso.com/adfs/ls/idpinitiatedsignon.aspx Final URL: https://adfs.contoso.com/adfs/ls/idpinitiatedsignon.aspx?RelayState=RPID%3dhttps%253a%252f%252fsso.adatum.com%26RelayState%3dhttps%253a%252f%252fwebapp.adatum.com |
The result is an IDP initiated sign on URL that tells AD FS which relying party STS the login is for, and also gives that relying party information that it can use to direct the user to the correct application.
Is there an easier way?
The multi-step process and manual manipulation of the strings are prone to human error which can cause confusion and frustration. Using a simple HTML file, we can fill out the starting information into a form and click the Generate URL button.
The code sample for this HTML file has been posted to CodePlex.
Conclusion and Links
I hope this post has helped demystify RelayState and will have everyone up and running quickly.
AD FS 2.0 RelayState Generator
https://social.technet.microsoft.com/wiki/contents/articles/13172.ad-fs-2-0-relaystate-generator.aspx
HTML Download
https://adfsrelaystate.codeplex.com/
AD FS 2.0 Rollup 2
https://support.microsoft.com/kb/2681584
Supporting Identity Provider Initiated RelayState
https://technet.microsoft.com/en-us/library/jj127245(WS.10).aspx
Joji "Halt! Who goes there!" Oshima
Comments
Anonymous
September 27, 2012
Good Article.Anonymous
October 15, 2012
UR2 made my day when it came out in the Spring. A lot of SP's out there don't support SP-initiated logon so having built-in support for this has been critical.Anonymous
October 18, 2012
The comment has been removedAnonymous
May 23, 2014
Pingback from single pointer on - SAML IDP, ADFS 2.0 SP & WS-Fed Application | Aasby ReviewAnonymous
May 27, 2015
Welcome to this custom Quick Reference Guide. The purpose of this guide is to provide you with the latest


