Hinweis
Für den Zugriff auf diese Seite ist eine Autorisierung erforderlich. Sie können versuchen, sich anzumelden oder das Verzeichnis zu wechseln.
Für den Zugriff auf diese Seite ist eine Autorisierung erforderlich. Sie können versuchen, das Verzeichnis zu wechseln.
As you have learned from our previous articles, Always Encrypted is a client-side encryption technology - sensitive data is transparently encrypted and decrypted within a client application by a client driver. SQL Server does not have access to plaintext encryption keys and cannot encrypt or decrypt encrypted data. An important implication of the above is that encrypting existing data requires downloading the data to a trusted client machine, encrypting it and uploading it back to the database.
In SQL Server 2016 CTP2, using SQL Server Import Export Wizard is the easiest way to perform encryption. We will show you two approaches:
- Encryption by copying the entire database containing columns to be encrypted.
- Encryption by copying selected tables containing columns to be encrypted.
If you want to follow the examples presented in this article, you will need to install the following:
- Database Engine from CTP2 of SQL Server 2016 (on a SQL Server machine).
- SQL Server Management Studio from CTP2 of SQL Server 2016 (on your development machine). Note that installing SSMS also installs SQL Server Import Export Wizard.
Sample Database
In the following examples, we assume we have a database, named Clinic, containing the Patients table, defined below.
 CREATE TABLE [dbo].[Patients](
 [PatientId] [int] IDENTITY(1,1),
 [SSN] [char](11) NOT NULL,
 [FirstName] [nvarchar](50) NULL,
 [LastName] [nvarchar](50) NULL,
 [MiddleName] [nvarchar](50) NULL,
 [StreetAddress] [nvarchar](50) NULL,
 [City] [nvarchar](50) NULL,
 [ZipCode] [char](5) NULL,
 [State] [char](2) NULL,
 [BirthDate] [date] NOT NULL
 PRIMARY KEY CLUSTERED ([PatientId] ASC) ON [PRIMARY])
 GO
The table contains existing data and we want to encrypt both the SSN and BirthDate columns.
Encryption by copying the entire database
Step 1: Create a new database and set it up for encryption
a) Create a new database, named ClinicEncrypted.
b) Set up Always Encrypted keys (a column encryption key and a column master key) in the new database. Please refer to the example in Getting Started With Always Encrypted for how to set up the keys.
c) Re-create the Patients table in the new database, configuring both the SSN and BirthDate columns as encrypted.
 CREATE TABLE [dbo].[Patients](
 [PatientId] [int] IDENTITY(1,1),
 [SSN] [char](11) COLLATE Latin1_General_BIN2
 ENCRYPTED WITH (ENCRYPTION_TYPE = DETERMINISTIC,
 ALGORITHM = 'AEAD_AES_256_CBC_HMAC_SHA_256',
 COLUMN_ENCRYPTION_KEY = CEK1) NOT NULL,
 [FirstName] [nvarchar](50) NULL,
 [LastName] [nvarchar](50) NULL,
 [MiddleName] [nvarchar](50) NULL,
 [StreetAddress] [nvarchar](50) NULL,
 [City] [nvarchar](50) NULL,
 [ZipCode] [char](5) NULL,
 [State] [char](2) NULL,
 [BirthDate] [date]
 ENCRYPTED WITH (ENCRYPTION_TYPE = RANDOMIZED,
 ALGORITHM = 'AEAD_AES_256_CBC_HMAC_SHA_256',
 COLUMN_ENCRYPTION_KEY = CEK1) NOT NULL
 PRIMARY KEY CLUSTERED ([PatientId] ASC) ON [PRIMARY] )
 GO
Please note that you need to set the collation of the SSN column to the Latin1_General_BIN2 collation – encrypted columns containing character strings must have one of the binary2 collations.
Step 2: Copy data from the original database to the new database
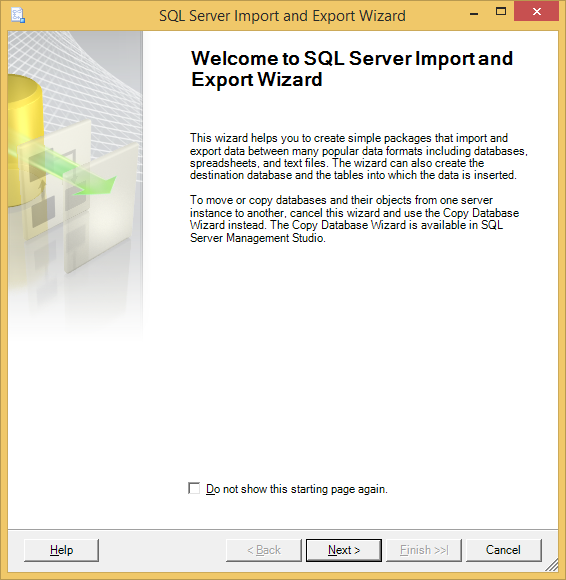
a) In SSMS, navigate to your original database, Clinic, using Object Explorer. Right click on the database, select Tasks, and then select Export Data … . This will open SQL Server Import Export Wizard. Click Next in the wizard window. (Alternatively, you can open the wizard directly.)
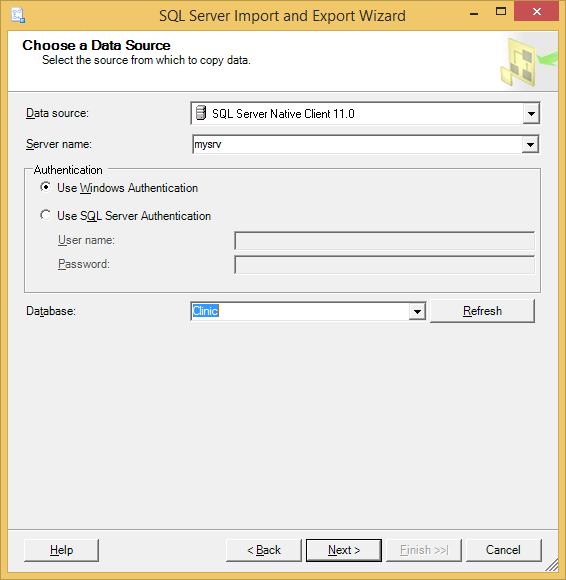
b) When configuring the data source, set up a connection to your original Clinic database, from which you will be exporting the data. You can use any SQL Server driver to connect to the database.
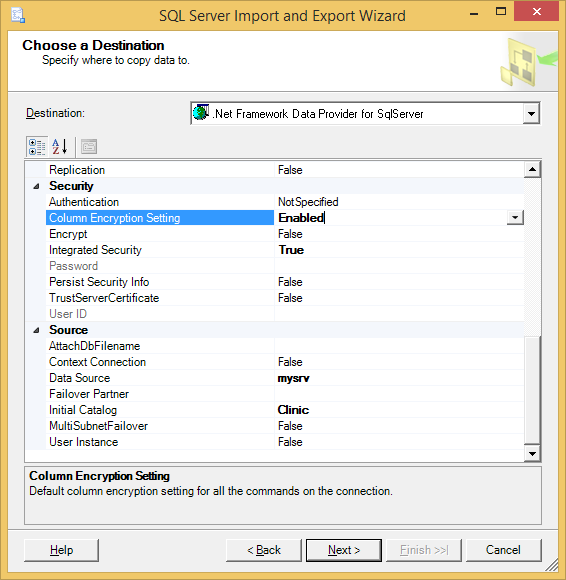
c) When configuring the data destination, set up a connection to the new database, ClinicEncrypted, you will be importing the data to. For this connection, you must:
- Select .Net Framework Data Provider for SqlServer in the Destination field. This will instruct the wizard to use SqlClient in .NET 4.6, which supports Always Encrypted.
- Set the Column Encryption Setting connection string keyword/property to Enabled. This will ensure SqlClient transparently encrypts data inserted to encrypted columns (SSN and BirthDate) during the import operation. Click Next.
d) Select Copy data from one or more tables or views and click Next.
e) Select all tables in the source database. Click Finish >> and then click Finish. The wizard will copy all data from your original database to the new ClinicEncrypted database. SqlClient will transparently encrypt data inserted into the SSN and BirthDate columns during the import operation. Close the wizard.
To verify the SSN and BirthDate columns in the new database are encrypted, you can query the Patients table in the new database (SELECT * FROM Patients). You should see encrypted binary values in both columns.
Note: SQL Server Import Export Wizard must be able to access the column master key, you configured in your database, in order to encrypt your columns. If you are using a certificate as a column master key, one way to ensure the wizard can access the certificate is to run the wizard on the same machine, on which the certificate was generated and installed (e.g. using SSMS) and under the context of the same user, who generated the certificate. Please, refer to Always Encrypted Key Metadata for information on how column master keys are used in the encryption process.
Step 3: Replace the old database with the encrypted database
To complete the database-level encryption workflow, you can remove or rename the original database (Clinic) and rename ClinicEncrypted as Clinic. Or, you could just redirect your applications to ClinicEncrypted by changing applications’ connection strings.
Table-level migration workflow
When using SQL Server Import Export Wizard for encryption, an alternative to copying the entire database is to copy the tables containing encrypted columns within your original database.
Step 1: Set up Always Encrypted keys in your database
Set up Always Encrypted keys (a column encryption key and a column master key) in your database (Clinic). Please refer to the example in Getting Started With Always Encrypted on how to set up the keys.
Step 2: Create a new table set up for encryption
For each table, containing columns you want to encrypt, you need to create a new version of that table, with the schema that is identical to the schema of the original table, but has selected columns encrypted. In our example, we are going to create the new PatientsEncrypted table with the SSN and BirthDate columns configured as encrypted.
 CREATE TABLE [dbo].[PatientsEncrypted](
 [PatientId] [int] IDENTITY(1,1),
 [SSN] [char](11) COLLATE Latin1_General_BIN2
 ENCRYPTED WITH (ENCRYPTION_TYPE = DETERMINISTIC,
 ALGORITHM = 'AEAD_AES_256_CBC_HMAC_SHA_256',
 COLUMN_ENCRYPTION_KEY = CEK1) NOT NULL,
 [FirstName] [nvarchar](50) NULL,
 [LastName] [nvarchar](50) NULL,
 [MiddleName] [nvarchar](50) NULL,
 [StreetAddress] [nvarchar](50) NULL,
 [City] [nvarchar](50) NULL,
 [ZipCode] [char](5) NULL,
 [State] [char](2) NULL,
 [BirthDate] [date]
 ENCRYPTED WITH (ENCRYPTION_TYPE = RANDOMIZED,
 ALGORITHM = 'AEAD_AES_256_CBC_HMAC_SHA_256',
 COLUMN_ENCRYPTION_KEY = CEK1) NOT NULL
 PRIMARY KEY CLUSTERED ([PatientId] ASC) ON [PRIMARY] )
 GO
Step 3: Copy data from the original table to the new table
a) In SSMS, navigate to your database, Clinic, using Object Explorer. Right click on the database, select Tasks, and then select Export Data … . This will open SQL Server Import Export Wizard. Click Next in the wizard window.
b) When configuring the data source, set up a connection to your Clinic database. You can use any SQL Server driver for that connection. Click Next.
c) When configuring the data destination, set up a connection to the same database – Clinic. For this connection, you must:
- Select .Net Framework Data Provider for SqlServer in the Destination field.
- Set the Column Encryption Setting connection string keyword/property to Enabled.
Click Next.
d) Select Copy data from one or more tables or views and click Next.
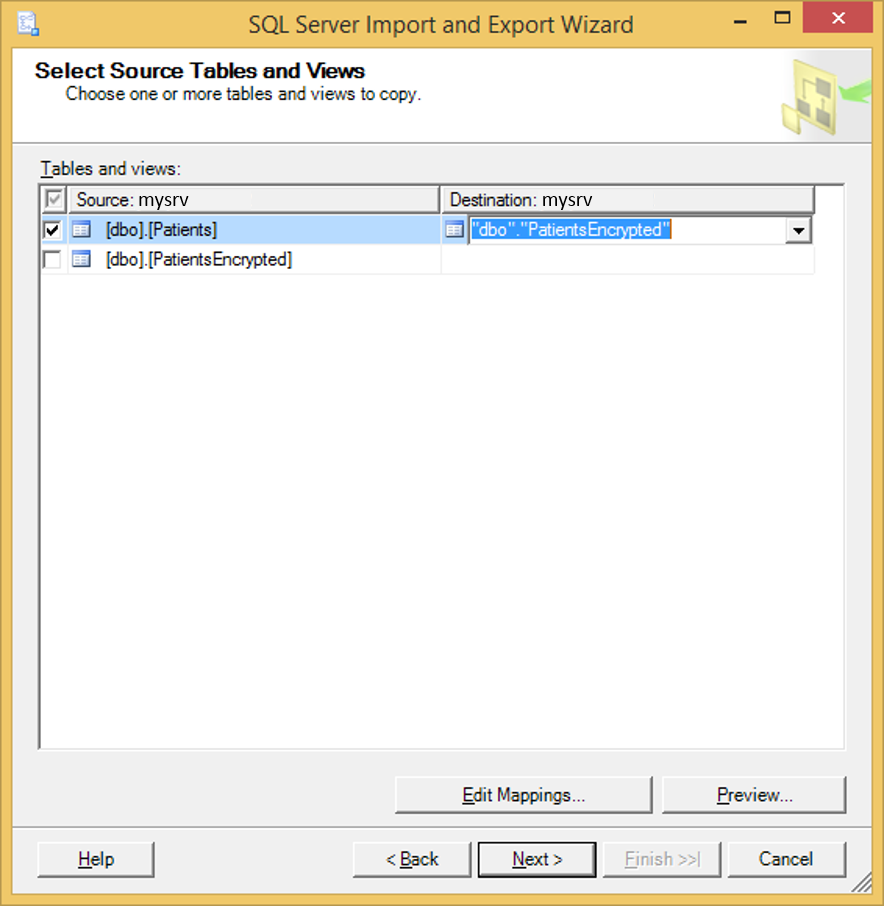
e) Configure the Patients table as a source table and set PatientsEncrypted as a destination table for data copied from the Patients table.
f) Click Finish>> and then click Finish.
g) The wizard will copy all data from the Patients table to the PatientsEncrypted table. SqlClient will transparently encrypt the data inserted into the SSN and BirthDate columns during the import operation. Close the wizard.
Step 4: Replace the old table with the encrypted table
To complete the table-level encryption workflow, you need to remove or rename the original table (Patients) and rename PatientsEncrypted as Patients. Note that if there were any dependencies of on the Patients table (e.g. foreign key relationships), you would need to remove the dependencies and recreate them after swapping the tables.
Considerations
Choosing between database-level and table-level encryption workflow
In general, we recommend using the table-level encryption workflow if one of the following is true:
- All columns that need to be encrypted in the database are contained in the same table and there are no or few dependencies between other tables and the table containing columns to be encrypted
- The size of other tables (not containing columns you want to encrypted) is large and you want to minimize the time needed to encrypt your data.
We recommend the database-level encryption workflow if columns to be encrypted are contained in multiple tables and the size of tables not containing columns you want to encrypt is small (or it is acceptable for the data migration to take a long time).
Application impact
Before you start encryption, you need to stop all applications (or at least stop all write transactions) using:
- The entire database – in the case of the database-level encryption workflow
- The tables containing columns you are encrypting – in the case of the table-level migration workflow.
Before resuming your application workload, you need modify your database connection strings to include column encryption setting=Enabled. Other changes might also be required, e.g. if an application issues queries that perform unsupported operations on encrypted columns, the queries/the application logic will need to be refactored.
We highly recommend performing encryption on production databases during a planned maintenance window.
Comments
- Anonymous
August 19, 2015
Hi Jakub, This is an nice post. You might be interested also to know that there seems to be a way to do AES in practice without downloading to the client. It is still research, but 1st implementation looks simple and is likely to follow then in 2015/16. If interested anyway, look please at publications at Lamsade Lab side at Dauphine University (Paris). Filter through my name. The title is: On-the fly AES Decryption/Encryption for Cloud SQL Databases Best, W. Litwin


