Azure Storage-Explorer Leitfaden zur Problembehandlung
Hinweis
Waren diese Informationen hilfreich? Wir schätzen Ihr Feedback. Bitte verwenden Sie die Schaltfläche Feedback auf dieser Seite, um uns mitzuteilen, wie gut Ihnen dieser Artikel gefallen hat oder wie wir ihn verbessern können.
Microsoft Azure Storage-Explorer ist eine eigenständige App, die das Arbeiten mit Azure Storage-Daten unter Windows, macOS und Linux vereinfacht. Die App kann eine Verbindung mit Speicherkonten herstellen, die in Azure, nationalen Clouds und Azure Stack gehostet werden.
In diesem Leitfaden werden Lösungen für Probleme zusammengefasst, die häufig in Storage-Explorer auftreten.
Probleme mit Azure RBAC-Berechtigungen
Die rollenbasierte Zugriffssteuerung in Azure (Azure Role-Based Access Control, Azure RBAC) ermöglicht eine hochgradig differenzierte Zugriffsverwaltung für Azure-Ressourcen, indem Berechtigungssätze in Rollen kombiniert werden. Im Folgenden finden Sie einige Strategien, mit denen Azure RBAC in Storage-Explorer optimal funktioniert.
Gewusst wie auf meine Ressourcen in Storage-Explorer zugreifen?
Wenn Beim Zugriff auf Speicherressourcen über Azure RBAC Probleme auftreten, wurden Ihnen möglicherweise nicht die entsprechenden Rollen zugewiesen. In den folgenden Abschnitten werden die Berechtigungen beschrieben, die Storage-Explorer derzeit für den Zugriff auf Ihre Speicherressourcen benötigen. Wenden Sie sich an den Administrator Ihres Azure-Kontos, wenn Sie nicht sicher sind, ob Sie über die entsprechenden Rollen oder Berechtigungen verfügen.
Problem mit den Berechtigungen "Lesen: Auflisten/Abrufen von Speicherkonten"
Sie müssen über die Berechtigung zum Auflisten von Speicherkonten verfügen. Um diese Berechtigung zu erhalten, muss Ihnen die Rolle Leser zugewiesen sein.
Auflisten von Speicherkontoschlüsseln
Storage-Explorer können auch Kontoschlüssel verwenden, um Anforderungen zu authentifizieren. Sie erhalten Zugriff auf Kontoschlüssel über leistungsfähigere Rollen, z. B. die Rolle Mitwirkender.
Hinweis
Zugriffsschlüssel gewähren uneingeschränkte Berechtigungen für alle Personen, die sie besitzen. Daher wird davon abgeraten, diese Schlüssel an Kontobenutzer auszuhändigen. Wenn Sie Zugriffsschlüssel widerrufen müssen, können Sie sie aus dem Azure-Portal erneut generieren.
Datenrollen
Ihnen muss mindestens eine Rolle zugewiesen sein, die Zugriff zum Lesen von Daten aus Ressourcen gewährt. Wenn Sie beispielsweise Blobs auflisten oder herunterladen möchten, benötigen Sie mindestens die Rolle Storage-Blobdatenleser.
Warum benötige ich eine Verwaltungsebenenrolle, um meine Ressourcen in Storage-Explorer anzuzeigen?
Azure Storage verfügt über zwei Zugriffsebenen: Verwaltung und Daten. Der Zugriff auf Abonnements und Speicherkonten erfolgt über die Verwaltungsebene. Der Zugriff auf Container, Blobs und andere Datenressourcen erfolgt über die Datenebene. Wenn Sie beispielsweise eine Liste Ihrer Speicherkonten aus Azure abrufen möchten, senden Sie eine Anforderung an den Verwaltungsendpunkt. Wenn Sie eine Liste von Blobcontainern in einem Konto benötigen, senden Sie eine Anforderung an den entsprechenden Dienstendpunkt.
Azure-Rollen können Ihnen Berechtigungen für den Zugriff auf Verwaltungs- oder Datenebenen gewähren. Die Rolle Leser gewährt beispielsweise schreibgeschützten Zugriff auf Ressourcen der Verwaltungsebene.
Streng genommen bietet die Rolle Leser keine Berechtigungen auf Datenebene und ist für den Zugriff auf die Datenebene nicht erforderlich.
Storage-Explorer erleichtert den Zugriff auf Ihre Ressourcen, indem die erforderlichen Informationen gesammelt werden, um eine Verbindung mit Ihren Azure-Ressourcen herzustellen. Um Beispielsweise Ihre Blobcontainer anzuzeigen, sendet Storage-Explorer eine Anforderung zum Auflisten von Containern an den Blobdienstendpunkt. Um diesen Endpunkt zu erhalten, durchsucht Storage-Explorer die Liste der Abonnements und Speicherkonten, auf die Sie Zugriff haben. Um Ihre Abonnements und Speicherkonten zu finden, benötigt Storage-Explorer auch Zugriff auf die Verwaltungsebene.
Wenn Sie über keine Rolle verfügen, die Berechtigungen auf Verwaltungsebene erteilt, können Storage-Explorer nicht die Informationen abrufen, die sie zum Herstellen einer Verbindung mit der Datenebene benötigen.
Was geschieht, wenn ich die erforderlichen Verwaltungsebenenberechtigungen nicht von meinem Administrator erhalten kann?
Wenn Sie auf Blobcontainer, Azure Data Lake Storage Gen2 Container oder Verzeichnisse oder Warteschlangen zugreifen möchten, können Sie diese Ressourcen mithilfe Ihrer Azure-Anmeldeinformationen anfügen.
- Öffnen Sie das Dialogfeld Verbinden .
- Wählen Sie den Ressourcentyp aus, mit dem Sie eine Verbindung herstellen möchten.
- Wählen Sie Mit Microsoft Entra ID>AnmeldenWeiter aus.
- Wählen Sie das Benutzerkonto und den Mandanten aus, das der Ressource zugeordnet ist, an die Sie anfügen, und wählen Sie dann Weiter aus.
- Geben Sie die URL der Ressource und dann einen eindeutigen Anzeigenamen für die Verbindung ein. Wählen Sie Weiter>Verbinden aus.
Derzeit gibt es keine Azure RBAC-bezogene Lösung für andere Ressourcentypen. Als Problemumgehung können Sie eine Shared Access Signature-URL anfordern und dann an Ihre Ressource anfügen:
- Öffnen Sie das Dialogfeld Verbinden .
- Wählen Sie den Ressourcentyp aus, mit dem Sie eine Verbindung herstellen möchten.
- Wählen Sie Shared Access Signature (SAS)>Weiter aus.
- Geben Sie die SHARED Access Signature-URL ein, die Sie erhalten haben, und geben Sie einen eindeutigen Anzeigenamen für die Verbindung ein. Wählen Sie Weiter>Verbinden aus.
Weitere Informationen zum Anfügen an Ressourcen finden Sie unter Anfügen an eine einzelne Ressource.
Empfohlene integrierte Azure-Rollen
Mehrere integrierte Azure-Rollen können die berechtigungen bereitstellen, die für die Verwendung von Storage-Explorer erforderlich sind. Einige dieser Rollen sind:
- Besitzer: Verwalten Sie alles, einschließlich des Zugriffs auf Ressourcen.
- Mitwirkender: Alles verwalten, mit Ausnahme des Zugriffs auf Ressourcen.
- Leser: Lesen und Auflisten von Ressourcen.
- Speicherkontomitwirkender: Vollständige Verwaltung von Speicherkonten.
- Besitzer von Speicherblobdaten: Vollzugriff auf Azure Storage-Blobcontainer und -Daten.
- Mitwirkender an Storage-Blobdaten: Lesen, Schreiben und Löschen von Azure Storage-Containern und -Blobs.
- Storage-Blobdatenleser: Lesen und Auflisten von Azure Storage-Containern und -Blobs.
Hinweis
Die Rollen Besitzer, Mitwirkender und Speicherkontomitwirkender gewähren Kontoschlüsselzugriff.
Ssl-Zertifikatprobleme
In diesem Abschnitt werden Probleme mit SSL-Zertifikaten erläutert.
Grundlegendes zu SSL-Zertifikatproblemen
Lesen Sie den Abschnitt SSL-Zertifikate in der Storage-Explorer Netzwerkdokumentation, bevor Sie fortfahren.
Verwenden des Systemproxys
Wenn Sie nur Features verwenden, die die Einstellung "Systemproxy verwenden" unterstützen, versuchen Sie, diese Einstellung zu verwenden. Weitere Informationen zur Systemproxyeinstellung finden Sie unter Netzwerkverbindungen in Storage-Explorer.
Importieren von SSL-Zertifikaten
Wenn Sie über eine Kopie der selbstsignierten Zertifikate verfügen, können Sie Storage-Explorer anweisen, ihnen zu vertrauen:
- Rufen Sie eine Base64-codierte X.509-Kopie (.cer) des Zertifikats ab.
- Wechseln Sie zu BEARBEITEN>SSL-Zertifikate>Importieren von Zertifikaten. Verwenden Sie dann die Dateiauswahl, um die .cer Datei zu suchen, auszuwählen und zu öffnen.
Dieses Problem kann auch auftreten, wenn mehrere Zertifikate (Stamm- und Zwischenzertifikate) vorhanden sind. Um diesen Fehler zu beheben, müssen Sie alle Zertifikate importieren.
Suchen nach SSL-Zertifikaten
Wenn Sie über keine Kopie der selbstsignierten Zertifikate verfügen, bitten Sie Ihren IT-Administrator um Hilfe.
Führen Sie die folgenden Schritte aus, um sie zu finden:
Installieren Sie OpenSSL:
- Windows: Alle Light-Versionen sollten ausreichend sein.
- Mac: OpenSSL sollte in Ihrem Betriebssystem enthalten sein.
- Linux: OpenSSL sollte in Ihrem Betriebssystem enthalten sein.
Führen Sie OpenSSL aus:
- Windows: Öffnen Sie das Installationsverzeichnis, wählen Sie /bin/ aus, und doppelklicken Sie dann auf openssl.exe.
- Mac: Führen Sie
opensslüber ein Terminal aus. - Linux: Führen Sie
opensslüber ein Terminal aus.
Führen Sie den Befehl
openssl s_client -showcerts -connect <hostname>:443für einen der Microsoft- oder Azure-Hostnamen aus, hinter denen Sich Ihre Speicherressourcen befinden. Weitere Informationen finden Sie in dieser Liste der Hostnamen, auf die häufig von Storage-Explorer zugegriffen wird.Suchen Sie nach selbstsignierten Zertifikaten. Wenn Antragsteller
("s:")und Aussteller("i:")identisch sind, ist das Zertifikat höchstwahrscheinlich selbstsigniert.Wenn Sie die selbstsignierten Zertifikate gefunden haben, kopieren Sie alles
-----BEGIN CERTIFICATE----------END CERTIFICATE-----, und fügen Sie sie in eine neue .cer-Datei ein.Öffnen Sie Storage-Explorer, und wechseln Sie zu Bearbeiten>SSL-Zertifikate>Importieren von Zertifikaten. Verwenden Sie dann die Dateiauswahl, um die von Ihnen erstellten .cer Dateien zu suchen, auszuwählen und zu öffnen.
Deaktivieren der SSL-Zertifikatüberprüfung
Wenn Sie mithilfe dieser Schritte keine selbstsignierten Zertifikate finden können, wenden Sie sich über das Feedbacktool an uns. Sie können Storage-Explorer auch über die Befehlszeile mit dem --ignore-certificate-errors Flag öffnen. Beim Öffnen mit diesem Flag ignoriert Storage-Explorer Zertifikatfehler. Dieses Flag wird nicht empfohlen.
Probleme bei der Anmeldung
In diesem Abschnitt werden Anmeldeprobleme erläutert, die möglicherweise auftreten können.
Grundlegendes zur Anmeldung
Stellen Sie sicher, dass Sie die Dokumentation Anmelden bei Storage-Explorer gelesen haben, bevor Sie fortfahren.
Häufiges erneutes Eingeben von Anmeldeinformationen
Das erneute Eingeben von Anmeldeinformationen ist höchstwahrscheinlich das Ergebnis von Richtlinien für bedingten Zugriff, die von Ihrem Microsoft Entra Administrator festgelegt wurden. Wenn Storage-Explorer Sie auffordern, die Anmeldeinformationen im Kontobereich erneut einzugeben, sollte der Link Fehlerdetails angezeigt werden. Wählen Sie ihn aus, um zu sehen, warum Storage-Explorer Sie zur erneuten Eingabe von Anmeldeinformationen auffordern. Richtlinienfehler für bedingten Zugriff, die ein erneutes Eingeben von Anmeldeinformationen erfordern, können in etwa wie folgt aussehen:
- Das Aktualisierungstoken ist abgelaufen.
- Für den Zugriff müssen Sie die mehrstufige Authentifizierung verwenden.
- Ihr Administrator hat eine Konfigurationsänderung vorgenommen.
Um die Häufigkeit der erneuten Eingeben von Anmeldeinformationen aufgrund von Fehlern wie den vorherigen zu verringern, wenden Sie sich an Ihren Microsoft Entra-Administrator.
Richtlinien für bedingten Zugriff
Wenn Sie über Richtlinien für bedingten Zugriff verfügen, die für Ihr Konto erfüllt werden müssen, stellen Sie sicher, dass Sie den Standardwebbrowserwert für die Einstellung Anmelden mit verwenden. Informationen zu dieser Einstellung finden Sie unter Ändern des Anmeldeorts.
Browser beschwert sich über HTTP-Umleitung oder unsichere Verbindung während der Anmeldung
Wenn Storage-Explorer sich in Ihrem Webbrowser anmeldet, erfolgt am Ende des Anmeldevorgangs eine Umleitung zu localhost. Browser geben manchmal eine Warnung oder einen Fehler aus, dass die Umleitung mit HTTP anstelle von HTTPS ausgeführt wird. Einige Browser versuchen möglicherweise auch, die Umleitung mit HTTPS zu erzwingen. Wenn eines dieser Probleme auftritt, haben Sie je nach Browser optionen:
- Ignorieren Sie die Warnung.
- Fügen Sie eine Ausnahme für localhost hinzu.
- Deaktivieren Sie https erzwingen, entweder global oder nur für localhost.
Wenn Sie keine dieser Optionen verwenden können, können Sie auch ändern, wo die Anmeldung mit der integrierten Anmeldung erfolgt, um die Verwendung Ihres Browsers zu vermeiden.
Token kann nicht abgerufen werden, Mandant wird herausgefiltert
Manchmal wird möglicherweise eine Fehlermeldung angezeigt, die besagt, dass ein Token nicht abgerufen werden kann, weil ein Mandant herausgefiltert wird. Dies bedeutet, dass Sie versuchen, auf eine Ressource zuzugreifen, die sich in einem Mandanten befindet, den Sie herausgefiltert haben. Um den Mandanten einzuschließen, wechseln Sie zum Kontobereich. Stellen Sie sicher, dass das Kontrollkästchen für den im Fehler angegebenen Mandanten aktiviert ist. Weitere Informationen zum Filtern von Mandanten in Storage-Explorer finden Sie unter Verwalten von Konten.
Fehler beim ordnungsgemäßen Starten der Authentifizierungsbibliothek
Wenn beim Start eine Fehlermeldung mit dem Hinweis angezeigt wird, dass die Authentifizierungsbibliothek von Storage-Explorer nicht ordnungsgemäß gestartet werden konnte, stellen Sie sicher, dass Ihre Installationsumgebung alle Voraussetzungen erfüllt. Die Wahrscheinlichkeit, dass die Voraussetzungen nicht erfüllt sind, ist die wahrscheinlichste Ursache für diese Fehlermeldung.
Wenn Sie der Meinung sind, dass Ihre Installationsumgebung alle Voraussetzungen erfüllt, öffnen Sie ein Problem auf GitHub. Wenn Sie Ihr Problem öffnen, stellen Sie sicher, dass Folgendes enthalten ist:
- Ihr Betriebssystem.
- Welche Version von Storage-Explorer Sie verwenden möchten.
- Gibt an, ob Sie die Voraussetzungen überprüft haben.
- Authentifizierungsprotokolle von einem nicht erfolgreichen Start von Storage-Explorer. Die ausführliche Authentifizierungsprotokollierung wird automatisch aktiviert, nachdem diese Art von Fehler aufgetreten ist.
Leeres Fenster bei Verwendung der integrierten Anmeldung
Wenn Sie die integrierte Anmeldung verwenden und ein leeres Anmeldefenster angezeigt wird, müssen Sie wahrscheinlich zu einer anderen Anmeldemethode wechseln. Leere Anmeldedialogfelder treten am häufigsten auf, wenn ein Active Directory-Verbunddienste (AD FS) Server Storage-Explorer auffordert, eine Umleitung durchzuführen, die von Electron nicht unterstützt wird.
Um zu einer anderen Anmeldemethode zu wechseln, ändern Sie die Einstellung Anmelden mit unter Einstellungen>Anwendungsanmeldung>. Informationen zu den verschiedenen Arten von Anmeldemethoden finden Sie unter Ändern des Anmeldeorts.
Erneute Authentifizierungsschleife oder UPN-Änderung
Wenn Sie sich in einer Schleife für die erneute Authentifizierung befinden oder den UPN eines Ihrer Konten geändert haben, führen Sie die folgenden Schritte aus:
- Öffnen Sie Storage-Explorer.
- Wechseln Sie zu Hilfe>Zurücksetzen.
- Stellen Sie sicher, dass mindestens Authentifizierung ausgewählt ist. Löschen Sie andere Elemente, die Sie nicht zurücksetzen möchten.
- Wählen Sie Zurücksetzen aus.
- Starten Sie Storage-Explorer neu, und versuchen Sie erneut, sich anzumelden.
Wenn nach dem Zurücksetzen weiterhin Probleme auftreten, führen Sie die folgenden Schritte aus:
- Öffnen Sie Storage-Explorer.
- Entfernen Sie alle Konten, und schließen Sie dann Storage-Explorer.
- Löschen Sie die . IdentityService-Ordner auf Ihrem Computer. Unter Windows befindet sich der Ordner unter C:\users\<username>\AppData\Local. Für Mac und Linux finden Sie den Ordner im Stammverzeichnis Ihres Benutzerverzeichnisses.
- Wenn Sie Mac oder Linux ausführen, müssen Sie auch den Eintrag aus dem
Microsoft.Developer.IdentityServiceKeystore Ihres Betriebssystems löschen. Auf dem Mac ist der Keystore die Gnome Keychain-Anwendung. Unter Linux wird die Anwendung in der Regel als Schlüsselring bezeichnet, der Name kann sich jedoch je nach Verteilung unterscheiden. - Starten Sie Storage-Explorer neu, und versuchen Sie erneut, sich anzumelden.
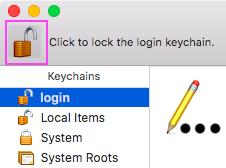
macOS: Schlüsselbundfehler oder Fenster "Keine Anmeldung"
Der macOS-Schlüsselbund kann manchmal in einen Zustand eintreten, der Probleme mit der Storage-Explorer-Authentifizierungsbibliothek verursacht. Führen Sie die folgenden Schritte aus, um den Schlüsselbund aus diesem Zustand zu bringen:
Schließen Sie Storage-Explorer.
Öffnen Sie den Schlüsselbund, indem Siebefehlstastentaste + auswählen, Keychain eingeben, und drücken Sie die EINGABETASTE.
Wählen Sie den anmelde Keychain aus.
Wählen Sie das Vorhängeschloss aus, um die Keychain zu sperren. Nach Abschluss des Vorgangs wird das Vorhängeschloss gesperrt angezeigt. Dies kann einige Sekunden dauern, je nachdem, welche Apps Sie geöffnet haben.
Öffnen Sie Storage-Explorer.
Sie werden mit einer Meldung wie "Der Diensthub möchte auf den Schlüsselbund zugreifen" aufgefordert. Geben Sie das Kennwort Für Ihr Mac-Administratorkonto ein, und wählen Sie Immer zulassen aus. Oder wählen Sie Zulassen aus, wenn "Immer zulassen " nicht verfügbar ist.
Versuchen Sie, sich anzumelden.
Linux: Keine Anwendungsfenster- oder Kennwort-Manager-Fehler beim Start
Wenn Sie Storage-Explorer auf einem Linux-System starten, kann eines der folgenden Probleme auftreten:
- Es wird kein Anwendungsfenster angezeigt.
- Fehler im Kennwort-Manager des Systems treten auf.
Storage-Explorer verwendet den Anmeldeinformations-Manager des Systems, um Ihre Daten zu schützen, einschließlich Anmeldeinformationen und SAS-Verbindungen. Wenn keine kompatible Anwendung für den Anmeldeinformations-Manager erkannt wird, wird Storage-Explorer nicht gestartet. Wenn auf Ihrem System kein lokales Tool zur Verwaltung von Anmeldeinformationen installiert ist, installieren Sie ein Drittanbietertool, das mit kompatibel ist libsecret. Auf Linux-Systemen, die die GNOME-Desktopumgebung verwenden, können Sie beispielsweise Seahorse installieren.
Storage-Explorer erstellt in der Regel einen Standardschlüsselbund, wenn er beim Start nicht vorhanden ist. In einigen Fällen kann dies jedoch nicht auftreten, was zu keinem Anwendungsfenster oder Kennwort-Manager-Dienstfehlern führt. Um die Probleme zu beheben, legen Sie manuell einen Standardschlüsselbund fest.
Wenn Sie Seahorse verwenden und keine vorhandenen Schlüsselbunde vorhanden sind oder sie einen neuen erstellen möchten, führen Sie die folgenden Schritte aus, um einen Standardschlüsselbund zu erstellen:
- Starten Sie die Anwendung "Kennwörter und Schlüssel".
- Wählen Sie die Schaltfläche "+" und dann Kennwortschlüsselbund aus.
- Legen Sie einen Namen und ein Kennwort für den neuen Schlüsselbund fest.
- Klicken Sie mit der rechten Maustaste auf den neuen Schlüsselbund, und wählen Sie Als Standard festlegen aus.
Wenn Sie die Storage-Explorer Snap verwenden, müssen Sie auch sicherstellen, dass Storage-Explorer mit dem Kennwort-Manager Ihres Systems verbunden ist. Führen Sie dazu den folgenden Befehl aus:
snap connect storage-explorer:password-manager-service :password-manager-service
Standardbrowser wird nicht geöffnet
Wenn Ihr Standardbrowser nicht geöffnet wird, wenn Sie versuchen, sich anzumelden, probieren Sie alle folgenden Techniken aus:
- Starten Sie Storage-Explorer neu.
- Öffnen Sie Ihren Browser manuell, bevor Sie mit der Anmeldung beginnen.
- Versuchen Sie es mit der integrierten Anmeldung. Anweisungen finden Sie unter Ändern des Anmeldeorts.
Andere Anmeldeprobleme
Wenn keine der obigen Anweisungen auf Ihr Anmeldeproblem zutrifft oder das Anmeldeproblem dadurch nicht behoben werden kann, öffnen Sie ein Problem auf GitHub.
Fehlende Abonnements und fehlerhafte Mandanten
Wenn Sie Ihre Abonnements nach der erfolgreichen Anmeldung nicht abrufen können, probieren Sie die folgenden Methoden zur Problembehandlung aus:
- Vergewissern Sie sich, dass Ihr Konto Zugriff auf die erwarteten Abonnements hat. Sie können Ihren Zugriff überprüfen, indem Sie sich beim Portal für die Azure-Umgebung anmelden, die Sie verwenden möchten.
- Stellen Sie sicher, dass Sie sich über die richtige Azure-Umgebung wie Azure, Azure China 21Vianet, Azure Deutschland, Azure US Government oder Custom Environment angemeldet haben.
- Wenn Sie sich hinter einem Proxyserver befinden, stellen Sie sicher, dass Sie den Storage-Explorer Proxy ordnungsgemäß konfiguriert haben.
- Versuchen Sie, das Konto zu entfernen und wieder hinzuzufügen.
- Wenn ein Link "Weitere Informationen" oder "Fehlerdetails" vorhanden ist, überprüfen Sie, welche Fehlermeldungen für die Mandanten gemeldet werden, bei denen ein Fehler auftritt. Wenn Sie nicht sicher sind, wie Sie auf die Fehlermeldungen reagieren sollen, öffnen Sie ein Problem in GitHub.
Problem bei der Interaktion mit dem Anmeldeinformationsspeicher ihres Betriebssystems während einer AzCopy-Übertragung
Wenn diese Meldung unter Windows angezeigt wird, ist der Windows-Anmeldeinformations-Manager höchstwahrscheinlich voll. Führen Sie die folgenden Schritte aus, um Platz im Windows-Anmeldeinformations-Manager zu schaffen:
- Schließen Sie Storage-Explorer.
- Suchen Sie im Menü Start nach Anmeldeinformationsverwaltung , und öffnen Sie ihn.
- Wechseln Sie zu Windows-Anmeldeinformationen.
- Suchen Sie unter Generische Anmeldeinformationen nach Einträgen, die programmen zugeordnet sind, die Sie nicht mehr verwenden, und löschen Sie sie. Sie können auch nach Einträgen wie
azcopy/aadtoken/<some number>suchen und diese Einträge löschen.
Wenn die Meldung nach Abschluss der oben genannten Schritte weiterhin angezeigt wird oder diese Meldung auf anderen Plattformen als Windows auftritt, können Sie ein Problem auf GitHub öffnen.
Ein angefügtes Speicherkonto oder eine angefügte Ressource kann nicht entfernt werden
Wenn Sie ein angefügtes Konto oder eine Speicherressource nicht über die Benutzeroberfläche entfernen können, können Sie alle angefügten Ressourcen manuell löschen, indem Sie die folgenden Ordner löschen:
- Windows: %AppData%/StorageExplorer
- macOS: /Users/<your_name>/Library/Application Support/StorageExplorer
- Linux: ~/.config/StorageExplorer
Schließen Sie Storage-Explorer, bevor Sie diese Ordner löschen.
Hinweis
Wenn Sie jemals SSL-Zertifikate importiert haben, sichern Sie den Inhalt des Zertifikatverzeichnisses . Später können Sie die Sicherung verwenden, um Ihre SSL-Zertifikate erneut zu importieren.
Proxyprobleme
Storage-Explorer unterstützt das Herstellen einer Verbindung mit Azure Storage-Ressourcen über einen Proxyserver. Wenn beim Herstellen einer Verbindung mit Azure über einen Proxy Probleme auftreten, finden Sie hier einige Vorschläge.
Storage-Explorer unterstützt nur die Standardauthentifizierung mit Proxyservern. Andere Authentifizierungsmethoden, z. B. NTLM, werden nicht unterstützt.
Hinweis
Storage-Explorer unterstützt keine Proxy-Autoconfig-Dateien zum Konfigurieren von Proxyeinstellungen.
Überprüfen Storage-Explorer Proxyeinstellungen
DieKonfigurationseinstellungAnwendungsproxy>> bestimmt, von welcher Quelle Storage-Explorer die Proxykonfiguration erhält.
Wenn Sie Umgebungsvariablen verwenden auswählen, stellen Sie sicher, dass Sie die Umgebungsvariablen HTTPS_PROXY oder HTTP_PROXY festlegen. Bei Umgebungsvariablen wird die Groß-/Kleinschreibung beachtet. Achten Sie daher darauf, die richtigen Variablen festzulegen. Wenn diese Variablen nicht definiert oder ungültig sind, verwenden Storage-Explorer keinen Proxy. Starten Sie Storage-Explorer neu, nachdem Sie Umgebungsvariablen geändert haben.
Wenn Sie App-Proxyeinstellungen verwenden auswählen, stellen Sie sicher, dass die In-App-Proxyeinstellungen korrekt sind.
Schritte zur Diagnose von Problemen
Wenn weiterhin Probleme auftreten, probieren Sie die folgenden Problembehandlungsmethoden aus:
- Wenn Sie eine Verbindung mit dem Internet herstellen können, ohne Ihren Proxy zu verwenden, überprüfen Sie, ob Storage-Explorer ohne aktivierte Proxyeinstellungen funktioniert. Wenn Storage-Explorer erfolgreich eine Verbindung herstellt, liegt möglicherweise ein Problem mit Ihrem Proxyserver vor. Arbeiten Sie mit Ihrem Administrator zusammen, um die Probleme zu identifizieren.
- Vergewissern Sie sich, dass andere Anwendungen, die den Proxyserver verwenden, wie erwartet funktionieren.
- Vergewissern Sie sich, dass Sie eine Verbindung mit dem Portal für die Azure-Umgebung herstellen können, die Sie verwenden möchten.
- Vergewissern Sie sich, dass Sie Antworten von Ihren Dienstendpunkten erhalten können. Geben Sie eine Ihrer Endpunkt-URLs in Ihren Browser ein. Wenn Sie eine Verbindung herstellen können, sollten Sie eine
InvalidQueryParameterValueoder eine ähnliche XML-Antwort erhalten. - Überprüfen Sie, ob eine andere Person, die Storage-Explorer mit demselben Proxyserver verwendet, eine Verbindung herstellen kann. Wenn dies möglich ist, müssen Sie sich möglicherweise an Ihren Proxyserveradministrator wenden.
Tools zum Diagnostizieren von Problemen
Ein Netzwerktool wie Fiddler kann Ihnen bei der Diagnose von Problemen helfen.
- Konfigurieren Sie Ihr Netzwerktool als Proxyserver, der auf dem lokalen Host ausgeführt wird. Wenn Sie weiterhin hinter einem tatsächlichen Proxy arbeiten müssen, müssen Sie möglicherweise Ihr Netzwerktool so konfigurieren, dass eine Verbindung über den Proxy hergestellt wird.
- Überprüfen Sie die Portnummer, die von Ihrem Netzwerktool verwendet wird.
- Konfigurieren Sie Storage-Explorer Proxyeinstellungen, um den lokalen Host und die Portnummer des Netzwerktools zu verwenden, z
localhost:8888. B. .
Wenn es richtig festgelegt ist, protokolliert Ihr Netzwerktool Netzwerkanforderungen, die von Storage-Explorer an Verwaltungs- und Dienstendpunkte gesendet werden.
Wenn Ihr Netzwerktool anscheinend nicht Storage-Explorer Datenverkehr protokolliert, testen Sie Ihr Tool mit einer anderen Anwendung. Geben Sie beispielsweise die Endpunkt-URL für eine Ihrer Speicherressourcen ein, z https://contoso.blob.core.windows.net/ . B. in einem Webbrowser. Sie erhalten eine Antwort ähnlich dem folgenden Codebeispiel:
<?xml version="1.0" encoding="UTF-8"?>
<Error>
    <Code>InvalidQueryParameterValue</Code>
    <Message>Value for one of the query parameters specified in the request URI is invalid.
        RequestId:<RequestId> Time:2017-04-10T21:42:17.3863214Z</Message>
    <QueryParameterName>comp</QueryParameterName>
    <QueryParameterValue/>
    <Reason/>
</Error>
Die Antwort deutet darauf hin, dass die Ressource vorhanden ist, obwohl Sie nicht darauf zugreifen können.
Wenn Ihr Netzwerktool nur Datenverkehr von anderen Anwendungen anzeigt, müssen Sie möglicherweise die Proxyeinstellungen in Storage-Explorer anpassen. Andernfalls müssen Sie möglicherweise die Einstellungen Ihres Tools anpassen.
Proxyserveradministrator kontaktieren
Wenn Ihre Proxyeinstellungen korrekt sind, müssen Sie sich möglicherweise an Ihren Proxyserveradministrator wenden, um Folgendes zu erfahren:
- Stellen Sie sicher, dass Ihr Proxy den Datenverkehr zu Azure-Verwaltungs- oder Ressourcenendpunkten nicht blockiert.
- Überprüfen Sie das von Ihrem Proxyserver verwendete Authentifizierungsprotokoll. Storage-Explorer unterstützt nur Standardauthentifizierungsprotokolle. Storage-Explorer unterstützt keine NTLM-Proxys.
Fehlermeldung "Untergeordnete Elemente können nicht abgerufen werden"
Wenn Sie über einen Proxy mit Azure verbunden sind, überprüfen Sie, ob Ihre Proxyeinstellungen korrekt sind.
Wenn der Besitzer eines Abonnements oder Kontos Ihnen Zugriff auf eine Ressource gewährt hat, überprüfen Sie, ob Sie über Lese- oder Listenberechtigungen für diese Ressource verfügen.
Verbindungszeichenfolge verfügt nicht über vollständige Konfigurationseinstellungen
Wenn Sie diese Fehlermeldung erhalten, verfügen Sie möglicherweise nicht über die erforderlichen Berechtigungen zum Abrufen der Schlüssel für Ihr Speicherkonto. Navigieren Sie zur Bestätigung zum Portal, und suchen Sie Ihr Speicherkonto. Klicken Sie mit der rechten Maustaste auf den Knoten für Ihr Speicherkonto, und wählen Sie Im Portal öffnen aus. Wechseln Sie dann zum Bereich Zugriffsschlüssel . Wenn Sie nicht über die Berechtigung zum Anzeigen von Schlüsseln verfügen, wird die Meldung "Sie haben keinen Zugriff" angezeigt. Um dieses Problem zu umgehen, können Sie entweder einen Kontonamen und -schlüssel oder eine Shared Access Signature des Kontos abrufen und diese zum Anfügen des Speicherkontos verwenden.
Wenn die Kontoschlüssel angezeigt werden, melden Sie ein Problem in GitHub, damit wir Ihnen bei der Behebung des Problems helfen können.
"Fehler beim Hinzufügen einer neuen Verbindung: TypeError: Eigenschaft 'Version' von undefiniert kann nicht gelesen werden"
Wenn Sie diese Fehlermeldung erhalten, wenn Sie versuchen, eine benutzerdefinierte Verbindung hinzuzufügen, sind die im lokalen Anmeldeinformations-Manager gespeicherten Verbindungsdaten möglicherweise beschädigt. Um dieses Problem zu umgehen, versuchen Sie, Ihre beschädigten lokalen Verbindungen zu löschen und wieder hinzuzufügen:
Starten Sie Storage-Explorer. Wechseln Sie im Menü zu Hilfe>Entwicklertools umschalten.
Wechseln Sie im geöffneten Fenster auf der Registerkarte Anwendung zu Lokaler Speicher>file:// auf der linken Seite.
Suchen Sie abhängig von der Art der Verbindung, mit der ein Problem besteht, nach dem Schlüssel. Kopieren Sie dann den Wert in einen Text-Editor. Der Wert ist ein Array Ihrer benutzerdefinierten Verbindungsnamen, z. B.:
- Speicherkonten
StorageExplorer_CustomConnections_Accounts_v1
- Blob-Container
StorageExplorer_CustomConnections_Blobs_v1StorageExplorer_CustomConnections_Blobs_v2
- Dateifreigaben
StorageExplorer_CustomConnections_Files_v1
- Warteschlangen
StorageExplorer_CustomConnections_Queues_v1
- Tabellen
StorageExplorer_CustomConnections_Tables_v1
- Speicherkonten
Nachdem Sie Ihre aktuellen Verbindungsnamen gespeichert haben, legen Sie den Wert in Den Entwicklertools auf fest
[].
Führen Sie die folgenden Schritte aus, um die beschädigten Verbindungen zu finden, um die nicht beschädigten Verbindungen zu erhalten. Wenn Es Ihnen nichts ausmacht, alle vorhandenen Verbindungen zu verlieren, überspringen Sie diese Schritte, und befolgen Sie die plattformspezifischen Anweisungen, um Ihre Verbindungsdaten zu löschen.
- Fügen Sie in einem Text-Editor die einzelnen Verbindungsnamen den Entwicklertools wieder hinzu. Überprüfen Sie dann, ob die Verbindung noch funktioniert.
- Wenn eine Verbindung ordnungsgemäß funktioniert, ist sie nicht beschädigt. Sie können es sicher dort lassen. Wenn eine Verbindung nicht funktioniert, entfernen Sie ihren Wert aus den Entwicklertools, und notieren Sie ihn, damit Sie sie später wieder hinzufügen können.
- Wiederholen Sie dies, bis Sie alle Ihre Verbindungen überprüft haben.
Nach dem Entfernen von Verbindungsnamen müssen Sie die beschädigten Daten löschen. Anschließend können Sie die Verbindungen mithilfe der Standardverbindungsschritte in Storage-Explorer wieder hinzufügen.
- Suchen Sie im Menü Start nach Anmeldeinformationsverwaltung , und öffnen Sie ihn.
- Wechseln Sie zu Windows-Anmeldeinformationen.
- Suchen Sie unter Generische Anmeldeinformationen nach Einträgen, die den
<connection_type_key>/<corrupted_connection_name>Schlüssel enthalten. Ein Beispiel istStorageExplorer_CustomConnections_Accounts_v1/account1. - Löschen Sie diese Verbindungen, und fügen Sie sie wieder hinzu.
Wenn dieser Fehler weiterhin auftritt, nachdem Sie diese Schritte ausgeführt haben, oder wenn Sie teilen möchten, was Sie vermuten, dass die Verbindungen beschädigt wurden, öffnen Sie ein Problem auf unserer GitHub-Seite.
Probleme mit einer Shared Access Signature-URL
Wenn Sie über eine Shared Access Signature-URL eine Verbindung mit einem Dienst herstellen und ein Fehler auftritt:
- Stellen Sie sicher, dass die URL die erforderlichen Berechtigungen zum Lesen oder Auflisten von Ressourcen bereitstellt.
- Vergewissern Sie sich, dass die URL nicht abgelaufen ist.
- Wenn die Shared Access Signature-URL auf einer Zugriffsrichtlinie basiert, überprüfen Sie, ob die Zugriffsrichtlinie nicht widerrufen wurde.
Wenn Sie versehentlich eine ungültige SHARED Access Signature-URL angefügt haben und jetzt nicht trennen können, führen Sie die folgenden Schritte aus:
- Wenn Sie Storage-Explorer ausführen, wählen Sie F12 aus, um das Fenster Entwicklertools zu öffnen.
- Wählen Sie auf der Registerkarte Anwendung die Option Lokaler Speicher>file:// auf der linken Seite aus.
- Suchen Sie den Schlüssel, der dem Diensttyp des Shared Access Signature-URI zugeordnet ist. Wenn der ungültige Shared Access Signature-URI beispielsweise für einen Blobcontainer gilt, suchen Sie nach dem Schlüssel namens
StorageExplorer_AddStorageServiceSAS_v1_blob. - Der Wert des Schlüssels sollte ein JSON-Array sein. Suchen Sie das Objekt, das dem ungültigen URI zugeordnet ist, und löschen Sie es.
- Drücken Sie STRG +R, um Storage-Explorer erneut zu laden.
Storage-Explorer Abhängigkeiten
Storage-Explorer enthält alle Abhängigkeiten, die für die Ausführung unter Windows erforderlich sind.
Patch Storage-Explorer für neuere Versionen von .NET Core
Für Storage-Explorer Version 1.7.0 oder früher müssen Sie möglicherweise die version von .NET Core patchen, die von Storage-Explorer verwendet wird:
Wechseln Sie zur NuGet-Seite , und laden Sie Version 1.5.43 von StreamJsonRpc über den Link Paket herunterladen auf der rechten Seite herunter.
Nachdem Sie das Paket heruntergeladen haben, ändern Sie die Dateierweiterung von .nupkg in .zip.
Entzippen Sie das Paket.
Öffnen Sie den Ordner streamjsonrpc.1.5.43/lib/netstandard1.1/ .
Kopieren Sie StreamJsonRpc.dll an die folgenden Speicherorte im Ordner Storage-Explorer:
- StorageExplorer/resources/app/ServiceHub/Services/Microsoft.Developer.IdentityService/
- StorageExplorer/resources/app/ServiceHub/Hosts/ServiceHub.Host.Core.CLR.x64/
Schaltfläche "In Explorer öffnen" im Azure-Portal funktioniert nicht
Wenn die Schaltfläche Öffnen in Explorer im Azure-Portal nicht funktioniert, stellen Sie sicher, dass Sie einen kompatiblen Browser verwenden. Die folgenden Browser wurden auf Kompatibilität getestet:
- Microsoft Edge
- Mozilla Firefox
- Google Chrome
- Microsoft Internet Explorer
Sammeln von Protokollen
Wenn Sie gitHub ein Problem melden, werden Sie möglicherweise aufgefordert, bestimmte Protokolle zu sammeln, um Ihr Problem zu diagnostizieren.
Storage-Explorer Protokolle
Storage-Explorer protokolliert verschiedene Dinge in seinen eigenen Anwendungsprotokollen. Sie können auf einfache Weise zu diesen Protokollen gelangen, indem Sie Hilfe zum>Öffnen von Protokollen auswählen. Standardmäßig Storage-Explorer Protokolle mit einer geringen Ausführlichkeitsebene. Um den Ausführlichkeitsgrad zu ändern, wechseln Sie zu Einstellungen (das Zahnradsymbol auf der linken Seite) >ProtokollebenederAnwendungsprotokollierung>>. Anschließend können Sie den Protokolliergrad nach Bedarf festlegen. Für die Problembehandlung wird die Protokollebene "Ablaufverfolgung" empfohlen, da es sich um die ausführlichste Ebene handelt.
Protokolle werden für jede von Ihnen ausgeführte Sitzung von Storage-Explorer in Ordner aufgeteilt. Für die Protokolldateien, die Sie freigeben müssen, platzieren Sie sie in einem ZIP-Archiv mit Dateien aus verschiedenen Sitzungen in verschiedenen Ordnern.
Authentifizierungsprotokolle
Bei Problemen im Zusammenhang mit der Anmeldung oder der Authentifizierungsbibliothek von Storage-Explorer müssen Sie höchstwahrscheinlich Authentifizierungsprotokolle sammeln. Authentifizierungsprotokolle werden gespeichert unter:
- Windows: C:\Users\<Your Username>\AppData\Local\Temp\servicehub\logs
- macOS: ~/. ServiceHub/logs
- Linux: ~/. ServiceHub/logs
Im Allgemeinen können Sie die folgenden Schritte ausführen, um die Protokolle zu erfassen:
- Wechseln Sie zu Einstellungen (das Zahnradsymbol auf der linken Seite) >Anwendung>Anmelden. Wählen Sie Ausführliche Authentifizierungsprotokollierung aus. Wenn Storage-Explorer aufgrund eines Problems mit der Authentifizierungsbibliothek nicht gestartet werden kann, wird dieser Schritt für Sie ausgeführt.
- Schließen Sie Storage-Explorer.
- Optional/empfohlen: Löschen Sie vorhandene Protokolle aus dem Protokollordner . Dieser Schritt reduziert die Menge an Informationen, die Sie uns senden müssen.
- Öffnen Sie Storage-Explorer, und reproduzieren Sie Ihr Problem.
- Schließen Sie Storage-Explorer.
- Zippen Sie den Inhalt des Protokollordners .
AzCopy-Protokolle
Wenn Sie Probleme beim Übertragen von Daten haben, müssen Sie möglicherweise die AzCopy-Protokolle abrufen. AzCopy-Protokolle können problemlos über zwei verschiedene Methoden gefunden werden:
Wenn übertragungsfehler sich noch im Aktivitätsprotokoll befinden, wählen Sie Zur AzCopy-Protokolldatei wechseln aus.
Für Übertragungen, bei denen in der Vergangenheit ein Fehler aufgetreten ist, wechseln Sie zum Ordner AzCopy-Protokolle. Diesen Ordner finden Sie unter:
- Windows: C:\Users\<Ihr Benutzername>\.azcopy
- macOS: ~/.azcopy
- Linux: ~/.azcopy
Netzwerkprotokolle
Bei einigen Problemen müssen Sie Protokolle der Netzwerkaufrufe bereitstellen, die von Storage-Explorer ausgeführt werden. Unter Windows können Sie Mithilfe von Fiddler Netzwerkprotokolle abrufen.
Hinweis
Fiddler-Ablaufverfolgungen können Kennwörter enthalten, die Sie während der Erfassung der Ablaufverfolgung in Ihrem Browser eingegeben oder gesendet haben. Lesen Sie unbedingt die Anweisungen zum Bereinigen einer Fiddler-Ablaufverfolgung. Laden Sie keine Fiddler-Ablaufverfolgungen auf GitHub hoch. Sie werden informiert, wo Sie Ihre Fiddler-Ablaufverfolgung sicher senden können.
Teil 1: Installieren und Konfigurieren von Fiddler
- Installieren Sie Fiddler.
- Starten Sie Fiddler.
- Wechseln Sie zu Extras>Optionen.
- Wählen Sie die Registerkarte HTTPS aus.
- Stellen Sie sicher, dass CONNECTs erfassen und HTTPS-Datenverkehr entschlüsseln ausgewählt sind.
- Wählen Sie Aktionen aus.
- Wählen Sie Stammzertifikat vertrauen und dann im nächsten Dialogfeld Ja aus.
- Starten Sie Storage-Explorer.
- Wechseln Sie zu Einstellungen (das Zahnradsymbol auf der linken Seite) >Anwendungsproxy>.
- Ändern Sie die Dropdownliste proxy source in Use system proxy (preview).
- Starten Sie Storage-Explorer neu.
- In Fiddler sollten Netzwerkaufrufe aus einem
storageexplorer:Prozess angezeigt werden.
Teil 2: Reproduzieren des Problems
- Schließen Sie alle apps außer Fiddler.
- Löschen Sie das Fiddler-Protokoll, indem Sie das X in der oberen linken Ecke neben dem Menü Ansicht verwenden.
- Optional/empfohlen: Lassen Sie Fiddler für einige Minuten festlegen. Wenn Netzwerkaufrufe angezeigt werden, die sich nicht auf Storage-Explorer beziehen, klicken Sie mit der rechten Maustaste darauf, und wählen Sie Jetzt> FilternProzessnamen> ausblenden <aus.
- Storage-Explorer starten/neu starten.
- Reproduzieren Sie das Problem.
- Wählen Sie Datei>Alle Sitzungen speichern> aus. Speichern Sie es an einem Ort, den Sie nicht vergessen werden.
- Schließen Sie Fiddler und Storage-Explorer.
Teil 3: Bereinigen der Fiddler-Ablaufverfolgung
- Doppelklicken Sie auf die Fiddler-Ablaufverfolgung (SAZ-Datei).
- Drücken Sie STRG + F.
- Stellen Sie im angezeigten Dialogfeld sicher, dass die folgenden Optionen festgelegt sind: Search = Anforderungen und Antworten und Überprüfen = vonHeadern und Textkörpern.
- Search für alle Kennwörter, die Sie beim Sammeln der Fiddler-Ablaufverfolgung verwendet haben, sowie für alle hervorgehobenen Einträge. Klicken Sie mit der rechten Maustaste, und wählen SieAusgewählte Sitzungenentfernen> aus.
- Wenn Sie während der Erfassung der Ablaufverfolgung definitiv Kennwörter in Ihren Browser eingegeben haben, aber keine Einträge finden, wenn Sie STRG + F verwenden, Ihre Kennwörter nicht ändern möchten oder wenn die von Ihnen verwendeten Kennwörter für andere Konten verwendet werden, überspringen Sie das Senden der SAZ-Datei.
- Speichern Sie die Ablaufverfolgung erneut mit einem neuen Namen.
- Optional: Löschen Sie die ursprüngliche Ablaufverfolgung.
Nächste Schritte
Wenn keine dieser Lösungen für Sie geeignet ist, verwenden Sie eine der folgenden Methoden:
Öffnen Sie ein Problem auf GitHub, indem Sie in der unteren linken Ecke die Schaltfläche Problem an GitHub melden auswählen.
Informationen zum Haftungsausschluss von Drittanbietern
Die in diesem Artikel genannten Drittanbieterprodukte stammen von Herstellern, die von Microsoft unabhängig sind. Microsoft gewährt keine implizite oder sonstige Garantie in Bezug auf die Leistung oder Zuverlässigkeit dieser Produkte.
Kontaktieren Sie uns für Hilfe
Wenn Sie Fragen haben oder Hilfe mit Ihren Azure-Gutschriften benötigen, dann erstellen Sie beim Azure-Support eine Support-Anforderung oder fragen Sie den Azure Community-Support. Sie können auch Produktfeedback an die Azure Feedback Community senden.
Feedback
Bald verfügbar: Im Laufe des Jahres 2024 werden wir GitHub-Issues stufenweise als Feedbackmechanismus für Inhalte abbauen und durch ein neues Feedbacksystem ersetzen. Weitere Informationen finden Sie unter https://aka.ms/ContentUserFeedback.
Feedback senden und anzeigen für