Erstellen von VMs in einer Skalierungsgruppe über das Azure-Portal
In diesem Artikel wird beschrieben, wie Sie im Azure-Portal eine VM-Skalierungsgruppe erstellen.
Anmelden an Azure
Melden Sie sich beim Azure-Portal an.
Erstellen einer VM-Skalierungsgruppe
Sie können eine Skalierungsgruppe mit einem Windows Server-Image oder Linux-Image wie RHEL, Ubuntu oder SLES bereitstellen.
Suchen Sie in der Suchleiste von Azure-Portal nach Virtual Machine Scale Sets, und wählen Sie diese Option aus.
Wählen Sie auf der Seite VM-Skalierungsgruppen die Option Erstellen aus.
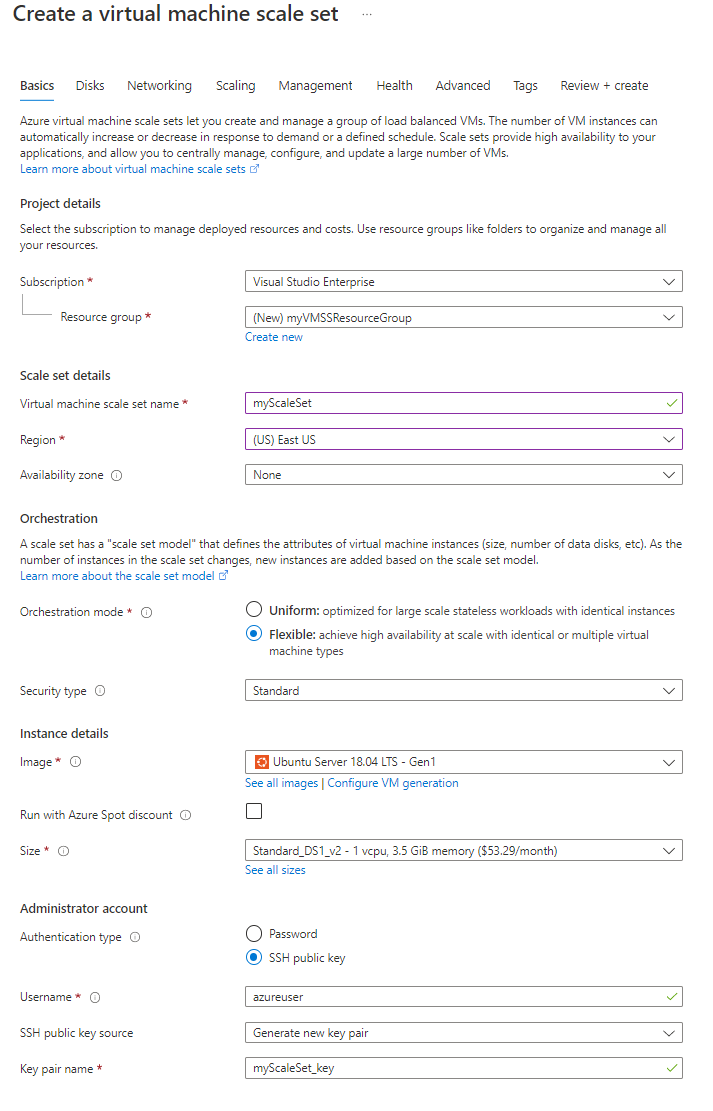
Stellen Sie auf der Registerkarte Grundlagen unter Projektdetails sicher, dass das richtige Abonnement ausgewählt ist, und erstellen Sie eine neue Ressourcengruppe mit dem Namen myVMSSResourceGroup.
Legen Sie unter Details zur Skalierungsgruppe für Ihren Skalierungsgruppennamen myScaleSet fest, und wählen Sie eine Region aus, die in Ihrer Nähe liegt.
Wählen Sie unter Orchestrierung die Option Flexibel aus.
Wählen Sie unter Instanzdetails ein Marketplace-Bild für Bild aus. Wählen Sie eine der unterstützten Distributionen aus.
Konfigurieren Sie unter Administratorkonto den Administratornamen, und legen Sie ein Kennwort oder einen öffentlichen SSH-Schlüssel fest.
- Ein Kennwort muss 12 Zeichen lang sein und zur Erfüllung der Komplexitätsanforderungen drei der folgenden vier Elemente enthalten: einen Kleinbuchstaben, einen Großbuchstaben, eine Zahl und ein Sonderzeichen. Weitere Informationen finden Sie im Artikel zu den Anforderungen an Benutzernamen und Kennwörter.
- Wenn Sie ein Datenträgerimage für Linux-Betriebssysteme auswählen, können Sie stattdessen einen öffentlichen SSH-Schlüssel auswählen. Sie können einen vorhandenen Schlüssel verwenden oder einen neuen erstellen. In diesem Beispiel generiert Azure ein neues Schlüsselpaar für uns. Weitere Informationen zum Generieren von Schlüsselpaaren finden Sie unter Erstellen und Verwenden von SSH-Schlüsseln.

Wählen Sie Weiter: Datenträger aus, um zu den Optionen für die Datenträgerkonfiguration zu wechseln. Behalten Sie für diese Schnellstartanleitung die Standardwerte der Datenträgerkonfiguration bei.
Wählen Sie Weiter: Netzwerk aus, um zu den Optionen für die Netzwerkkonfiguration zu wechseln.
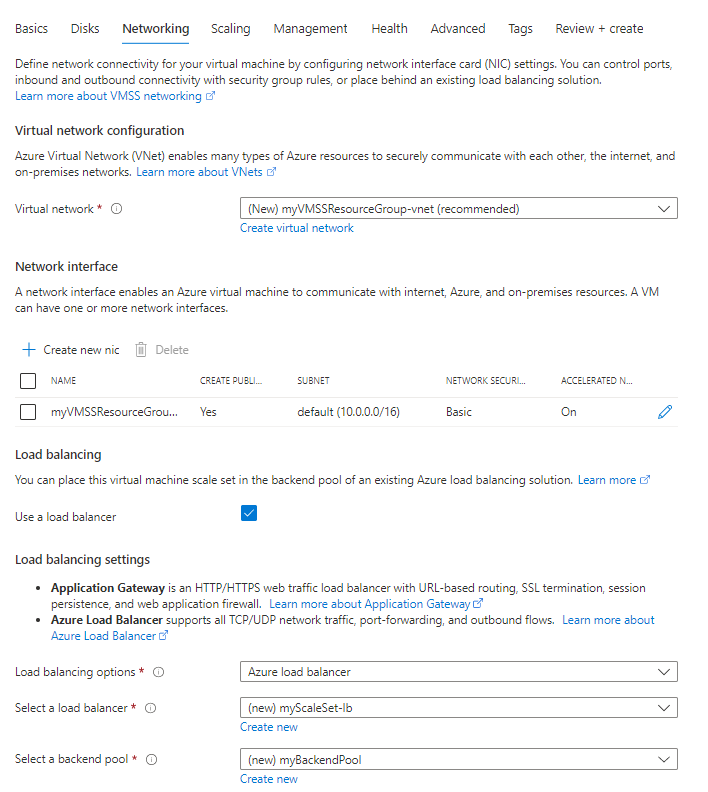
Aktivieren Sie auf der Seite Netzwerk unter Lastenausgleich das Kontrollkästchen Lastenausgleichsmodul verwenden, um die Skalierungsgruppeninstanzen hinter einen Lastenausgleich zu setzen.
Wählen Sie unter Optionen für den Lastenausgleich die Option Azure Load Balancer aus.
Wählen Sie unter Load Balancer auswählen einen Lastenausgleich aus, oder erstellen Sie einen neuen Lastenausgleich.
Wählen Sie unter Back-End-Pool auswählen die Option Neuen erstellen aus, geben Sie myBackendPool ein, und wählen Sie dann Erstellen aus.

Wählen Sie Weiter: Skalierung aus, um zu den Skalierungskonfigurationen zu wechseln.
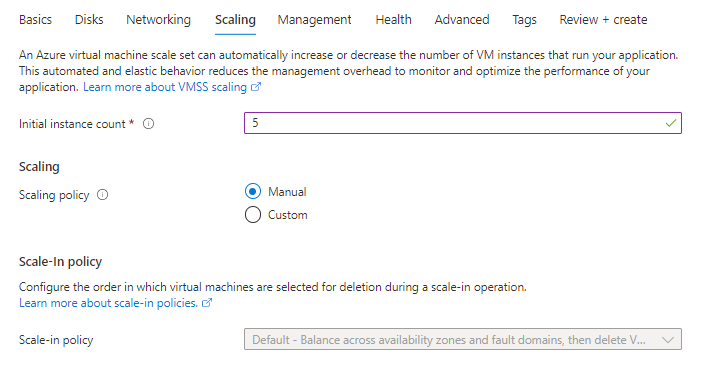
Legen Sie auf der Seite Skalierung das Feld Anzahl der Anfangsinstanzen auf 5 fest. Sie können diese Zahl auf bis zu 1000 einstellen.
Behalten Sie für die Skalierungsrichtlinie die Einstellung Manuell bei.

- Wählen Sie abschließend Überprüfen + erstellen aus.
- Wählen Sie nach der erfolgreichen Überprüfung Erstellen aus, um die Skalierungsgruppe bereitzustellen.
Bereinigen von Ressourcen
Wenn Ressourcengruppe, Skalierungsgruppe und alle zugehörigen Ressourcen nicht mehr benötigt werden, löschen Sie sie. Wählen Sie hierzu die Ressourcengruppe für die Skalierungsgruppe und anschließend Löschen aus.