How to host Composer as a Web App on an Ubuntu VM in Azure
APPLIES TO: Composer v2.x
We recommend installing Bot Framework Composer as a desktop application. If the desktop app isn't suited to your needs, you can build Composer from source or host Composer in the cloud.
This article covers an approach to hosting Composer in the cloud as a service. It also covers topics related to customizing and extending the behaviors of Composer in this environment.
Who is this for?
Hosting Composer in the cloud is a technical process that involves setting up and configuring cloud resources and writing code. A high level of technical proficiency is necessary to execute this process.
However, this document should provide enough background information to users interested in evaluating this approach without having to implement it yourself.
Prerequisites
- A subscription to Microsoft Azure.
- Knowledge of Linux and familiarity with package management.
- Familiarity with nginx, or a similar web server and proxy service, and using it from the command line.
Composer application architecture
Composer is a fairly traditional web application and it consists of several major components:
- The core Composer application, a React and Node webapp.
- A back-end web server that hosts the website and provides features like access to bot projects. This component is a Node.js application.
- A front-end client that provides the authoring tools and user interface. This component is a React JS application.
- A web application that acts as a bot runtime for dotnet or JavaScript bots.
- The bot runtime is an application that takes the content authored in Composer and interprets it to provide a running bot that can be interacted with via the Emulator or other client.
In most configurations, there will be one copy of the core Composer application running that will serve all users. It's possible to restrict access to this service using Microsoft Entra ID or a similar system.
In addition, there will be one or more bot runtime applications running for testing purposes—designed to be managed through Composer. In the default configuration, these processes run in the background on the same computer that hosts Composer. It's possible to change this behavior using plugins.
In the next sections, you'll learn how to host Composer in an Azure VM.
Create a virtual machine
In its default configuration, Composer uses the local file system to read and write content, and also starts and stops processes "in the background" to enable real-time testing of bots. As a result, our recommended hosting environment for a bot is an Azure VM.
This type of host provides several key capabilities:
- Ability to read and write files to the local filesystem.
- Ability to execute processes.
- Ability to have a custom networking configuration and proxy settings.
When you create an Azure VM, we recommend using Ubuntu. In the VM networking configuration, allow inbound connections to port 3000, which allows connections to both Composer and the bot apps. You'll need a port range like 3979-3999 to allow for bots to run locally.
Note
You can choose the type of VM to host Composer, but this article is specific to hosting Composer in an Ubuntu VM.
Get Composer up and running
In your VM instance, install the following prerequisites with correct versions.
This article uses nvm to manage Node.js version on the VM.
Tip
Depending on your Unix account permissions, you may need to preface these commands with
sudoto enable administrative access.Update the packages available.
apt updateInstall Node.js.
apt install nodejsTip
If you're unable to install Nodejs, you may need to use the
nodesourceinstructions for Debian and Ubuntu based distributions.Install npm the node package manager.
apt install npmUse npm to install yarn.
npm install -g yarnInstall the nvm node version manager
curl -o- https://raw.githubusercontent.com/creationix/nvm/v0.35.1/install.sh | bashUse nvm to install the long term support version of node 14.x.
nvm install --ltsGet the updated Ubuntu packages for dotnet.
wget https://packages.microsoft.com/config/ubuntu/18.04/packages-microsoft-prod.deb -O packages-microsoft-prod.deb && dpkg -i packages-microsoft-prod.debInstall the .NET SDK.
apt-get update; apt-get install -y apt-transport-https && apt-get update && apt-get install -y dotnet-sdk-3.1
Create a fork of the Composer repo. With a fork of Composer, you can make small modifications to the codebase and still pull upstream changes.
To enable the use of QnA Maker, run this command every time before starting Composer:
Note
Azure QnA Maker will be retired on 31 March 2025. Beginning 1 October 2022, you won't be able to create new QnA Maker resources or knowledge bases. A newer version of the question and answering capability is now available as part of Azure AI Language.
Custom question answering, a feature of Azure AI Language, is the updated version of the QnA Maker service. For more information about question-and-answer support in Composer, see Natural language processing.
export QNA_SUBSCRIPTION_KEY=<Your_QnA_Subscription_Key>Follow the instructions below to build Composer and run it.
cd Composer
yarn
yarn build
yarn start
In your VM instance, load Composer in a browser at
localhost:3000and verify that you can use Composer in it.Outside your VM, load Composer in a browser at
http://<IP ADDRESS OF VM>:3000and verify that you can use Composer at this URL.
Set up nginx
After you deploy Composer into your VM, it's accessible as a web app at http://<IP ADDRESS OF VM>:3000.
You can use a web server and proxy service, such as nginx or HAProxy, to make Composer available on port 80 instead of port 3000. This can simplify access to your hosted Composer. It can sit in front of the Composer service and pass requests into Composer. It can also be used to enable SSL on the domain without binding with Composer, and to proxy the individual bot processes instead of exposing their ports to the Internet.
Tip
The following steps are specific to nginx.
Install nginx.
# install nginx web server
apt install nginx
# edit the main config file
vi /etc/nginx/sites-enabled/default
Edit the default nginx config to proxy all requests to the composer app running at
:3000.Find the section that says:
location / {
    # First attempt to serve request as file, then
    # as directory, then fall back to displaying a 404.
    try_files $uri $uri/ =404;
}
Replace the above with the following:
location / {
    # First attempt to serve request as file, then
    # as directory, then fall back to displaying a 404.
    proxy_pass http://127.0.0.1:3000;
    proxy_http_version 1.1;
    proxy_set_header Upgrade $http_upgrade;
    proxy_set_header Connection "Upgrade";
    proxy_set_header Host $host;
}
Now you can load
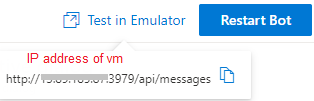
http://<ip address of VM>/and you should see Composer. No port number is required. You should be able to create and edit bots in Composer. You should also be able to start the bot; however, the URL for the bot will belocalhost(hover over Test in Emulator). In the next step, you'll fix the URL by patching the code of Composer in two small places.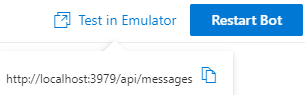
Update Start Bot Emulator links
The default URL for the Emulator link is localhost. Now that Composer is hosted in your VM, you should update this URL in the Emulator.
In your fork, navigate to the
Composer\plugins\localPublish\src\localPublish\src\index.jsfile and updatelocalhostto your IP or hostname. There are two places you need to update this.Run
yarn build:pluginsto rebuild this plugin file.Run
yarn startallto restart your Composer app.Now if you create a bot, click Start Bot then click Test in Emulator. Emulator should open and connect to your dev bot.
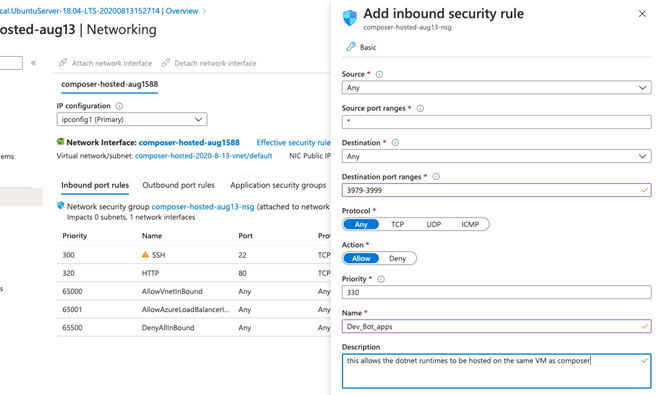
If you want to allow bots to run and be connected on this instance of Composer, you should open network ports. In your Azure portal, go to the VM's networking tab. Add an inbound security rule.
Set up Composer to run after you log out
You can set up Composer to run even after you log out. Follow the steps:
Install pm2 process manager.
npm install -g pm2Start Composer using pm2. This will allow the app to continue running even once you log out.
pm2 start npm --name composer -- startTest to see if Composer is already running by using
pm2 list
You now have a working copy of Composer in a shared location.
Important
Without additional steps, anyone can access this instance of Composer. Before you leave it running, take measures to secure the access control either by installing an auth plugin covered in this article or by turning on service-level access controls via the Azure portal.
Next steps
You can use extensions to add functionality to Composer. For example, you can set up multi-user authentication or provide an alternate version of the runtime template. For more information, see how to Extend Composer.
Feedback
Bald verfügbar: Im Laufe des Jahres 2024 werden wir GitHub-Issues stufenweise als Feedbackmechanismus für Inhalte abbauen und durch ein neues Feedbacksystem ersetzen. Weitere Informationen finden Sie unter https://aka.ms/ContentUserFeedback.
Feedback senden und anzeigen für