Erstellen von Android-Apps mit Microsoft Graph
In diesem Lernprogramm erfahren Sie, wie Sie eine Android-App erstellen, die die Microsoft Graph-API zum Abrufen von Kalenderinformationen für einen Benutzer verwendet.
Tipp
Wenn Sie es vorziehen, nur das abgeschlossene Lernprogramm herunterzuladen, können Sie das GitHub Repository herunterladen oder klonen.
Voraussetzungen
Bevor Sie mit diesem Lernprogramm beginnen, sollten Sie Android Studio auf Ihrem Entwicklungscomputer installiert haben.
Sie sollten auch über ein persönliches Microsoft-Konto mit einem Postfach auf Outlook.com oder ein Microsoft-Geschäfts-, Schul- oder Unikonto verfügen. Wenn Sie kein Microsoft-Konto haben, gibt es einige Optionen, um ein kostenloses Konto zu erhalten:
- Sie können sich für ein neues persönliches Microsoft-Konto registrieren.
- Sie können sich für das Microsoft 365-Entwicklerprogramm registrieren, um ein kostenloses Microsoft 365 Abonnement zu erhalten.
Hinweis
Dieses Lernprogramm wurde mit Android Studio Version 4.1.3 und dem Android 10.0 SDK geschrieben. Die Schritte in diesem Handbuch funktionieren möglicherweise mit anderen Versionen, die jedoch nicht getestet wurden.
Feedback
Bitte geben Sie Feedback zu diesem Lernprogramm im GitHub Repository.
Erstellen einer Android-App
Erstellen Sie zunächst ein neues Android Studio-Projekt.
Öffnen Sie Android Studio, und wählen Sie auf der Willkommensseite ein neues Android Studio-Projekt starten aus.
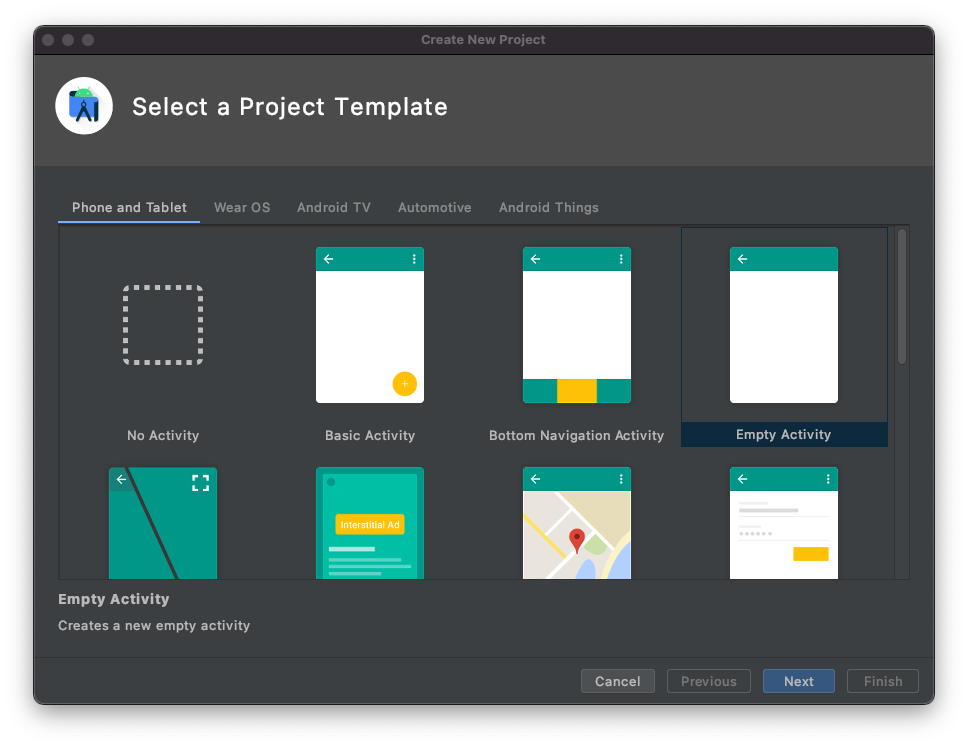
Wählen Sie im Dialogfeld "Neue Project erstellen" die Option "Leere Aktivität" und dann "Weiter" aus.
Legen Sie im Dialogfeld Projekt konfigurieren den Namen auf
Graph Tutorial, stellen Sie sicher, dass das Feld "Sprache " festgelegtJavaist, und stellen Sie sicher, dass die MINIMALE API-Ebene aufAPI 29: Android 10.0 (Q)festgelegt ist. Ändern Sie den Paketnamen und den Speicherort nach Bedarf. Wählen Sie Fertig stellen aus.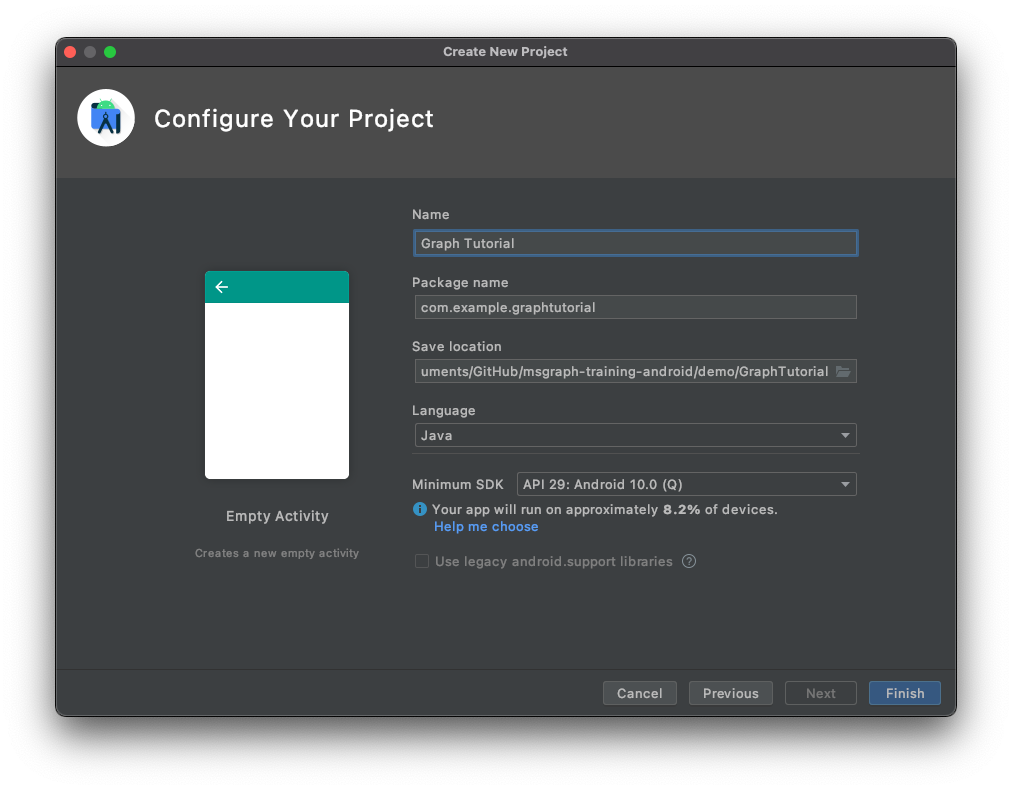
Wichtig
Der Code und die Anweisungen in diesem Lernprogramm verwenden den Paketnamen "com.example.graphtutorial". Wenn Sie beim Erstellen des Projekts einen anderen Paketnamen verwenden, müssen Sie ihren Paketnamen überall dort verwenden, wo dieser Wert angezeigt wird.
Installieren von Abhängigkeiten
Bevor Sie fortfahren, installieren Sie einige zusätzliche Abhängigkeiten, die Sie später verwenden werden.
com.google.android.material:materialum die Navigationsansicht für die App verfügbar zu machen.- Microsoft Authentication Library (MSAL) für Android zur Behandlung Azure AD Authentifizierung und Tokenverwaltung.
- Microsoft Graph SDK für Java für Aufrufe der Microsoft-Graph.
Erweitern Sie Gradle-Skripts, und öffnen Sie dann build.gradle (Modul: Graph_Tutorial.app).
Fügen Sie die folgenden Zeilen innerhalb des Werts
dependencieshinzu.implementation 'com.google.android.material:material:1.3.0' implementation 'com.microsoft.identity.client:msal:2.0.8' implementation ('com.microsoft.graph:microsoft-graph:3.1.0') { exclude group: 'javax.activation' }Fügen Sie einen
packagingOptionsWert innerhalb desandroidWerts in "build.gradle" (Modul: Graph_Tutorial.app) hinzu.packagingOptions { pickFirst 'META-INF/*' }Fügen Sie das Azure Maven-Repository für die MicrosoftDeviceSDK-Bibliothek hinzu, eine Abhängigkeit von MSAL. Öffnen Sie "build.gradle" (Project: Graph_Tutorial). Fügen Sie dem Wert innerhalb des Werts Folgendes
repositoriesallprojectshinzu.maven { url 'https://pkgs.dev.azure.com/MicrosoftDeviceSDK/DuoSDK-Public/_packaging/Duo-SDK-Feed/maven/v1' }Speichern Sie Ihre Änderungen. Wählen Sie im Menü "Datei**" die Option "Project mit Gradle-Dateien synchronisieren" aus**.
Entwerfen der App
Die Anwendung verwendet eine Navigationsschublade, um zwischen verschiedenen Ansichten zu navigieren. In diesem Schritt aktualisieren Sie die Aktivität so, dass ein Navigationsschubladenlayout verwendet wird, und fügen Fragmente für die Ansichten hinzu.
Erstellen einer Navigationsschublade
In diesem Abschnitt erstellen Sie Symbole für das Navigationsmenü der App, erstellen ein Menü für die Anwendung und aktualisieren das Design und Layout der Anwendung so, dass sie mit einer Navigationsschublade kompatibel sind.
Erstellen von Symbolen
Klicken Sie mit der rechten Maustaste auf den Ordner "app/res/drawable ", und wählen Sie "Neu" und dann " Vector Asset" aus.
Klicken Sie auf die Symbolschaltfläche neben ClipArt.
Geben
homeSie im Fenster "Symbol auswählen" die Suchleiste ein, wählen Sie dann das Startsymbol aus, und wählen Sie "OK" aus.Ändern Sie den Namen in
ic_menu_home.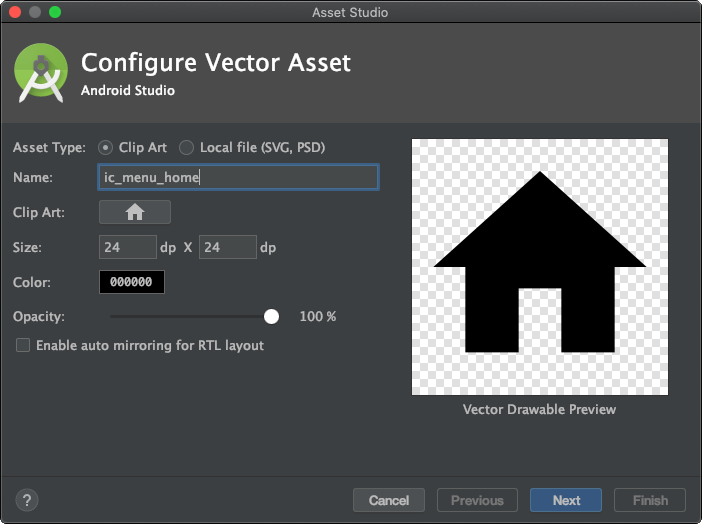
Wählen Sie "Weiter" und dann "Fertig stellen" aus.
Wiederholen Sie den vorherigen Schritt, um vier weitere Symbole zu erstellen.
- Name:
ic_menu_calendar, Symbol:event - Name:
ic_menu_add_event, Symbol:add box - Name:
ic_menu_signout, Symbol:exit to app - Name:
ic_menu_signin, Symbol:person add
- Name:
Erstellen des Menüs
Klicken Sie mit der rechten Maustaste auf den Ordner "Res ", und wählen Sie "Neu" und dann " Android-Ressourcenverzeichnis" aus.
Ändern Sie den Ressourcentyp in
menu"OK", und wählen Sie "OK" aus.Klicken Sie mit der rechten Maustaste auf den neuen Menüordner , und wählen Sie "Neu" und dann " Menüressourcendatei" aus.
Benennen Sie die Datei
drawer_menu, und wählen Sie "OK" aus.Wenn die Datei geöffnet wird, wählen Sie die Registerkarte "Code " aus, um den XML-Code anzuzeigen, und ersetzen Sie dann den gesamten Inhalt durch Folgendes.
<?xml version="1.0" encoding="utf-8"?>
<menu xmlns:android="http://schemas.android.com/apk/res/android"
    xmlns:tools="http://schemas.android.com/tools"
    tools:showIn="navigation_view">

    <group android:checkableBehavior="single">
        <item
            android:id="@+id/nav_home"
            android:icon="@drawable/ic_menu_home"
            android:title="Home" />

        <item
            android:id="@+id/nav_calendar"
            android:icon="@drawable/ic_menu_calendar"
            android:title="Calendar" />

        <item
            android:id="@+id/nav_create_event"
            android:icon="@drawable/ic_menu_add_event"
            android:title="New Event" />

        <item
            android:id="@+id/nav_signout"
            android:icon="@drawable/ic_menu_signout"
            android:title="Sign Out" />

        <item
            android:id="@+id/nav_signin"
            android:icon="@drawable/ic_menu_signin"
            android:title="Sign In" />
    </group>
</menu>
Aktualisieren des Anwendungsdesigns und -layouts
Öffnen Sie die Datei "app/res/values/themes.xml ", und fügen Sie die folgenden Zeilen innerhalb des
styleElements hinzu.<item name="windowActionBar">false</item> <item name="windowNoTitle">true</item>Öffnen Sie die Datei "app/res/values-night/themes.xml ", und fügen Sie die folgenden Zeilen innerhalb des
styleElements hinzu.<item name="windowActionBar">false</item> <item name="windowNoTitle">true</item>Klicken Sie mit der rechten Maustaste auf den Ordner "app/res/layout ".
Select New, then Layout resource file.
Benennen Sie die Datei
nav_header, und ändern Sie das Stammelement inLinearLayout, und wählen Sie dann OK aus.Öffnen Sie die dateinav_header.xml , und wählen Sie die Registerkarte "Code " aus. Ersetzen Sie den gesamten Inhalt durch Folgendes.
<?xml version="1.0" encoding="utf-8"?>
<LinearLayout xmlns:android="http://schemas.android.com/apk/res/android"
    android:layout_width="match_parent"
    android:layout_height="176dp"
    android:background="?colorPrimary"
    android:gravity="bottom"
    android:orientation="vertical"
    android:padding="16dp"
    android:theme="@style/Theme.GraphTutorial">

    <ImageView
        android:id="@+id/user_profile_pic"
        android:layout_width="wrap_content"
        android:layout_height="wrap_content"
        android:src="@mipmap/ic_launcher" />

    <TextView
        android:id="@+id/user_name"
        android:layout_width="wrap_content"
        android:layout_height="wrap_content"
        android:paddingTop="8dp"
        android:text="Test User"
        android:textColor="?colorOnPrimary"
        android:textAppearance="@style/TextAppearance.AppCompat.Body1" />

    <TextView
        android:id="@+id/user_email"
        android:layout_width="wrap_content"
        android:layout_height="wrap_content"
        android:text="test@contoso.com"
        android:textColor="?colorOnPrimary" />

</LinearLayout>
Öffnen Sie die Datei "app/res/layout/activity_main.xml ", und aktualisieren Sie das Layout auf einen
DrawerLayout, indem Sie den vorhandenen XML-Code durch Folgendes ersetzen.<?xml version="1.0" encoding="utf-8"?> <androidx.drawerlayout.widget.DrawerLayout xmlns:android="http://schemas.android.com/apk/res/android" xmlns:app="http://schemas.android.com/apk/res-auto" xmlns:tools="http://schemas.android.com/tools" android:id="@+id/drawer_layout" android:layout_width="match_parent" android:layout_height="match_parent" android:fitsSystemWindows="true" tools:context=".MainActivity" tools:openDrawer="start"> <RelativeLayout android:layout_width="match_parent" android:layout_height="match_parent" android:orientation="vertical"> <ProgressBar android:id="@+id/progressbar" android:layout_width="75dp" android:layout_height="75dp" android:layout_centerInParent="true" android:visibility="gone"/> <androidx.appcompat.widget.Toolbar android:id="@+id/toolbar" android:layout_width="match_parent" android:layout_height="?attr/actionBarSize" android:background="?colorPrimary" app:titleTextColor="?colorOnPrimary" android:elevation="4dp" android:theme="@style/Theme.GraphTutorial" /> <FrameLayout android:id="@+id/fragment_container" android:layout_width="match_parent" android:layout_height="match_parent" android:layout_below="@+id/toolbar" /> </RelativeLayout> <com.google.android.material.navigation.NavigationView android:id="@+id/nav_view" android:layout_width="wrap_content" android:layout_height="match_parent" android:layout_gravity="start" app:headerLayout="@layout/nav_header" app:menu="@menu/drawer_menu" /> </androidx.drawerlayout.widget.DrawerLayout>Öffnen Sie app/res/values/strings.xml , und fügen Sie die folgenden Elemente innerhalb des
resourcesElements hinzu.<string name="navigation_drawer_open">Open navigation drawer</string> <string name="navigation_drawer_close">Close navigation drawer</string>Öffnen Sie die Datei "app/java/com.example/graphtutorial/MainActivity ", und ersetzen Sie den gesamten Inhalt durch Folgendes.
package com.example.graphtutorial;

import android.os.Bundle;
import android.view.Menu;
import android.view.MenuItem;
import android.view.View;
import android.widget.FrameLayout;
import android.widget.ProgressBar;
import android.widget.TextView;
import androidx.annotation.NonNull;
import androidx.appcompat.app.ActionBarDrawerToggle;
import androidx.appcompat.app.AppCompatActivity;
import androidx.appcompat.widget.Toolbar;
import androidx.core.view.GravityCompat;
import androidx.drawerlayout.widget.DrawerLayout;
import com.google.android.material.navigation.NavigationView;

public class MainActivity extends AppCompatActivity implements NavigationView.OnNavigationItemSelectedListener {
    private static final String SAVED_IS_SIGNED_IN = "isSignedIn";
    private static final String SAVED_USER_NAME = "userName";
    private static final String SAVED_USER_EMAIL = "userEmail";
    private static final String SAVED_USER_TIMEZONE = "userTimeZone";

    private DrawerLayout mDrawer;
    private NavigationView mNavigationView;
    private View mHeaderView;
    private boolean mIsSignedIn = false;
    private String mUserName = null;
    private String mUserEmail = null;
    private String mUserTimeZone = null;

    @Override
    protected void onCreate(Bundle savedInstanceState) {
        super.onCreate(savedInstanceState);
        setContentView(R.layout.activity_main);

        // Set the toolbar
        Toolbar toolbar = findViewById(R.id.toolbar);
        setSupportActionBar(toolbar);

        mDrawer = findViewById(R.id.drawer_layout);

        // Add the hamburger menu icon
        ActionBarDrawerToggle toggle = new ActionBarDrawerToggle(this, mDrawer, toolbar,
                R.string.navigation_drawer_open, R.string.navigation_drawer_close);
        mDrawer.addDrawerListener(toggle);
        toggle.syncState();

        mNavigationView = findViewById(R.id.nav_view);

        // Set user name and email
        mHeaderView = mNavigationView.getHeaderView(0);
        setSignedInState(mIsSignedIn);

        // Listen for item select events on menu
        mNavigationView.setNavigationItemSelectedListener(this);

        if (savedInstanceState == null) {
            // Load the home fragment by default on startup
            openHomeFragment(mUserName);
        } else {
            // Restore state
            mIsSignedIn = savedInstanceState.getBoolean(SAVED_IS_SIGNED_IN);
            mUserName = savedInstanceState.getString(SAVED_USER_NAME);
            mUserEmail = savedInstanceState.getString(SAVED_USER_EMAIL);
            mUserTimeZone = savedInstanceState.getString(SAVED_USER_TIMEZONE);
            setSignedInState(mIsSignedIn);
        }
    }

    @Override
    protected void onSaveInstanceState(@NonNull Bundle outState) {
        super.onSaveInstanceState(outState);
        outState.putBoolean(SAVED_IS_SIGNED_IN, mIsSignedIn);
        outState.putString(SAVED_USER_NAME, mUserName);
        outState.putString(SAVED_USER_EMAIL, mUserEmail);
        outState.putString(SAVED_USER_TIMEZONE, mUserTimeZone);
    }

    @Override
    public boolean onNavigationItemSelected(@NonNull MenuItem menuItem) {
        // TEMPORARY
        return false;
    }

    @Override
    public void onBackPressed() {
        if (mDrawer.isDrawerOpen(GravityCompat.START)) {
            mDrawer.closeDrawer(GravityCompat.START);
        } else {
            super.onBackPressed();
        }
    }

    public void showProgressBar()
    {
        FrameLayout container = findViewById(R.id.fragment_container);
        ProgressBar progressBar = findViewById(R.id.progressbar);
        container.setVisibility(View.GONE);
        progressBar.setVisibility(View.VISIBLE);
    }

    public void hideProgressBar()
    {
        FrameLayout container = findViewById(R.id.fragment_container);
        ProgressBar progressBar = findViewById(R.id.progressbar);
        progressBar.setVisibility(View.GONE);
        container.setVisibility(View.VISIBLE);
    }

    // Update the menu and get the user's name and email
    private void setSignedInState(boolean isSignedIn) {
        mIsSignedIn = isSignedIn;

        mNavigationView.getMenu().clear();
        mNavigationView.inflateMenu(R.menu.drawer_menu);

        Menu menu = mNavigationView.getMenu();

        // Hide/show the Sign in, Calendar, and Sign Out buttons
        if (isSignedIn) {
            menu.removeItem(R.id.nav_signin);
        } else {
            menu.removeItem(R.id.nav_home);
            menu.removeItem(R.id.nav_calendar);
            menu.removeItem(R.id.nav_create_event);
            menu.removeItem(R.id.nav_signout);
        }

        // Set the user name and email in the nav drawer
        TextView userName = mHeaderView.findViewById(R.id.user_name);
        TextView userEmail = mHeaderView.findViewById(R.id.user_email);

        if (isSignedIn) {
            // For testing
            mUserName = "Lynne Robbins";
            mUserEmail = "lynner@contoso.com";
            mUserTimeZone = "Pacific Standard Time";

            userName.setText(mUserName);
            userEmail.setText(mUserEmail);
        } else {
            mUserName = null;
            mUserEmail = null;
            mUserTimeZone = null;

            userName.setText("Please sign in");
            userEmail.setText("");
        }
    }
}
Hinzufügen von Fragmenten
In diesem Abschnitt erstellen Sie Fragmente für die Startseiten- und Kalenderansichten.
Klicken Sie mit der rechten Maustaste auf den Ordner "app/res/layout ", und wählen Sie "Neu" und dann " Layoutressourcendatei" aus.
Benennen Sie die Datei
fragment_home, und ändern Sie das Stammelement inRelativeLayout, und wählen Sie dann OK aus.Öffnen Sie die dateifragment_home.xml , und ersetzen Sie den Inhalt durch Folgendes.
<?xml version="1.0" encoding="utf-8"?>
<RelativeLayout xmlns:android="http://schemas.android.com/apk/res/android"
    android:layout_width="match_parent"
    android:layout_height="match_parent">

    <LinearLayout
        android:layout_width="wrap_content"
        android:layout_height="wrap_content"
        android:layout_centerInParent="true"
        android:orientation="vertical">

        <TextView
            android:layout_width="wrap_content"
            android:layout_height="wrap_content"
            android:layout_gravity="center_horizontal"
            android:text="Welcome!"
            android:textSize="30sp" />

        <TextView
            android:id="@+id/home_page_username"
            android:layout_width="wrap_content"
            android:layout_height="wrap_content"
            android:layout_gravity="center_horizontal"
            android:paddingTop="8dp"
            android:text="Please sign in"
            android:textSize="20sp" />
    </LinearLayout>

</RelativeLayout>
Klicken Sie mit der rechten Maustaste auf den Ordner "app/res/layout ", und wählen Sie "Neu" und dann " Layoutressourcendatei" aus.
Benennen Sie die Datei
fragment_calendar, und ändern Sie das Stammelement inRelativeLayout, und wählen Sie dann OK aus.Öffnen Sie die dateifragment_calendar.xml , und ersetzen Sie den Inhalt durch Folgendes.
<?xml version="1.0" encoding="utf-8"?>
<RelativeLayout xmlns:android="http://schemas.android.com/apk/res/android"
    android:layout_width="match_parent"
    android:layout_height="match_parent">

    <TextView
        android:layout_width="wrap_content"
        android:layout_height="wrap_content"
        android:layout_centerInParent="true"
        android:text="Calendar"
        android:textSize="30sp" />

</RelativeLayout>
Klicken Sie mit der rechten Maustaste auf den Ordner "app/res/layout ", und wählen Sie "Neu" und dann " Layoutressourcendatei" aus.
Benennen Sie die Datei
fragment_new_event, und ändern Sie das Stammelement inRelativeLayout, und wählen Sie dann OK aus.Öffnen Sie die dateifragment_new_event.xml , und ersetzen Sie den Inhalt durch Folgendes.
<?xml version="1.0" encoding="utf-8"?>
<RelativeLayout xmlns:android="http://schemas.android.com/apk/res/android"
    android:layout_width="match_parent"
    android:layout_height="match_parent">

    <TextView
        android:layout_width="wrap_content"
        android:layout_height="wrap_content"
        android:layout_centerInParent="true"
        android:text="New Event"
        android:textSize="30sp" />

</RelativeLayout>
Klicken Sie mit der rechten Maustaste auf den Ordner "app/java/com.example.graphtutorial ", und wählen Sie "Neu" und dann " Java-Klasse" aus.
Benennen Sie die Klasse
HomeFragment, und wählen Sie dann OK aus.Öffnen Sie die HomeFragment-Datei , und ersetzen Sie den Inhalt durch Folgendes.
package com.example.graphtutorial;

import android.os.Bundle;
import android.view.LayoutInflater;
import android.view.View;
import android.view.ViewGroup;
import android.widget.TextView;
import androidx.annotation.NonNull;
import androidx.annotation.Nullable;
import androidx.fragment.app.Fragment;

public class HomeFragment extends Fragment {
    private static final String USER_NAME = "userName";

    private String mUserName;

    public HomeFragment() {

    }

    public static HomeFragment createInstance(String userName) {
        HomeFragment fragment = new HomeFragment();

        // Add the provided username to the fragment's arguments
        Bundle args = new Bundle();
        args.putString(USER_NAME, userName);
        fragment.setArguments(args);
        return fragment;
    }

    @Override
    public void onCreate(@Nullable Bundle savedInstanceState) {
        super.onCreate(savedInstanceState);
        if (getArguments() != null) {
            mUserName = getArguments().getString(USER_NAME);
        }
    }

    @Nullable
    @Override
    public View onCreateView(@NonNull LayoutInflater inflater, @Nullable ViewGroup container, @Nullable Bundle savedInstanceState) {
        View homeView = inflater.inflate(R.layout.fragment_home, container, false);

        // If there is a username, replace the "Please sign in" with the username
        if (mUserName != null) {
            TextView userName = homeView.findViewById(R.id.home_page_username);
            userName.setText(mUserName);
        }

        return homeView;
    }
}
Klicken Sie mit der rechten Maustaste auf den Ordner "app/java/com.example.graphtutorial ", und wählen Sie "Neu" und dann " Java-Klasse" aus.
Benennen Sie die Klasse
CalendarFragment, und wählen Sie dann OK aus.Öffnen Sie die CalendarFragment-Datei , und ersetzen Sie deren Inhalt durch Folgendes.
package com.example.graphtutorial;

import android.os.Bundle;
import android.view.LayoutInflater;
import android.view.View;
import android.view.ViewGroup;
import androidx.annotation.NonNull;
import androidx.annotation.Nullable;
import androidx.fragment.app.Fragment;

public class CalendarFragment extends Fragment {
    private static final String TIME_ZONE = "timeZone";

    private String mTimeZone;

    public CalendarFragment() {}

    public static CalendarFragment createInstance(String timeZone) {
        CalendarFragment fragment = new CalendarFragment();

        // Add the provided time zone to the fragment's arguments
        Bundle args = new Bundle();
        args.putString(TIME_ZONE, timeZone);
        fragment.setArguments(args);
        return fragment;
    }

    @Override
    public void onCreate(@Nullable Bundle savedInstanceState) {
        super.onCreate(savedInstanceState);
        if (getArguments() != null) {
            mTimeZone = getArguments().getString(TIME_ZONE);
        }
    }

    @Nullable
    @Override
    public View onCreateView(@NonNull LayoutInflater inflater, @Nullable ViewGroup container, @Nullable Bundle savedInstanceState) {
        return inflater.inflate(R.layout.fragment_calendar, container, false);
    }
}
Klicken Sie mit der rechten Maustaste auf den Ordner "app/java/com.example.graphtutorial ", und wählen Sie "Neu" und dann " Java-Klasse" aus.
Benennen Sie die Klasse
NewEventFragment, und wählen Sie dann OK aus.Öffnen Sie die Datei "NewEventFragment", und ersetzen Sie deren Inhalt durch Folgendes.
package com.example.graphtutorial;

import android.os.Bundle;
import android.view.LayoutInflater;
import android.view.View;
import android.view.ViewGroup;
import androidx.annotation.NonNull;
import androidx.annotation.Nullable;
import androidx.fragment.app.Fragment;

public class NewEventFragment extends Fragment {
    private static final String TIME_ZONE = "timeZone";

    private String mTimeZone;

    public NewEventFragment() {}

    public static NewEventFragment createInstance(String timeZone) {
        NewEventFragment fragment = new NewEventFragment();

        // Add the provided time zone to the fragment's arguments
        Bundle args = new Bundle();
        args.putString(TIME_ZONE, timeZone);
        fragment.setArguments(args);
        return fragment;
    }

    @Override
    public void onCreate(@Nullable Bundle savedInstanceState) {
        super.onCreate(savedInstanceState);
        if (getArguments() != null) {
            mTimeZone = getArguments().getString(TIME_ZONE);
        }
    }

    @Nullable
    @Override
    public View onCreateView(@NonNull LayoutInflater inflater, @Nullable ViewGroup container, @Nullable Bundle savedInstanceState) {
        return inflater.inflate(R.layout.fragment_new_event, container, false);
    }
}
Öffnen Sie die Datei "MainActivity.java ", und fügen Sie der Klasse die folgenden Funktionen hinzu.
// Load the "Home" fragment
public void openHomeFragment(String userName) {
    HomeFragment fragment = HomeFragment.createInstance(userName);
    getSupportFragmentManager().beginTransaction()
            .replace(R.id.fragment_container, fragment)
            .commit();
    mNavigationView.setCheckedItem(R.id.nav_home);
}

// Load the "Calendar" fragment
private void openCalendarFragment(String timeZone) {
    CalendarFragment fragment = CalendarFragment.createInstance(timeZone);
    getSupportFragmentManager().beginTransaction()
            .replace(R.id.fragment_container, fragment)
            .commit();
    mNavigationView.setCheckedItem(R.id.nav_calendar);
}

// Load the "New Event" fragment
private void openNewEventFragment(String timeZone) {
    NewEventFragment fragment = NewEventFragment.createInstance(timeZone);
    getSupportFragmentManager().beginTransaction()
            .replace(R.id.fragment_container, fragment)
            .commit();
    mNavigationView.setCheckedItem(R.id.nav_create_event);
}

private void signIn() {
    setSignedInState(true);
    openHomeFragment(mUserName);
}

private void signOut() {
    setSignedInState(false);
    openHomeFragment(mUserName);
}
Ersetzen Sie die vorhandene
onNavigationItemSelected-Funktion durch Folgendes.@Override public boolean onNavigationItemSelected(@NonNull MenuItem menuItem) { // Load the fragment that corresponds to the selected item switch (menuItem.getItemId()) { case R.id.nav_home: openHomeFragment(mUserName); break; case R.id.nav_calendar: openCalendarFragment(mUserTimeZone); break; case R.id.nav_create_event: openNewEventFragment(mUserTimeZone); break; case R.id.nav_signin: signIn(); break; case R.id.nav_signout: signOut(); break; } mDrawer.closeDrawer(GravityCompat.START); return true; }Speichern Sie alle Änderungen.
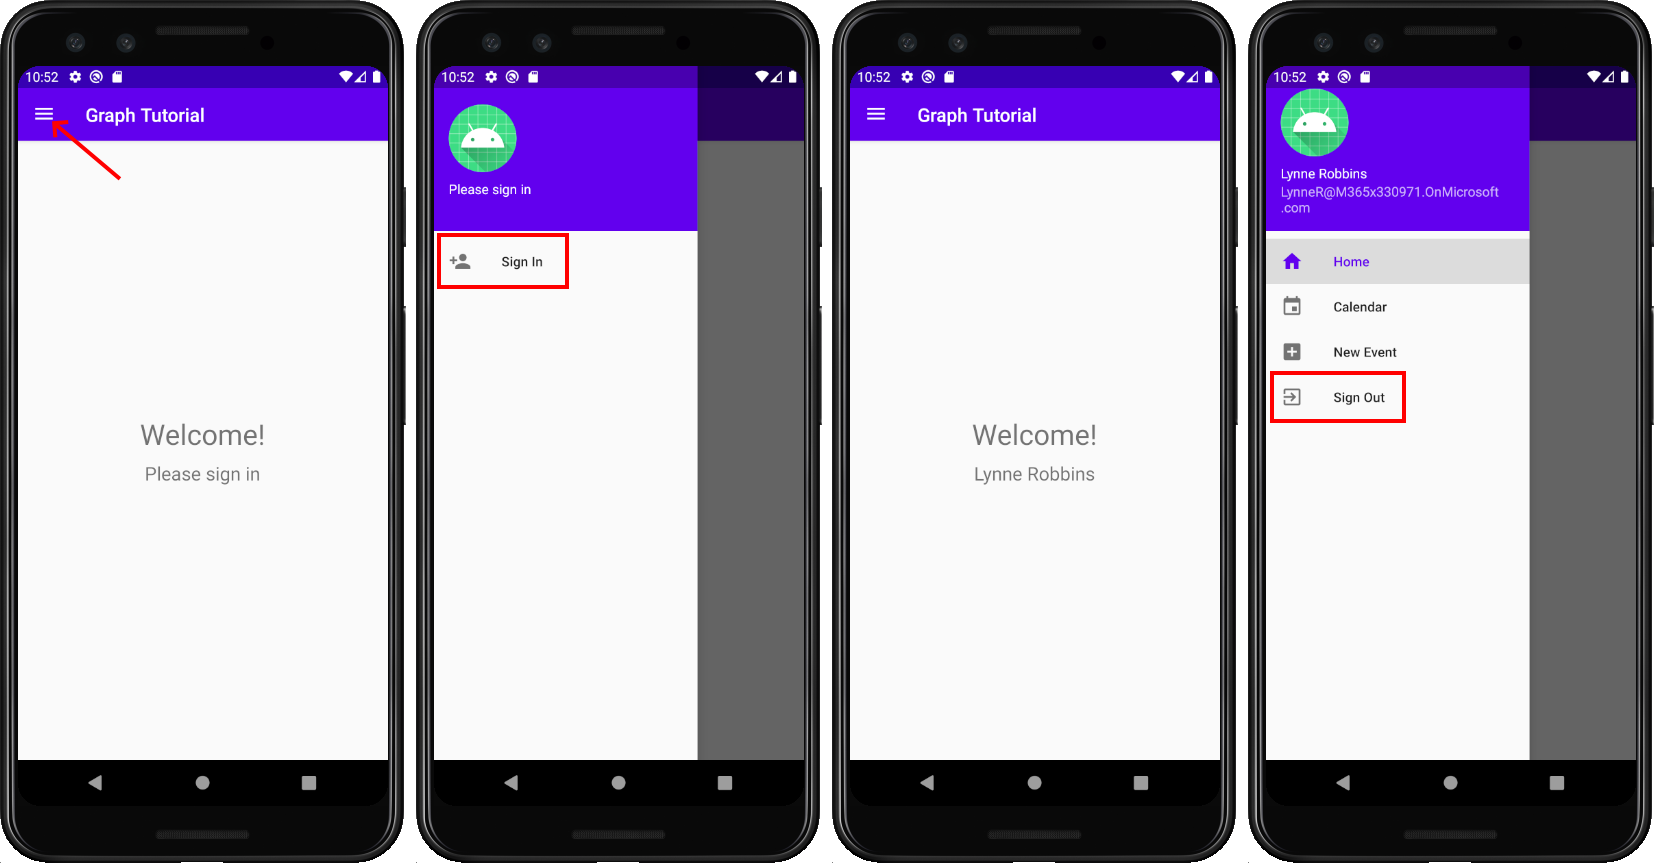
Wählen Sie im Menü "Ausführen " die Option "App ausführen" aus.
Das Menü der App sollte funktionieren, um zwischen den beiden Fragmenten zu navigieren und sich zu ändern, wenn Sie auf die Schaltflächen " Anmelden " oder " Abmelden " tippen.
Registrieren der App im Portal
In dieser Übung erstellen Sie eine neue Azure AD systemeigene Anwendung mithilfe des Azure Active Directory Admin Centers.
Öffnen Sie einen Browser, und navigieren Sie zum Azure Active Directory Admin Center. Melden Sie sich mit einem persönlichen Konto (auch: Microsoft-Konto) oder einem Geschäfts- oder Schulkonto an.
Wählen Sie in der linken Navigationsleiste Azure Active Directory aus, und wählen Sie dann App-Registrierungen unter Verwalten aus.
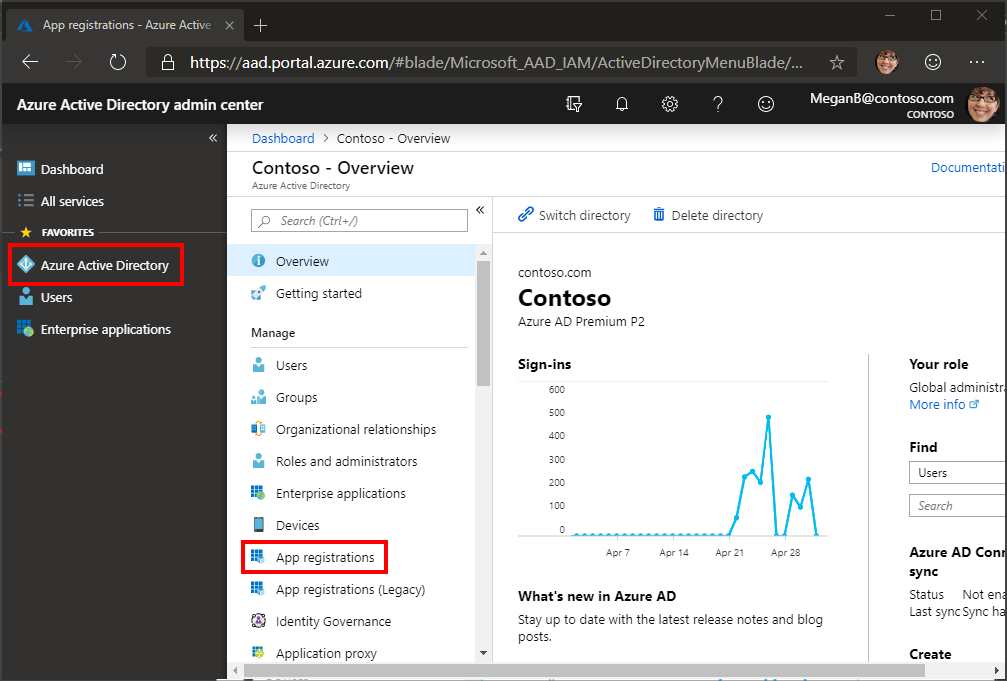
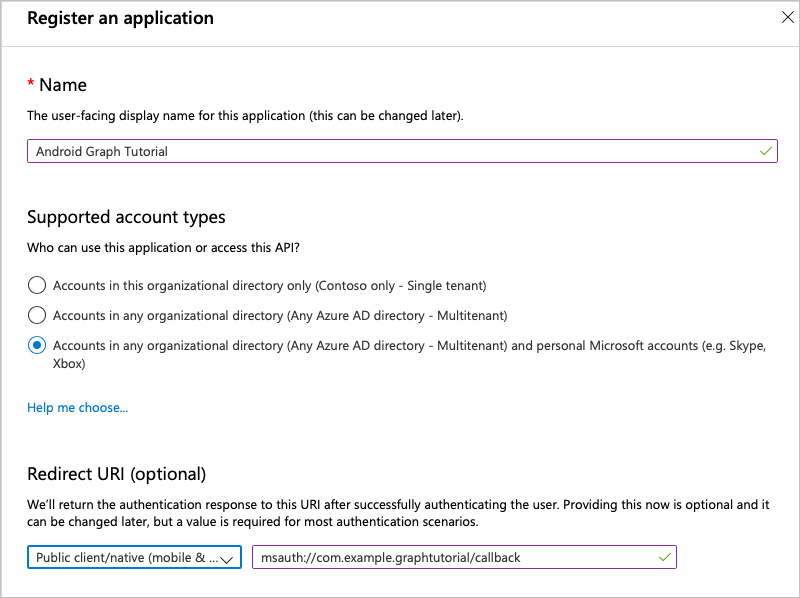
Wählen Sie Neue Registrierung aus. Legen Sie auf der Seite Anwendung registrieren die Werte wie folgt fest.
- Legen Sie Name auf
Android Graph Tutorialfest. - Legen Sie Unterstützte Kontotypen auf Konten in allen Organisationsverzeichnissen und persönliche Microsoft-Konten fest.
- Legen Sie unter "Umleitungs-URI" die Dropdownliste auf "Public client/native" (mobile & Desktop) fest, und legen Sie den Wert auf
msauth://YOUR_PACKAGE_NAME/callbackfest, und ersetzen Sie ihn durchYOUR_PACKAGE_NAMEden Paketnamen Ihres Projekts.
- Legen Sie Name auf
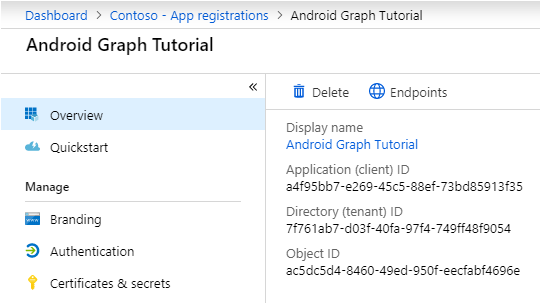
Wählen Sie Registrieren aus. Kopieren Sie auf der Lernprogrammseite für Android Graph den Wert der Anwendungs-ID (Client-ID), und speichern Sie ihn. Sie benötigen ihn im nächsten Schritt.
Hinzufügen der Azure AD-Authentifizierung
In dieser Übung erweitern Sie die Anwendung aus der vorherigen Übung, um die Authentifizierung mit Azure AD zu unterstützen. Dies ist erforderlich, um das erforderliche OAuth-Zugriffstoken zum Aufrufen der Microsoft Graph abzurufen. Zu diesem Zweck integrieren Sie die Microsoft-Authentifizierungsbibliothek (MSAL) für Android in die Anwendung.
Klicken Sie mit der rechten Maustaste auf den Ordner "Res ", und wählen Sie "Neu" und dann " Android-Ressourcenverzeichnis" aus.
Ändern Sie den Ressourcentyp in
raw"OK", und wählen Sie "OK" aus.Klicken Sie mit der rechten Maustaste auf den neuen unformatierten Ordner, und wählen Sie "Neu" und dann " Datei" aus.
Benennen Sie die Datei
msal_config.json, und wählen Sie "OK" aus.Fügen Sie der Datei msal_config.json Folgendes hinzu.
{
  "client_id" : "YOUR_APP_ID_HERE",
  "redirect_uri" : "msauth://com.example.graphtutorial/callback",
  "broker_redirect_uri_registered": false,
  "account_mode": "SINGLE",
  "authorities" : [
    {
      "type": "AAD",
      "audience": {
        "type": "AzureADandPersonalMicrosoftAccount"
      },
      "default": true
    }
  ]
}
Ersetzen Sie
YOUR_APP_ID_HEREdies durch die App-ID aus Ihrer App-Registrierung, und ersetzen Sie siecom.example.graphtutorialdurch den Paketnamen Ihres Projekts.Wichtig
Wenn Sie die Quellcodeverwaltung wie Git verwenden, wäre es jetzt ein guter Zeitpunkt, die Datei aus der
msal_config.jsonQuellcodeverwaltung auszuschließen, um zu vermeiden, dass versehentlich Ihre App-ID offengelegt wird.
Implementieren der Anmeldung
In diesem Abschnitt aktualisieren Sie das Manifest so, dass MSAL einen Browser zum Authentifizieren des Benutzers verwenden kann, Ihren Umleitungs-URI als von der App behandelt registrieren, eine Authentifizierungshilfsklasse erstellen und die App so aktualisieren, dass sie sich anmeldet und abmeldet.
Erweitern Sie den Ordner "app/manifests", und öffnen SieAndroidManifest.xml. Fügen Sie die folgenden Elemente über dem
applicationElement hinzu.<uses-permission android:name="android.permission.INTERNET" /> <uses-permission android:name="android.permission.ACCESS_NETWORK_STATE" />Hinweis
Diese Berechtigungen sind erforderlich, damit die MSAL-Bibliothek den Benutzer authentifizieren kann.
Fügen Sie das folgende Element in das
applicationElement ein, und ersetzen Sie dieYOUR_PACKAGE_NAME_HEREZeichenfolge durch den Paketnamen.<!--Intent filter to capture authorization code response from the default browser on the device calling back to the app after interactive sign in --> <activity android:name="com.microsoft.identity.client.BrowserTabActivity"> <intent-filter> <action android:name="android.intent.action.VIEW" /> <category android:name="android.intent.category.DEFAULT" /> <category android:name="android.intent.category.BROWSABLE" /> <data android:scheme="msauth" android:host="YOUR_PACKAGE_NAME_HERE" android:path="/callback" /> </intent-filter> </activity>Klicken Sie mit der rechten Maustaste auf den Ordner "app/java/com.example.graphtutorial ", und wählen Sie "Neu" und dann " Java-Klasse" aus. Ändern Sie die Art in "Schnittstelle". Benennen Sie die Schnittstelle
IAuthenticationHelperCreatedListener, und wählen Sie "OK" aus.Öffnen Sie die neue Datei, und ersetzen Sie den Inhalt durch Folgendes.
package com.example.graphtutorial;

import com.microsoft.identity.client.exception.MsalException;

public interface IAuthenticationHelperCreatedListener {
    void onCreated(final AuthenticationHelper authHelper);
    void onError(final MsalException exception);
}
Klicken Sie mit der rechten Maustaste auf den Ordner "app/java/com.example.graphtutorial ", und wählen Sie "Neu" und dann " Java-Klasse" aus. Benennen Sie die Klasse
AuthenticationHelper, und wählen Sie "OK" aus.Öffnen Sie die neue Datei, und ersetzen Sie den Inhalt durch Folgendes.
package com.example.graphtutorial;

import android.app.Activity;
import android.content.Context;
import android.util.Log;

import androidx.annotation.NonNull;

import com.microsoft.graph.authentication.BaseAuthenticationProvider;
import com.microsoft.identity.client.AuthenticationCallback;
import com.microsoft.identity.client.IAuthenticationResult;
import com.microsoft.identity.client.IPublicClientApplication;
import com.microsoft.identity.client.ISingleAccountPublicClientApplication;
import com.microsoft.identity.client.PublicClientApplication;
import com.microsoft.identity.client.exception.MsalException;

import java.net.URL;
import java.util.concurrent.CompletableFuture;

import javax.annotation.Nonnull;

// Singleton class - the app only needs a single instance
// of PublicClientApplication
public class AuthenticationHelper extends BaseAuthenticationProvider {
    private static AuthenticationHelper INSTANCE = null;
    private ISingleAccountPublicClientApplication mPCA = null;
    private String[] mScopes = { "User.Read", "MailboxSettings.Read", "Calendars.ReadWrite" };

    private AuthenticationHelper(Context ctx, final IAuthenticationHelperCreatedListener listener) {
        PublicClientApplication.createSingleAccountPublicClientApplication(ctx, R.raw.msal_config,
                new IPublicClientApplication.ISingleAccountApplicationCreatedListener() {
                    @Override
                    public void onCreated(ISingleAccountPublicClientApplication application) {
                        mPCA = application;
                        listener.onCreated(INSTANCE);
                    }

                    @Override
                    public void onError(MsalException exception) {
                        Log.e("AUTHHELPER", "Error creating MSAL application", exception);
                        listener.onError(exception);
                    }
                });
    }

    public static synchronized CompletableFuture<AuthenticationHelper> getInstance(Context ctx) {

        if (INSTANCE == null) {
            CompletableFuture<AuthenticationHelper> future = new CompletableFuture<>();
            INSTANCE = new AuthenticationHelper(ctx, new IAuthenticationHelperCreatedListener() {
                @Override
                public void onCreated(AuthenticationHelper authHelper) {
                    future.complete(authHelper);
                }

                @Override
                public void onError(MsalException exception) {
                    future.completeExceptionally(exception);
                }
            });

            return future;
        } else {
            return CompletableFuture.completedFuture(INSTANCE);
        }
    }

    // Version called from fragments. Does not create an
    // instance if one doesn't exist
    public static synchronized AuthenticationHelper getInstance() {
        if (INSTANCE == null) {
            throw new IllegalStateException(
                    "AuthenticationHelper has not been initialized from MainActivity");
        }

        return INSTANCE;
    }

    public CompletableFuture<IAuthenticationResult> acquireTokenInteractively(Activity activity) {
        CompletableFuture<IAuthenticationResult> future = new CompletableFuture<>();
        mPCA.signIn(activity, null, mScopes, getAuthenticationCallback(future));

        return future;
    }

    public CompletableFuture<IAuthenticationResult> acquireTokenSilently() {
        // Get the authority from MSAL config
        String authority = mPCA.getConfiguration()
            .getDefaultAuthority().getAuthorityURL().toString();

        CompletableFuture<IAuthenticationResult> future = new CompletableFuture<>();
        mPCA.acquireTokenSilentAsync(mScopes, authority, getAuthenticationCallback(future));
        return future;
    }

    public void signOut() {
        mPCA.signOut(new ISingleAccountPublicClientApplication.SignOutCallback() {
            @Override
            public void onSignOut() {
                Log.d("AUTHHELPER", "Signed out");
            }

            @Override
            public void onError(@NonNull MsalException exception) {
                Log.d("AUTHHELPER", "MSAL error signing out", exception);
            }
        });
    }

    private AuthenticationCallback getAuthenticationCallback(
        CompletableFuture<IAuthenticationResult> future) {
        return new AuthenticationCallback() {
            @Override
            public void onCancel() {
                future.cancel(true);
            }

            @Override
            public void onSuccess(IAuthenticationResult authenticationResult) {
                future.complete(authenticationResult);
            }

            @Override
            public void onError(MsalException exception) {
                future.completeExceptionally(exception);
            }
        };
    }

    @Nonnull
    @Override
    public CompletableFuture<String> getAuthorizationTokenAsync(@Nonnull URL requestUrl) {
        if (shouldAuthenticateRequestWithUrl(requestUrl) == true) {
            return acquireTokenSilently()
                .thenApply(result -> result.getAccessToken());
        }

        return CompletableFuture.completedFuture(null);
    }
}
Öffnen Sie MainActivity , und fügen Sie die folgenden
importAnweisungen hinzu.import android.util.Log; import com.microsoft.identity.client.IAuthenticationResult; import com.microsoft.identity.client.exception.MsalClientException; import com.microsoft.identity.client.exception.MsalServiceException; import com.microsoft.identity.client.exception.MsalUiRequiredException;Fügen Sie der Klasse die
MainActivityfolgende Membereigenschaft hinzu.private AuthenticationHelper mAuthHelper = null;Fügen Sie am Ende der
onCreate-Funktion den folgenden Code hinzu.showProgressBar(); // Get the authentication helper AuthenticationHelper.getInstance(getApplicationContext()) .thenAccept(authHelper -> { mAuthHelper = authHelper; if (!mIsSignedIn) { doSilentSignIn(false); } else { hideProgressBar(); } }) .exceptionally(exception -> { Log.e("AUTH", "Error creating auth helper", exception); return null; });Fügen Sie der Klasse die
MainActivityfolgenden Funktionen hinzu.// Silently sign in - used if there is already a // user account in the MSAL cache private void doSilentSignIn(boolean shouldAttemptInteractive) { mAuthHelper.acquireTokenSilently() .thenAccept(authenticationResult -> { handleSignInSuccess(authenticationResult); }) .exceptionally(exception -> { // Check the type of exception and handle appropriately Throwable cause = exception.getCause(); if (cause instanceof MsalUiRequiredException) { Log.d("AUTH", "Interactive login required"); if (shouldAttemptInteractive) doInteractiveSignIn(); } else if (cause instanceof MsalClientException) { MsalClientException clientException = (MsalClientException)cause; if (clientException.getErrorCode() == "no_current_account" || clientException.getErrorCode() == "no_account_found") { Log.d("AUTH", "No current account, interactive login required"); if (shouldAttemptInteractive) doInteractiveSignIn(); } } else { handleSignInFailure(cause); } hideProgressBar(); return null; }); } // Prompt the user to sign in private void doInteractiveSignIn() { mAuthHelper.acquireTokenInteractively(this) .thenAccept(authenticationResult -> { handleSignInSuccess(authenticationResult); }) .exceptionally(exception -> { handleSignInFailure(exception); hideProgressBar(); return null; }); } // Handles the authentication result private void handleSignInSuccess(IAuthenticationResult authenticationResult) { // Log the token for debug purposes String accessToken = authenticationResult.getAccessToken(); Log.d("AUTH", String.format("Access token: %s", accessToken)); hideProgressBar(); setSignedInState(true); openHomeFragment(mUserName); } private void handleSignInFailure(Throwable exception) { if (exception instanceof MsalServiceException) { // Exception when communicating with the auth server, likely config issue Log.e("AUTH", "Service error authenticating", exception); } else if (exception instanceof MsalClientException) { // Exception inside MSAL, more info inside MsalError.java Log.e("AUTH", "Client error authenticating", exception); } else { Log.e("AUTH", "Unhandled exception authenticating", exception); } }Ersetzen Sie die vorhandenen
signInFunktionen durchsignOutFolgendes.private void signIn() { showProgressBar(); // Attempt silent sign in first // if this fails, the callback will handle doing // interactive sign in doSilentSignIn(true); } private void signOut() { mAuthHelper.signOut(); setSignedInState(false); openHomeFragment(mUserName); }Hinweis
Beachten Sie, dass die
signInMethode eine automatische Anmeldung (überdoSilentSignIn) durchführt. Der Rückruf für diese Methode führt eine interaktive Anmeldung durch, wenn die automatische Anmeldung fehlschlägt. Dies verhindert, dass der Benutzer jedes Mal aufgefordert werden muss, wenn er die App startet.Speichern Sie die Änderungen, und führen Sie die App aus.
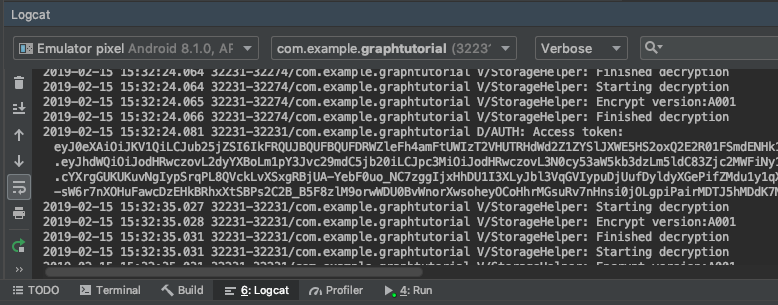
Wenn Sie auf das Menüelement "Anmelden" tippen, wird ein Browser zur Azure AD Anmeldeseite geöffnet. Melden Sie sich mit Ihrem Konto an.
Sobald die App fortgesetzt wird, sollte ein Zugriffstoken im Debugprotokoll in Android Studio gedruckt werden.
Benutzerdetails abrufen
In diesem Abschnitt erstellen Sie eine Hilfsklasse, die alle Aufrufe von Microsoft Graph enthält, und aktualisieren die MainActivity Klasse so, dass diese neue Klasse zum Abrufen des angemeldeten Benutzers verwendet wird.
Klicken Sie mit der rechten Maustaste auf den Ordner "app/java/com.example.graphtutorial ", und wählen Sie "Neu" und dann " Java-Klasse" aus. Benennen Sie die Klasse
GraphHelper, und wählen Sie "OK" aus.Öffnen Sie die neue Datei, und ersetzen Sie den Inhalt durch Folgendes.
package com.example.graphtutorial;

import com.microsoft.graph.models.extensions.User;
import com.microsoft.graph.requests.GraphServiceClient;

import java.util.concurrent.CompletableFuture;

// Singleton class - the app only needs a single instance
// of the Graph client
public class GraphHelper implements IAuthenticationProvider {
    private static GraphHelper INSTANCE = null;
    private GraphServiceClient mClient = null;

    private GraphHelper() {
        AuthenticationHelper authProvider = AuthenticationHelper.getInstance();

        mClient = GraphServiceClient.builder()
            .authenticationProvider(authProvider).buildClient();
    }

    public static synchronized GraphHelper getInstance() {
        if (INSTANCE == null) {
            INSTANCE = new GraphHelper();
        }

        return INSTANCE;
    }

    public CompletableFuture<User> getUser() {
        // GET /me (logged in user)
        return mClient.me().buildRequest()
            .select("displayName,mail,mailboxSettings,userPrincipalName")
            .getAsync();
    }
}
Hinweis
Überlegen Sie, was dieser Code bewirkt.
- Es macht eine
getUserFunktion verfügbar, um die Informationen des angemeldeten Benutzers vom/meGraph Endpunkt abzurufen.- Es wird
.selectverwendet, um nur die Eigenschaften des Benutzers anzufordern, den die Anwendung benötigt.
- Es wird
- Es macht eine
Entfernen Sie die folgenden Zeilen, die den Benutzernamen und die E-Mail-Adresse festlegen:
// For testing
mUserName = "Lynne Robbins";
mUserEmail = "lynner@contoso.com";
mUserTimeZone = "Pacific Standard Time";
Ersetzen Sie die vorhandene
handleSignInSuccess-Funktion durch Folgendes.// Handles the authentication result private void handleSignInSuccess(IAuthenticationResult authenticationResult) { // Log the token for debug purposes String accessToken = authenticationResult.getAccessToken(); Log.d("AUTH", String.format("Access token: %s", accessToken)); // Get Graph client and get user GraphHelper graphHelper = GraphHelper.getInstance(); graphHelper.getUser() .thenAccept(user -> { mUserName = user.displayName; mUserEmail = user.mail == null ? user.userPrincipalName : user.mail; mUserTimeZone = user.mailboxSettings.timeZone; runOnUiThread(() -> { hideProgressBar(); setSignedInState(true); openHomeFragment(mUserName); }); }) .exceptionally(exception -> { Log.e("AUTH", "Error getting /me", exception); runOnUiThread(()-> { hideProgressBar(); setSignedInState(false); }); return null; }); }Speichern Sie die Änderungen, und führen Sie die App aus. Nach der Anmeldung wird die Benutzeroberfläche mit dem Anzeigenamen und der E-Mail-Adresse des Benutzers aktualisiert.
Kalenderansicht erhalten
In dieser Übung integrieren Sie die Microsoft Graph in die Anwendung. Für diese Anwendung verwenden Sie das Microsoft Graph SDK für Java, um Aufrufe an Microsoft Graph zu tätigen.
Abrufen von Kalenderereignissen von Outlook
In diesem Abschnitt erweitern Sie die GraphHelper Klasse, um eine Funktion hinzuzufügen, um die Ereignisse des Benutzers für die aktuelle Woche abzurufen und zu aktualisieren CalendarFragment , um diese neuen Funktionen zu verwenden.
Öffnen Sie GraphHelper , und fügen Sie die folgenden
importAnweisungen am Anfang der Datei hinzu.import com.microsoft.graph.options.Option; import com.microsoft.graph.options.HeaderOption; import com.microsoft.graph.options.QueryOption; import com.microsoft.graph.requests.EventCollectionPage; import com.microsoft.graph.requests.EventCollectionRequestBuilder; import java.time.ZonedDateTime; import java.time.format.DateTimeFormatter; import java.util.LinkedList; import java.util.List; import java.util.concurrent.CompletableFuture;Fügen Sie der Klasse die
GraphHelperfolgenden Funktionen hinzu.public CompletableFuture<List<Event>> getCalendarView(ZonedDateTime viewStart, ZonedDateTime viewEnd, String timeZone) { final List<Option> options = new LinkedList<Option>(); options.add(new QueryOption("startDateTime", viewStart.format(DateTimeFormatter.ISO_OFFSET_DATE_TIME))); options.add(new QueryOption("endDateTime", viewEnd.format(DateTimeFormatter.ISO_OFFSET_DATE_TIME))); // Start and end times adjusted to user's time zone options.add(new HeaderOption("Prefer", "outlook.timezone=\"" + timeZone + "\"")); final List<Event> allEvents = new LinkedList<Event>(); // Create a separate list of options for the paging requests // paging request should not include the query parameters from the initial // request, but should include the headers. final List<Option> pagingOptions = new LinkedList<Option>(); pagingOptions.add(new HeaderOption("Prefer", "outlook.timezone=\"" + timeZone + "\"")); return mClient.me().calendarView() .buildRequest(options) .select("subject,organizer,start,end") .orderBy("start/dateTime") .top(5) .getAsync() .thenCompose(eventPage -> processPage(eventPage, allEvents, pagingOptions)); } private CompletableFuture<List<Event>> processPage(EventCollectionPage currentPage, List<Event> eventList, List<Option> options) { eventList.addAll(currentPage.getCurrentPage()); // Check if there is another page of results EventCollectionRequestBuilder nextPage = currentPage.getNextPage(); if (nextPage != null) { // Request the next page and repeat return nextPage.buildRequest(options) .getAsync() .thenCompose(eventPage -> processPage(eventPage, eventList, options)); } else { // No more pages, complete the future // with the complete list return CompletableFuture.completedFuture(eventList); } } // Debug function to get the JSON representation of a Graph // object public String serializeObject(Object object) { return mClient.getSerializer().serializeObject(object); }Hinweis
Überlegen Sie, was der Code
getCalendarViewmacht.- Die URL, die aufgerufen wird, lautet
/v1.0/me/calendarview.- Die
startDateTimeParameter undendDateTimeAbfrageparameter definieren den Anfang und das Ende der Kalenderansicht. - Der
Prefer: outlook.timezoneHeader bewirkt, dass die Microsoft Graph die Start- und Endzeiten jedes Ereignisses in der Zeitzone des Benutzers zurückgibt. - Die
select-Funktion beschränkt die Felder, die für jedes Ereignis zurückgegeben werden, auf nur diejenigen, die von der Ansicht tatsächlich verwendet werden. - Die
orderbyFunktion sortiert die Ergebnisse nach Startzeit. - Die
topFunktion fordert 25 Ergebnisse pro Seite an.
- Die
- Die
processPageFunktion überprüft, ob weitere Ergebnisse verfügbar sind, und fordert bei Bedarf zusätzliche Seiten an.
- Die URL, die aufgerufen wird, lautet
Klicken Sie mit der rechten Maustaste auf den Ordner "app/java/com.example.graphtutorial ", und wählen Sie "Neu" und dann " Java-Klasse" aus. Benennen Sie die Klasse
GraphToIana, und wählen Sie "OK" aus.Öffnen Sie die neue Datei, und ersetzen Sie den Inhalt durch Folgendes.
package com.example.graphtutorial;

import java.time.ZoneId;
import java.util.HashMap;

// Basic lookup for mapping Windows time zone identifiers to
// IANA identifiers
// Mappings taken from
// https://github.com/unicode-org/cldr/blob/master/common/supplemental/windowsZones.xml
public class GraphToIana {
    private static final HashMap<String, String> timeZoneIdMap = new HashMap<String, String>();
    static {
        timeZoneIdMap.put("Dateline Standard Time", "Etc/GMT+12");
        timeZoneIdMap.put("UTC-11", "Etc/GMT+11");
        timeZoneIdMap.put("Aleutian Standard Time", "America/Adak");
        timeZoneIdMap.put("Hawaiian Standard Time", "Pacific/Honolulu");
        timeZoneIdMap.put("Marquesas Standard Time", "Pacific/Marquesas");
        timeZoneIdMap.put("Alaskan Standard Time", "America/Anchorage");
        timeZoneIdMap.put("UTC-09", "Etc/GMT+9");
        timeZoneIdMap.put("Pacific Standard Time (Mexico)", "America/Tijuana");
        timeZoneIdMap.put("UTC-08", "Etc/GMT+8");
        timeZoneIdMap.put("Pacific Standard Time", "America/Los_Angeles");
        timeZoneIdMap.put("US Mountain Standard Time", "America/Phoenix");
        timeZoneIdMap.put("Mountain Standard Time (Mexico)", "America/Chihuahua");
        timeZoneIdMap.put("Mountain Standard Time", "America/Denver");
        timeZoneIdMap.put("Central America Standard Time", "America/Guatemala");
        timeZoneIdMap.put("Central Standard Time", "America/Chicago");
        timeZoneIdMap.put("Easter Island Standard Time", "Pacific/Easter");
        timeZoneIdMap.put("Central Standard Time (Mexico)", "America/Mexico_City");
        timeZoneIdMap.put("Canada Central Standard Time", "America/Regina");
        timeZoneIdMap.put("SA Pacific Standard Time", "America/Bogota");
        timeZoneIdMap.put("Eastern Standard Time (Mexico)", "America/Cancun");
        timeZoneIdMap.put("Eastern Standard Time", "America/New_York");
        timeZoneIdMap.put("Haiti Standard Time", "America/Port-au-Prince");
        timeZoneIdMap.put("Cuba Standard Time", "America/Havana");
        timeZoneIdMap.put("US Eastern Standard Time", "America/Indianapolis");
        timeZoneIdMap.put("Turks And Caicos Standard Time", "America/Grand_Turk");
        timeZoneIdMap.put("Paraguay Standard Time", "America/Asuncion");
        timeZoneIdMap.put("Atlantic Standard Time", "America/Halifax");
        timeZoneIdMap.put("Venezuela Standard Time", "America/Caracas");
        timeZoneIdMap.put("Central Brazilian Standard Time", "America/Cuiaba");
        timeZoneIdMap.put("SA Western Standard Time", "America/La_Paz");
        timeZoneIdMap.put("Pacific SA Standard Time", "America/Santiago");
        timeZoneIdMap.put("Newfoundland Standard Time", "America/St_Johns");
        timeZoneIdMap.put("Tocantins Standard Time", "America/Araguaina");
        timeZoneIdMap.put("E. South America Standard Time", "America/Sao_Paulo");
        timeZoneIdMap.put("SA Eastern Standard Time", "America/Cayenne");
        timeZoneIdMap.put("Argentina Standard Time", "America/Buenos_Aires");
        timeZoneIdMap.put("Greenland Standard Time", "America/Godthab");
        timeZoneIdMap.put("Montevideo Standard Time", "America/Montevideo");
        timeZoneIdMap.put("Magallanes Standard Time", "America/Punta_Arenas");
        timeZoneIdMap.put("Saint Pierre Standard Time", "America/Miquelon");
        timeZoneIdMap.put("Bahia Standard Time", "America/Bahia");
        timeZoneIdMap.put("UTC-02", "Etc/GMT+2");
        timeZoneIdMap.put("Azores Standard Time", "Atlantic/Azores");
        timeZoneIdMap.put("Cape Verde Standard Time", "Atlantic/Cape_Verde");
        timeZoneIdMap.put("UTC", "Etc/GMT");
        timeZoneIdMap.put("GMT Standard Time", "Europe/London");
        timeZoneIdMap.put("Greenwich Standard Time", "Atlantic/Reykjavik");
        timeZoneIdMap.put("Sao Tome Standard Time", "Africa/Sao_Tome");
        timeZoneIdMap.put("Morocco Standard Time", "Africa/Casablanca");
        timeZoneIdMap.put("W. Europe Standard Time", "Europe/Berlin");
        timeZoneIdMap.put("Central Europe Standard Time", "Europe/Budapest");
        timeZoneIdMap.put("Romance Standard Time", "Europe/Paris");
        timeZoneIdMap.put("Central European Standard Time", "Europe/Warsaw");
        timeZoneIdMap.put("W. Central Africa Standard Time", "Africa/Lagos");
        timeZoneIdMap.put("Jordan Standard Time", "Asia/Amman");
        timeZoneIdMap.put("GTB Standard Time", "Europe/Bucharest");
        timeZoneIdMap.put("Middle East Standard Time", "Asia/Beirut");
        timeZoneIdMap.put("Egypt Standard Time", "Africa/Cairo");
        timeZoneIdMap.put("E. Europe Standard Time", "Europe/Chisinau");
        timeZoneIdMap.put("Syria Standard Time", "Asia/Damascus");
        timeZoneIdMap.put("West Bank Standard Time", "Asia/Hebron");
        timeZoneIdMap.put("South Africa Standard Time", "Africa/Johannesburg");
        timeZoneIdMap.put("FLE Standard Time", "Europe/Kiev");
        timeZoneIdMap.put("Israel Standard Time", "Asia/Jerusalem");
        timeZoneIdMap.put("Kaliningrad Standard Time", "Europe/Kaliningrad");
        timeZoneIdMap.put("Sudan Standard Time", "Africa/Khartoum");
        timeZoneIdMap.put("Libya Standard Time", "Africa/Tripoli");
        timeZoneIdMap.put("Namibia Standard Time", "Africa/Windhoek");
        timeZoneIdMap.put("Arabic Standard Time", "Asia/Baghdad");
        timeZoneIdMap.put("Turkey Standard Time", "Europe/Istanbul");
        timeZoneIdMap.put("Arab Standard Time", "Asia/Riyadh");
        timeZoneIdMap.put("Belarus Standard Time", "Europe/Minsk");
        timeZoneIdMap.put("Russian Standard Time", "Europe/Moscow");
        timeZoneIdMap.put("E. Africa Standard Time", "Africa/Nairobi");
        timeZoneIdMap.put("Iran Standard Time", "Asia/Tehran");
        timeZoneIdMap.put("Arabian Standard Time", "Asia/Dubai");
        timeZoneIdMap.put("Astrakhan Standard Time", "Europe/Astrakhan");
        timeZoneIdMap.put("Azerbaijan Standard Time", "Asia/Baku");
        timeZoneIdMap.put("Russia Time Zone 3", "Europe/Samara");
        timeZoneIdMap.put("Mauritius Standard Time", "Indian/Mauritius");
        timeZoneIdMap.put("Saratov Standard Time", "Europe/Saratov");
        timeZoneIdMap.put("Georgian Standard Time", "Asia/Tbilisi");
        timeZoneIdMap.put("Volgograd Standard Time", "Europe/Volgograd");
        timeZoneIdMap.put("Caucasus Standard Time", "Asia/Yerevan");
        timeZoneIdMap.put("Afghanistan Standard Time", "Asia/Kabul");
        timeZoneIdMap.put("West Asia Standard Time", "Asia/Tashkent");
        timeZoneIdMap.put("Ekaterinburg Standard Time", "Asia/Yekaterinburg");
        timeZoneIdMap.put("Pakistan Standard Time", "Asia/Karachi");
        timeZoneIdMap.put("Qyzylorda Standard Time", "Asia/Qyzylorda");
        timeZoneIdMap.put("India Standard Time", "Asia/Calcutta");
        timeZoneIdMap.put("Sri Lanka Standard Time", "Asia/Colombo");
        timeZoneIdMap.put("Nepal Standard Time", "Asia/Katmandu");
        timeZoneIdMap.put("Central Asia Standard Time", "Asia/Almaty");
        timeZoneIdMap.put("Bangladesh Standard Time", "Asia/Dhaka");
        timeZoneIdMap.put("Omsk Standard Time", "Asia/Omsk");
        timeZoneIdMap.put("Myanmar Standard Time", "Asia/Rangoon");
        timeZoneIdMap.put("SE Asia Standard Time", "Asia/Bangkok");
        timeZoneIdMap.put("Altai Standard Time", "Asia/Barnaul");
        timeZoneIdMap.put("W. Mongolia Standard Time", "Asia/Hovd");
        timeZoneIdMap.put("North Asia Standard Time", "Asia/Krasnoyarsk");
        timeZoneIdMap.put("N. Central Asia Standard Time", "Asia/Novosibirsk");
        timeZoneIdMap.put("Tomsk Standard Time", "Asia/Tomsk");
        timeZoneIdMap.put("China Standard Time", "Asia/Shanghai");
        timeZoneIdMap.put("North Asia East Standard Time", "Asia/Irkutsk");
        timeZoneIdMap.put("Singapore Standard Time", "Asia/Singapore");
        timeZoneIdMap.put("W. Australia Standard Time", "Australia/Perth");
        timeZoneIdMap.put("Taipei Standard Time", "Asia/Taipei");
        timeZoneIdMap.put("Ulaanbaatar Standard Time", "Asia/Ulaanbaatar");
        timeZoneIdMap.put("Aus Central W. Standard Time", "Australia/Eucla");
        timeZoneIdMap.put("Transbaikal Standard Time", "Asia/Chita");
        timeZoneIdMap.put("Tokyo Standard Time", "Asia/Tokyo");
        timeZoneIdMap.put("North Korea Standard Time", "Asia/Pyongyang");
        timeZoneIdMap.put("Korea Standard Time", "Asia/Seoul");
        timeZoneIdMap.put("Yakutsk Standard Time", "Asia/Yakutsk");
        timeZoneIdMap.put("Cen. Australia Standard Time", "Australia/Adelaide");
        timeZoneIdMap.put("AUS Central Standard Time", "Australia/Darwin");
        timeZoneIdMap.put("E. Australia Standard Time", "Australia/Brisbane");
        timeZoneIdMap.put("AUS Eastern Standard Time", "Australia/Sydney");
        timeZoneIdMap.put("West Pacific Standard Time", "Pacific/Port_Moresby");
        timeZoneIdMap.put("Tasmania Standard Time", "Australia/Hobart");
        timeZoneIdMap.put("Vladivostok Standard Time", "Asia/Vladivostok");
        timeZoneIdMap.put("Lord Howe Standard Time", "Australia/Lord_Howe");
        timeZoneIdMap.put("Bougainville Standard Time", "Pacific/Bougainville");
        timeZoneIdMap.put("Russia Time Zone 10", "Asia/Srednekolymsk");
        timeZoneIdMap.put("Magadan Standard Time", "Asia/Magadan");
        timeZoneIdMap.put("Norfolk Standard Time", "Pacific/Norfolk");
        timeZoneIdMap.put("Sakhalin Standard Time", "Asia/Sakhalin");
        timeZoneIdMap.put("Central Pacific Standard Time", "Pacific/Guadalcanal");
        timeZoneIdMap.put("Russia Time Zone 11", "Asia/Kamchatka");
        timeZoneIdMap.put("New Zealand Standard Time", "Pacific/Auckland");
        timeZoneIdMap.put("UTC+12", "Etc/GMT-12");
        timeZoneIdMap.put("Fiji Standard Time", "Pacific/Fiji");
        timeZoneIdMap.put("Chatham Islands Standard Time", "Pacific/Chatham");
        timeZoneIdMap.put("UTC+13", "Etc/GMT-13");
        timeZoneIdMap.put("Tonga Standard Time", "Pacific/Tongatapu");
        timeZoneIdMap.put("Samoa Standard Time", "Pacific/Apia");
        timeZoneIdMap.put("Line Islands Standard Time", "Pacific/Kiritimati");
    }

    public static String getIanaFromWindows(String windowsTimeZone) {
        String iana = timeZoneIdMap.get(windowsTimeZone);

        // If a mapping was not found, assume the value passed
        // was already an IANA identifier
        return (iana == null) ? windowsTimeZone : iana;
    }

    public static ZoneId getZoneIdFromWindows(String windowsTimeZone) {
        String timeZoneId = getIanaFromWindows(windowsTimeZone);

        return ZoneId.of(timeZoneId);
    }
}
Fügen Sie die folgenden
importAnweisungen am Anfang der CalendarFragment-Datei hinzu.import android.util.Log; import android.widget.ListView; import com.google.android.material.snackbar.BaseTransientBottomBar; import com.google.android.material.snackbar.Snackbar; import com.microsoft.graph.core.ClientException; import com.microsoft.graph.models.Event; import com.microsoft.identity.client.AuthenticationCallback; import com.microsoft.identity.client.IAuthenticationResult; import com.microsoft.identity.client.exception.MsalException; import java.time.DayOfWeek; import java.time.ZoneId; import java.time.ZonedDateTime; import java.time.temporal.ChronoUnit; import java.time.temporal.TemporalAdjusters; import java.util.List;Fügen Sie der Klasse den
CalendarFragmentfolgenden Member hinzu.private List<Event> mEventList = null;Fügen Sie der Klasse die folgenden Funktionen hinzu, um die
CalendarFragmentStatusanzeige auszublenden und anzuzeigen.private void showProgressBar() { getActivity().runOnUiThread(new Runnable() { @Override public void run() { getActivity().findViewById(R.id.progressbar) .setVisibility(View.VISIBLE); getActivity().findViewById(R.id.fragment_container) .setVisibility(View.GONE); } }); } private void hideProgressBar() { getActivity().runOnUiThread(new Runnable() { @Override public void run() { getActivity().findViewById(R.id.progressbar) .setVisibility(View.GONE); getActivity().findViewById(R.id.fragment_container) .setVisibility(View.VISIBLE); } }); }Fügen Sie die folgende Funktion hinzu, um die Ereignisliste zu Debugzwecken auszugeben.
private void addEventsToList() { // Temporary for debugging String jsonEvents = GraphHelper.getInstance().serializeObject(mEventList); Log.d("GRAPH", jsonEvents); }Ersetzen Sie die vorhandene
onCreateViewFunktion in derCalendarFragmentKlasse durch Folgendes.@Nullable @Override public View onCreateView(@NonNull LayoutInflater inflater, @Nullable ViewGroup container, @Nullable Bundle savedInstanceState) { View view = inflater.inflate(R.layout.fragment_calendar, container, false); showProgressBar(); final GraphHelper graphHelper = GraphHelper.getInstance(); ZoneId tzId = GraphToIana.getZoneIdFromWindows(mTimeZone); // Get midnight of the first day of the week (assumed Sunday) // in the user's timezone, then convert to UTC ZonedDateTime startOfWeek = ZonedDateTime.now(tzId) .with(TemporalAdjusters.previousOrSame(DayOfWeek.SUNDAY)) .truncatedTo(ChronoUnit.DAYS) .withZoneSameInstant(ZoneId.of("UTC")); // Add 7 days to get the end of the week ZonedDateTime endOfWeek = startOfWeek.plusDays(7); // Get the user's events graphHelper .getCalendarView(startOfWeek, endOfWeek, mTimeZone) .thenAccept(eventList -> { mEventList = eventList; addEventsToList(); hideProgressBar(); }) .exceptionally(exception -> { hideProgressBar(); Log.e("GRAPH", "Error getting events", exception); Snackbar.make(getView(), exception.getMessage(), BaseTransientBottomBar.LENGTH_LONG).show(); return null; }); return view; }Führen Sie die App aus, melden Sie sich an, und tippen Sie im Menü auf das Navigationselement "Kalender ". Im Debugprotokoll in Android Studio sollte ein JSON-Abbild der Ereignisse angezeigt werden.
Anzeigen der Ergebnisse
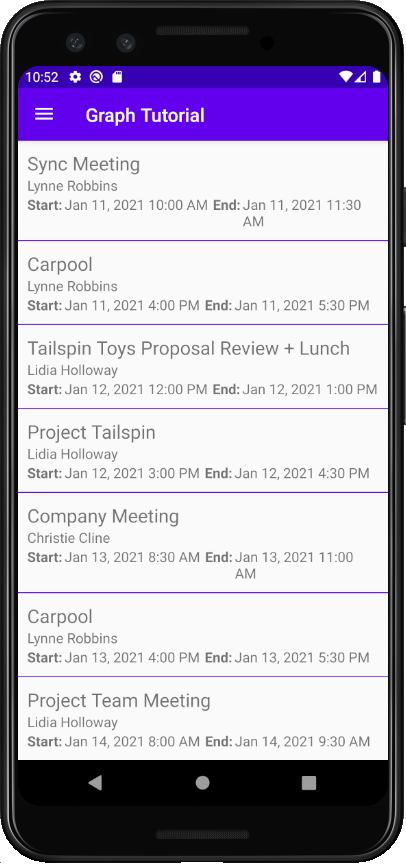
Jetzt können Sie das JSON-Dump durch etwas ersetzen, um die Ergebnisse auf benutzerfreundliche Weise anzuzeigen. In diesem Abschnitt fügen Sie dem Kalenderfragment eine ListView hinzu, erstellen ein Layout für jedes Element in der ListViewund erstellen einen benutzerdefinierten Listenadapter für die ListView Felder der einzelnen Event Elemente der entsprechenden TextView Ansicht.
Ersetzen Sie die
TextViewin app/res/layout/fragment_calendar.xml durch eineListView.<?xml version="1.0" encoding="utf-8"?> <RelativeLayout xmlns:android="http://schemas.android.com/apk/res/android" android:layout_width="match_parent" android:layout_height="match_parent"> <ListView android:id="@+id/eventlist" android:layout_width="match_parent" android:layout_height="match_parent" android:divider="?colorPrimary" android:dividerHeight="1dp" /> </RelativeLayout>Klicken Sie mit der rechten Maustaste auf den Ordner "app/res/layout ", und wählen Sie "Neu" und dann " Layoutressourcendatei" aus.
Benennen Sie die Datei
event_list_item, ändern Sie das Stammelement inRelativeLayout, und wählen Sie OK aus.Öffnen Sie die dateievent_list_item.xml , und ersetzen Sie den Inhalt durch Folgendes.
<?xml version="1.0" encoding="utf-8"?> <RelativeLayout xmlns:android="http://schemas.android.com/apk/res/android" android:layout_width="match_parent" android:layout_height="match_parent" android:padding="10dp"> <TextView android:id="@+id/eventsubject" android:layout_width="match_parent" android:layout_height="wrap_content" android:text="Subject" android:textSize="20sp" /> <TextView android:id="@+id/eventorganizer" android:layout_width="match_parent" android:layout_height="wrap_content" android:layout_below="@id/eventsubject" android:text="Adele Vance" android:textSize="15sp" /> <LinearLayout android:layout_width="match_parent" android:layout_height="wrap_content" android:layout_below="@id/eventorganizer" android:orientation="horizontal"> <TextView android:layout_width="wrap_content" android:layout_height="wrap_content" android:paddingEnd="2sp" android:text="Start:" android:textSize="15sp" android:textStyle="bold" /> <TextView android:id="@+id/eventstart" android:layout_width="wrap_content" android:layout_height="wrap_content" android:text="1:30 PM 2/19/2019" android:textSize="15sp" /> <TextView android:layout_width="wrap_content" android:layout_height="wrap_content" android:paddingStart="5sp" android:paddingEnd="2sp" android:text="End:" android:textSize="15sp" android:textStyle="bold" /> <TextView android:id="@+id/eventend" android:layout_width="wrap_content" android:layout_height="wrap_content" android:text="1:30 PM 2/19/2019" android:textSize="15sp" /> </LinearLayout> </RelativeLayout>Klicken Sie mit der rechten Maustaste auf den Ordner "app/java/com.example.graphtutorial ", und wählen Sie "Neu" und dann " Java-Klasse" aus.
Benennen Sie die Klasse
EventListAdapter, und wählen Sie "OK" aus.Öffnen Sie die Datei "EventListAdapter ", und ersetzen Sie deren Inhalt durch Folgendes.
package com.example.graphtutorial; import android.content.Context; import android.view.LayoutInflater; import android.view.View; import android.view.ViewGroup; import android.widget.ArrayAdapter; import android.widget.TextView; import androidx.annotation.NonNull; import com.microsoft.graph.models.DateTimeTimeZone; import com.microsoft.graph.models.Event; import java.time.LocalDateTime; import java.time.ZoneId; import java.time.ZonedDateTime; import java.time.format.DateTimeFormatter; import java.time.format.FormatStyle; import java.util.List; import java.util.TimeZone; public class EventListAdapter extends ArrayAdapter<Event> { private Context mContext; private int mResource; // Used for the ViewHolder pattern // https://developer.android.com/training/improving-layouts/smooth-scrolling static class ViewHolder { TextView subject; TextView organizer; TextView start; TextView end; } public EventListAdapter(Context context, int resource, List<Event> events) { super(context, resource, events); mContext = context; mResource = resource; } @NonNull @Override public View getView(int position, View convertView, ViewGroup parent) { Event event = getItem(position); ViewHolder holder; if (convertView == null) { LayoutInflater inflater = LayoutInflater.from(mContext); convertView = inflater.inflate(mResource, parent, false); holder = new ViewHolder(); holder.subject = convertView.findViewById(R.id.eventsubject); holder.organizer = convertView.findViewById(R.id.eventorganizer); holder.start = convertView.findViewById(R.id.eventstart); holder.end = convertView.findViewById(R.id.eventend); convertView.setTag(holder); } else { holder = (ViewHolder) convertView.getTag(); } holder.subject.setText(event.subject); holder.organizer.setText(event.organizer.emailAddress.name); holder.start.setText(getLocalDateTimeString(event.start)); holder.end.setText(getLocalDateTimeString(event.end)); return convertView; } // Convert Graph's DateTimeTimeZone format to // a LocalDateTime, then return a formatted string private String getLocalDateTimeString(DateTimeTimeZone dateTime) { ZonedDateTime localDateTime = LocalDateTime.parse(dateTime.dateTime) .atZone(GraphToIana.getZoneIdFromWindows(dateTime.timeZone)); return String.format("%s %s", localDateTime.format(DateTimeFormatter.ofLocalizedDate(FormatStyle.MEDIUM)), localDateTime.format(DateTimeFormatter.ofLocalizedTime(FormatStyle.SHORT))); } }Öffnen Sie die CalendarFragment-Klasse , und ersetzen Sie die vorhandene
addEventsToListFunktion durch Folgendes.private void addEventsToList() { getActivity().runOnUiThread(new Runnable() { @Override public void run() { ListView eventListView = getView().findViewById(R.id.eventlist); EventListAdapter listAdapter = new EventListAdapter(getActivity(), R.layout.event_list_item, mEventList); eventListView.setAdapter(listAdapter); } }); }Führen Sie die App aus, melden Sie sich an, und tippen Sie auf das Navigationselement "Kalender ". Die Liste der Ereignisse sollte angezeigt werden.
Erstellen eines neuen Ereignisses
In diesem Abschnitt fügen Sie die Möglichkeit hinzu, Ereignisse im Kalender des Benutzers zu erstellen.
Öffnen Sie GraphHelper , und fügen Sie die folgenden
importAnweisungen am Anfang der Datei hinzu.import com.microsoft.graph.models.Attendee; import com.microsoft.graph.models.DateTimeTimeZone; import com.microsoft.graph.models.EmailAddress; import com.microsoft.graph.models.ItemBody; import com.microsoft.graph.models.AttendeeType; import com.microsoft.graph.models.BodyType;Fügen Sie der Klasse die
GraphHelperfolgende Funktion hinzu, um ein neues Ereignis zu erstellen.public CompletableFuture<Event> createEvent(String subject, ZonedDateTime start, ZonedDateTime end, String timeZone, String[] attendees, String body) { Event newEvent = new Event(); // Set properties on the event // Subject newEvent.subject = subject; // Start newEvent.start = new DateTimeTimeZone(); // DateTimeTimeZone has two parts: // The date/time expressed as an ISO 8601 Local date/time // Local meaning there is no UTC or UTC offset designation // Example: 2020-01-12T09:00:00 newEvent.start.dateTime = start.format(DateTimeFormatter.ISO_LOCAL_DATE_TIME); // The time zone - can be either a Windows time zone name ("Pacific Standard Time") // or an IANA time zone identifier ("America/Los_Angeles") newEvent.start.timeZone = timeZone; // End newEvent.end = new DateTimeTimeZone(); newEvent.end.dateTime = end.format(DateTimeFormatter.ISO_LOCAL_DATE_TIME); newEvent.end.timeZone = timeZone; // Add attendees if any were provided if (attendees.length > 0) { newEvent.attendees = new LinkedList<>(); for (String attendeeEmail : attendees) { Attendee newAttendee = new Attendee(); // Set the attendee type, in this case required newAttendee.type = AttendeeType.REQUIRED; // Create a new EmailAddress object with the address // provided newAttendee.emailAddress = new EmailAddress(); newAttendee.emailAddress.address = attendeeEmail; newEvent.attendees.add(newAttendee); } } // Add body if provided if (!body.isEmpty()) { newEvent.body = new ItemBody(); // Set the content newEvent.body.content = body; // Specify content is plain text newEvent.body.contentType = BodyType.TEXT; } return mClient.me().events().buildRequest() .postAsync(newEvent); }
Aktualisieren eines neuen Ereignisfragments
Klicken Sie mit der rechten Maustaste auf den Ordner "app/java/com.example.graphtutorial ", und wählen Sie "Neu" und dann " Java-Klasse" aus. Benennen Sie die Klasse
EditTextDateTimePicker, und wählen Sie "OK" aus.Öffnen Sie die neue Datei, und ersetzen Sie den Inhalt durch Folgendes.
package com.example.graphtutorial; import android.app.DatePickerDialog; import android.app.TimePickerDialog; import android.content.Context; import android.view.View; import android.widget.DatePicker; import android.widget.EditText; import android.widget.TimePicker; import java.time.ZoneId; import java.time.ZonedDateTime; import java.time.format.DateTimeFormatter; import java.time.format.FormatStyle; // Class to wrap an EditText control to act as a date/time picker // When the user taps it, a date picker is shown, followed by a time picker // The values selected are combined to create a date/time value, which is then // displayed in the EditText public class EditTextDateTimePicker implements View.OnClickListener, DatePickerDialog.OnDateSetListener, TimePickerDialog.OnTimeSetListener { private Context mContext; private EditText mEditText; private ZonedDateTime mDateTime; EditTextDateTimePicker(Context context, EditText editText, ZoneId zoneId) { mContext = context; mEditText = editText; mEditText.setOnClickListener(this); // Initialize to now mDateTime = ZonedDateTime.now(zoneId).withSecond(0).withNano(0); // Round time to closest upcoming half-hour int offset = 30 - (mDateTime.getMinute() % 30); if (offset > 0) { mDateTime = mDateTime.plusMinutes(offset); } updateText(); } @Override public void onClick(View v) { // First, show a date picker DatePickerDialog dialog = new DatePickerDialog(mContext, this, mDateTime.getYear(), mDateTime.getMonthValue(), mDateTime.getDayOfMonth()); dialog.show(); } @Override public void onDateSet(DatePicker view, int year, int month, int dayOfMonth) { // Update the stored date/time with the new date mDateTime = mDateTime.withYear(year).withMonth(month).withDayOfMonth(dayOfMonth); // Show a time picker TimePickerDialog dialog = new TimePickerDialog(mContext, this, mDateTime.getHour(), mDateTime.getMinute(), false); dialog.show(); } @Override public void onTimeSet(TimePicker view, int hourOfDay, int minute) { // Update the stored date/time with the new time mDateTime = mDateTime.withHour(hourOfDay).withMinute(minute); // Update the text in the EditText updateText(); } public ZonedDateTime getZonedDateTime() { return mDateTime; } private void updateText() { mEditText.setText(String.format("%s %s", mDateTime.format(DateTimeFormatter.ofLocalizedDate(FormatStyle.MEDIUM)), mDateTime.format(DateTimeFormatter.ofLocalizedTime(FormatStyle.SHORT)))); } }Diese Klasse umschließt ein
EditTextSteuerelement mit einer Datums- und Uhrzeitauswahl, wenn der Benutzer darauf tippt, und aktualisiert den Wert mit dem ausgewählten Datum und der uhrzeit.Öffnen Sie app/res/layout/fragment_new_event.xml , und ersetzen Sie den Inhalt durch Folgendes.
<?xml version="1.0" encoding="utf-8"?> <LinearLayout xmlns:android="http://schemas.android.com/apk/res/android" android:layout_width="match_parent" android:layout_height="match_parent" android:orientation="vertical" android:padding="10dp"> <TextView android:layout_width="wrap_content" android:layout_height="wrap_content" android:text="Subject" /> <com.google.android.material.textfield.TextInputLayout android:id="@+id/neweventsubject" android:layout_width="match_parent" android:layout_height="wrap_content"> <com.google.android.material.textfield.TextInputEditText android:layout_width="match_parent" android:layout_height="wrap_content" /> </com.google.android.material.textfield.TextInputLayout> <TextView android:layout_width="match_parent" android:layout_height="wrap_content" android:text="Attendees" /> <com.google.android.material.textfield.TextInputLayout android:id="@+id/neweventattendees" android:layout_width="match_parent" android:layout_height="wrap_content"> <com.google.android.material.textfield.TextInputEditText android:layout_width="match_parent" android:layout_height="wrap_content" android:hint="Separate multiple entries with ';'" /> </com.google.android.material.textfield.TextInputLayout> <TextView android:layout_width="match_parent" android:layout_height="wrap_content" android:text="Start" /> <com.google.android.material.textfield.TextInputLayout android:id="@+id/neweventstartdatetime" android:layout_width="match_parent" android:layout_height="wrap_content"> <com.google.android.material.textfield.TextInputEditText android:layout_width="match_parent" android:layout_height="wrap_content" android:focusable="false" android:clickable="true" /> </com.google.android.material.textfield.TextInputLayout> <TextView android:layout_width="match_parent" android:layout_height="wrap_content" android:text="End" /> <com.google.android.material.textfield.TextInputLayout android:id="@+id/neweventenddatetime" android:layout_width="match_parent" android:layout_height="wrap_content"> <com.google.android.material.textfield.TextInputEditText android:layout_width="match_parent" android:layout_height="wrap_content" android:focusable="false" android:clickable="true" /> </com.google.android.material.textfield.TextInputLayout> <TextView android:layout_width="match_parent" android:layout_height="wrap_content" android:text="Body" /> <com.google.android.material.textfield.TextInputLayout android:id="@+id/neweventbody" android:layout_width="match_parent" android:layout_height="0dp" android:layout_weight="1"> <com.google.android.material.textfield.TextInputEditText android:layout_width="match_parent" android:layout_height="match_parent" android:inputType="textMultiLine" android:gravity="top" /> </com.google.android.material.textfield.TextInputLayout> <Button android:id="@+id/createevent" android:layout_width="match_parent" android:layout_height="wrap_content" android:text="Create" /> </LinearLayout>Öffnen Sie NewEventFragment , und fügen Sie die folgenden
importAnweisungen am Anfang der Datei hinzu.import android.util.Log; import android.widget.Button; import com.google.android.material.snackbar.BaseTransientBottomBar; import com.google.android.material.snackbar.Snackbar; import com.google.android.material.textfield.TextInputLayout; import java.time.ZoneId; import java.time.ZonedDateTime;Fügen Sie der Klasse die
NewEventFragmentfolgenden Member hinzu.private TextInputLayout mSubject; private TextInputLayout mAttendees; private TextInputLayout mStartInputLayout; private TextInputLayout mEndInputLayout; private TextInputLayout mBody; private EditTextDateTimePicker mStartPicker; private EditTextDateTimePicker mEndPicker;Fügen Sie die folgenden Funktionen hinzu, um eine Statusanzeige anzuzeigen und auszublenden.
private void showProgressBar() {
    getActivity().runOnUiThread(new Runnable() {
        @Override
        public void run() {
            getActivity().findViewById(R.id.progressbar)
                .setVisibility(View.VISIBLE);
            getActivity().findViewById(R.id.fragment_container)
                .setVisibility(View.GONE);
        }
    });
}

private void hideProgressBar() {
    getActivity().runOnUiThread(new Runnable() {
        @Override
        public void run() {
            getActivity().findViewById(R.id.progressbar)
                .setVisibility(View.GONE);
            getActivity().findViewById(R.id.fragment_container)
                .setVisibility(View.VISIBLE);
        }
    });
}
Fügen Sie die folgenden Funktionen hinzu, um die Werte aus den Eingabesteuerelementen abzurufen und die
GraphHelper.createEventFunktion aufzurufen.private void createEvent() { String subject = mSubject.getEditText().getText().toString(); String attendees = mAttendees.getEditText().getText().toString(); String body = mBody.getEditText().getText().toString(); ZonedDateTime startDateTime = mStartPicker.getZonedDateTime(); ZonedDateTime endDateTime = mEndPicker.getZonedDateTime(); // Validate boolean isValid = true; // Subject is required if (subject.isEmpty()) { isValid = false; mSubject.setError("You must set a subject"); } // End must be after start if (!endDateTime.isAfter(startDateTime)) { isValid = false; mEndInputLayout.setError("The end must be after the start"); } if (isValid) { // Split the attendees string into an array String[] attendeeArray = attendees.split(";"); GraphHelper.getInstance() .createEvent(subject, startDateTime, endDateTime, mTimeZone, attendeeArray, body) .thenAccept(newEvent -> { hideProgressBar(); Snackbar.make(getView(), "Event created", BaseTransientBottomBar.LENGTH_SHORT).show(); }) .exceptionally(exception -> { hideProgressBar(); Log.e("GRAPH", "Error creating event", exception); Snackbar.make(getView(), exception.getMessage(), BaseTransientBottomBar.LENGTH_LONG).show(); return null; }); } }Ersetzen Sie das vorhandene
onCreateViewdurch Folgendes.@Nullable @Override public View onCreateView(@NonNull LayoutInflater inflater, @Nullable ViewGroup container, @Nullable Bundle savedInstanceState) { View newEventView = inflater.inflate(R.layout.fragment_new_event, container, false); ZoneId userTimeZone = GraphToIana.getZoneIdFromWindows(mTimeZone); mSubject = newEventView.findViewById(R.id.neweventsubject); mAttendees = newEventView.findViewById(R.id.neweventattendees); mBody = newEventView.findViewById(R.id.neweventbody); mStartInputLayout = newEventView.findViewById(R.id.neweventstartdatetime); mStartPicker = new EditTextDateTimePicker(getContext(), mStartInputLayout.getEditText(), userTimeZone); mEndInputLayout = newEventView.findViewById(R.id.neweventenddatetime); mEndPicker = new EditTextDateTimePicker(getContext(), mEndInputLayout.getEditText(), userTimeZone); Button createButton = newEventView.findViewById(R.id.createevent); createButton.setOnClickListener(v -> { // Clear any errors mSubject.setErrorEnabled(false); mEndInputLayout.setErrorEnabled(false); showProgressBar(); createEvent(); }); return newEventView; }Speichern Sie die Änderungen, und starten Sie die App neu. Wählen Sie das Menüelement "Neues Ereignis " aus, füllen Sie das Formular aus, und wählen Sie " ERSTELLEN" aus.
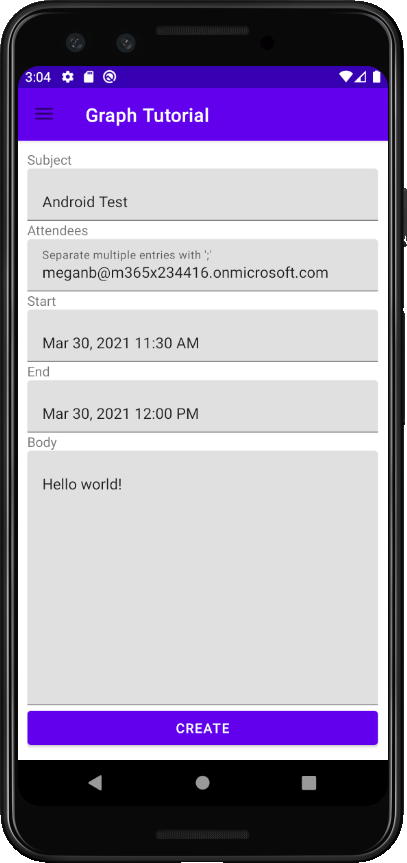
Herzlichen Glückwunsch!
Sie haben das Lernprogramm für Android Microsoft Graph abgeschlossen. Nachdem Sie nun über eine funktionierende App verfügen, die Microsoft Graph aufruft, können Sie experimentieren und neue Features hinzufügen. Besuchen Sie die Übersicht über Microsoft Graph, um alle Daten anzuzeigen, auf die Sie mit Microsoft Graph zugreifen können.
Feedback
Bitte geben Sie Feedback zu diesem Lernprogramm im GitHub Repository.
Liegt ein Problem mit diesem Abschnitt vor? Wenn ja, senden Sie uns Feedback, damit wir den Abschnitt verbessern können.