Suspend your work and manage your shelvesets
TFS 2017 | TFS 2015 | TFS 2013
Visual Studio 2019 | Visual Studio 2017 | Visual Studio 2015 | Visual Studio 2013
For a variety of reasons, sometimes you need to set aside some or all of your work in progress. Shelvesets are useful when you want to stop work for:
Interruption: You have pending changes that are not ready for check in, but you need to work on a different task.
Collaboration: You have pending changes that are not ready for check in but you need to share them with another team member.
Code Review: You want another team member to perform a code review of your pending changes.
Tip
If you are using Visual Studio Premium or a more powerful edition, you can use the Code Review feature.
Private Build: Before you check in your changes, you can use your automated build system to build and test your code.
Backup: You have work in progress that you cannot finish now so you want a backup copy that is stored on your server and available to other team members who might need to access it.
Handoff: You have work in progress that you want to hand off to another team member.
You can move your pending changes to a shelveset on the server and then clean your workspace. The shelveset saves and stores not only your file revisions, but also the Comment, the list of Related Work Items, and check-in notes (if you evaluate policies before shelving).
Prerequisites
You must be one of the Contributors for your project. To learn more, see Default TFVC permissions.
Suspend and resume your work from the My Work page
Note
The My Work feature is available only in Visual Studio Premium and Visual Studio Ultimate.
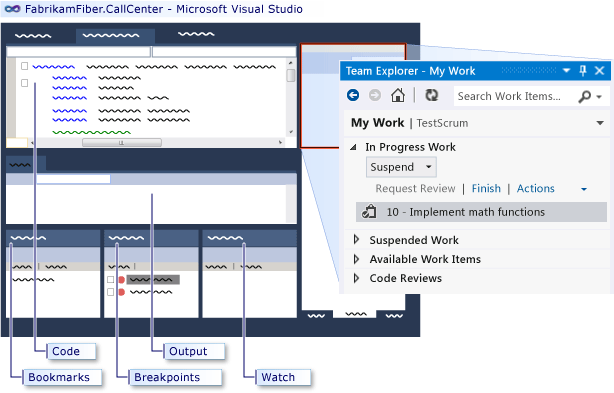
From the My Work page you can save and then restore not only your file changes and related work items, but also the position of your open windows, breakpoints, and other important cues.
In Team Explorer, choose  Home, and then choose My Work. On the My Work page, choose Suspend & Shelve, and then type a description of the suspended work.
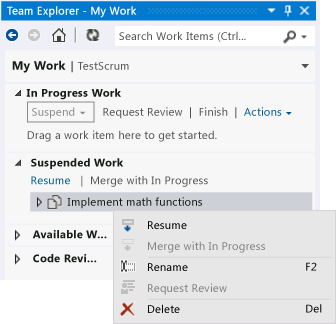
When you are ready to resume the work, go the Suspended & Shelved Work section of the My Work page, select a set of suspended work, and choose Resume.
Shelve your changes
Tip
In either Solution Explorer or Source Control Explorer, you can shelve a specific subset of the files that you are working with: select them, open their context menu, and then choose Shelve Pending Changes. The Pending Changes page appears, ready to shelve only the files you selected.
To shelve your changes
In Team Explorer, choose
Home, and then choose Pending Changes.In the Pending Changes page, make sure that the changes you want to shelve are listed in the Included Changes section. You can drag files between Included Changes and Excluded Changes (Keyboard shortcut: open the context menu of an item, and then choose Include or Exclude.
Choose the Shelve link.
Type a name for the shelveset.
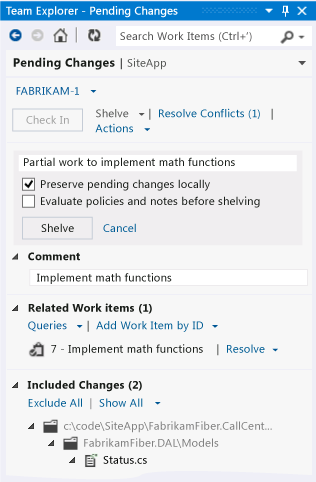
(Optional) Select either of the following check boxes:
Preserve pending change locally
By default, this check box is selected. When this check box is selected, your pending changes (including the comment and the Related Work Items list) are not removed from your workspace. If you want to clean your workspace to work on another task, you should clear this check box.
Evaluate Policies and check-in notes before shelving
When you select this check box, all check-in policies are evaluated before the shelveset is created. For more information about check-in policies, see Set and Enforce Quality Gates.
Choose the Shelve button.
Find a shelveset
To find a shelveset
In Team Explorer, choose
Home, and then choose Pending Changes.Choose the Actions link, and then choose Find Shelvesets.
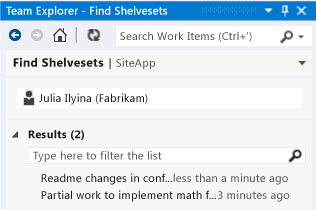
On the Find Shelvesets page, enter the name or alias of a project team member in the box, and then choose the Enter key.
Tip
If you don't know the name of the owner, you can type * to list shelvesets for all users.
A list of shelvesets appears in the Results list. You can type a filter to reduce the size of the list.
View and work with a shelveset
After you have a list of shelvesets (explained in "To find a shelveset") in the Find Shelvesets page, double-click the shelveset to view it.
The Shelveset Details page appears.
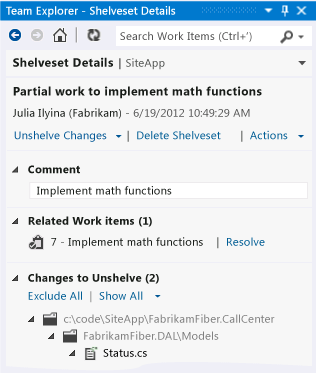
You can toggle between list and tree view from the Actions menu.
To get more information about a change to a file, open its context menu, and then choose Open, View History, or one of the Compare options.
Choose Unshelve Changes if you want to retrieve the changes in the shelveset into your workspace:
For any file changes that you do not want to unshelve, open the context menu of the file, and then choose Exclude.
If you want to delete the shelveset, clear the Preserve shelveset on server check box.
If you do not want to restore the work item list and check-in notes that are stored in the shelveset clear the Restore work items and check-in notes check box.
Choose the Unshelve button.
If there are conflicts between changes in the shelveset and the file versions in your workspace, the system will prompt you to resolve them.
Choose Delete Shelveset if you want to delete the shelveset.
Caution:
Be sure you do not need any of the work stored in a shelveset before you delete it. There is no way to recover a deleted shelveset.
Work from the command prompt
- Shelve Command : Create or delete a shelveset.
- Shelvesets Command : List shelvesets.
- Unshelve Command : Unshelve a shelveset.
- Difference Command : Compare the changes to a file in a shelveset with another version.
Tips
 Unlike a changeset, a shelveset is a non-versioned entity. If you or another user unshelve the items of which a shelveset consists, edit several files, and then later reshelve the shelveset, the system does not create a new version of the items for future comparison and maintains no record of who revised the items, when, or in what manner. The original shelveset is completely replaced.
- Conflicts can occur and prevent you from resuming suspended work. If this happens, see Resolve Team Foundation Version Control conflicts.