Hinweis
Für den Zugriff auf diese Seite ist eine Autorisierung erforderlich. Sie können versuchen, sich anzumelden oder das Verzeichnis zu wechseln.
Für den Zugriff auf diese Seite ist eine Autorisierung erforderlich. Sie können versuchen, das Verzeichnis zu wechseln.
Applies to: ![]() Visual Studio
Visual Studio ![]() Visual Studio for Mac
Visual Studio for Mac
Note
This article applies to Visual Studio 2017. If you're looking for the latest Visual Studio documentation, see Visual Studio documentation. We recommend upgrading to the latest version of Visual Studio. Download it here
A Python environment is a context in which you run Python code and includes global, virtual, and conda environments. An environment consists of an interpreter, a library (typically the Python Standard Library), and a set of installed packages. These components together determine valid language constructs and syntax, operating-system functionality that you can access, and packages you can use.
In Visual Studio on Windows, you use the Python Environments window, as described in this article, to manage environments and select one as the default for new projects. Other aspects of environments are found in the following articles:
For any given project, you can select a specific environment rather than use the default.
For details on creating and using virtual environments for Python projects, see Use virtual environments.
If you want to install packages in an environment, refer to the Packages tab reference.
To install another Python interpreter, see Install Python interpreters. In general, if you download and run an installer for a mainline Python distribution, Visual Studio detects that new installation and the environment appears in the Python Environments window and can be selected for projects.
If you're new to Python in Visual Studio, the following articles also provide from general background:
Note
You can't manage environments for Python code that is opened only as a folder using the File > Open > Folder command. Instead, Create a Python project from existing code to enjoy the environment features of Visual Studio.
The Python Environments window
The environments that Visual Studio knows about are displayed in the Python Environments window. To open the window, use one of the following methods:
- Select the View > Other Windows > Python Environments menu command.
- Right-click the Python Environments node for a project in Solution Explorer and select View All Python Environments:
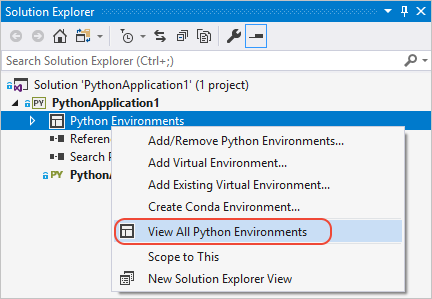
In all these cases, the Python Environments window appears alongside Solution Explorer:
Visual Studio looks for installed global environments using the registry (following PEP 514), along with virtual environments and conda environments (see Types of environments). If you don't see an expected environment in the list, see Manually identify an existing environment.
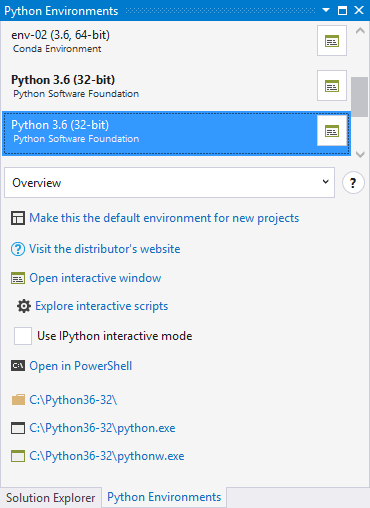
When you select an environment in the list, Visual Studio displays various properties and commands for that environment on the Overview tab.
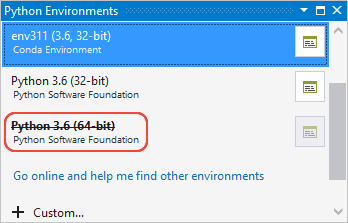
For example, you can see in the image above that the interpreter's location is C:\Python36-32. The four commands at the bottom of the Overview tab each open a command prompt with the interpreter running. For more information, see Python Environments window tab reference 2017- Overview.
Use the drop-down list below the list of environments to switch to different tabs such as Packages, and IntelliSense. These tabs are also described in the Python Environments window tab reference.
Selecting an environment doesn't change its relation to any projects. The default environment, shown in boldface in the list, is the one that Visual Studio uses for any new projects. To use a different environment with new projects, use the Make this the default environment for new projects command. Within the context of a project, you can always select a specific environment. For more information, see Select an environment for a project.
To the right of each listed environment, is a control that opens an Interactive window for that environment. (In Visual Studio 2017 15.5 and earlier, another control appears that refreshes the IntelliSense database for that environment. See Environments window tab reference for details about the database.)
Tip
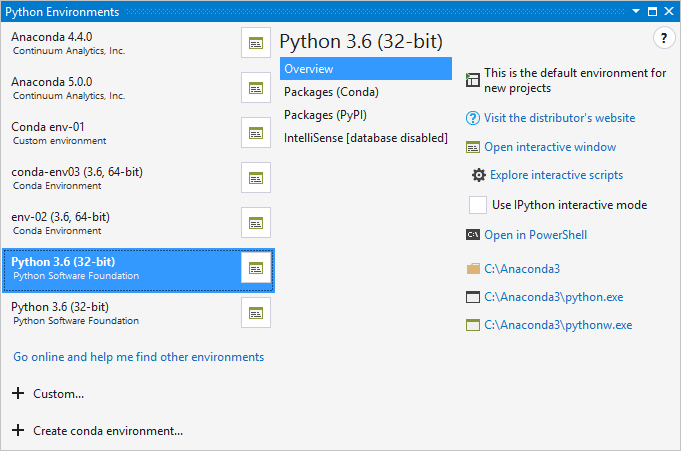
When you expand the Python Environments window wide enough, you'll get a fuller view of your environments that is more convenient to work with.
Note
Although Visual Studio respects the system-site-packages option, it doesn't provide a way to change it from within Visual Studio.
What if no environments appear?
If no environments appear, it means Visual Studio failed to detect any Python installations in standard locations. For example, you might have installed Visual Studio 2017 or later but cleared all the interpreter options in the installer options for the Python workload. Similarly, you might have installed Visual Studio 2015 or earlier but didn't install an interpreter manually (see Install Python interpreters).
If you know you have a Python interpreter on your computer but Visual Studio (any version) didn't detect it, then use the + Custom command to specify its location manually. See the next section, Manually identify an existing environment.
Tip
Visual Studio detects updates to an existing interpreter, such as upgrading Python 2.7.11 to 2.7.14 using the installers from python.org. During the installation process, the older environment disappears from the Python Environments list before the update appears in its place.
However, if you manually move an interpreter and its environment using the file system, Visual Studio won't know the new location. For more information, see Move an interpreter.
Types of environments
Visual Studio can work with global, virtual, and conda environments.
Global environments
Each Python installation maintains its own global environment. For example, Python 2.7, Python 3.6, Python 3.7, Anaconda 4.4.0, and so on. See Install Python interpreters)
Each environment is composed of the specific Python interpreter, its standard library, a set of pre-installed packages, and any other packages you install while that environment is activated. Installing a package into a global environment makes it available to all projects using that environment. If the environment is located in a protected area of the file system (within c:\program files, for example), then installing packages requires administrator privileges.
Global environments are available to all projects on the computer. In Visual Studio, you select one global environment as the default, which is used for all projects unless you specifically choose a different one for a project. For more information, see Select an environment for a project.
Virtual environments
Working in a global environment is an easy way to get started. Over time, the environments become cluttered with many different packages that you've installed for different projects. Such clutter makes it difficult to thoroughly test your application against a specific set of packages with known versions. But, the kind of environment is exactly as above that you'd set up on a build server or web server. Conflicts can also occur when two projects require incompatible packages or different versions of the same package.
For this reason, developers often create a virtual environment for a project. A virtual environment is a subfolder in a project that contains a copy of a specific interpreter. If you activate the virtual environment, any packages you install are installed only in that environment's subfolder. When you then run a Python program within that environment, you know that it's running against only those specific packages.
Visual Studio provides direct support for creating a virtual environment for a project. For example, if you open a project that contains a requirements.txt, or create a project from a template that includes that file, Visual Studio prompts you automatically to create a virtual environment and install those dependencies.
At any time within an open project, you can create a new virtual environment. In Solution Explorer, expand the project node, right-click Python Environments, and choose Add environment. In Add Environment, choose Virtual environment.
Visual Studio also provides a command to generate a requirements.txt file from a virtual environment, making it easy to recreate the environment on other computers. For more information, see Use virtual environments.
Conda environments
A conda environment is one you create using the conda tool, or with integrated conda management in Visual Studio 2017 version 15.7 and higher. (Requires Anaconda or Miniconda, which are available through the Visual Studio installer, see Install Visual Studio 2017
Select + Create conda environment in the Python Environments window, which opens a Create new conda environment tab:

Enter a name for the environment in the Name field, select a base Python interpreter in the Python field, and select Create.
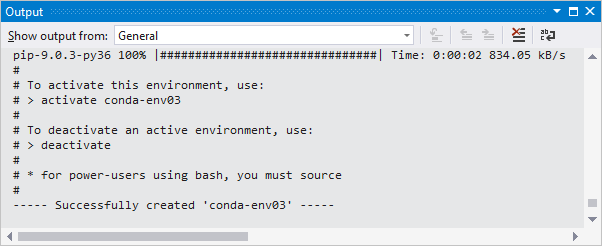
The Output window shows progress for the new environment, with a few CLI instructions once creation is complete:
Within Visual Studio, you can activate a conda environment for a project as you would any other environment as described on Select an environment for a project.
To install packages in the environment, use the Packages tab.
Note
For best results with conda environments, use conda 4.4.8 or later (conda versions are different from Anaconda versions). You can install suitable versions of Miniconda (Visual Studio 2019 and Visual Studio 2022) and Anaconda (Visual Studio 2017) through the Visual Studio installer.
To see the conda version, where conda environments are stored, and other information, run conda info at an Anaconda command prompt (that is, a command prompt where Anaconda is in the path):
conda info
Your conda environment folders appear as follows:
       envs directories : C:\Users\user\.conda\envs
                          c:\anaconda3\envs
                          C:\Users\user\AppData\Local\conda\conda\envs
Because conda environments aren't stored with a project, they act similarly to global environments. For example, installing a new package into a conda environment makes that package available to all projects using that environment.
For Visual Studio 2017 version 15.6 and earlier, you can use conda environments by pointing to them manually as described under Manually identify an existing environment.
Visual Studio 2017 version 15.7 and later detects conda environments automatically and displays them in the Python Environments window as described in the next section.
Manually identify an existing environment
Use the following steps to identify an environment that's installed in a non-standard location:
Use the following steps to identify an environment that's installed in a non-standard location (including conda environments in Visual Studio 2017 version 15.6 and earlier):
Select + Custom in the Python Environments window, which opens the Configure tab:
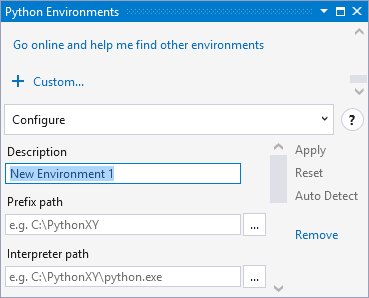
Enter a name for the environment in the Description field.
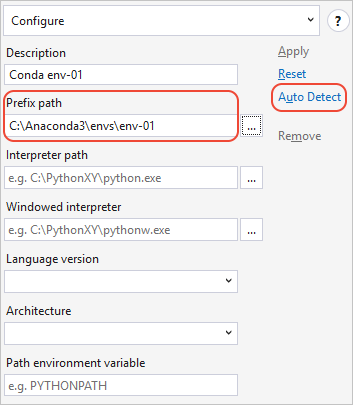
Enter or browse (using ...) to the path of the interpreter in the Prefix path field.
If Visual Studio detects a Python interpreter at that location (such as the path shown below for a conda environment), it enables the Auto Detect command. Selecting Auto Detect completes the remaining fields. You can also complete those fields manually.
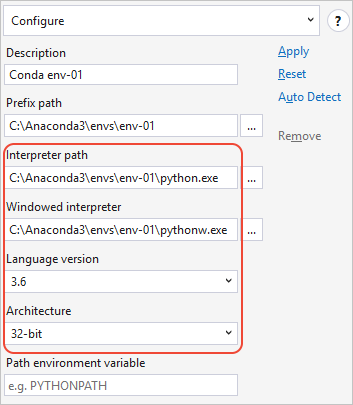
Once the fields contain the values you want, select Apply to save the configuration. You can now use the environment like any other within Visual Studio.
If you need to remove a manually identified environment, select the Remove command on the Configure tab. Autodetected environments don't provide this option. For more information, see Configure tab.
Fix or delete invalid environments
If Visual Studio finds registry entries for an environment, but the path to the interpreter is invalid, then the Python Environments window shows the name with a strikeout font:
To correct an environment you wish to keep, first try using its installer's Repair process. The installers for standard Python 3.x, for example, include that option.
Modify the registry to correct an environment that doesn't have a repair option, or to remove an invalid environment
Use the following steps to modify the registry directly. Visual Studio automatically updates thePython Environments window when you make changes to the registry.
Run regedit.exe.
Navigate to HKEY_LOCAL_MACHINE\SOFTWARE\Python or HKEY_CURRENT_USER\SOFTWARE\Python. For IronPython, look for IronPython instead.
Expand the node that matches the distribution, such as Python Core for CPython or ContinuumAnalytics for Anaconda. For IronPython, expand the version number node.
Inspect the values under the InstallPath node:
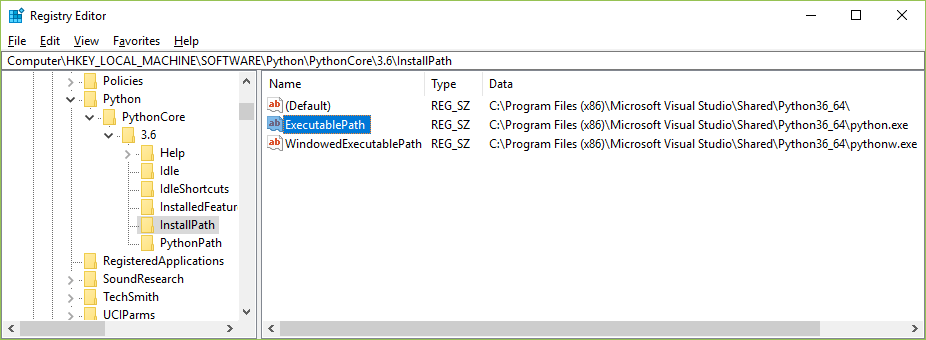
- If the environment still exists on your computer, change the value of ExecutablePath to the correct location. Also correct the (Default) and WindowedExecutablePath values as necessary.
- If the environment no longer exists on your computer and you want to remove it from the Python Environments window, delete the parent node of InstallPath, such as 3.6 in the image above.
- Invalid settings in HKEY_CURRENT_USER\SOFTWARE\Python override the settings in HKEY_LOCAL_MACHINE\SOFTWARE\Python