Hinweis
Für den Zugriff auf diese Seite ist eine Autorisierung erforderlich. Sie können versuchen, sich anzumelden oder das Verzeichnis zu wechseln.
Für den Zugriff auf diese Seite ist eine Autorisierung erforderlich. Sie können versuchen, das Verzeichnis zu wechseln.
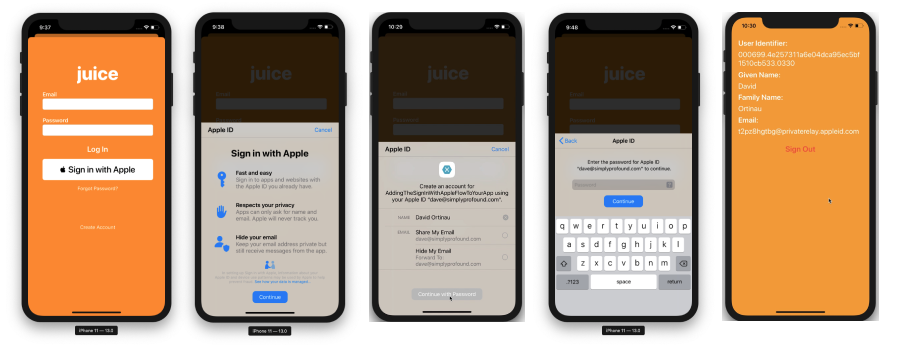
Die Anmeldung mit Apple ist ein neuer Dienst, der Identitätsschutz für Benutzer von Authentifizierungsdiensten von Drittanbietern bietet. Ab iOS 13 muss Apple jede neue App, die einen Authentifizierungsdienst eines Drittanbieters verwendet, auch die Anmeldung bei Apple bereitstellen. Vorhandene Apps, die aktualisiert werden, müssen bis April 2020 keine Anmeldung mit Apple hinzufügen.
In diesem Dokument wird erläutert, wie Sie die Anmeldung mit Apple zu iOS 13-Anwendungen hinzufügen können.
Apple-Entwicklersetup
Bevor Sie eine App mit Der Anmeldung mit Apple erstellen und ausführen, müssen Sie diese Schritte ausführen. Auf Apple Developer Certificates, Identifiers & Profiles Portal:
- Erstellen Sie einen neuen App-ID-Bezeichner .
- Legen Sie eine Beschreibung im Feld "Beschreibung " fest.
- Wählen Sie eine explizite Bundle-ID aus, und legen Sie sie im Feld fest
com.xamarin.AddingTheSignInWithAppleFlowToYourApp. - Aktivieren Sie "Anmelden mit Apple "-Funktion, und registrieren Sie die neue Identität.
- Erstellen Sie ein neues Bereitstellungsprofil mit der neuen Identität.
- Laden Sie es herunter, und installieren Sie es auf Ihrem Gerät.
- Aktivieren Sie in Visual Studio die Anmeldefunktion mit Apple in der Datei "Entitlements.plist".
Anmeldestatus überprüfen
Wenn Ihre App beginnt oder wenn Sie zuerst den Authentifizierungsstatus eines Benutzers überprüfen müssen, instanziieren Sie einen ASAuthorizationAppleIdProvider und überprüfen Sie den aktuellen Status:
var appleIdProvider = new ASAuthorizationAppleIdProvider ();
appleIdProvider.GetCredentialState (KeychainItem.CurrentUserIdentifier, (credentialState, error) => {
    switch (credentialState) {
    case ASAuthorizationAppleIdProviderCredentialState.Authorized:
        // The Apple ID credential is valid.
        break;
    case ASAuthorizationAppleIdProviderCredentialState.Revoked:
        // The Apple ID credential is revoked.
        break;
    case ASAuthorizationAppleIdProviderCredentialState.NotFound:
        // No credential was found, so show the sign-in UI.
        InvokeOnMainThread (() => {
            var storyboard = UIStoryboard.FromName ("Main", null);

            if (!(storyboard.InstantiateViewController (nameof (LoginViewController)) is LoginViewController viewController))
                return;

            viewController.ModalPresentationStyle = UIModalPresentationStyle.FormSheet;
            viewController.ModalInPresentation = true;
            Window?.RootViewController?.PresentViewController (viewController, true, null);
        });
        break;
    }
});
In diesem Code, der während FinishedLaunching des Aufrufs in der AppDelegate.csApp aufgerufen wird, verarbeitet die App, wenn ein Zustand ist NotFound und dem LoginViewController Benutzer präsentiert wird. Wenn der Zustand zurückgegeben Authorized wurde oder Revokedeine andere Aktion dem Benutzer angezeigt werden kann.
Ein LoginViewController für die Anmeldung mit Apple
Die UIViewController Implementierung der Anmeldelogik und das Angebot der Anmeldung mit Apple muss wie im LoginViewController folgenden Beispiel implementiert IASAuthorizationControllerDelegate werdenIASAuthorizationControllerPresentationContextProviding.
public partial class LoginViewController : UIViewController, IASAuthorizationControllerDelegate, IASAuthorizationControllerPresentationContextProviding {
    public LoginViewController (IntPtr handle) : base (handle)
    {
    }

    public override void ViewDidLoad ()
    {
        base.ViewDidLoad ();
        // Perform any additional setup after loading the view, typically from a nib.

        SetupProviderLoginView ();
    }

    public override void ViewDidAppear (bool animated)
    {
        base.ViewDidAppear (animated);

        PerformExistingAccountSetupFlows ();
    }

    void SetupProviderLoginView ()
    {
        var authorizationButton = new ASAuthorizationAppleIdButton (ASAuthorizationAppleIdButtonType.Default, ASAuthorizationAppleIdButtonStyle.White);
        authorizationButton.TouchUpInside += HandleAuthorizationAppleIDButtonPress;
        loginProviderStackView.AddArrangedSubview (authorizationButton);
    }

    // Prompts the user if an existing iCloud Keychain credential or Apple ID credential is found.
    void PerformExistingAccountSetupFlows ()
    {
        // Prepare requests for both Apple ID and password providers.
        ASAuthorizationRequest [] requests = {
            new ASAuthorizationAppleIdProvider ().CreateRequest (),
            new ASAuthorizationPasswordProvider ().CreateRequest ()
        };

        // Create an authorization controller with the given requests.
        var authorizationController = new ASAuthorizationController (requests);
        authorizationController.Delegate = this;
        authorizationController.PresentationContextProvider = this;
        authorizationController.PerformRequests ();
    }

    private void HandleAuthorizationAppleIDButtonPress (object sender, EventArgs e)
    {
        var appleIdProvider = new ASAuthorizationAppleIdProvider ();
        var request = appleIdProvider.CreateRequest ();
        request.RequestedScopes = new [] { ASAuthorizationScope.Email, ASAuthorizationScope.FullName };

        var authorizationController = new ASAuthorizationController (new [] { request });
        authorizationController.Delegate = this;
        authorizationController.PresentationContextProvider = this;
        authorizationController.PerformRequests ();
    }
}
Dieser Beispielcode überprüft den aktuellen Anmeldestatus und PerformExistingAccountSetupFlows stellt eine Verbindung mit der aktuellen Ansicht als Stellvertretung her. Wenn eine vorhandene iCloud-Schlüsselbundanmeldeinformationen oder Apple-ID-Anmeldeinformationen gefunden werden, wird der Benutzer aufgefordert, dies zu verwenden.
Apple bietet ASAuthorizationAppleIdButtoneine Schaltfläche speziell für diesen Zweck an. Wenn sie berührt wird, löst die Schaltfläche den in der Methode HandleAuthorizationAppleIDButtonPressbehandelten Workflow aus.
Behandeln von Autorisierung
Implementieren Sie in der IASAuthorizationController Implementierung einer benutzerdefinierten Logik zum Speichern des Benutzerkontos. Im folgenden Beispiel wird das Konto des Benutzers im Schlüsselbund gespeichert, der eigene Speicherdienst von Apple.
#region IASAuthorizationController Delegate

[Export ("authorizationController:didCompleteWithAuthorization:")]
public void DidComplete (ASAuthorizationController controller, ASAuthorization authorization)
{
    if (authorization.GetCredential<ASAuthorizationAppleIdCredential> () is ASAuthorizationAppleIdCredential appleIdCredential) {
        var userIdentifier = appleIdCredential.User;
        var fullName = appleIdCredential.FullName;
        var email = appleIdCredential.Email;

        // Create an account in your system.
        // For the purpose of this demo app, store the userIdentifier in the keychain.
        try {
            new KeychainItem ("com.example.apple-samplecode.juice", "userIdentifier").SaveItem (userIdentifier);
        } catch (Exception) {
            Console.WriteLine ("Unable to save userIdentifier to keychain.");
        }

        // For the purpose of this demo app, show the Apple ID credential information in the ResultViewController.
        if (!(PresentingViewController is ResultViewController viewController))
            return;

        InvokeOnMainThread (() => {
            viewController.UserIdentifierText = userIdentifier;
            viewController.GivenNameText = fullName?.GivenName ?? "";
            viewController.FamilyNameText = fullName?.FamilyName ?? "";
            viewController.EmailText = email ?? "";

            DismissViewController (true, null);
        });
    } else if (authorization.GetCredential<ASPasswordCredential> () is ASPasswordCredential passwordCredential) {
        // Sign in using an existing iCloud Keychain credential.
        var username = passwordCredential.User;
        var password = passwordCredential.Password;

        // For the purpose of this demo app, show the password credential as an alert.
        InvokeOnMainThread (() => {
            var message = $"The app has received your selected credential from the keychain. \n\n Username: {username}\n Password: {password}";
            var alertController = UIAlertController.Create ("Keychain Credential Received", message, UIAlertControllerStyle.Alert);
            alertController.AddAction (UIAlertAction.Create ("Dismiss", UIAlertActionStyle.Cancel, null));

            PresentViewController (alertController, true, null);
        });
    }
}

[Export ("authorizationController:didCompleteWithError:")]
public void DidComplete (ASAuthorizationController controller, NSError error)
{
    Console.WriteLine (error);
}

#endregion
Autorisierungscontroller
Der letzte Teil dieser Implementierung ist die ASAuthorizationController Verwaltung von Autorisierungsanforderungen für den Anbieter.
#region IASAuthorizationControllerPresentation Context Providing

public UIWindow GetPresentationAnchor (ASAuthorizationController controller) => View.Window;

#endregion