Verwalten der Netzwerktopologie
Wenn in Ihrer Organisation standortbasiertes Routing für Direct Routing oder die dynamische Notruffunktion bereitgestellt werden soll, müssen Sie Netzwerkeinstellungen für die Verwendung mit diesen Features in Microsoft Teams konfigurieren. Abhängig von der Cloud-VoIP-Funktion und -Funktion, die Sie bereitstellen, konfigurieren Sie einige oder alle diese Einstellungen, einschließlich:
Eine Netzwerkregion enthält eine Sammlung von Netzwerkstandorten. Eine Netzwerkregion verbindet verschiedene Teile eines Netzwerks, das sich über verschiedene geografische Bereiche erstreckt. Wenn Ihre Organisation beispielsweise über viele Standorte in Indien verfügt, können Sie „Indien“ als Netzwerkregion festlegen. Jeder Netzwerkstandort muss einer bestimmten Netzwerkregion zugeordnet sein.
Ein Netzwerkstandort stellt einen Ort dar, an dem Ihre Organisation einen physischen Wert hat, z. B. ein Büro, eine Reihe von Gebäuden oder einen Campus. Diese Websites sind als Sammlung von IP-Subnetzen definiert. Jeder Netzwerkstandort muss einer bestimmten Netzwerkregion zugeordnet sein.
Netzwerksubnetz – Jedes Subnetz muss einem bestimmten Netzwerkstandort zugeordnet sein. Der Standort eines Clients wird basierend auf dem Netzwerksubnetz und dem zugehörigen Netzwerkstandort bestimmt. Sie können mehrere Subnetze demselben Netzwerkstandort zuordnen, aber nicht mehrere Standorte demselben Subnetz zuordnen.
Vertrauenswürdige IP-Adressen – Vertrauenswürdige IP-Adressen sind die externen INTERNET-IP-Adressen des Unternehmensnetzwerks. Sie bestimmen, ob sich der Endpunkt des Benutzers innerhalb des Unternehmensnetzwerks befindet, bevor eine bestimmte Übereinstimmung mit der Website überprüft wird.
Sie konfigurieren Netzwerkeinstellungen auf der Seite „Netzwerktopologie“ im Microsoft Teams Admin Center oder mithilfe von Windows PowerShell.
Konfigurieren der Netzwerkeinstellungen
Konfigurieren von Netzwerkstandorten
Sie definieren Netzwerkregionen, Netzwerkstandorte und Subnetze auf der Registerkarte Netzwerkstandorte auf der Seite „Netzwerktopologie“.
Wechseln Sie im linken Navigationsbereich des Microsoft Teams Admin Centers zu Netzwerktopologie> für Standorte und wählen Sie dann die Registerkarte Netzwerkstandorte aus.
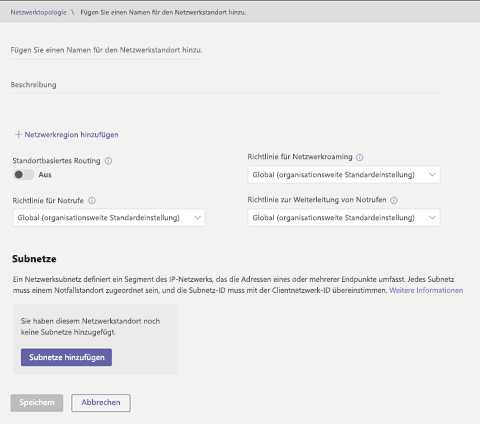
Wählen Sie + Hinzufügen aus, und geben Sie dann einen Namen und eine Beschreibung für den Wählplan ein.
Um den Standort einer Netzwerkregion zuzuordnen, wählen Sie +Netzwerkregion hinzufügen, wählen Sie eine vorhandene Region aus, oder wählen Sie Hinzufügen aus, um eine Region hinzuzufügen, und wählen Sie dann Verknüpfen aus.
Um Location-Based Routing für den Standort zu aktivieren, aktivieren Sie standortbasiertes Routing.
Führen Sie eine oder beide der folgenden Aktionen aus, um dem Standort Notfalldienstrichtlinien zuzuweisen:
- Wenn Ihre Organisation Anrufpläne, Telefonieanbieter oder Direct Routing verwendet, wählen Sie unter Richtlinie für Notrufe"die gewünschte Richtlinie aus.
- Wenn Ihre Organisation Direct Routing bereitgestellt hat, wählen Sie unter Richtlinie für die Notrufweiterleitung die gewünschte Richtlinie aus.
Wenn Sie dem Standort ein Subnetz zuordnen möchten, wählen Sie unter Subnetze die Option Subnetze hinzufügen aus. Geben Sie die IP-Version, die IP-Adresse, den Netzwerkbereich an, fügen Sie eine Beschreibung hinzu, und wählen Sie dann Übernehmen aus. Ein Netzwerksubnetz muss einem bestimmten Netzwerkstandort zugeordnet sein.
Klicken Sie auf Speichern.
Sie können auch das folgende PowerShell-Cmdlet verwenden, um Netzwerkstandorte zu konfigurieren:
Verwenden Sie zum Definieren von Netzwerkregionen das Cmdlet
New-CsTenantNetworkRegion.Verwenden Sie zum Definieren von Netzwerkstandorten das Cmdlet
New-CsTenantNetworkSite.Verwenden Sie zum Definieren von Netzwerksubnetzen das Cmdlet
New-CsTenantNetworkSubnet.
Konfigurieren Sie vertrauenswürdige IP-Adressen
Sie verwalten externe vertrauenswürdige IP-Adressen auf der Registerkarte Vertrauenswürdige IPs auf der Seite „Netzwerktopologie“ im Microsoft Teams Admin Center. Sie können eine unbegrenzte Anzahl von externen vertrauenswürdigen IP-Adressen hinzufügen.
Wechseln Sie in der linken Navigationsleiste des Microsoft Teams Admin Centers zu Netzwerktopologie> für Standorte und wählen Sie dann die Registerkarte Vertrauenswürdige IPs aus.
Wählen Sie Neu aus.
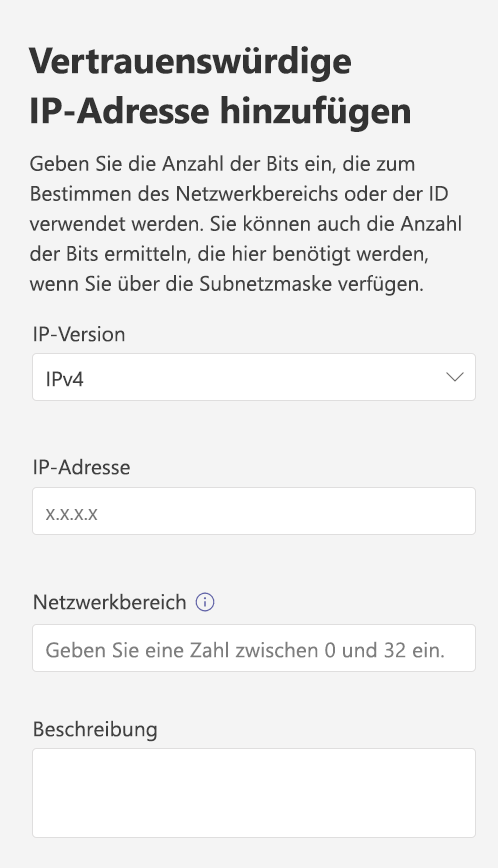
Geben Sie im Bereich Vertrauenswürdige IP-Adresse hinzufügen die IP-Version, die IP-Adresse, den Netzwerkbereich an, fügen Sie eine Beschreibung hinzu, und wählen Sie dann Übernehmen aus.
Sie können auch das folgende PowerShell-Cmdlet verwenden, um vertrauenswürdige IP-Adressen zu konfigurieren:
- Verwenden Sie das Cmdlet
New-CsTenantTrustedIPAddress, um externe Subnetze zu definieren und sie dem Mandanten zuzuweisen.
Bearbeiten einer vertrauenswürdigen IP-Adresse
Wechseln Sie in der linken Navigationsleiste des Microsoft Teams Admin Centers zu Netzwerktopologie> für Standorte und wählen Sie dann die Registerkarte Vertrauenswürdige IPs aus.
Wählen Sie die IP-Adresse aus, indem Sie links davon klicken, und wählen Sie dann Bearbeiten aus.
Nehmen Sie im Bereich Vertrauenswürdige IP-Adresse bearbeiten die gewünschten Änderungen vor, und wählen Sie dann Übernehmen aus.
Konfigurieren von Roamingrichtlinien
Zusätzlich zur Verwaltung von Video- und Medieneinstellungen mit Besprechungsrichtlinien können Sie die Verwendung der vom Microsoft Teams-Client verwendeten IP-Video – und Medienbitrate dynamisch mithilfe der Teams-Netzwerkroamingrichtlinie steuern.
Mit dieser Richtlinie können Sie Netzwerkstandorten Einstellungen zuweisen. Der Teams-Client übernimmt die Einstellungen dynamisch basierend auf dem Netzwerkstandort, mit dem er eine Verbindung herstellt.
Wenn sich der Teams-Client von einem Netzwerkstandort mit zugewiesener Roamingrichtlinie anmeldet, wird diese Richtlinie verwendet. Wenn keine Richtlinie zugewiesen ist, werden die in der Besprechungsrichtlinie festgelegten Werte verwendet.
Wechseln Sie in der linken Navigationsleiste des Microsoft Teams Admin Centers zu Netzwerktopologie> für Standorte und wählen Sie dann die Registerkarte Roamingrichtlinien aus.
Wählen Sie + Hinzufügen aus.
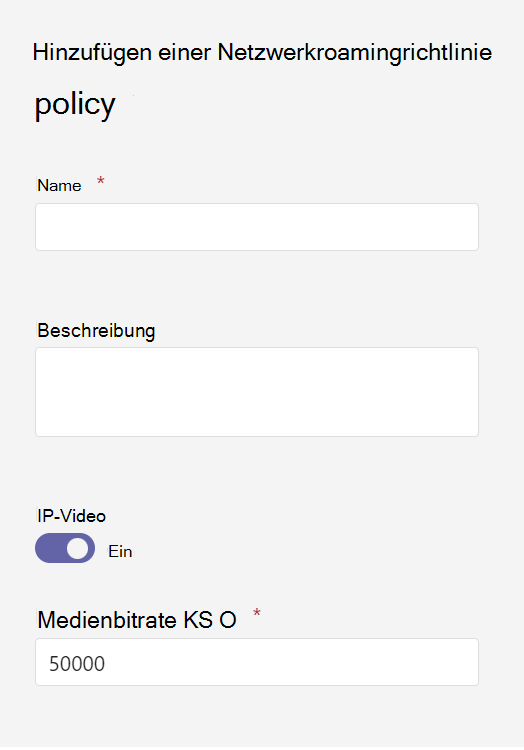
Konfigurieren Sie im Bereich Netzwerkroamingrichtlinie hinzufügen die gewünschten Einstellungen, und wählen Sie dann Übernehmen aus.
IP-Video : Diese Einstellung steuert, ob Video in Besprechungen aktiviert werden kann, die von einem Benutzer gehostet werden, und in 1:1- und Gruppenanrufen, die von einem Benutzer gestartet wurden.
Medienbitrate (Kbs) – Diese Einstellung bestimmt die durchschnittliche Medienbitrate für Audio-, Video- und videobasierte App-Freigabeübertragungen in Anrufen und Besprechungen für den Benutzer.
Anschließend können Sie die Roamingrichtlinie zuweisen, indem Sie einen Netzwerkstandort über die Registerkarte Netzwerkstandorte bearbeiten.
Sie können auch das folgende PowerShell-Cmdlet verwenden, um Roamingrichtlinien zu konfigurieren:
Get-CsTeamsNetworkRoamingPolicyNew-CsTeamsNetworkRoamingPolicySet-CsTeamsNetworkRoamingPolicyRemove-CsTeamsNetworkRoamingPolicy
Nachdem Sie die Richtlinie konfiguriert haben, weisen Sie sie mithilfe des Set-CsTenantNetworkSite Cmdlets einem oder mehreren Netzwerkstandorten zu.
Weitere Informationen finden Sie unter Konfigurieren von Netzwerkeinstellungen mithilfe von PowerShell.
Netzwerkeinstellungen für Microsoft eCDN
Das Microsoft eCDN-Setup hat einige Netzwerkanforderungen, hauptsächlich in den folgenden Bereichen.
Wenn ein Benutzer zur Ereignisseite naviziert, muss der Client das Microsoft eCDN-Skript herunterladen, das eine HTTP- oder HTTPS-Verbindung mit *.ecdn.teams.microsoft.com erfordert.
Nach dem Herunterladen wird eine sichere WebSocket-Verbindung mit unserem Back-End hergestellt.
Die Peer-to-Peer-Verbindung selbst ist eine UDP-Verbindung über den Portbereich 1025-65535, die vom Browser zufällig ausgewählt wird. Microsoft Edge und Google Chrome ermöglichen die Konfiguration des Portbereichs mithilfe von Chrome für Administratoren.
- Externe Connections: Connections, die ins Internet gehen. In der Regel durchlaufen Pakete in diesen Verbindungen die Firewall und benötigen eine Zulassungsliste.
| Hostname | Ports | Protokoll | Beschreibung |
|---|---|---|---|
| *.ecdn.teams.microsoft.com | 443 | HTTP/S über TCP | Microsoft eCDN-Skripts |
| *.ecdn.teams.microsoft.com | 443 | WebSocket über TCP | Microsoft eCDN-Back-End |
- Interne Verbindungen: Connections, die innerhalb des Unternehmensnetzwerks verbleiben. In der Regel durchlaufen Pakete in diesen Verbindungen keine Firewall und benötigen keine Konfiguration, um sie zuzulassen.
| Hostname | Ports | Protokoll | Beschreibung |
|---|---|---|---|
| n/v | 1025-65535 | SCTP über DTLS über UDP | P2P-Kommunikation |
Weitere Informationen finden Sie unter Technische Übersicht über Microsoft eCDN.