Note
Access to this page requires authorization. You can try signing in or changing directories.
Access to this page requires authorization. You can try changing directories.
You can configure the following Defender for Endpoint advanced features depending on the Microsoft security products in your environment.
Enable advanced features
To enable or disable an advanced feature in the Microsoft Defender portal:
Go to the Microsoft Defender portal and sign in.
In the navigation pane, select Settings > Endpoints > Advanced features.
Select the advanced feature you want to configure and toggle the setting between On and Off.
Select Save preferences.
Use the following advanced features to get better protected from potentially malicious files and gain better insight during security investigations.
Restrict correlation to within scoped device groups
The scoped device group correlation setting can be used for scenarios where local SOC operations would like to limit alert correlations only to device groups that they can access. When the scoped device group correlation setting is turned on, an incident composed of alerts that cross-device groups is no longer considered a single incident. The local SOC can then take action on the incident because they have access to one of the device groups involved. However, global SOC sees several different incidents by device group instead of one incident. We don't recommend turning on this setting unless doing so outweighs the benefits of incident correlation across the entire organization.
Note
- Changing this setting impacts future alert correlations only.
- Device group creation is supported in Defender for Endpoint Plan 1 and Plan 2.
Enable EDR in block mode
Endpoint detection and response (EDR) in block mode provides protection from malicious artifacts, even when Microsoft Defender Antivirus is running in passive mode. When EDR in block mode is turned on, it blocks malicious artifacts or behaviors that are detected on a device. EDR in block mode works behind the scenes to remediate malicious artifacts that are detected post breach.
Automatically resolve alerts
Turn on the auto-resolve alerts setting to automatically resolve alerts where no threats were found or where detected threats were remediated. If you don't want to have alerts auto resolved, you'll need to manually turn off the feature.
Note
- The result of the auto-resolve action may influence the Device risk level calculation which is based on the active alerts found on a device.
- If a security operations analyst manually sets the status of an alert to "In progress" or "Resolved" the auto-resolve capability will not overwrite it.
Configure allow or block file settings
To use this feature, your organization must meet these requirements:
- Microsoft Defender Antivirus is the active antimalware solution.
- Cloud-based protection is enabled.
This feature lets you block harmful files in your network. When you block a file, devices in your organization can't read, write, or run it.
To turn on Allow or block files:
In the Microsoft Defender portal, select Settings > Endpoints > General > Advanced features > Allow or block file.
Toggle the setting between On and Off.
a.
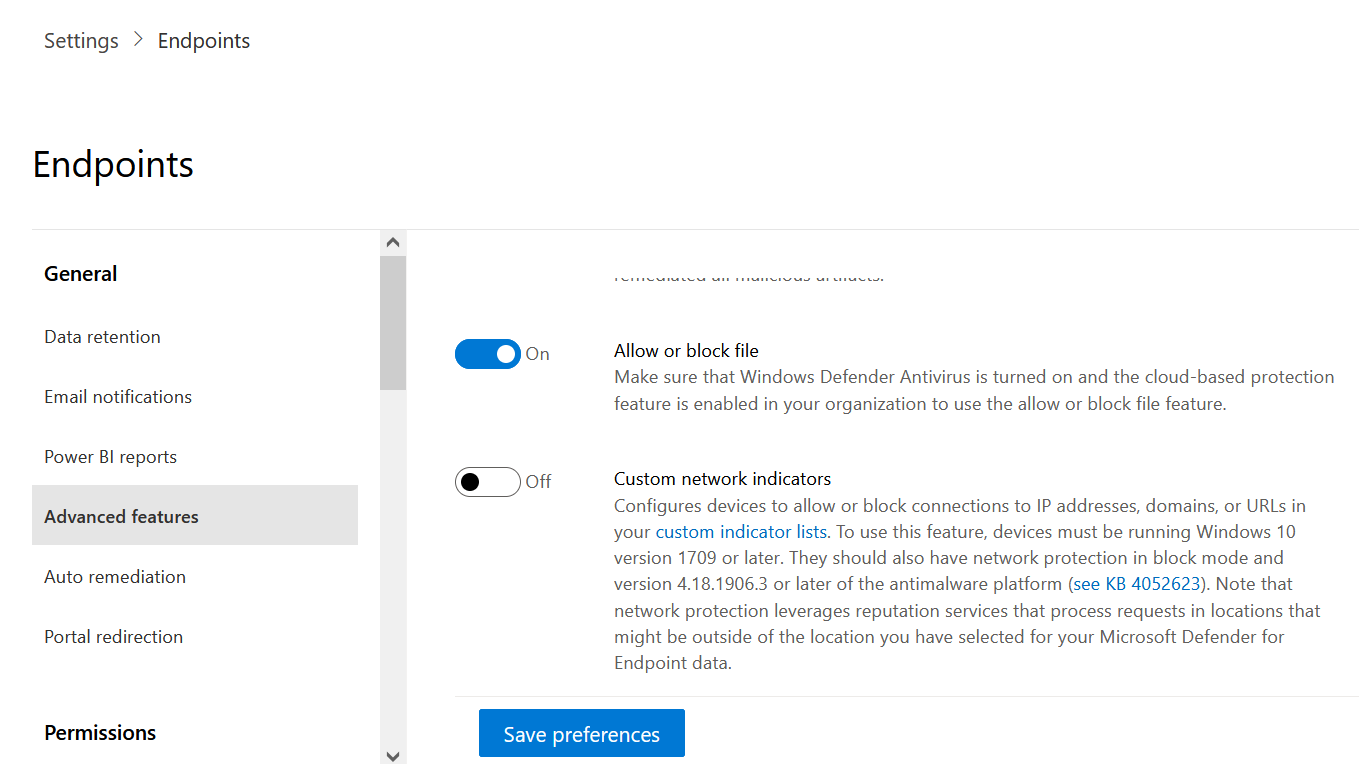
Select Save preferences at the bottom of the page.
After you turn on this feature, you can block files from the Add Indicator tab on a file's profile page.
Hide potential duplicate device records
Turn on this feature to hide duplicate device records so you see only the most accurate data for each device. Duplicates can happen for many reasons. For example, device discovery might scan your network and find a device that is already onboarded or was recently offboarded.
This feature matches duplicates by hostname and last seen time. It hides them from the Device Inventory, Microsoft Defender Vulnerability Management pages, and Public APIs for machine data. The most accurate record stays visible. Duplicates still appear in global search, advanced hunting, alerts, and incidents pages.
This setting is on by default and applies tenant wide. To show duplicate records, turn off the feature manually.
Configure custom network indicators
Turning on custom network indicators allows you to create indicators for IP addresses, domains, or URLs, which determine whether they'll be allowed or blocked based on your custom indicator list.
To use this feature, devices must be running Windows 10 version 1709 or later, or Windows 11.
For more information, see Overview of indicators.
Note
Network protection leverages reputation services that process requests in locations that might be outside of the location you've selected for your Defender for Endpoint data.
Enable tamper protection
During cyber attacks, attackers might try to turn off security features like antivirus protection on your devices. They do this to access your data, install malware, or exploit your identity and devices. Tamper protection locks Microsoft Defender Antivirus and stops your security settings from being changed by apps or other methods.
For more information, including how to configure tamper protection, see Tamper protection overview.
Enable user details display
Turn on the show user details feature so that you can see user details stored in Microsoft Entra ID. Details include a user's picture, name, title, and department information when investigating user account entities. You can find user account information in the following views:
- Alert queue
- Device details page
For more information, see Investigate a user account.
Configure Skype for Business integration
Enabling the Skype for Business integration gives you the ability to communicate with users using Skype for Business, email, or phone. The Skype for Business integration can be handy when you need to communicate with the user and mitigate risks.
Note
When a device is being isolated from the network, there's a pop-up where you can choose to enable Outlook and Skype communications which allows communications to the user while they are disconnected from the network. The Outlook and Skype communications option applies only when devices are in isolation mode.
Configure Microsoft Defender for Cloud Apps integration
Enabling the Microsoft Defender for Cloud Apps integration forwards Defender for Endpoint signals to Microsoft Defender for Cloud Apps to provide deeper visibility into cloud application usage. Forwarded data is stored and processed in the same location as your Defender for Cloud Apps data.
For more information, see Microsoft Defender for Cloud Apps overview.
Configure web content filtering
Block access to websites containing unwanted content and track web activity across all domains. Before you deploy the Microsoft Defender for Endpoint security baseline, ensure network protection is in block mode. To specify the web content categories you want to block, create a web content filtering policy.
Enable the unified audit log
Search in Microsoft Purview enables your security and compliance team to view critical audit log event data to gain insight and investigate user activities. Whenever an audited activity is performed by a user or an admin, an audit record is generated and stored in the Microsoft 365 audit log for your organization. For more information, see the Search the audit log.
Enable device discovery
Helps you find unmanaged devices connected to your corporate network without the need for extra appliances or cumbersome process changes. Using onboarded devices, you can find unmanaged devices in your network and assess vulnerabilities and risks. For more information, see Device discovery.
Note
You can always apply filters to exclude unmanaged devices from the device inventory list. You can also use the onboarding status column on API queries to filter out unmanaged devices.
Download quarantined files
Backup quarantined files in a secure and compliant location so they can be downloaded directly from quarantine. The Download file button is always available in the file page. The download quarantined files setting is turned on by default. Requirements for downloading quarantined files
Default to streamlined connectivity when onboarding devices in the Defender portal
This setting makes streamlined connectivity the default onboarding package for supported operating systems. You can still use the standard package, but you need to select it from the drop-down on the onboarding page.
Enable live response
Turn on this feature so that users with the appropriate permissions can start a live response session on devices.
To assign roles for live response, see Create and manage roles.
Enable live response for servers
Turn on this feature so that users with the appropriate permissions can start a live response session on servers.
For more information about role assignments, see Create and manage roles.
Allow unsigned script execution in live response
Enabling this feature allows you to run unsigned scripts in a live response session.
Configure automatic attack disruption
Automatic attack disruption stops attacks by containing compromised assets that the attacker controls. It limits lateral movement early, which reduces the cost and productivity loss from an attack. Security operations teams keep full control to investigate, fix issues, and bring assets back online. For more information, see Automatic attack disruption in Microsoft Defender.
Share endpoint alerts with Microsoft Compliance Center
The endpoint alert sharing setting sends endpoint security alerts and their triage status to the Microsoft Purview portal. You can use these alerts to improve insider risk management policies and address internal risks before they cause harm. Forwarded data is stored in the same location as your Office 365 data.
After you set up the policy indicators in insider risk management settings, Defender for Endpoint shares alerts with insider risk management for applicable users.
Configure the Microsoft Intune connection
You can integrate Defender for Endpoint with Microsoft Intune to enable device risk-based conditional access. When you configure Conditional Access, Defender for Endpoint shares device data with Intune to help enforce policies.
This integration requires Microsoft Intune. Intune is a separate product that isn't part of Microsoft Defender for Endpoint, and it isn't included in all subscriptions. You need licenses that support Defender for Endpoint, Intune, and Microsoft Entra Conditional Access. For more information, see Microsoft Intune licensing and Conditional Access policy license requirements.
Important
You must enable this integration in both Intune and Defender for Endpoint. For detailed steps, see Configure Conditional Access in Defender for Endpoint.
This feature requires the following:
- An active Microsoft Intune environment, with Intune-managed Windows devices Microsoft Entra joined.
Enable authenticated telemetry
You can Turn on Authenticated telemetry to prevent spoofing telemetry into your dashboard.
Enable preview features
Learn about new features in the Defender for Endpoint preview release.
Try upcoming features by turning on the preview experience. You'll have access to upcoming features, which you can provide feedback on to help improve the overall experience before features are generally available.
If you already have preview features turned on, manage your settings from the main Defender XDR settings.
For more information, see Microsoft Defender XDR preview features
Configure Endpoint Attack Notifications
Endpoint Attack Notifications let Microsoft hunt for critical threats in your endpoint data. Threats are ranked by urgency and impact.
For proactive hunting across Microsoft Defender XDR, including threats that span email, collaboration, identity, cloud apps, and endpoints, get started with Microsoft Defender Experts.