Note
Access to this page requires authorization. You can try signing in or changing directories.
Access to this page requires authorization. You can try changing directories.
Phishing is one of the most common entry points for cyberattacks and a persistent operational burden for security operations center (SOC) teams. Analysts face a continuous stream of user‑reported suspicious emails that require careful review and triage. At scale, this volume slows response, consumes analyst time, and increases the risk of genuine threats being missed.
The Phishing Triage Agent in Microsoft Defender is an AI agent that helps security teams scale the triage and classification of user‑reported phishing emails, reducing repetitive investigation work and accelerating response.
The Phishing Triage Agent uses large language model (LLM)–based analysis to assess reported emails, determine intent, and classify each submission as a real threat or a false positive. Rather than relying on static rules or predefined inputs, the agent applies contextual reasoning to evaluate submissions dynamically and at scale.
By filtering out false alarms, the agent enables analysts to focus on confirmed threats and higher‑impact investigations - improving efficiency, accelerating detection, and strengthening the organization’s overall security posture.
Watch this video for a demonstration of the Phishing Triage Agent:
How the agent works
The Phishing Triage Agent is a Security Copilot agent in Microsoft Defender that enhances the efficiency of security operations teams by classifying and triaging user-submitted phishing incidents. The agent’s key capabilities include:
- Autonomous triage: Uses advanced AI tools to perform sophisticated assessments and determine whether a submission is a real threat or a false alarm, without requiring step-by-step human input or code.
- Transparent rationale: Provides transparent rationale for its classification verdicts in natural language, detailing the reasoning behind its conclusions and the evidence used to reach them. It also provides a visual representation of its reasoning process.
- Learning based on feedback: Analysts can provide feedback on classification outcomes. Over time, this feedback helps refine the agent’s behavior to better reflect organizational context and reduce manual follow‑up.
To investigate phishing attempts, the agent uses a combination of Microsoft Defender and Microsoft Security Copilot capabilities, along with a set of security tools that continuously evolve as new detection techniques and integrations become available. Current examples include:
- Email content analysis – Detects suspicious patterns and indicators in email bodies.
- File and URL detonation – Safely executes and analyzes potentially malicious files and links using Microsoft deep analysis tools.
- Screenshot analysis – Reviews visual content from emails, URLs, and supported file types.
- Threat intelligence tools – Uses Microsoft Threat Intelligence feeds to provide enriched detection context.
- Advanced hunting across data source – Correlates signals across all available security data sources to contextualize suspicious activity and drive informed investigative decisions.
Prerequisites
To run the Phishing Triage Agent in your environment, you need:
| Components | Details |
|---|---|
| Products | - Security Copilot and provisioned capacity in Security Compute Units (SCU). See Get started with Security Copilot or check whether you're entitled to SCUs as part of the Microsoft Security Copilot inclusion model - Microsoft Defender for Office 365 Plan 2 deployed |
| Microsoft Defender required features | - Unified role-based access control (URBAC) enabled for Defender for Office 365. See Activate URBAC settings for more information. - Enable Monitor reported messages in Outlook in User reported settings. See User reported settings for more information - The alert policy Email reported by user as malware or phish must be turned on. See Alert policies in the Microsoft Defender portal for more information |
| Plugins | The Phishing Triage Agent automatically activates these Security Copilot plugins: - Microsoft Defender XDR - Microsoft Threat Intelligence - Phishing Triage Agent |
| Alert-tuning rules | The Phishing Triage Agent doesn't triage alerts that are resolved by alert tuning. Make sure to disable the Auto-Resolve - Email reported by user as malware or phish built-in alert tuning rule and any custom tuning rules that resolve this alert. |
Activate URBAC settings
Activate the Defender for Office 365 workload in the Microsoft Defender XDR settings:

For more information, see Activate workloads in Microsoft Defender XDR settings.
Configure user reported settings
Enable Monitor reported messages in Outlook to define how users report potentially malicious messages in Microsoft Outlook and select any of the Reported message destinations options:

For more information, see Use the Microsoft Defender portal to configure user reported settings.
If you’re using a third-party email reporting tool, review Options for third-party reporting tools and view your vendor’s options to integrate reported messages with Microsoft Defender XDR.
Enable alert policy
The Phishing Triage Agent addresses phishing incidents that include alerts with the type Email reported by user as malware or phish. Ensure that you have the corresponding alert policy enabled. See Alert policies in the Microsoft Defender portal for more information.
Important
The Phishing Triage Agent doesn't triage alerts resolved by alert tuning. Make sure to disable the Auto-Resolve - Email reported by user as malware or phish built-in alert tuning rule and any custom tuning rules that resolve this alert.
Permissions required
This table outlines the permissions required to perform various actions related to the Phishing Triage Agent in the Defender portal.
| User action | Permission required |
|---|---|
| View agent results and teach agent through feedback | Security Copilot (read), Security data basics (read), Alerts (manage), Email & collaboration metadata (read), and Email & collaboration content (read) under the Security operations permissions group in the Defender portal, scoped to the Microsoft Defender for Office 365 data source. For more information, see Phishing Triage Agent required permissions. |
| View agent settings | Security Copilot (read) and Security data basics (read) under the Security operations permissions group in the Defender portal OR Security Administrator in Microsoft Entra ID |
| View feedback page | Security Copilot (read), Security data basics (read), and Email & collaboration metadata (read) under the Security operations permissions group in the Defender portal OR Security Administrator in Microsoft Entra ID |
| Manage agent settings (set up, pause, remove the agent, and manage agent identity) | Security Administrator in Microsoft Entra ID |
| Reject feedback | Security Administrator in Microsoft Entra ID |
For more information about unified RBAC in the Defender portal, see Microsoft Defender XDR Unified role-based access control (RBAC).
Set up the Phishing Triage Agent
Make sure you have the permissions required and all prerequisites are met before setting up the agent.
Begin setup
Open the Phishing Triage Agent setup wizard in one of two ways:
From the Security Store in the Microsoft Defender portal, as explained in Deploy AI agents in Microsoft Defender.
From the Incidents queue in the Microsoft Defender portal, select Set up agent.


Follow the steps in the setup wizard, as described in the sections below.
Assign the agent’s identity and permissions
The setup wizard walks you through assigning the agent an identity and the permissions required to do its work.
Assign an identity
The agent requires an identity to operate. The wizard prompts you to select one of two identity types.

Select:
Create a new agent identity (recommended) - Automatically create a new Microsoft Entra Agent ID. Microsoft Entra creates Agent IDs specifically for AI agents. Using Agent IDs keeps access scoped, secure, and easier to manage. For more information, see What are agent identities?.
OR
Connect an existing user account - Assign an existing user account as the agent identity. The agent inherits the user account's access and permissions. To use this identity option, you need to create the identity yourself and assign it the permissions the agent requires before setup. For information on creating a user account, see Create a new user.
When you connect the agent to an account, we recommend setting a long account expiration date and closely monitoring its authentication status to ensure continuous operation of the agent. If authentication expires, the agent stops functioning until it’s renewed.
The agent's specified user identity isn't compatible with PIM or TAP because they don't support long-term background operations.
Tip
Use a dedicated identity account with the minimum required permissions for the agent. When creating the account, assign a distinct display name like Phishing Triage Agent to easily identify it in the Microsoft Defender portal.
Set conditional access policies for Security Copilot to enable the agent to function based on the user account created for it. For more information, see Troubleshoot Conditional Access policies for Microsoft Security Copilot.
Note
You can change the agent identity after setup as described in Change the agent’s identity and role.
Assign permissions
In alignment with the principle of least privileges, we recommend assigning the agent identity only the permissions the Phishing Triage Agent requires to perform its tasks.
If you use an Agent ID, the dropdown only displays roles in your organization that have the permissions the agent needs. Select an existing role in your organization or automatically create a new role with the required permissions if you don't already have a suitable role set up.

If you use an existing user account, you need to assign the required permissions to that identity before assigning the agent identity during setup - you can't do this from the setup wizard.


Phishing Triage Agent required permissions
The agent identity needs these permissions to access emails, analyze their content, and manage alerts:
- Security data basics (read): Used to access basic security data, such as alerts and incidents.
- Alerts (manage): Used to classify the alert and monitor the alert’s state, preventing override of the alert status.
- Security Copilot (read): Used to access Security Copilot capabilities.
- Email & collaboration metadata (read): Used to access metadata for user reported emails.
- Email & collaboration content (read): Used to read the content of user reported emails needed to do the analysis.
These permissions are under the Security operations permissions group:

Make sure to grant the agent access to the Microsoft Defender for Office 365 data source.

To create a role:
- Ensure that the relevant Defender workloads are activated to allow the agent to effectively analyze alerts with comprehensive context. Follow the steps in Activate URBAC settings.
- Create a role with the required permissions or assign an existing role with these permissions to the agent.
- Assign the role to the agent. Make sure to grant the agent access to the Microsoft Defender for Office 365 data source.
Important
After assigning the agent its permissions, ensure the user group monitoring the agent has equal or higher permissions to oversee its activity and output. To do this, compare the permissions of the user group to the agent in the Permissions page in the Microsoft Defender portal.
Enhance incident response with the Phishing Triage Agent
The agent is designed to help security teams manage the overwhelming volume of suspicious emails organizations receive daily. Acting as a force multiplier for SOC teams, the agent offloads time-consuming triage tasks, reduces alert fatigue, and accelerates incident response by autonomously identifying true phishing threats. This enables analysts to cut through the noise and focus their attention on the threats that truly matter.
Agent trigger and flow
Once fully set up and running, the Phishing Triage Agent is automatically triggered when a user reports a suspicious phishing email and an alert is created. The agent then autonomously analyzes the alert using sophisticated AI tools and your organization’s context to determine whether the associated threat is malicious or just a false alarm.
If the alert is determined to be a false alarm, the agent classifies it as a False Positive and resolves it accordingly. If the alert is deemed malicious, it's classified as a True Positive, and the status of the associated incident remains open and in progress for an analyst to investigate and take further action.
For every alert it processes, the agent provides a detailed explanation of its verdict—enhancing transparency and building analyst confidence in the corresponding incident.
Collaborate with the agent
To maintain transparency, the agent routinely updates incident fields during the triage process. When triaging starts, the agent assigns the alert to itself and adds an Agent tag to the corresponding incident. Analysts can filter the incident queue to see only incidents tagged by the agent, which simplifies oversight and prioritization.
Tip
You can also filter the incident queue using the name of the identity you assigned to the Phishing Triage Agent to see the incidents the agent is actively working on.
When an alert is identified as a true phishing threat, the Phishing Triage Agent marks it as a True Positive. This enables analysts to prioritize confirmed phishing threats and respond more swiftly. With these alerts clearly flagged, analysts can easily filter the queue to focus on verified threats, resulting in significant queue reduction and minimizing the time spent sorting through false positives. This allows them to concentrate their efforts where they matter most.

Transparency and explainability in phishing triage
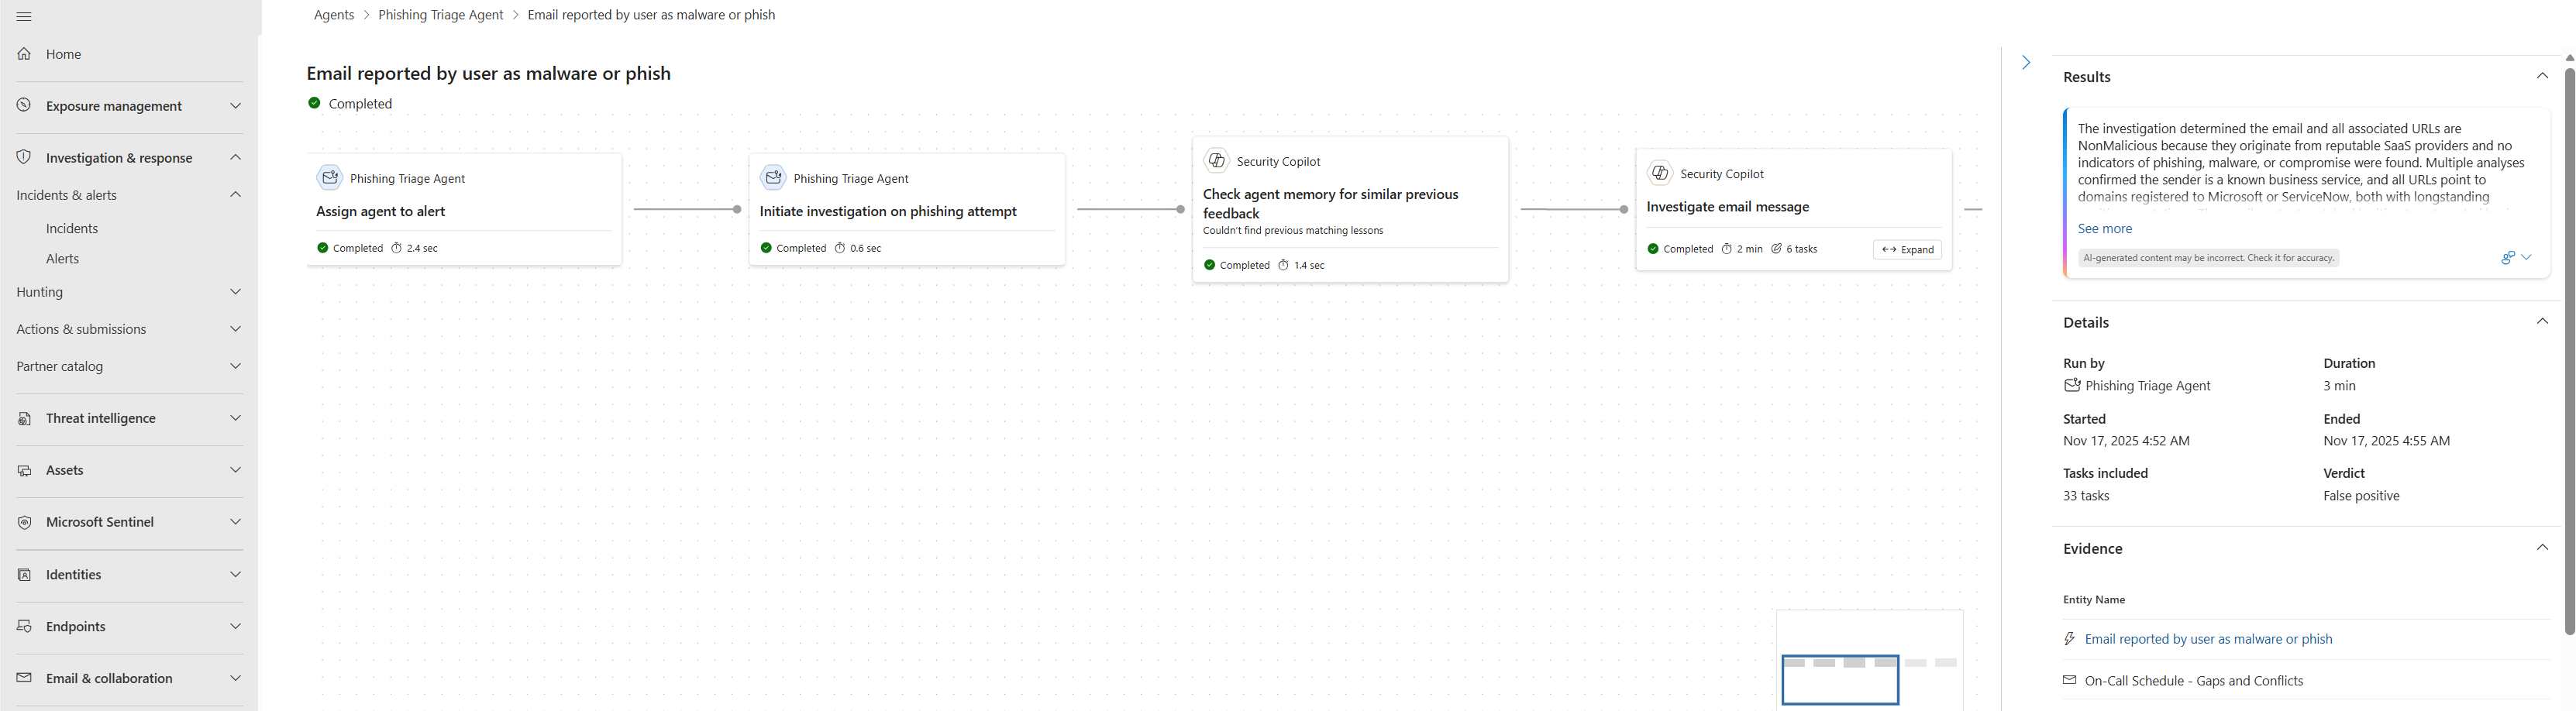
The Phishing Triage Agent is purpose-built to clearly explain why and how it made each decision. For every alert it processes, it provides a detailed explanation in plain text along with a full graphical representation of its decision-making workflow. This level of transparency allows analysts to quickly interpret results, build trust in the agent’s output, and focus their time on making informed decisions—rather than repeating manual steps in the phishing triage process.
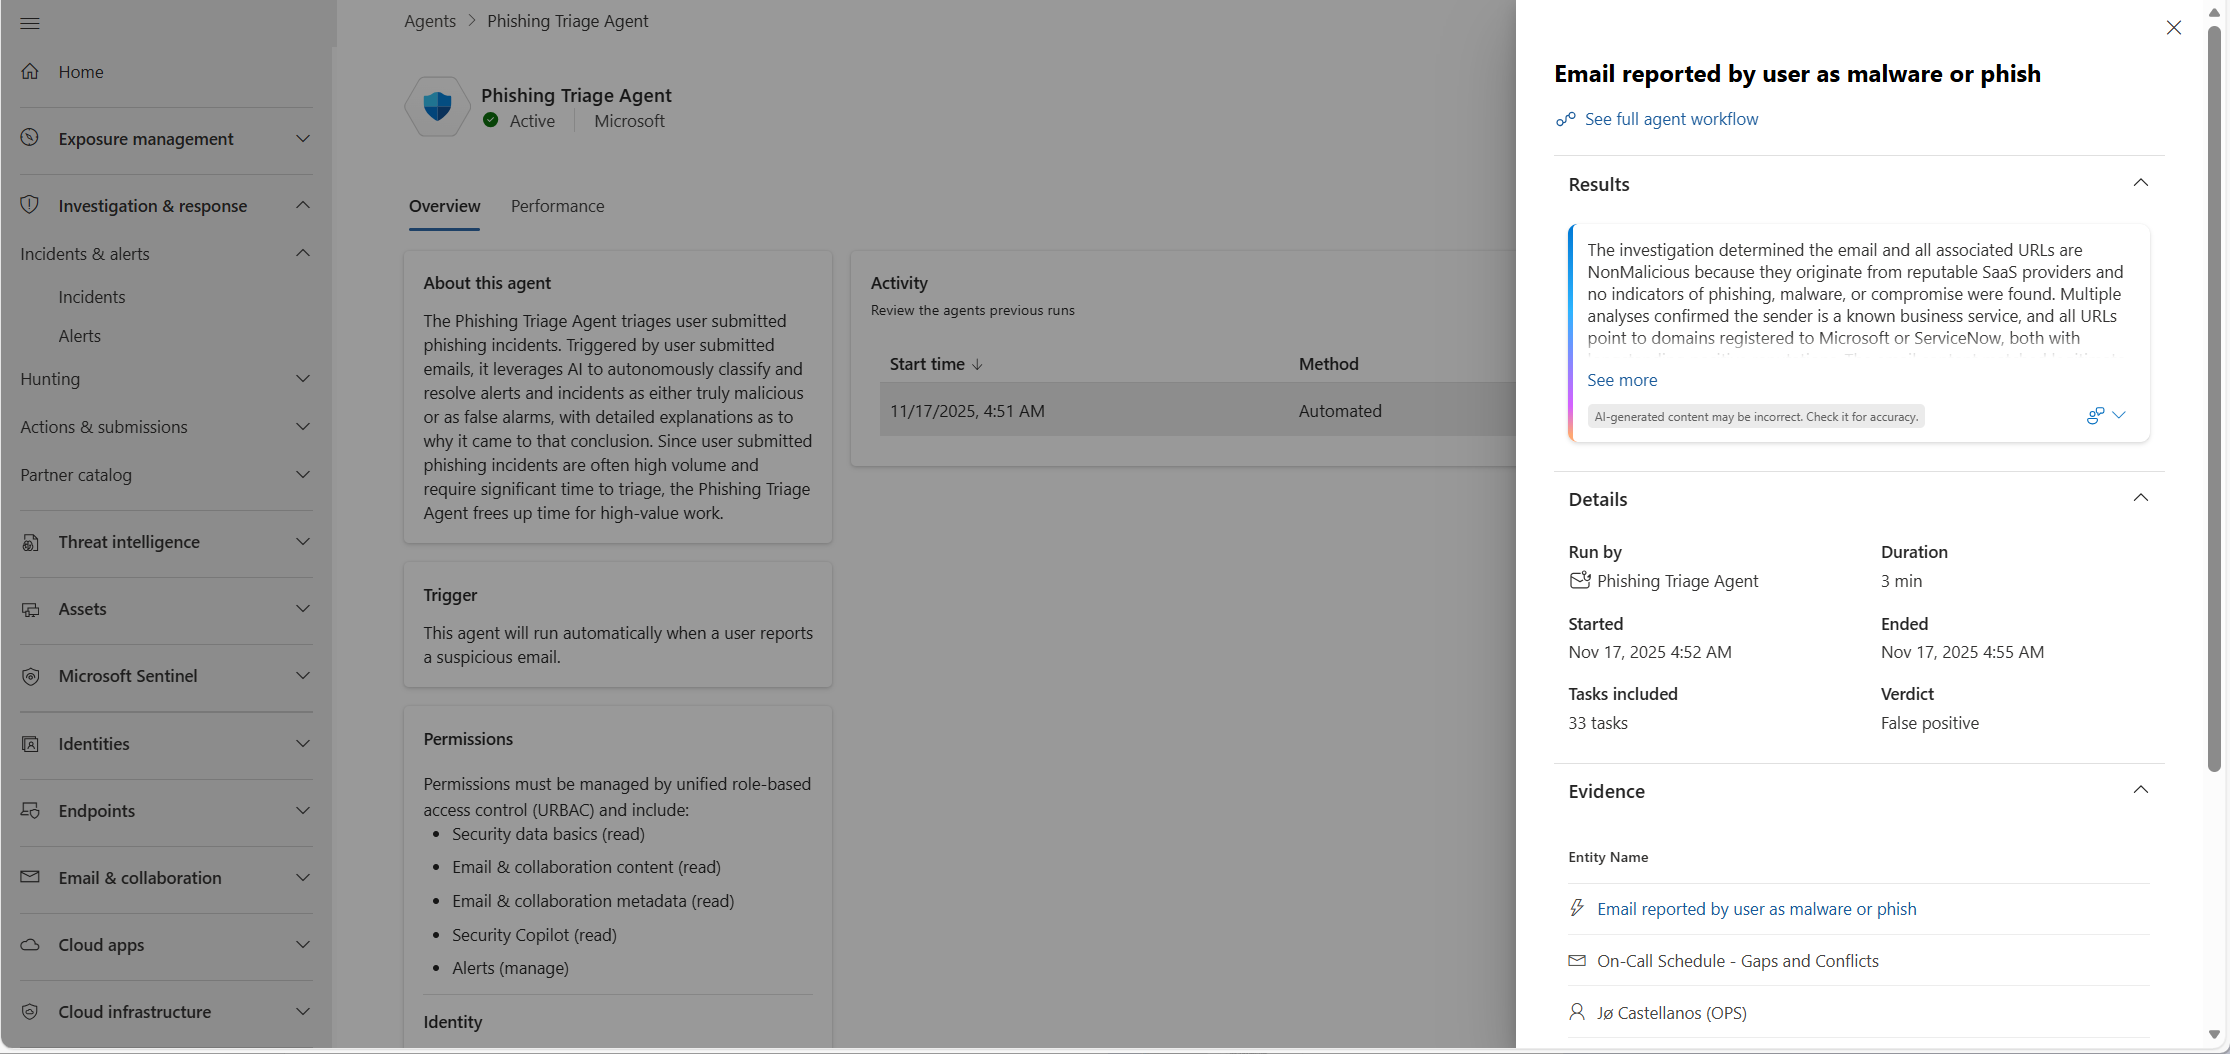
To review the agent’s findings, follow these steps:
Select an incident from the incident queue.
On the incident page, look for the Phishing Triage Agent card in the Copilot or Tasks side panel under the Guided Response Triage section. The task is marked as completed and assigned to the agent. The card presents the agent’s verdict based on its classification, highlighting key pieces of incriminating evidence that informed the decision.

You can select the More actions ellipsis to view more alert details, copy the agent’s classification details to the clipboard, or manage feedback.

To view the steps the agent took prior to reaching its classification, select View agent activity in the Phishing Triage Agent card. This shows the logic behind the agent’s final classification.


Teach the agent your organization’s context through feedback
The Phishing Triage Agent continuously improves its decision-making based on feedback tailored to your organization’s needs. Analysts can provide input in plain, natural language—no complex configurations required—making it easy to guide and shape the agent’s behavior. This feedback is stored in the agent’s memory, allowing it to adapt to how your organization interprets and classifies phishing threats. Over time, this adaptation enhances the agent’s accuracy and effectiveness in triaging future alerts, with your team in control.
To provide feedback and teach the agent, follow these steps:
In the incident page, look for the Phishing Triage Agent card in the Copilot or Tasks side panel under the Guided Response triage section.
Review the agent’s classification and reasoning displayed in the card’s title and content. If the decision doesn’t align with your organization’s classification criteria, select Change classification. Alternatively, you can update the classification by selecting the specific alert from the Alerts tab, then choosing Manage alert.

In the Manage alert pane, select the new classification from the Classification dropdown menu. Then, provide your reason for the change by filling out the Why did you change this classification field. This step records your input on the feedback management page for auditing purposes only. The agent won't use this feedback to improve its decision-making until you explicitly select Use this feedback to teach the agent. If you choose not to use this feedback for teaching the agent, you can select Save, which will only audit the feedback without inserting it into the agent’s memory.

To apply your feedback, select Use this feedback to teach the agent. You can use the guide to writing feedback to help you craft effective input, and then choose Evaluate feedback to allow you to preview how the agent translates your feedback into a lesson and assess whether the outcome aligns with your intent. Additionally, the feedback evaluation performs basic safety checks to ensure that the applied feedback is relevant for the agent to use and doesn’t conflict with previous feedback.
Note
You can only provide feedback to the agent once per alert, and it can only be used to teach the agent how to classify phishing alerts, specifically by selecting either True Positive (phishing) or False Positive (not malicious). Always review your feedback and verify the AI-generated response before saving the lesson.
If the result meets your expectations, you can choose to insert the lesson into the agent’s memory to influence its future decisions. Select Save to save the lesson and store it as a lesson in the agent’s memory if applicable. All feedback recorded for audit purposes, and lessons added to the agent’s memory, can be later reviewed in the feedback management page.


The agent utilizes stored feedback to triage and classify similar alerts in the future. When a relevant alert that matches the feedback characteristics is received, the agent applies this feedback to determine its classification, incorporating it as supporting evidence in its decision-making process.
Best practices for writing feedback
Lessons provide systematic guidelines that help the agent determine whether an alert is a genuine phishing threat or a false alarm. To ensure the agent effectively incorporates your feedback, follow these best practices when providing input to the Phishing Triage Agent:
- Ensure feedback is relevant and contextual. Feedback should pertain only to the email currently under review. It must also align with the updated classification you’ve assigned.
- Be descriptive and specific. Clearly explain the characteristics of the email. Provide relevant details like the email subject, message body, sender, or recipients to help the agent understand the context. Specific feedback with multiple details enhances effectiveness.
- Ensure clarity and decisiveness. Avoid vague or universal statements. Give feedback that's clear and actionable. Use decisive and clear identification terms.
- Be consistent with previous feedback. Ensure that new feedback aligns with what was previously provided to avoid contradictions that could confuse the agent or reduce the accuracy of its decisions. You can review all previously submitted input on the Feedback management page.
- Review the agent’s interpretation of your feedback. When you submit feedback, always verify that the feedback is accurately translated into a lesson. Confirm that the lesson reflects your intent and maintains consistency with your original input. Checking the validity of AI-generated responses to ensure they're applicable to the scenario.
Here are examples of how you can write your feedback to the agent.
| Area | Examples of well-written feedback | Examples of feedback that can lead to failure | Comparison |
|---|---|---|---|
| Feedback about a sender | Any email claiming to be from benefits providers must originate from “@benefits.company.com”. | The sender in the 2nd alert in the incident is not legitimate. | Feedback must relate to the email in the current alert and its context. It will be tied to the chosen classification (even if not mentioned explicitly in the feedback) and used for similar future alerts. |
| Feedback about the sender and email body | Emails offering file sharing or document access should only come from our authorized provider Contoso.com. | Emails offering file sharing or document access should only come from our authorized providers. | Well-written feedback clearly states specific requirements (for example, sender domain), while vague references (for example “authorized providers”) do not contain actionable information. |
| Feedback about email subject | Any email that its subject contains a request for billing transaction is not allowed in our organization and is considered as phishing. | If the subject has a positive natural sentiment, it’s legitimate. | Feedback that is descriptive and specific can be effectively validated, while subjective feedback may lead to unintended outcomes. |
| Feedback about the email body | Emails requesting credential verification should include a reference to the specific account or service. Any generic 'verify your account' request without details should be treated as phishing. | This email should be treated as phishing. | Feedback that includes detailed information is more likely to be clearly understood, while feedback lacking detail may be interpreted in various ways and could lead to unpredictable outcomes. |
| Feedback about a recipient and email body | This email was sent to multiple employees, and the body instructs recipients to download an 'important attachment' without describing its contents—legitimate emails always specify attachment details. | Mass internal emails with attachments are phishing. | Feedback that highlights specific missing details commonly found in legitimate emails is more effective. Feedback that contains broad generalizations (mass emails) or vague terms (such as “internal”) may lead to an excessive number of true positives. |
| Feedback about a recipient and a domain | New contractor onboarding emails should only be sent to email addresses starting with 'v-' to ensure they are directed to the correct recipients. | Contractor emails look different from usual, so they might be phishing. | Well-written feedback clearly defines the expected recipient format, while feedback that is indecisive (“might be”) and lacks clear identification criteria (“looks different from usual” without specifying what is different), makes detection unreliable. |
Resolve feedback failures
When the agent takes your feedback, it translates it into a lesson. If the agent doesn’t succeed in interpreting the feedback, a relevant message shows what caused the failure. You can address these failures based on the message returned by the agent.
Here are examples of failures you might encounter when writing feedback to the agent, and how you can resolve them.
| Failure message | Recommended action |
|---|---|

Part of the feedback provided can't be addressed as the agent currently doesn't support this type of input and therefore couldn't be translated to a lesson at all. |
Rewrite your feedback and ensure that it follows the best practices. Select Evaluate feedback to try again. |

The feedback contains input that the agent can support but it's not relevant to the email at hand and therefore couldn't be translated into an actionable lesson to be saved in the memory. |
Rewrite your feedback and ensure that it addresses descriptions of the email that it can support. Then select Evaluate feedback to try again. |

The given feedback conflicts with previous feedback given to a similar email. |
In the feedback management page search for the feedback ID to view the feedback that it conflicts with. Based on your review, you can: - Reject the previous feedback in the feedback management page. Thereafter, select Evaluate to try inserting your feedback again. - Rewrite your given feedback in a way that isn't conflicting and then select Evaluate feedback for the agent to reevaluate your new input. |
Note
You can choose not to resolve feedback failures. You can leave your feedback and select Save without checking the box for teaching the agent. The feedback won’t be saved to the agent’s memory and will only be documented on the feedback management page for your future tracking classification changes.
Once the agent is taught and equipped with organizational knowledge, it begins to refine its decision-making capabilities. This interactive teaching process ensures that the agent evolves continuously, delivering increasingly precise classifications and responses over time. By integrating feedback loops, the system adapts dynamically to the changing landscape of organizational priorities and incident patterns.
Monitor and manage the Phishing Triage Agent
To view agent metrics and manage the agent, go to the Phishing Triage Agent card in the incident queue or the Agents page:
To open the Phishing Triage Agent page directly, select Security Copilot > Agents, look for the Phishing Triage Agent under Agents in use and select Go to agent.
This page consists of two tabs: Overview and Performance.
The Overview tab provides details about the agent’s current status, identity, role, and recent activity.

Select an activity from the Recent activity list to view details about the agent's investigation and the agent full workflow.
Select See full agent workflow to view a graphical representation of the agent’s decision-making process for that specific activity.
The Performance tab displays key metrics about the agent’s activity over time, including daily activity, mean time to triage (MTTT), and SCU consumption.

Select the ellipsis (...) at the top right corner of the page to access management options for the agent, as described in the sections below.
Select Pause or Run to temporarily stop or restart the agent’s activities.
To open the Phishing Triage Agent card in the incident queue, select Investigation & response > Incidents & alerts > Incidents .
The Phishing Triage Agent card above the incident queue shows some of the agent’s key metrics, including:
- Incidents addressed: Incidents containing user-reported phishing alerts that the agent classified as true phishing threats or false alarms.
- Incidents resolved: Incidents that no longer require further handling, like false alarms.
This data helps demonstrate the agent’s impact and can be used to inform broader strategic conversations, highlight return on investment, or support decisions around scaling automation across your organization.
Metrics are calculated based on the agent’s activity, beginning either from its first recorded incident or from the last 30 days - whichever is more recent.

Select Manage agent on the card to open the Phishing Triage Agent page, which has more performance metrics and management options.


Change the agent’s identity and role
To manage the agent’s identity and role:
- Select Security Copilot > Agents, look for the Phishing Triage Agent under Agents in use and select Go to agent.
- Select the ellipsis (...) > Edit agent at the top right corner of the page. This opens the Edit agent page.
- Select Identity and role > Select a new identity.
- Select a new identity, as described in the Assign the agent's identity and permissions.
View and manage feedback to the agent
The Phishing Triage Agent learns from user-submitted feedback and improves its performance over time. It stores applicable feedback in its memory as lessons. You can view and manage feedback for the Phishing Triage Agent on the Agent feedback page.
This page provides a comprehensive list of all feedback submitted to the agent. You can review key details for each piece of feedback, including:
- The agent’s original classification and the user-applied change
- The original feedback provided by the user, when changing the classification
- The translated lesson generated by the agent (if applicable)
- Feedback status: in use, not in use, or conflict
- The user who provided the feedback
- Feedback submission date, feedback ID, alert ID, and the incident ID

This table explains the feedback statuses:
| Status | Description |
|---|---|
| In use | The feedback was successfully converted into a lesson in the agent’s memory and is actively used to triage and classify similar incidents. |
| Conflict | The feedback provided conflicted with previously provided feedback in a similar incident. Learn how you can resolve feedback failures. |
| Not in use | The feedback was either not incorporated into the agent's memory or not marked by the user for teaching. Rejected lessons appear as "not in use" and are saved only for auditing, not for triaging and classifying incidents. For more details, select the details panel. |
Tip
Feedback can only be managed individually. Bulk management of multiple feedback entries isn't currently supported.
To view and manage user-submitted feedback:
Select Security Copilot > Agents, look for the Phishing Triage Agent under Agents in use and select Go to agent.
Select the ellipsis (...) > Edit agent at the top right corner of the page. This opens the Edit agent page.
Select Feedback in the left pane to open the Agent feedback page.
Select an entry from the feedback list to open the Review feedback pane.
Check the details of the feedback provided, the agent’s lesson, the classification changes, and other important details.

To reject specific feedback, select Reject feedback. The agent stops using the feedback in future triage decisions.
Note
To reject feedback provided, you need the Security Administrator role in Microsoft Entra ID.

Remove the agent
When you remove the agent, triage and classification of new incidents stop, and all feedback is deleted. However, the history of previously triaged incidents is retained for your reference.
To remove the agent:
- Select Security Copilot > Agents, look for the Phishing Triage Agent under Agents in use and select Go to agent.
- Select the ellipsis (...) at the top right corner of the page, and then select Remove.
Frequently asked questions
Following are responses to commonly asked questions about the Phishing Triage Agent. For information about the agent's capabilities and requirements, see How the agent works and prerequisites sections of this article.
When is the agent triggered?
The agent automatically runs when a user reports a potential phishing attempt, and an alert is created.
Why is the Phishing Triage Agent important?
Phishing remains one of the most common methods by which attackers gain initial access to systems. While security tools effectively block most threats, some still manage to slip through, overwhelming inboxes and leaving email users uncertain whether a suspicious email is a legitimate phishing attempt or harmless spam. This uncertainty often leads to an influx of user-submitted reports. Therefore, managing these incidents becomes a tedious and repetitive task for Security Operations Center (SOC) analysts. Each alert may require up to 30 minutes of manual triage, demanding significant effort to sift through a large volume of incidents in search of the genuine threat amidst the noise. This effort overwhelms analysts, who have a limited amount of time to dedicate to completing critical demands. By alleviating the burden of reactive work, the Phishing Triage Agent empowers analysts to focus on proactive security measures, ultimately strengthening organizations’ overall security postures.
Can the Phishing Triage Agent be trusted?
Microsoft AI agents follow strict Responsible AI guidelines and undergo thorough reviews to ensure compliance with all AI standards and safeguards. Security Copilot’s Phishing Triage Agent is fully incorporated into these controls. During setup, you assign the agent an identity and configure it with the minimum permissions required for its operation, ensuring that it doesn’t have unnecessary permissions. All agent activities are logged in detail, with the complete flow available for review by analysts and admins at any time. Feedback provided to the agent to help it adapt to the organization’s environment is logged, reflected in the system, and accessible for review and modification by admins as needed.
How does the agent differ from a standard SOAR solution?
While both SOAR solutions and the Phishing Triage Agent aim to automate aspects of security operations, their approaches are fundamentally different. SOAR tools rely on static, policy- and rule-based workflows that require predefined logic and manual tuning. In contrast, the agent uses recursive reasoning to autonomously complete tasks—learning, adapting, and improving over time.
The agent doesn’t need to be reprogrammed for every new situation. Within defined boundaries, it adjusts to the task at hand, making it far more flexible than traditional automation. Rather than being rigid and reactive, it continuously evolves with your environment and threat landscape, guided by analyst feedback and grounded in real data. Purpose-built for security teams, the Phishing Triage Agent helps accelerate responses and reduces manual workloads, freeing up analysts to focus on strategic initiatives.
What level of visibility and control do I have over the agent?
Microsoft provides tools for organizations to maintain visibility into and control over the Phishing Triage Agent from deployment through ongoing operations. The agent adheres to Microsoft’s Responsible AI (RAI) standards for fairness, reliability, safety, privacy, security, inclusiveness, transparency, and accountability.
Administrators configure the agent’s identity and access levels during installation, following least-privilege principles. Security and IT teams can authorize specific actions, monitor performance, and review outputs directly in Microsoft Defender. Capacity consumption and data access limits are also configurable by administrators.
The Phishing Triage Agent operates within a zero-trust environment. The system enforces organizational policies on every agent action by evaluating the intent and scope of each operation. All decisions, reasoning, and actions taken by the agent are transparently documented as a decision tree within Defender and recorded in Microsoft Purview audit logs for traceability and compliance.
I want to try the Phishing Triage Agent - how do I set it up in Microsoft Defender?
To set up the agent, you must have access to Security Copilot in Microsoft Defender and meet the necessary prerequisites. If you haven’t onboarded to Security Copilot, see Get started with Security Copilot or contact your Microsoft representative. After you've onboarded to Security Copilot, it can take a bit of time for the agent setup option to become available in the Microsoft Defender portal.
I've tried the Phishing Triage Agent - how can I estimate the SCU capacity needed for the agent in my organization?
After setup, the agent automatically starts consuming SCUs provisioned for the workspace when the trial period ends.
It's important to ensure that your organization has sufficient SCUs for healthy agent operation. To evaluate SCU usage and plan capacity going forward, see the Usage monitoring dashboard in the Security Copilot portal and check whether you're entitled to SCUs as part of the Microsoft Security Copilot inclusion model. The dashboard shows:
- Cost per email processed
- Capacity consumption over time
You can also export the dashboard data into Excel for more detailed analysis, and to filter on agent operations only.
After evaluating your SCU usage needs, update the SCU capacity for your organization. For more information about managing SCUs, see Manage security compute unit usage in Security Copilot.