Note
Access to this page requires authorization. You can try signing in or changing directories.
Access to this page requires authorization. You can try changing directories.
Use this process to upgrade from Business Central 2020 release wave 1 (version 16) to the Business Central 2020 release wave 2 platform (version 17). This process won't upgrade the application to the latest version.
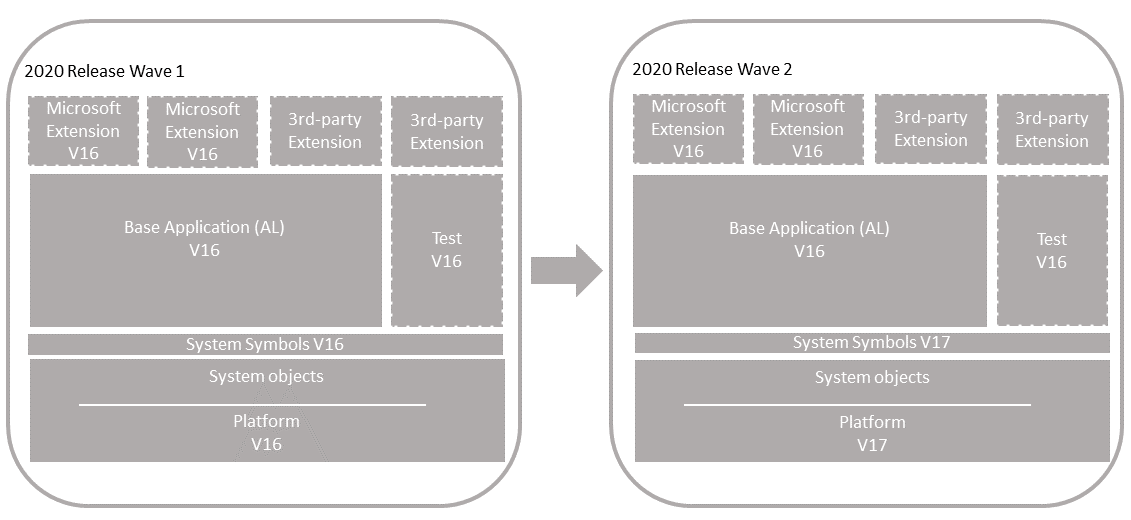
Single-tenant and multitenant deployments
The process for upgrading is similar for a single-tenant and multitenant deployment. However, there are some inherent differences. With a single-tenant deployment, the application code and business data are in the same database. In a multitenant deployment, application code is in a separate database (the application database) than the business data (tenant). In the procedures that follow, for a single-tenant deployment, consider references to the application database and tenant database as the same database. Steps are marked as Single-tenant only or Multitenant only where applicable.
Prerequisites
Your version 16 platform is compatible with version 17.
There are several updates for version 16. The updates have a compatible version 17 update. For more information, see Dynamics 365 Business Central Upgrade Compatibility Matrix. For example, if your solution is currently running 16.6, you can't upgrade to 17.0. You must wait until 17.1 is available.
Disable data encryption.
If the current server instance uses data encryption, disable it. You can enable it again after upgrading.
For more information, see Managing Encryption and Encryption Keys.
Instead of disabling encryption, you can export the current encryption key, which you'll then import after upgrade. However, we recommend disabling encryption before upgrading.
Task 1: Prepare databases
In this task, you prepare the application and tenant databases for the upgrade.
- Make backup of the database.
(Single-tenant only) Uninstall all extensions from the old tenants.
Run the Business Central Administration Shell for version 16.0 as an administrator. For more information, see Run Business Central Administration Shell.
Use the Uninstall-NAVApp cmdlet to uninstall an extension. For example, together with the Get-NAVAppInfo cmdlet, you can uninstall all extensions with a single command:
Get-NAVAppInfo -ServerInstance <BC16 server instance> | % { Uninstall-NAVApp -ServerInstance <BC16 server instance> -Name $_.Name -Version $_.Version }Unpublish all system, test, and application symbols.
To unpublish symbols, use the Unpublish-NAVAPP cmdlet. You can unpublish all symbols by using the Get-NAVAppInfo cmdlet with the
-SymbolsOnlyswitch as follows:Get-NAVAppInfo -ServerInstance <BC16 server instance> -SymbolsOnly | % { Unpublish-NAVApp -ServerInstance <BC16 server instance> -Name $_.Name -Version $_.Version }(Multitenant only) Dismount the tenants from the application server instance.
To dismount a tenant, use the Dismount-NAVTenant cmdlet:
Dismount-NAVTenant -ServerInstance <BC16 server instance> -Tenant <tenant ID>Stop the server instance.
Stop-NAVServerInstance -ServerInstance <BC16 server instance>
Task 2: Install version 17
Before you install version 17, it can be useful to create desktop shortcuts to the version 16.0 tools, such as the Business Central Server Administration tool, Business Central Administration Shell, and Dynamics NAV Development Shell because the Start menu items for these tools will be replaced with the version 17.0 tools.
Install version 17 components.
You'll keep version 16 installed for now. When you install version 17, you must either specify different port numbers for components (like the Business Central Server instance and web services) or stop the version 16.0 Business Central Server instance before you run the installation. Otherwise, you'll get an error that the Business Central Server failed to install.
For more information, see Installing Business Central Using Setup.
Task 3: Copy Dynamics Online Connect add-in
The Dynamics Online Connect add-in has been deprecated in version 17. As a result, it has been removed from the DVD and is no longer installed as part of the Business Central Server. However, when doing a technical upgrade, it is still required for the old System Application. To meet this requirement, copy the Add-ins\Connect folder of the version 16 server installation to the Add-ins folder of the version 17 server installation.
Task 4: Convert the version 16.0 application database
This task runs a technical upgrade on the application database. A technical upgrade converts the database from the version 16.0 platform to the version 17.0 platform. This conversion updates the system tables of the database to the new schema (data structure). It also provides the latest platform features and performance enhancements.
Important
The conversion does not modify the application objects, but it will remove any modifications that you have made to system tables. After the conversion you will no longer be able to use it with Business Central 14.
Start Business Central Administration Shell for version 17.0 as an administrator.
For more information, see Run Business Central Administration Shell.
Run the Invoke-NAVApplicationDatabaseConversion cmdlet to start the conversion. In a multitenant deployment, run this cmdlet against the application database.
Invoke-NAVApplicationDatabaseConversion -DatabaseServer <database server>\<database instance> -DatabaseName "<BC16 database name>"When completed, a message like the following displays in the console:
DatabaseServer      : .\BCDEMO
DatabaseName        : Demo Database BC (16-0)
DatabaseCredentials :
DatabaseLocation    :
Collation           :
Note
When the database is on Azure SQL Database, you may get the following error:
SQL Server: Execution Timeout Expired. The timeout period elapsed prior to completion of the operation or the server is not responding. The statement has been terminated.
If you do, scale up the database resources in Azure SQL, then run the Invoke-NAVApplicationDatabaseConversion cmdlet again. If the conversion is successful, you can then scale it back down to its original setting and continue the upgrade.
Task 5: Configure version 17 server
When you installed version 17 in Task 1, a version 17 Business Central Server instance was created. In this task, you change server configuration settings that are required to complete the upgrade. Some of the changes are only required for version 16 to version 17.0 upgrade and can be reverted after you complete the upgrade.
Set the server instance to connect to the application database.
Set-NAVServerConfiguration -ServerInstance <BC17 server instance> -KeyName DatabaseName -KeyValue "<BC17 database name>"In a single tenant deployment, this command mounts the tenant automatically. For more information, see Connecting a Server Instance to a Database.
Disable task scheduler on the server instance for purposes of upgrade.
Set-NavServerConfiguration -ServerInstance <BC17 server instance> -KeyName "EnableTaskScheduler" -KeyValue falseBe sure to re-enable task scheduler after upgrade if needed.
Restart the server instance.
Restart-NAVServerInstance -ServerInstance <BC17 server instance>
Task 6: Upload Business Central partner license
If you have a new Business Central partner license, make sure that it has been uploaded to the database. To upload the license, use the Import-NAVServerLicense cmdlet:
Import-NAVServerLicense -ServerInstance <BC17 server instance> -LicenseFile "<path to the license>"
For more information, see Uploading a License File for a Specific Database.
Task 7: Publish new system symbols
Use the Publish-NAVApp cmdlet to publish the new symbols extension package. This package is called System.app. If you've installed the AL Development Environment, you find the file in the installation folder. By default, the folder path is C:\Program Files (x86)\Microsoft Dynamics 365 Business Central\170\AL Development Environment.
Publish-NAVApp -ServerInstance <BC17 server instance> -Path "<path to the System.app file>" -PackageType SymbolsOnly
Task 8: Recompile published extensions
Compile all published extensions against the new platform.
To compile an extension, use the Repair-NAVApp cmdlet, For example:
Repair-NAVApp -ServerInstance <server instance> -Name <extension name> -Version <extension name>To compile all published extensions at once, you can use this command:
Get-NAVAppInfo -ServerInstance <server instance> | Repair-NAVAppRestart the server instance.
Restart-NAVServerInstance -ServerInstance <server instance>
Task 9: Synchronize tenant
(Multitenant only) Mount the tenant to the new Business Central Server instance.
You'll have to do this step and the next for each tenant. For more information, see Mount or Dismount a Tenant.
Synchronize the tenant.
Use the Sync-NAVTenant cmdlet:
Sync-NAVTenant -ServerInstance <server instance> -Tenant <tenant ID> -Mode SyncFor a single-tenant deployment, you can either set the
<tenant ID>todefaultor omit the-Tenant <tenant ID>parameter. For more information about syncing, see Synchronizing the Tenant Database and Application Database.
Task 10: Reinstall extensions
Skip this task for a multitenant environment. In this task, you reinstall the same extensions that were installed on the tenant before.
To install an extension, you use the Install-NAVApp cmdlet.
If your solution uses the System Application, install this first.
Install-NAVApp -ServerInstance <server instance> -Name "System Application" -Version <extension version>Replace
<extension version>with the exact version of the published System Application.Install the Base Application.
Install-NAVApp -ServerInstance <server instance> -Name "Base Application" -Version <extension version>Replace
<extension version>with the exact version of the published System Application.Install the Application extension.
Install-NAVApp -ServerInstance <server instance> -Name "Application" -Version <extension version>Replace
<extension version>with the exact version of the published Application extension.For more information about the Application extension, see The Microsoft_Application.app File.
Install other extensions, including Microsoft and third-party extensions.
Install-NAVApp -ServerInstance <server instance name> -Name <extension name> -Version <extension version>
At this point, your solution has been updated to the latest platform.
Task 11: Upgrade control add-ins
The Business Central Server installation includes new versions of the Microsoft-provided Javascript-based control add-ins, like Microsoft.Dynamics.Nav.Client.BusinessChart, Microsoft.Dynamics.Nav.Client.VideoPlayer, and more. If your solution uses any of these control add-ins, upgrade them to the latest version.
To upgrade the control add-ins, do the following steps:
Open the Business Central client.
Search for and open the Control Add-ins page.
Choose Actions > Control Add-in Resource > Import.
Locate and select the .zip file for the control add-in and choose Open.
The .zip files are located in the Add-ins folder of the Business Central Server installation. There's a subfolder for each add-in. For example, the path to the Business Chart control add-in is
C:\Program Files\Microsoft Dynamics 365 Business Central\170\Service\Add-ins\BusinessChart\Microsoft.Dynamics.Nav.Client.BusinessChart.zip.After you've imported all the new control add-in versions, restart Business Central Server instance.
Alternatively, you can use the Set-NAVAddin cmdlet of the Business Central Administration Shell. For example, the following commands update the control add-ins installed by default. Modify the commands to suit:
$InstanceName = 'BC170'
$ServicesAddinsFolder = 'C:\Program Files\Microsoft Dynamics 365 Business Central\170\Service\Add-ins'
Set-NAVAddIn -ServerInstance $InstanceName -AddinName 'Microsoft.Dynamics.Nav.Client.BusinessChart' -PublicKeyToken 31bf3856ad364e35 -ResourceFile ($AppName = Join-Path $ServicesAddinsFolder 'BusinessChart\Microsoft.Dynamics.Nav.Client.BusinessChart.zip')
Set-NAVAddIn -ServerInstance $InstanceName -AddinName 'Microsoft.Dynamics.Nav.Client.FlowIntegration' -PublicKeyToken 31bf3856ad364e35 -ResourceFile ($AppName = Join-Path $ServicesAddinsFolder 'FlowIntegration\Microsoft.Dynamics.Nav.Client.FlowIntegration.zip')
Set-NAVAddIn -ServerInstance $InstanceName -AddinName 'Microsoft.Dynamics.Nav.Client.OAuthIntegration' -PublicKeyToken 31bf3856ad364e35 -ResourceFile ($AppName = Join-Path $ServicesAddinsFolder 'OAuthIntegration\Microsoft.Dynamics.Nav.Client.OAuthIntegration.zip')
Set-NAVAddIn -ServerInstance $InstanceName -AddinName 'Microsoft.Dynamics.Nav.Client.PageReady' -PublicKeyToken 31bf3856ad364e35 -ResourceFile ($AppName = Join-Path $ServicesAddinsFolder 'PageReady\Microsoft.Dynamics.Nav.Client.PageReady.zip')
Set-NAVAddIn -ServerInstance $InstanceName -AddinName 'Microsoft.Dynamics.Nav.Client.PowerBIManagement' -PublicKeyToken 31bf3856ad364e35 -ResourceFile ($AppName = Join-Path $ServicesAddinsFolder 'PowerBIManagement\Microsoft.Dynamics.Nav.Client.PowerBIManagement.zip')
Set-NAVAddIn -ServerInstance $InstanceName -AddinName 'Microsoft.Dynamics.Nav.Client.RoleCenterSelector' -PublicKeyToken 31bf3856ad364e35 -ResourceFile ($AppName = Join-Path $ServicesAddinsFolder 'RoleCenterSelector\Microsoft.Dynamics.Nav.Client.RoleCenterSelector.zip')
Set-NAVAddIn -ServerInstance $InstanceName -AddinName 'Microsoft.Dynamics.Nav.Client.SatisfactionSurvey' -PublicKeyToken 31bf3856ad364e35 -ResourceFile ($AppName = Join-Path $ServicesAddinsFolder 'SatisfactionSurvey\Microsoft.Dynamics.Nav.Client.SatisfactionSurvey.zip')
Set-NAVAddIn -ServerInstance $InstanceName -AddinName 'Microsoft.Dynamics.Nav.Client.SocialListening' -PublicKeyToken 31bf3856ad364e35 -ResourceFile ($AppName = Join-Path $ServicesAddinsFolder 'SocialListening\Microsoft.Dynamics.Nav.Client.SocialListening.zip')
Set-NAVAddIn -ServerInstance $InstanceName -AddinName 'Microsoft.Dynamics.Nav.Client.VideoPlayer' -PublicKeyToken 31bf3856ad364e35 -ResourceFile ($AppName = Join-Path $ServicesAddinsFolder 'VideoPlayer\Microsoft.Dynamics.Nav.Client.VideoPlayer.zip')
Set-NAVAddIn -ServerInstance $InstanceName -AddinName 'Microsoft.Dynamics.Nav.Client.WebPageViewer' -PublicKeyToken 31bf3856ad364e35 -ResourceFile ($AppName = Join-Path $ServicesAddinsFolder 'WebPageViewer\Microsoft.Dynamics.Nav.Client.WebPageViewer.zip')
Set-NAVAddIn -ServerInstance $InstanceName -AddinName 'Microsoft.Dynamics.Nav.Client.WelcomeWizard' -PublicKeyToken 31bf3856ad364e35 -ResourceFile ($AppName = Join-Path $ServicesAddinsFolder 'WelcomeWizard\Microsoft.Dynamics.Nav.Client.WelcomeWizard.zip')
Task 12: Post-upgrade
Enable task scheduler on the server instance.
(Multitenant only) For tenants other than the tenant that you use for administration purposes, if you mounted the tenants using the
-AllowAppDatabaseWriteparameter, dismount the tenants, then mount them again without using the-AllowAppDatabaseWriteparameter.If you want to use data encryption as before, enable it.
For more information, see Managing Encryption and Encryption Keys.
Optionally, if you exported the encryption key instead of disabling encryption earlier, import the encryption key file to enable encryption.
Related information
Upgrading to Business Central
Business Central Compatibility matrix