Note
Access to this page requires authorization. You can try signing in or changing directories.
Access to this page requires authorization. You can try changing directories.
Note
The Retail Interest Group by Dynamics 365 Commerce has moved from Yammer to Viva Engage. If you don't have access to the new Viva Engage community, fill out this form (https://aka.ms/JoinD365commerceVivaEngageCommunity) to be added and stay engaged in the latest discussions.
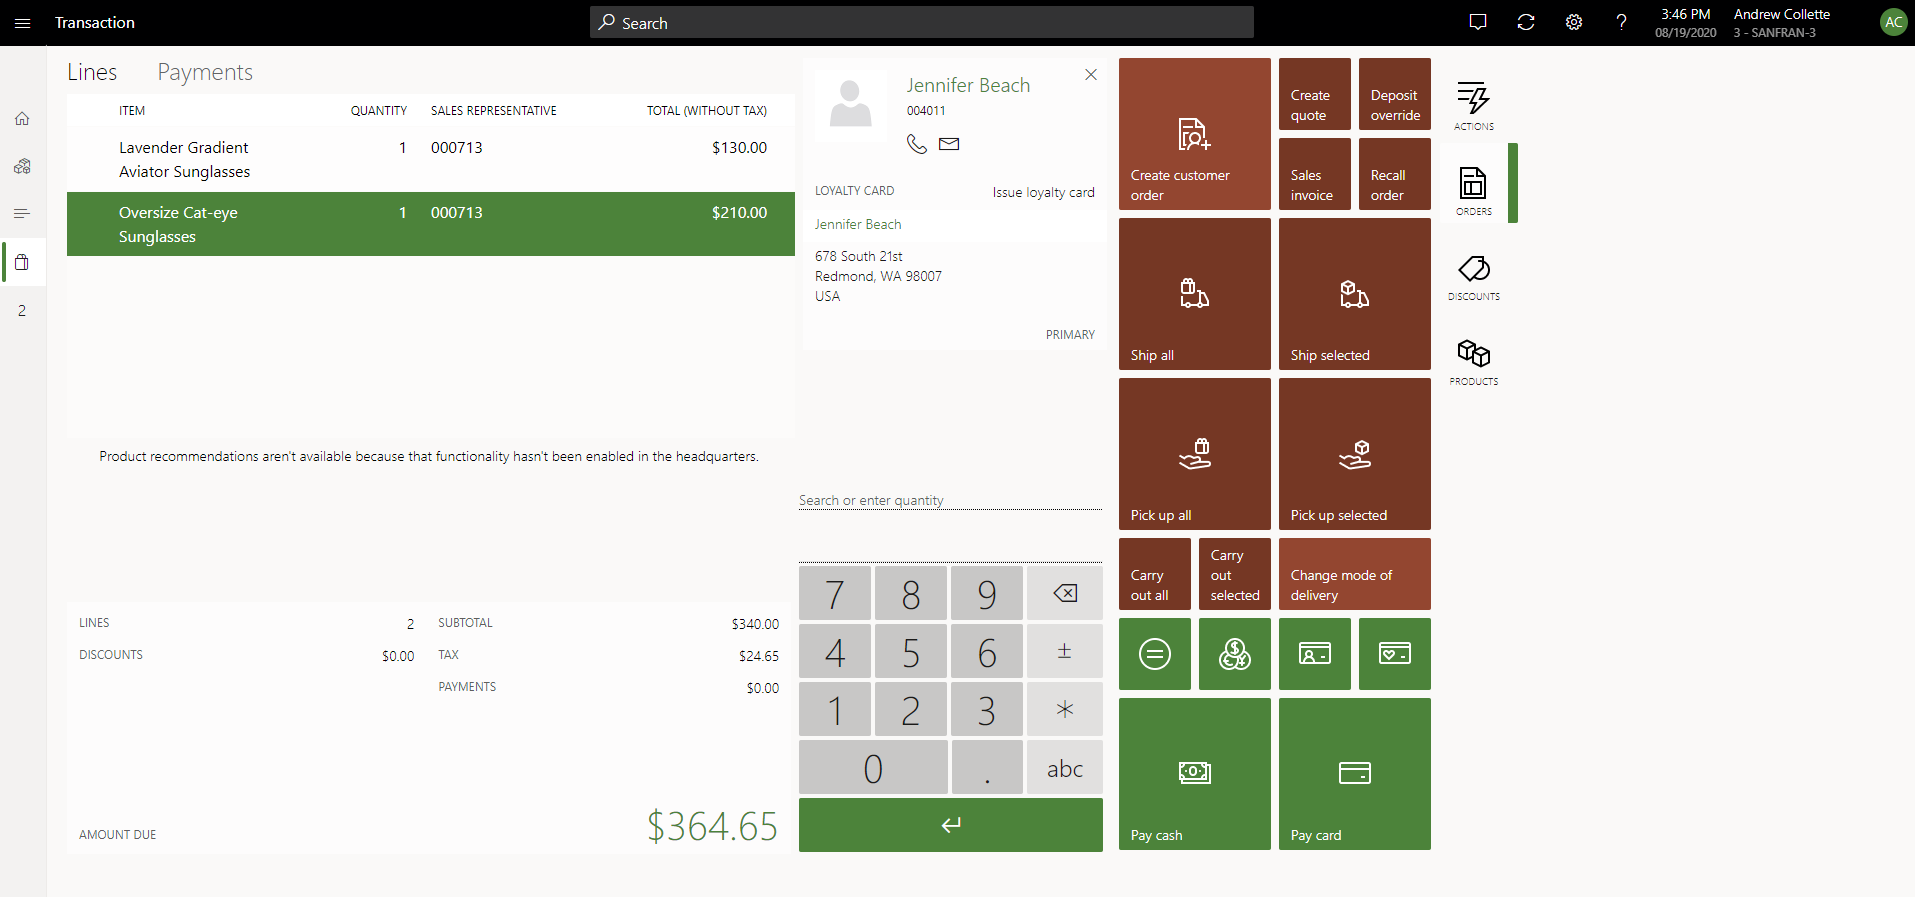
This article describes how to create and manage customer orders in Microsoft Dynamics 365 Commerce point of sale (POS). Use customer orders to capture sales where shoppers want to pick up products on a later date, pick up products from a different location, or have items shipped to them.
In an omnichannel commerce world, many retailers provide the option of customer orders, or special orders, to meet various product and fulfillment requirements. Here are some typical scenarios:
- A customer wants products delivered to a specific address on a specific date.
- A customer wants to pick up products from a store or location that differs from the store or location where the customer purchased those products.
- A customer inside a store location wants to order products today and pick them up from the same store location on a later date.
Retailers can use customer orders to minimize lost sales that stock outages might otherwise cause, because the merchandise can be delivered or picked up at a different time or place.
Set up customer orders
Before you try to use customer order functionality in POS, ensure that you complete all the required configurations in Commerce headquarters.
Configure modes of delivery
To use customer orders, configure modes of delivery that the store channel can use. Define at least one mode of delivery to be used when order lines are shipped to a customer from a store. Also, define at least one pickup mode of delivery to be used when order lines are picked up from the store. Define modes of delivery on the Modes of delivery page in headquarters. For more information about how to set up modes of delivery for Commerce channels, see Define delivery modes.
Set up fulfillment groups
Some stores or warehouse locations might not be able to fulfill customer orders. By configuring fulfillment groups, an organization can specify which stores and warehouse locations are shown as options to users who create customer orders in POS. Configure fulfillment groups on the Fulfillment groups page. Create as many fulfillment groups as required. After defining a fulfillment group, link it to a store by selecting Fulfillment group assignment from the Set up tab on the Action Pane of the Stores page.
In Commerce version 10.0.12 and later, organizations can define whether the warehouse or warehouse and store combinations that are defined in fulfillment groups can be used for shipping, for pickup, or for both shipping and pickup. This functionality allows for added flexibility when determining which warehouses can be selected for customer orders with items to ship, and which stores can be selected for customer orders with items to pick up. To use these configuration options, turn on the Ability to specify locations as "Shipping" or "Pickup" enabled within Fulfillment group feature. If a warehouse linked to a fulfillment group isn't a store, it can be configured only as a shipping location. It can't be used when orders for pickup are configured in POS.
Configure channel settings
When you work with customer orders in POS, consider some of the settings of the store channel. Find these settings on the Stores page in headquarters.
- Warehouse – This field shows the warehouse that the system uses when decrementing inventory for cash and carry and customer pickup orders tied to this store. Use unique warehouses for each store channel to prevent conflicting business logic problems across stores.
- Shipping Warehouse - This field shows the warehouse that the system uses when decrementing inventory for customer orders to ship from the selected store. If the feature Ability to specify locations as “Shipping” or “Pickup” enabled within Fulfillment group is enabled in your environment, POS users can choose a specific warehouse to ship from in POS, instead of choosing a store to ship from. Therefore, when that feature is enabled, the shipping warehouse is no longer used, since the user picks the specific warehouse to ship the order from when the order is created.
- Fulfillment group assignment – Select this button (on the Set up tab on the Action Pane) to link the fulfillment groups that are referenced to show options for pickup locations or shipment origins when customer orders are created in POS.
- Use destination-based tax – This option indicates whether the shipping address is used to determine the tax group that is applied to order lines that are shipped to the customer's address.
- Use customer-based tax – This option indicates whether the tax group that is defined for the customer's delivery address is used to tax customer orders that are created in POS for shipment to the customer's home.
Set up customer order parameters
Before you try to create customer orders in POS, configure the appropriate parameters in headquarters. Find these parameters on the Customer orders tab of the Commerce parameters page.
Default order type – This legacy property isn't supported.
Default deposit percentage – Enter the percentage of the order total amount that the customer must pay as a deposit before an order can be confirmed. Depending on their privileges, store associates might be able to override the amount by using the Deposit override operation in POS, if that operation is configured for the transaction screen layout.
Note
The deposit percentage setting is ignored if a business-to-business (B2B) type customer belonging to a customer hierarchy is added to the customer order. For such customers, the default deposit percentage is always set to zero, but the cashier can override the deposit percentage by using the Deposit override operation.
Pickup mode of delivery – Enter the mode of delivery that the system should apply to sales order lines that are configured for pickup in POS.
Carryout mode of delivery – Enter the mode of delivery that the system should apply to sales order lines that are considered carryout order lines when a mixed cart is created, where some lines are picked up or shipped, and other lines are carried out by the customer immediately.
Cancellation charge percentage – If a charge should be applied when a customer order is canceled, enter the amount of that charge.
Cancellation charge code – Enter the accounts receivable charge code that the system should use when a cancellation charge is applied to canceled customer orders through POS. The charge code defines the financial posting logic for the cancellation charge.
Note
When advanced auto charges features aren't enabled, create a dedicated charge code for cancellation charges instead of reusing the shipping charge code, since the latter choice might result in unexpected behavior when the system selects the sales tax group for the charge. Choose a cancellation charge code name and description that makes it clear to cashiers that the cancellation charge code is only for cancellations.
Shipping charge code – If the Use advanced auto charges option is set to Yes, this parameter setting has no effect. If that option is set to No, users are prompted to manually enter a shipping charge when they create customer orders in POS. Use this parameter to map an accounts receivable charge code to apply to orders when users enter a shipping charge. The charge code defines the financial posting logic for the shipping charge.
Use advanced auto charges – Set this option to Yes to use system-calculated auto charges when customer orders are created in POS. These auto charges can calculate shipping fees or other order or item-specific charges. For more information about how to set up and use advanced auto charges, see Omnichannel advanced auto charges.
Update transaction screen layouts in POS
Make sure that you configure the POS screen layout to support the creation and management of customer orders. Also, configure all required POS operations. Here are some of the POS operations that are recommended to correctly support customer order creation and management:
- Ship all products – Use this operation to specify that all lines in the transaction cart are shipped to a destination.
- Ship selected products – Use this operation to specify that selected lines in the transaction cart are shipped to a destination.
- Pick up all products – Use this operation to specify that all lines in the transaction cart are picked up from a selected store location.
- Pick up selected products – Use this operation to specify that selected lines in the transaction cart are picked up from a selected store location.
- Carry out all products – Use this operation to specify that all lines in the transaction cart are carried out. If you use this operation in POS, the customer order is converted to a cash-and-carry transaction.
- Carryout out selected products – Use this operation to specify that selected lines in the transaction cart are being carried out by the customer at the time of purchase. This operation is useful only in a hybrid order scenario.
- Recall order – Use this operation to search and retrieve customer orders so that POS users can edit, cancel, or perform fulfillment-related operations on them as required.
- Change mode of delivery – Use this operation to quickly change the mode of delivery for lines that are already configured for shipment, without requiring that users go through the "ship all products" or "ship selected products" flow again.
- Deposit override – Use this operation to change the deposit amount that the customer pays for the selected customer order.
Work with customer orders in POS
Note
Revenue recognition functionality isn't currently supported for use in Commerce channels (e-commerce, POS, call center). Don't add items configured with revenue recognition to orders created in Commerce channels.
Create a customer order for products that are shipped to the customer
To create a customer order for products that are shipped to the customer, follow these steps:
- On the POS transaction screen, add a customer to the transaction.
- Add products to the cart.
- Select Ship selected or Ship all to ship the products to an address on the customer account.
- Select the option to create a customer order.
- Confirm or change the "ship from" location, confirm or change the shipping address, and select a shipping method.
- Enter the customer's desired order shipment date.
- Use the payment functions to pay for any calculated amounts that are due, or use the Deposit override operation to change the amounts that are due, and then apply payment.
- If the full order total wasn't paid, enter a credit card that's charged for the balance that's due on the order when invoiced.
Create a customer order for products that the customer picks up
To create a customer order for products that the customer picks up, follow these steps:
- On the POS transaction screen, add a customer to the transaction.
- Add products to the cart.
- Select Pick up selected or Pick up all to initiate the order pickup configuration.
- Select the store location where the customer picks up the selected products.
- Select a date when the item is picked up.
- Use the payment functions to pay for any calculated amounts that are due, or use the Deposit override operation to change the amounts that are due, and then apply payment.
- If the full order total wasn't paid, select whether the customer provides payment later (at pickup), or whether a credit card is tokenized now and used and captured at the time of pickup.
Use credit management for Commerce orders
Starting in Dynamics 365 Commerce version 10.0.48, you can configure customer orders to follow the full credit management flow. When you enable this feature, the system evaluates orders against credit management blocking rules and can put orders on credit hold for your finance team's visibility and control before fulfillment proceeds.
To enable this behavior, configure the following settings:
- Enable the Leverage credit management setup for Commerce orders feature in the Feature management workspace.
- Enable the Credit management option in Accounts receivable parameters > Credit management.
Note
If you don't enable either of these settings, Commerce orders use the default behavior where the system directly blocks the order or transaction when a customer's credit limit is exceeded, instead of routing it through the credit hold flow.
Simple customer orders (pickup or shipment)
You can control whether the system checks the credit limit at the time of order capture. To let cashiers (on POS) or B2B buyers (on e-commerce site) place orders even after the credit limit is exceeded, enable a new setting named Skip credit check during order capture in the Functionality profile for POS or online stores. After the order is placed, the customer orders with in-store pickup or a shipment mode of delivery go through the credit management flow. Depending on the configured blocking rules, orders might be placed on credit hold for review.
Note
For the Credit limit used blocking rule to take effect, you must also enable Check credit limit on sales order in Credit and collections parameters. This setting applies to all credit management checkpoints, including order confirmation, picking list generation, and invoicing. Other blocking rules don't require this setting.
Hybrid customer orders
For hybrid orders that include a carryout line (where the customer takes some items immediately), the order doesn't go through the credit management flow. Carryout lines are invoiced at the time of transaction, so the system can't apply a credit hold to the order header. The existing behavior is preserved for these orders.
Order fulfillment actions in-store
When store associates perform fulfillment actions on an order (such as picking or packing), those actions don't trigger the credit management flow. If the customer's credit limit is exceeded and Message when exceeding credit limit is set to Error, the system blocks the fulfillment action. Fulfillment actions performed in-store don't change the credit management setting at the order header level. This behavior ensures that order lines fulfilled from a warehouse continue to go through the credit management flow as expected.
Cash and carry transactions
For cash and carry transactions, the system blocks the transaction if the customer's credit limit is exceeded and the Message when exceeding credit limit setting in Credit and collections parameters is set to Error. This behavior remains unchanged regardless of whether credit management is enabled.
Edit an existing customer order
You can recall and edit retail orders created in either the online or store channel through POS as required.
Important
Not all retail orders can be edited through the POS application. If the Enable order completion setting is turned on for the call center channel, orders that are created in a call center channel can't be edited through POS. To ensure correct payment processing, orders that originated in a call center channel and that use Enable order completion functionality must be edited through the call center application in headquarters.
Note
Microsoft recommends that you don't edit orders and quotations in POS created by a non-call center user in headquarters. Those orders and quotes don't use the Commerce pricing engine, so if they're edited in POS, the Commerce pricing engine reprices them.
Users can edit eligible orders through the POS application even if the order is partially fulfilled. However, orders that are fully invoiced still can't be edited through POS. To enable this capability, turn on the Edit partially fulfilled orders in Point of Sale feature in the Feature management workspace. If this feature isn't enabled, or if you're using version 10.0.16 or earlier, users can only edit customer orders in POS if the order is fully open. Further, if the feature is enabled, you can limit which stores can edit partially fulfilled orders. You can also configure the option to disable this capability for specific stores through the Functionality profile under the General tab.
- Select Recall order.
- Use Search to enter filters to find the order, and then select Apply.
- Select the order in the list of results, and then select Edit. If the Edit button is unavailable, the order is in a state where it can't be edited.
- From the transaction cart, make any necessary changes to the customer order. Some changes might be prohibited during editing.
- Complete the editing process by selecting a payment operation.
- To exit the editing process without saving any changes, use the Void transaction operation.
Pricing impact when orders are edited
When customers place orders in POS or on a Commerce e-commerce site, they commit to an amount. This amount includes a price, and it might also include a discount. A customer who places an order and then contacts the call center later to change that order (for example, to add another item) has specific expectations about the application of discounts. Even if the promotions on the existing order lines are expired, the customer expects that the discounts that were originally applied to those lines to remain in effect. However, if no discount was in effect when the order was originally placed, but a discount goes into effect later, the customer expects the new discount to be applied to the changed order. Otherwise, the customer might cancel the existing order and then create a new order where the new discount is applied. As this scenario shows, prices and discounts that customers commit to must be preserved. At the same time, POS and call center users must have the flexibility to recalculate prices and discounts for sales order lines as required.
When users recall and edit orders in POS, the prices and discounts of the existing order lines are considered "locked." In other words, they don't change, even if some order lines are canceled or changed, or new order lines are added. To change the prices and discounts of existing sales lines, the POS user must select Recalculate. The price lock is then removed from the existing order lines. However, before the Commerce version 10.0.21 release, this capability wasn't available in the call center. Instead, any changes to order lines caused prices and discounts to be recalculated.
In the Commerce version 10.0.21 release, a new feature named Prevent unintentional price calculation for commerce orders is available in the Feature management workspace. This feature is turned on by default. When turned on, a new Price locked property is available for all e-commerce orders. After order capture is completed for orders placed from any channel, this property is enabled automatically (that is, the checkbox is selected) for all the order lines. The Commerce pricing engine then excludes those order lines from all price and discount calculations. Therefore, if the order is edited, the order lines are excluded from the pricing and discount calculation by default. However, call center users can disable the property (that is, clear the checkbox) for any order line and then select Recalculate to include the existing order lines in the pricing calculations.
Even when they're applying a manual discount to an existing sales line, call center users must disable the Price locked property of the sales line before they apply the manual discount.
Call center users can also disable the Price locked property for order lines in bulk by selecting Remove price lock in the Calculate group on the Sell tab on the Action Pane of the Sales order page. In this case, the price lock is removed from all order lines except lines that are noneditable (in other words, lines that have a status of Partially invoiced or Invoiced). Then, after the changes to the order are completed and submitted, the price lock is reapplied to all the order lines.
Important
When the Prevent unintentional price calculation for commerce orders feature is turned on, the setup of trade agreement evaluation is ignored in the pricing workflows. In other words, the trade agreement evaluation dialog boxes don't show the Price related section. This behavior occurs because both the trade agreement evaluation setup and the price lock feature have a similar purpose: to prevent unintentional price changes. However, the user experience for trade agreement evaluation doesn't scale well for large orders where users must select one or more order lines for repricing.
Note
The Price locked property can be disabled for one or more selected lines only when the Call center module is used. The behavior of POS remains unchanged. In other words, POS user can't unlock prices for selected order lines. However, they can select Recalculate to remove the price lock from all existing order lines.
Cancel a customer order
To cancel a customer order, follow these steps:
- Select Recall order.
- Use Search to enter filters to find the order, and then select Apply.
- Select the order in the list of results, and then select Cancel. If the Cancel button is unavailable, the order is in a state where it can't be canceled.
- If cancellation charges are configured, confirm them. You can adjust the cancellation charges before you confirm them, as required.
- From the transaction cart, complete the cancellation process by selecting a payment operation. If deposits that you paid exceed the cancellation charge, refund payments might be due.
- To exit the cancellation process without saving any changes, use the Void transaction operation.
In Commerce versions before 10.0.36, if an order is partially canceled and you recall it in POS for editing, the canceled order lines are displayed on the transaction and printed on the receipt of the edited order. In Commerce version 10.0.36 and later, the canceled lines are hidden from POS and aren't printed on the receipt. This functionality is controlled by the Hide canceled order lines from POS feature, which is enabled by default in the feature management workspace starting in version 10.0.36. You can disable the feature if necessary.
Finalizing the customer order shipment or pickup from POS
After you create an order, the customer picks up the items from a store location or the items are shipped, depending on the configuration of the order. For more information about this process, see the store order fulfillment documentation.
Asynchronous transaction flow for customer orders
You can create customer orders in POS in either synchronous mode or asynchronous mode.
Important
Use the asynchronous order creation mode. It's much more performant than synchronous order creation mode and provides a better user experience.
Enable creating customer orders in asynchronous mode
To enable creating customer orders in asynchronous mode, follow these steps:
In headquarters, go to Retail and Commerce > Channel setup > POS profiles > Functionality profiles.
Select the functionality profile that corresponds to the store that you want to enable asynchronous order creation for.
On the General FastTab, select from the following configuration options:
- Create customer order in async mode
- Use realtime service for order creation with async backup
Note
The Use realtime service for order creation with async backup option is available in Commerce version 10.0.33 and later.
The Create customer order in async mode option always creates the order in a batch process. POS immediately completes the transaction by using the confirmation number for the order, but it takes a few minutes for the order to be created in headquarters (after the relevant jobs run). The jobs that are required to create the order are the P-0001 (Channel transactions) job and the Synchronize orders job. You can use the confirmation number to recall the order for fulfillment and editing scenarios.
The Use realtime service for order creation with async backup option can only be enabled if the Create customer order in async mode option is already enabled. The Use realtime service for order creation with async backup option first tries to create the order by using the Retail Transaction Service (RTS). If that attempt fails, the order is created by using the same batch process described earlier. Most of the time, the order is created as quickly as it would be via synchronous order creation. However, with this configuration, POS uses the confirmation number to immediately complete the order transaction and doesn't wait for the RTS call to be completed.
Starting with the Commerce version 10.0.35 release, you can cancel asynchronous customer orders even if the corresponding sales order isn't created in headquarters. To enable this capability, turn on the Enable asynchronous order cancellation feature in the Feature management workspace.
Note
The Enable asynchronous order cancellation feature is currently marked as a preview feature because it isn't yet validated against localization features.
The experience of canceling an asynchronous order is similar to that of canceling an existing customer order. The only difference is that when canceling an asynchronous order, the system can prompt the store associate with the customer's primary contact details to validate them with the customer. If a store associate needs to modify customer details, the associate can open the customer record from the transaction screen and modify the customer data from there. This functionality is helpful because after canceling the order asynchronously (even though the cancellation action is successful on POS and the customer deposit is refunded), the original order is canceled only after it's created in headquarters. If there's an issue canceling the order, the customer can then be reached by using the validated information. Starting with the Commerce 10.0.36 release, to configure the prompt for customer information, enable Prompt for phone number and email for asynchronous order cancellation on the POS functionality profile form.
To ensure that the system automatically cancels the original order after it's created in headquarters, run the following batch jobs at predefined intervals.
To create and schedule the batch jobs that ensure that the Enable asynchronous order cancellation feature works correctly, follow these steps:
- Go to System administration > Inquiries > Batch jobs.
- On the Batch job page, create the following two batch jobs:
- Configure a job to run the RetailDocumentOperationMonitorBatch class.
- Configure a job to run the RetailDocumentOperationProcessingBatch class.
- Schedule the new batch jobs to run on a recurring basis. For example, set the schedule so that the jobs run every five minutes.
If you experience any issues when canceling an order, you can view the issues in the Incomplete async order cancellations > Sales order processing and inquiry workspace. Two types of issues can prevent an original sales order from getting canceled: permanent issues, or transient issues (also known as retryable issues). Permanent issue scenarios include cases where an order is fulfilled and so can't be canceled, or where an order is partially fulfilled (and partially canceled), but the customer is refunded the full deposit. Transient issues include cases where an original order isn't yet created, so the corresponding cancellation transaction isn't yet processed. The system automatically retries to process lines associated with transient errors, but you must manually handle lines associated with permanent errors. Once you fix an order manually, you can set the troubleshooting status of a transaction to indicate that no further troubleshooting is needed.
For scenarios where organizations can't enable asynchronous customer orders and must use synchronous customer orders, if order creation takes too long so that the POS times out, or if the order gets into a bad state, you can use the Force complete transaction operation (released in version 10.0.35) to complete the order asynchronously. Since the organization doesn't want the asynchronous customer order, use the asynchronous order cancellation process described earlier to cancel the order, and then try creating a new order. To summarize, the Force complete transaction operation provides a way for you to get out from a state where order creation is failing but you can't void the transaction.
Note
The Force complete transaction operation can only be used if the Enable asynchronous order cancellation feature is enabled.