Note
Access to this page requires authorization. You can try signing in or changing directories.
Access to this page requires authorization. You can try changing directories.
Note
Dynamics 365 Guides and Remote Assist will no longer be available after December 31, 2026. Learn more at Dynamics 365 Guides and Remote Assist reaching end of support.
Annotations are useful for pointing out different parts of your space, including parts that might be difficult to reach. All call participants can see each other's additions, and can make their own annotations. Once an annotation is placed, it remains anchored in your space until the person who placed the annotation deletes it or leaves the call.
If you're using Dynamics 365 Guides and you're on a call with another person or group, you can annotate in your environment in different ways. The primary way to use annotations is through Microsoft Teams.
- If you're on a mobile device and have Microsoft Teams, use Teams mobile to annotate the environment. Teams desktop users (PC or Mac) can annotate in a mobile user's space.
- If you're not on a mobile device but are using a HoloLens, use your HoloLens to annotate the environment.
- If you're using Teams desktop (PC or Mac) and not a HoloLens, use Teams desktop to annotate the environment.
Use Teams mobile to annotate in a user's environment
Spatial annotations can greatly enhance your communication and collaboration, especially when working with remote teams.

Prerequisites
At least one person on the call has a Dynamics 365 Field Service, Guides, or Remote Assist license.
The mobile user who shares their space for annotating must have Augmented Reality (AR) capability:
For successful use of spatial annotations, go to Best practices.
Use spatial annotations
Use the Spatial Annotations toolbar in Teams. For others to view the toolbar, a mobile user must select Spatial Annotations from the menu and start presenting. After presenting starts, everyone else on the call can view the toolbar.
While in a mobile call, select Spatial Annotations.

Start presenting. The Spatial Annotations toolbar displays for all users on the call.

Use the toolbar to place 3D arrows or draw in your space for other callers to see or annotate in another user's space. Each call participant can only undo and delete their own annotations.
Button Description 
Add an arrow. To add an arrow, tap where you want to place the arrow. To control the direction of the arrow, tap, hold, and rotate the arrow until it's facing the desired direction. To change the size of the arrow, tap, hold, and drag to the size you want. Release to lock the arrow in place. 
Add ink (draw). 
Change the arrow or ink color. 
Undo the most recent annotation you added. 
To delete all annotations that you added, select this button, and then select Delete Annotations. This action doesn't clear annotations made by other users. Note
If a participant joins a group call or meeting after spatial annotations have begun and can't annotate on the presenter's 3D space, the presenter can minimize and maximize their Teams mobile app to restore the edit annotation functionality.
Alternatively, the presenter can stop and restart presenting spatial annotations. However, this action removes any annotations previously added to their 3D space.
When you're done annotating, close the toolbar. All annotations persist even after you stop editing.
Enable a one-time call to use spatial annotations
You can collaborate using spatial annotations with an external user who isn't a part of your organization. For example, having a call with a vendor or a contractor to solve a problem or discuss a process using augmented reality. If your collaborators don't have a Dynamics 365 Field Service, Guides, or Remote Assist license, they can still use spatial annotations when they join a call or meeting on a one-time basis. The system only requires one licensed user to unlock spatial annotation capabilities to all other mobile and desktop users.
Make sure your Teams admin has enabled meetings for external users.
Create a Teams meeting or start a call with one participant having a Dynamics 365 Field Service, Guides, or Remote Assist license and invite your other participants.
All participants can use spatial annotations as long as one person on the call has a Field Service, Guides, or Remote Assist license. The Spatial Annotations toolbar appears for all users on the call after a mobile user starts presenting.
Best practices
The person with the mobile device who shares their space for annotating should establish tracking. Tracking enables the mobile device to build a spatial map of visual feature points in the space. Without proper tracking, the mobile device doesn't understand the space and spatial annotations might not attach or be placed as expected.
For best results, the person should do a quick scan of the area they want to annotate:
- Point the camera where you want to annotate, covering different angles and distances.
- Move the camera around slowly to gather data about the space, object, or point of interest.
- Point the camera at different angles and distances from the object.
- Ensure even lighting conditions to detect surfaces and objects clearly.
- Use textured surfaces to provide more visual feature points to track, rather than uniform, shiny, or translucent surfaces.
If something interrupts the camera, tracking might temporarily be lost and annotations are unavailable. The system can recover when the camera detects familiar feature points again. The message "Please wait while Mixed Reality user re-establishes tracking" appears. Wait a moment for the camera to re-establish tracking so annotations are available.
Use Guides HoloLens to annotate in your environment
Prerequisites
Use HoloLens to annotate
If you're using Dynamics 365 Guides on HoloLens, and you're on a call with a remote collaborator using Microsoft Teams (PC, Mac, or mobile), you and your remote collaborators can annotate in your environment. Call participants can also annotate shared files or screens.
Note
A HoloLens user can draw in their environment but can't place arrows. The remote collaborator on Teams can draw and place arrows in the Dynamics 365 Guides user's environment.
Annotations don't work well on black or reflective surfaces.
When you're on a call, use the Annotate toolbar to place arrows or draw in your space.

Select from the following annotations.
Button Description 
Direct ink (draw). Pinch your index finger and thumb to place ink at the tip of your fingers. Lift your index finger from your thumb to stop placing ink. 
Draw far away. Use your hand rays to place the cursor where you want to start drawing. Air tap, keep your index finger and thumb together, and then start drawing. Release the air tap to stop drawing. 
Change ink color. Select the Color button and then select the color you want. That color will be used the next time that you draw with the Direct ink or Draw far away button.
Undo the most recent action, including the Erase all action.
Erase all drawings.
Use Teams (PC or Mac) to annotate the Guides user's environment
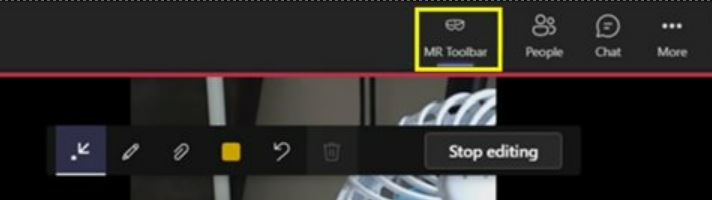
When you join a call in Microsoft Teams (PC or Mac), the Dynamics 365 Guides collaborator’s space displays, including holograms, and you can use the Mixed Reality toolbar in Teams to add annotations.

Note
- The toolbar appears only when the video feed for the Dynamics 365 Guides user is active.
- The toolbar is disabled if the Dynamics 365 Guides user isn't ready to receive annotations and files (for example, the user's outgoing video feed is disabled, the user temporarily loses tracking, or Guides isn't in the foreground).
- The toolbar is disabled if the same Guides user is connected from Teams and Dynamics 365 Guides at the same time, regardless of the device used.
Start annotations
To pause the video stream and enter edit mode, choose one of the following actions:
- Select anywhere in the call window.
- Select one of the items on the Mixed Reality toolbar.
- Select Start editing.
In edit mode, a live stream of the call displays in the corner of the app window, including the annotations that other call participants add.
Use the Mixed Reality toolbar to place arrows, draw, or add files in the HoloLens user's space. Each call participant can remove only the annotations that they add. Specific drawings or arrows can’t be removed.
Button Description 
Add an arrow. 
Add ink (draw). 
Insert a file in the HoloLens user's space. You can select an image or .pdf file from OneDrive or from your device. Learn more about sharing a file. 
Change the arrow or ink color. 
In edit mode, undo the last action. 
If you're in edit mode, erase all of the annotations made during that editing session. In you're in live mode, erase all of the annotations made during that call. When you're done annotating, select Stop editing or select the live video feed in the corner of your screen.
To minimize the Mixed Reality toolbar and focus on the video stream from the HoloLens user, select the Mixed Reality Toolbar button. The toolbar remains minimized if you switch to a different Dynamics 365 Guides user's video feed. To restore the toolbar, select the Mixed Reality Toolbar button again.