Σημείωση
Η πρόσβαση σε αυτή τη σελίδα απαιτεί εξουσιοδότηση. Μπορείτε να δοκιμάσετε να συνδεθείτε ή να αλλάξετε καταλόγους.
Η πρόσβαση σε αυτή τη σελίδα απαιτεί εξουσιοδότηση. Μπορείτε να δοκιμάσετε να αλλάξετε καταλόγους.
Azure App Service provides predefined application stacks, like ASP.NET or Node.js, on Windows. These application stacks run on IIS. The preconfigured Windows environment locks down the operating system from:
- Administrative access.
- Software installations.
- Changes to the global assembly cache.
For more information, see Operating system functionality on App Service.
You can deploy a custom-configured Windows image from Visual Studio to make OS changes that your app needs. Doing so makes it easy to migrate an on-premises app that requires a custom OS and software configuration. This tutorial demonstrates how to migrate to App Service an ASP.NET app that uses custom fonts installed in the Windows font library. You deploy a custom-configured Windows image from Visual Studio to Azure Container Registry and then run it in App Service.
Prerequisites
- Sign up for a Docker Hub account.
- Install Docker for Windows.
- Configure Docker to run Windows containers.
- Install Visual Studio 2022 with the ASP.NET and web development and Azure development workloads. If you already have Visual Studio 2022 installed:
- Install the latest updates in Visual Studio by selecting Help > Check for Updates.
- Add the workloads in Visual Studio by selecting Tools > Get Tools and Features.
Set up the app locally
Download the sample
In this step, you set up the local .NET project.
- Download the sample project.
- Extract (unzip) the custom-font-win-container-master.zip file.
The sample project contains a simple ASP.NET application that uses a custom font that's installed into the Windows font library. It's not necessary to install fonts. However, the sample is an example of an app that's integrated with the underlying OS. To migrate such an app to App Service, you either rearchitect your code to remove the integration, or migrate it as-is in a custom Windows container.
Install the font
In Windows Explorer, go to custom-font-win-container-master/CustomFontSample, right-click FrederickatheGreat-Regular.ttf, and select Install.
This font is publicly available from Google Fonts.
Run the app
Open the custom-font-win-container-master/CustomFontSample.sln file in Visual Studio.
Select Ctrl+F5 to run the app without debugging. The app is displayed in your default browser.
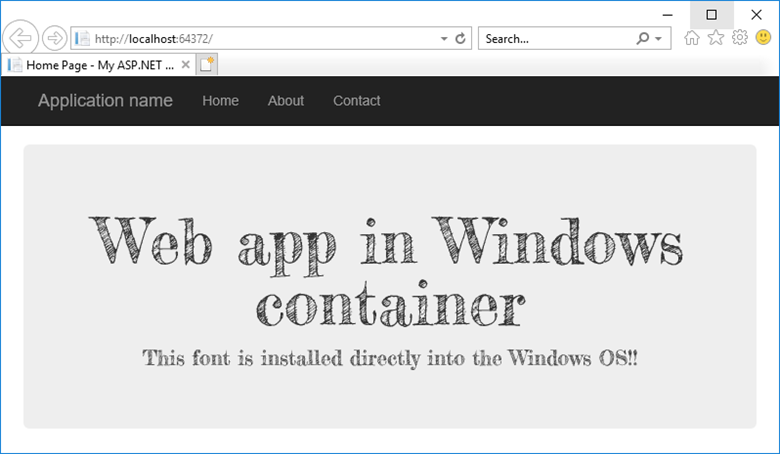
Because the app uses an installed font, the app can't run in the App Service sandbox. However, you can deploy it by using a Windows container instead, because you can install the font in the Windows container.
Configure Windows container
In Solution Explorer, right-click the CustomFontSample project and select Add > Container Orchestration Support.
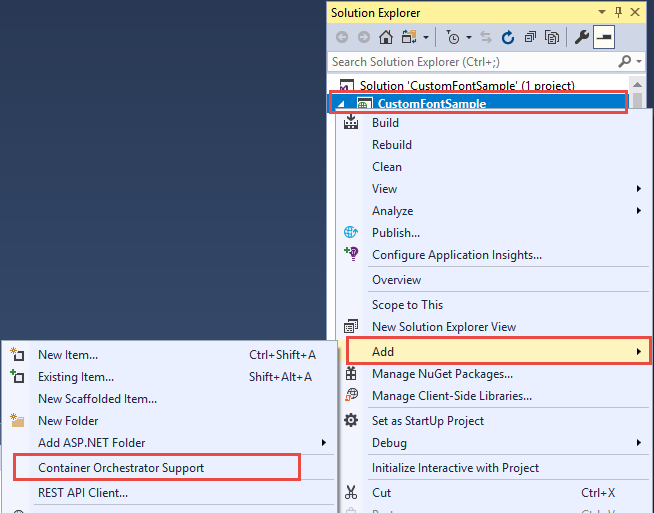
Select Docker Compose > OK.
Your project is now set to run in a Windows container. A Dockerfile is added to the CustomFontSample project, and a docker-compose project is added to the solution.
From Solution Explorer, open Dockerfile.
You need to use a supported parent image. Change the parent image by replacing the FROM line with the following code:
FROM mcr.microsoft.com/dotnet/framework/aspnet:4.7.2-windowsservercore-ltsc2019
Add the following line to the end of the file and save the file:
RUN ${source:-obj/Docker/publish/InstallFont.ps1}
You can find InstallFont.ps1 in the CustomFontSample project. It's a simple script that installs the font. You can find a more complex version of the script in the PowerShell Gallery.
Note
To test the Windows container locally, ensure that Docker is started on your local machine.
Publish to Azure Container Registry
Azure Container Registry can store your images for container deployments. You can configure App Service to use images that are hosted in Container Registry.
Open the Publish window
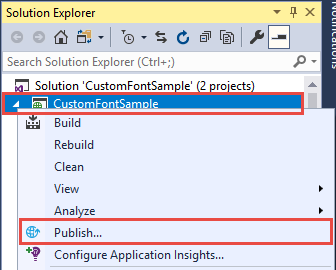
In Solution Explorer, right-click the CustomFontSample project and select Publish.
Create and publish the registry
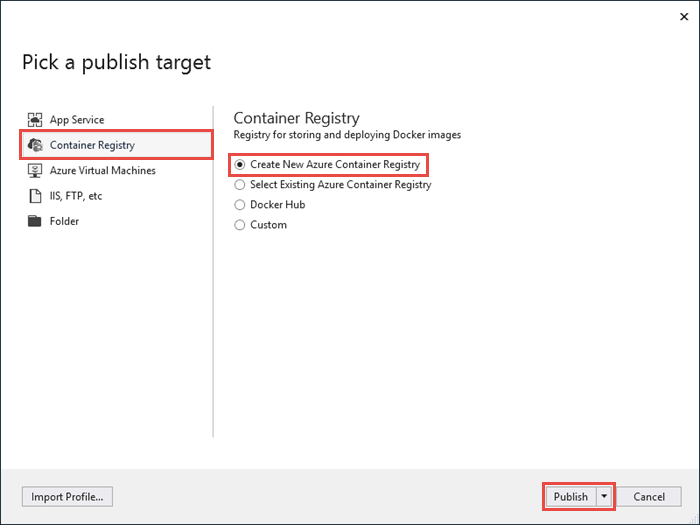
In the Publish window, select Azure, and then select Next.
Select Azure Container Registry, and then select Next.
Select the subscription where you want to publish the registry, and then select Create new.
Sign in with an Azure account
In the Azure Container Registry window, select Add an account, and then sign in to your Azure subscription. If you're already signed in, select the account containing the desired subscription from the dropdown list.
Configure the registry
Configure the new container registry by using the suggested values in the following table as a guide. When finished, select Create.
| Setting | Suggested value |
|---|---|
| DNS prefix | Keep the generated registry name, or change it to another unique name. |
| Resource group | Select New, enter myResourceGroup, and then select OK. |
| SKU | Basic. For more information, see Pricing tiers. |
| Registry Location | West Europe |
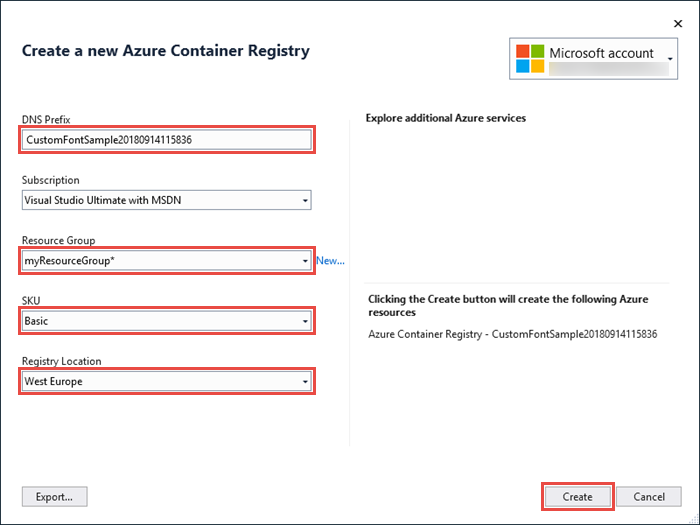
Select Finish.
A terminal window opens and displays the image deployment progress. Wait for the deployment to complete.
Sign in to Azure
Sign in to the Azure portal.
Create a web app
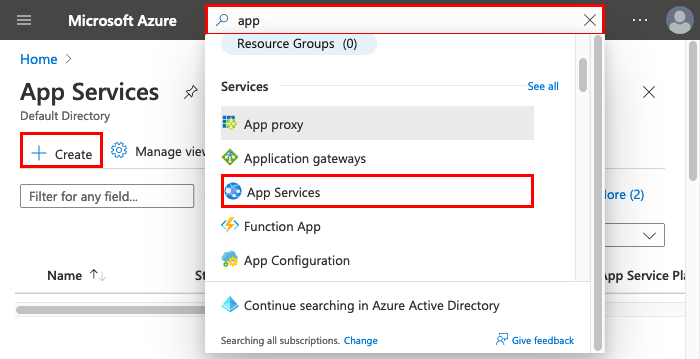
Select Create a resource, and then select Create under Web App.
Configure app basics
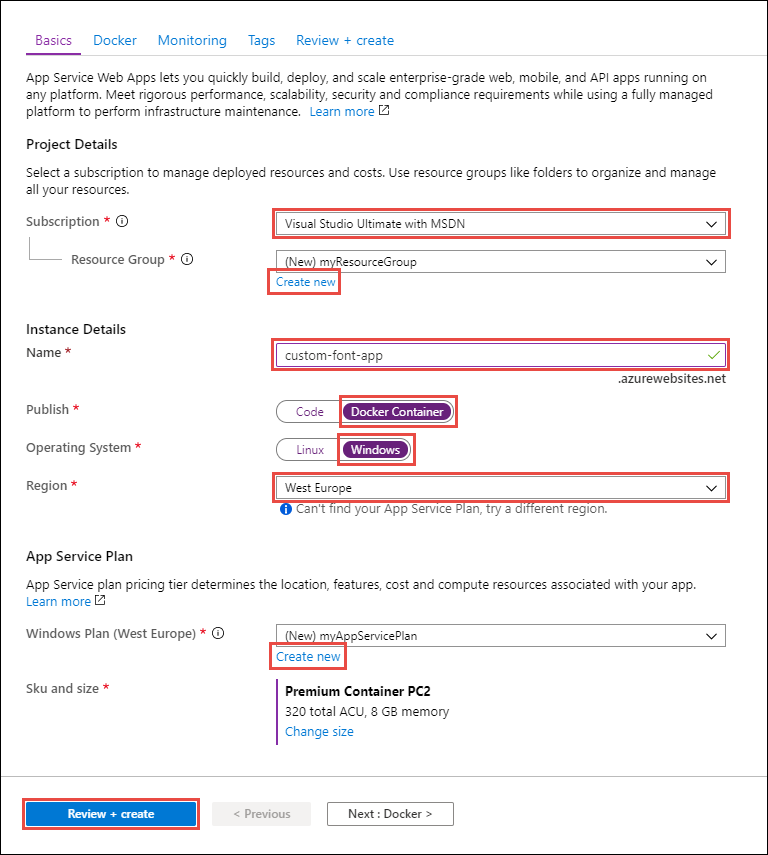
On the Basics tab, configure the settings by using the following table as a guide.
| Setting | Suggested value |
|---|---|
| Subscription | Make sure the correct subscription is selected. |
| Resource group | Select Create new, enter myResourceGroup, and then select OK. |
| Name | Enter a unique name. The URL of the web app is https://<app-name>.azurewebsites.net, where <app-name> is your app name. |
| Publish | Container |
| Operating System | Windows |
| Region | West Europe |
| Windows Plan | Select Create new, enter myAppServicePlan, and then select OK. |
Your Basics tab should look similar to this one:
Configure the Windows container
On the Container tab, configure your custom Windows container as shown in the following table, and then select Review + create.
| Setting | Suggested value |
|---|---|
| Image Source | Azure Container Registry |
| Registry | Select the registry you created earlier. |
| Image | customfontsample |
| Tag | latest |
Complete app creation
Select Create and wait for Azure to create the required resources.
Browse to the web app
When the deployment is complete, a notification message appears:
Select Go to resource.
In the app page, select the link under URL.
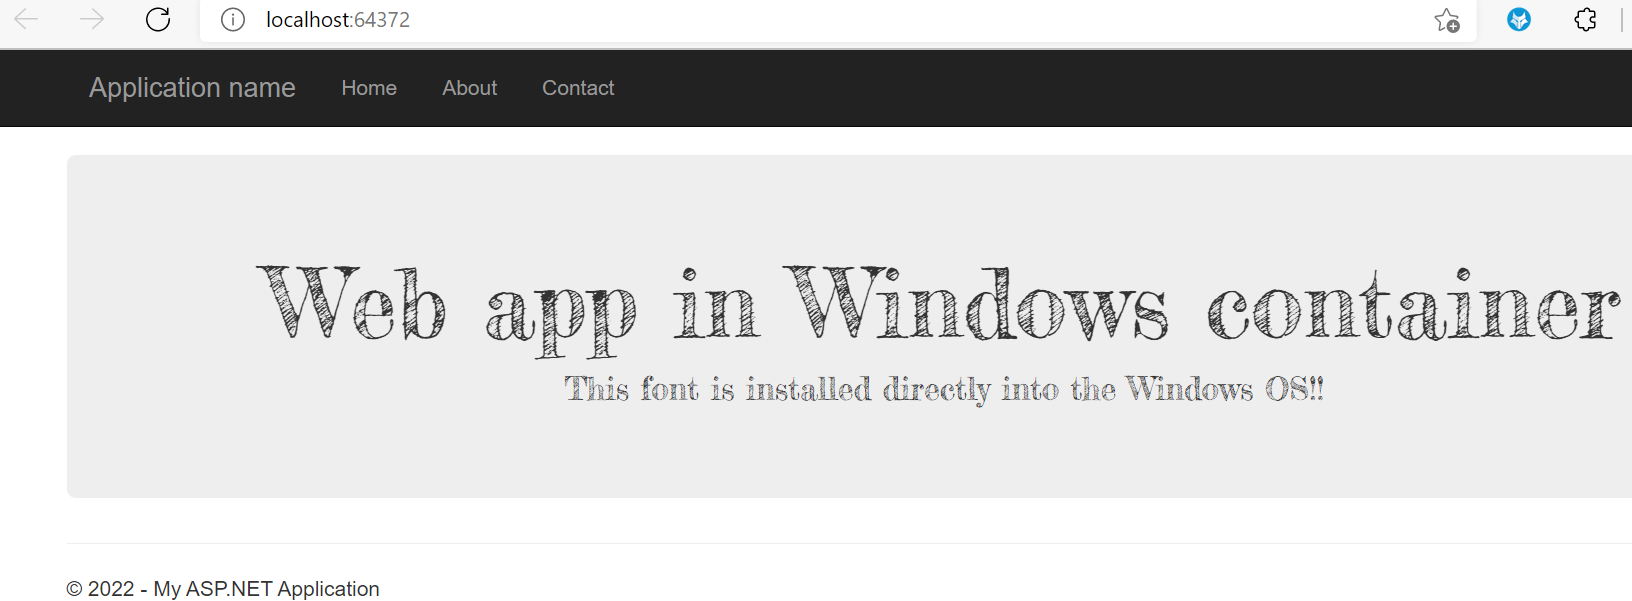
A new browser page is opened to the following page:
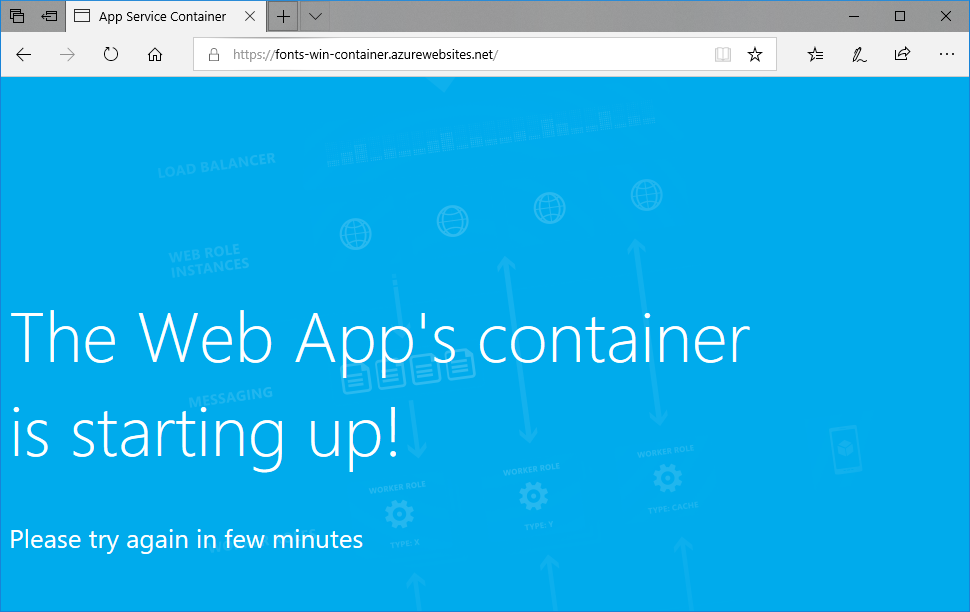
Wait a few minutes and try again, until you get the homepage with the font you expect:

Congratulations! You've migrated an ASP.NET application to App Service in a Windows container.
View the container startup logs
It might take some time for the Windows container to load. To see the progress, go to the following URL. (Replace <app-name> with the name of your app.)
https://<app-name>.scm.azurewebsites.net/api/logstream
The streamed logs look like this:
14/09/2018 23:16:19.889 INFO - Site: fonts-win-container - Creating container for image: customfontsample20180914115836.azurecr.io/customfontsample:latest.
14/09/2018 23:16:19.928 INFO - Site: fonts-win-container - Create container for image: customfontsample20180914115836.azurecr.io/customfontsample:latest succeeded. Container Id 329ecfedbe370f1d99857da7352a7633366b878607994ff1334461e44e6f5418
14/09/2018 23:17:23.405 INFO - Site: fonts-win-container - Start container succeeded. Container: 329ecfedbe370f1d99857da7352a7633366b878607994ff1334461e44e6f5418
14/09/2018 23:17:28.637 INFO - Site: fonts-win-container - Container ready
14/09/2018 23:17:28.637 INFO - Site: fonts-win-container - Configuring container
14/09/2018 23:18:03.823 INFO - Site: fonts-win-container - Container ready
14/09/2018 23:18:03.823 INFO - Site: fonts-win-container - Container start-up and configuration completed successfully
Azure App Service uses Docker container technology to host both built-in images and custom images. To see a list of built-in images, run the Azure CLI command, az webapp list-runtimes --os linux. If those images don't satisfy your needs, you can build and deploy a custom image.
Note
Your container should target the x86-64 architecture. ARM64 isn't supported.
In this tutorial, you learn how to:
- Push a custom Docker image to Azure Container Registry.
- Deploy the custom image to App Service.
- Configure environment variables.
- Pull the image into App Service by using a managed identity.
- Access diagnostic logs.
- Enable CI/CD from Container Registry to App Service.
- Connect to the container by using SSH.
Completing this tutorial incurs a small charge in your Azure account for the container registry and can incur more costs if you host the container for longer than a month.
Set up your initial environment
This tutorial requires version 2.0.80 or later of the Azure CLI. If you're using Azure Cloud Shell, the latest version is already installed.
- Be sure that you have an Azure account with an active subscription. Create an account for free.
Use the Bash environment in Azure Cloud Shell. For more information, see Get started with Azure Cloud Shell.
If you prefer to run CLI reference commands locally, install the Azure CLI. If you're running on Windows or macOS, consider running Azure CLI in a Docker container. For more information, see How to run the Azure CLI in a Docker container.
If you're using a local installation, sign in to the Azure CLI by using the az login command. To finish the authentication process, follow the steps displayed in your terminal. For other sign-in options, see Authenticate to Azure using Azure CLI.
When you're prompted, install the Azure CLI extension on first use. For more information about extensions, see Use and manage extensions with the Azure CLI.
Run az version to find the version and dependent libraries that are installed. To upgrade to the latest version, run az upgrade.
- Install Docker, which you use to build Docker images. Installing Docker might require a computer restart.
After installing Docker, open a terminal window and verify that the docker is installed:
docker --version
Clone or download the sample app
You can obtain the sample for this tutorial via Git clone or download.
Clone the repo by using Git Bash
Clone the sample repository:
git clone https://github.com/Azure-Samples/docker-django-webapp-linux.git --config core.autocrlf=input
Ensure that you include the --config core.autocrlf=input argument to guarantee proper line endings in files that are used inside the Linux container.
Then navigate to the folder:
cd docker-django-webapp-linux
Download the ZIP from GitHub
Instead of using Git clone, you can go to https://github.com/Azure-Samples/docker-django-webapp-linux and select Code > Local > Download ZIP.
Unpack the ZIP file into a folder named docker-django-webapp-linux.
Then open a terminal window in the docker-django-webapp-linux folder.
(Optional) Examine the Docker file
Following is the file in the sample that's named Dockerfile. It describes the Docker image and contains configuration instructions.
FROM tiangolo/uwsgi-nginx-flask:python3.6

RUN mkdir /code
WORKDIR /code
ADD requirements.txt /code/
RUN pip install -r requirements.txt --no-cache-dir
ADD . /code/

# ssh
ENV SSH_PASSWD "root:Docker!"
RUN apt-get update \
        && apt-get install -y --no-install-recommends dialog \
        && apt-get update \
 && apt-get install -y --no-install-recommends openssh-server \
 && echo "$SSH_PASSWD" | chpasswd

COPY sshd_config /etc/ssh/
COPY init.sh /usr/local/bin/

RUN chmod u+x /usr/local/bin/init.sh
EXPOSE 8000 2222

#CMD ["python", "/code/manage.py", "runserver", "0.0.0.0:8000"]
ENTRYPOINT ["init.sh"]
- The first group of commands installs the app's requirements in the environment.
- The second group of commands creates an SSH server to provide improved-security communication between the container and the host.
- The last line,
ENTRYPOINT ["init.sh"], invokesinit.shto start the SSH service and Python server.
Build and test the image locally
Note
Docker Hub imposes quotas on the number of anonymous pulls per IP and the number of authenticated pulls per free user. If you notice that your pulls from Docker Hub are being limited, try running docker login if you're not already logged in.
Run the following command to build the image:
docker build --tag appsvc-tutorial-custom-image .Test that the build works by running the Docker container locally:
docker run -it -p 8000:8000 appsvc-tutorial-custom-imageThis
docker runcommand specifies the port by using the-pargument and includes the name of the image.-itlets you stop it by using Ctrl+C.Tip
If you're running on Windows and see the error *standard_init_linux.go:211: exec user process caused "no such file or directory," the init.sh file contains CRLF line endings instead of the expected LF endings. This error happens if you used Git to clone the sample repository but omitted the
--config core.autocrlf=inputparameter. In this case, clone the repository again with the--configargument. You might also see the error if you edited init.sh and saved it with CRLF endings. In this case, save the file again with LF endings only.Browse to
http://localhost:8000to verify that the web app and container are functioning correctly.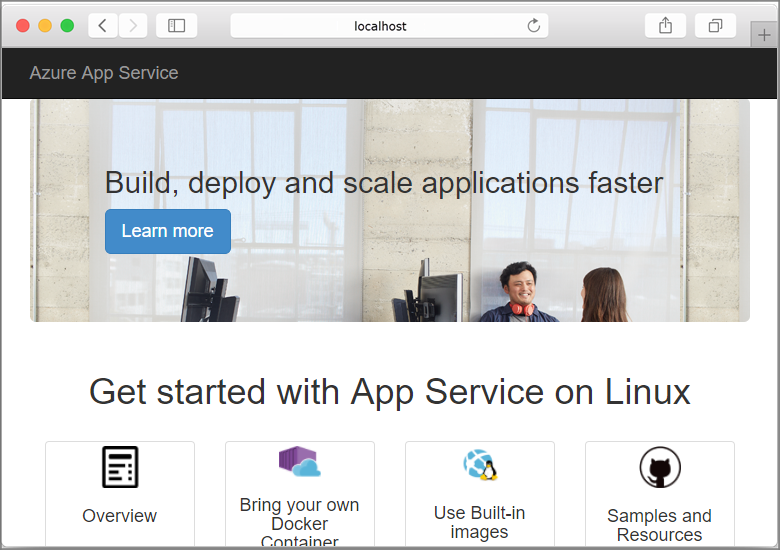
Create a user-assigned managed identity
App Service can use either a default managed identity or a user-assigned managed identity to authenticate with a container registry. In this tutorial, you'll use a user-assigned managed identity.
Run the az group create command to create a resource group:
az group create --name msdocs-custom-container-tutorial --location westeuropeYou can change the
--locationvalue to specify a region near you.Create a managed identity in the resource group:
az identity create --name myID --resource-group msdocs-custom-container-tutorial
Create a container registry
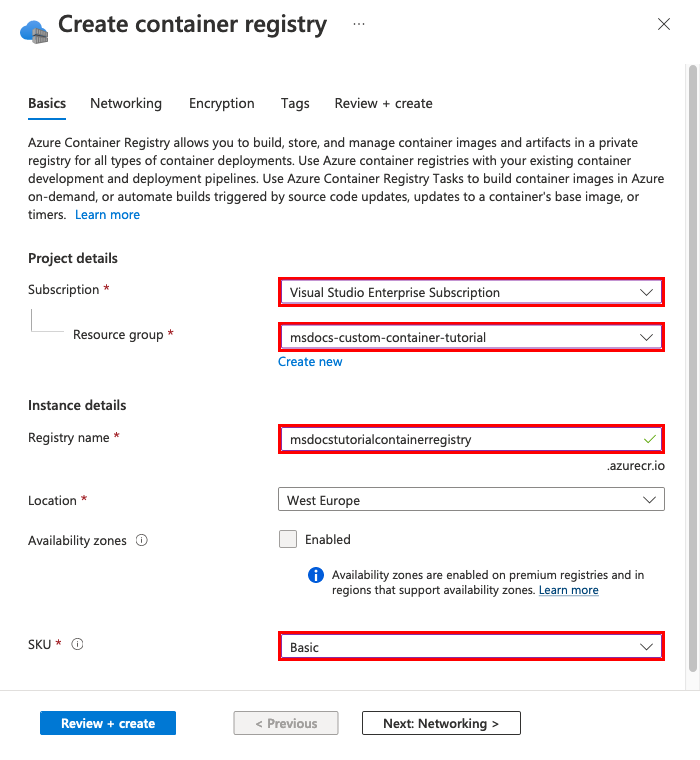
Create a container registry by using the following
az acr createcommand. Replace<registry-name>with a unique name for your registry. The name must contain only letters and numbers, and must be unique across all of Azure.az acr create --name <registry-name> --resource-group msdocs-custom-container-tutorial --sku Basic --admin-enabled trueThe
--admin-enabledparameter lets you push images to the registry by using administrative credentials.Retrieve the administrative credentials by running the
az credential acr showcommand:az acr credential show --resource-group msdocs-custom-container-tutorial --name <registry-name>The JSON output of this command provides two passwords along with the registry's user name.
Push the sample image to Container Registry
In this section, you push the image to Container Registry, which is used by App Service later.
From the local terminal where you built the sample image, use the
docker logincommand to sign in to the container registry:docker login <registry-name>.azurecr.io --username <registry-username>Replace
<registry-name>and<registry-username>with values from the previous steps. When prompted, type in one of the passwords from the previous section.Use the same registry name in all the remaining steps of this section.
When the sign-in is successful, tag your local Docker image to the registry:
docker tag appsvc-tutorial-custom-image <registry-name>.azurecr.io/appsvc-tutorial-custom-image:latestUse the
docker pushcommand to push the image to the registry:docker push <registry-name>.azurecr.io/appsvc-tutorial-custom-image:latestUploading the image the first time might take a few minutes because it includes the base image. Subsequent uploads are typically faster.
While you're waiting, you can complete the steps in the next section to configure App Service to deploy from the registry.
Authorize the managed identity for your registry
The managed identity you created doesn't yet have authorization to pull from the container registry. In this step, you enable the authorization.
Retrieve the principal ID for the managed identity:
principalId=$(az identity show --resource-group msdocs-custom-container-tutorial --name myID --query principalId --output tsv)Retrieve the resource ID for the container registry:
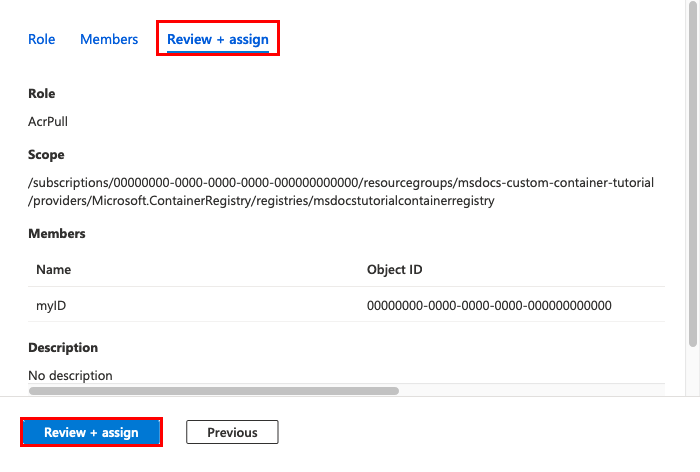
registryId=$(az acr show --resource-group msdocs-custom-container-tutorial --name <registry-name> --query id --output tsv)Grant the managed identity permission to access the container registry:
az role assignment create --assignee $principalId --scope $registryId --role "AcrPull"For more information about these permissions, see What is Azure role-based access control?.
Create the web app
Create an App Service plan by using the
az appservice plan createcommand:az appservice plan create --name myAppServicePlan --resource-group msdocs-custom-container-tutorial --is-linuxAn App Service plan corresponds to the virtual machine that hosts the web app. By default, the previous command uses an inexpensive B1 pricing tier that's free for the first month. You can specify the tier by using the
--skuparameter.Create the web app with the
az webapp createcommand:az webapp create --resource-group msdocs-custom-container-tutorial --plan myAppServicePlan --name <app-name> --deployment-container-image-name <registry-name>.azurecr.io/appsvc-tutorial-custom-image:latestReplace
<app-name>with a name for the web app. The name must be unique across all of Azure. Also replace<registry-name>with the name of your registry from the previous section.Tip
You can retrieve the web app's container settings at any time with the command
az webapp config container show --name <app-name> --resource-group msdocs-custom-container-tutorial. The image is specified in the propertyDOCKER_CUSTOM_IMAGE_NAME. When the web app is deployed through Azure DevOps or Azure Resource Manager templates, the image can also appear in a property namedLinuxFxVersion. Both properties serve the same purpose. If both are present in the web app's configuration,LinuxFxVersiontakes precedence.
Configure the web app
In this step, you configure the web app as follows:
- Configure the app to send requests to port 8000. The sample container is listening on port 8000 for web requests.
- Configure your app to use the managed identity to pull images from your container registry.
- Configure continuous deployment from the container registry. (Every image push to the registry will trigger your app to pull the new image.) This step isn't needed to configure your web app to pull from your container registry, but it can notify the web app when a new image is pushed to the registry. If you don't complete this step, you must manually trigger an image pull by restarting the web app.
Use
az webapp config appsettings setto set theWEBSITES_PORTenvironment variable as expected by the app code:az webapp config appsettings set --resource-group msdocs-custom-container-tutorial --name <app-name> --settings WEBSITES_PORT=8000Replace
<app-name>with the name you used in the previous step.Enable the user-assigned managed identity in the web app by using the
az webapp identity assigncommand:id=$(az identity show --resource-group msdocs-custom-container-tutorial --name myID --query id --output tsv) az webapp identity assign --resource-group msdocs-custom-container-tutorial --name <app-name> --identities $idReplace
<app-name>with the name you used in the previous step.Configure your app to pull from Container Registry by using managed identities.
appConfig=$(az webapp config show --resource-group msdocs-custom-container-tutorial --name <app-name> --query id --output tsv)
az resource update --ids $appConfig --set properties.acrUseManagedIdentityCreds=True
Replace
<app-name>with the name you used in the previous step.Set the client ID your web app uses to pull from Container Registry. This step isn't required if you use the system-assigned managed identity.
clientId=$(az identity show --resource-group msdocs-custom-container-tutorial --name myID --query clientId --output tsv)
az resource update --ids $appConfig --set properties.AcrUserManagedIdentityID=$clientId
Enable CI/CD in App Service.
cicdUrl=$(az webapp deployment container config --enable-cd true --name <app-name> --resource-group msdocs-custom-container-tutorial --query CI_CD_URL --output tsv)CI_CD_URLis a URL that App Service generates for you. Your registry should use this URL to notify App Service that an image push occurred. It doesn't actually create the webhook for you.Create a webhook in your container registry. Use the CI_CD_URL you got in the last step.
az acr webhook create --name appserviceCD --registry <registry-name> --uri $cicdUrl --actions push --scope appsvc-tutorial-custom-image:latestTo test if your webhook is configured properly, ping the webhook and see whether you get a 200 OK response.
eventId=$(az acr webhook ping --name appserviceCD --registry <registry-name> --query id --output tsv)
az acr webhook list-events --name appserviceCD --registry <registry-name> --query "[?id=='$eventId'].eventResponseMessage"
Tip
To see all information about all webhook events, remove the
--queryparameter.If you're streaming the container log, you should see a
Starting container for sitemessage after the webhook ping because the webhook triggers the app to restart.
Browse to the web app
To test the app, browse to https://<app-name>.azurewebsites.net. Replace <app-name> with the name of your web app.
The first time you attempt to access the app, it might take some time for the app to respond because App Service must pull the entire image from the registry. If the browser times out, just refresh the page. After the initial image is pulled, subsequent tests will run much faster.
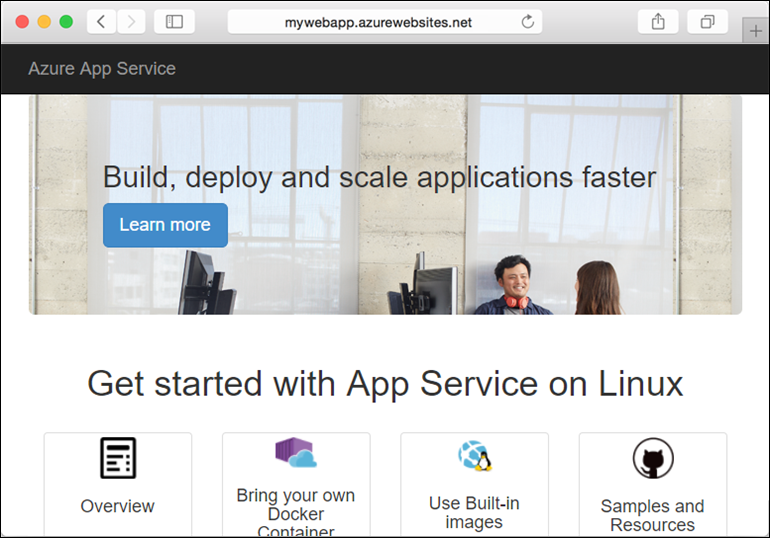
Access diagnostic logs
While you're waiting for the App Service to pull in the image, it's helpful to see exactly what App Service is doing by streaming the container logs to your terminal.
Turn on container logging:
az webapp log config --name <app-name> --resource-group msdocs-custom-container-tutorial --docker-container-logging filesystemEnable the log stream:
az webapp log tail --name <app-name> --resource-group msdocs-custom-container-tutorialIf you don't see console logs immediately, check again in 30 seconds.
You can also inspect the log files from a browser by going to
https://<app-name>.scm.azurewebsites.net/api/logs/docker.To stop log streaming at any time, select Ctrl+C.
Modify the app code and redeploy
In this section, you make a change to the web app code, rebuild the image, and then push it to your container registry. App Service then automatically pulls the updated image from the registry to update the running web app.
In your local docker-django-webapp-linux folder, open the file app/templates/app/index.html.
Change the first HTML element to match the following code.
<nav class="navbar navbar-inverse navbar-fixed-top">
  <div class="container">
    <div class="navbar-header">
      <a class="navbar-brand" href="#">Azure App Service - Updated Here!</a>
    </div>
  </div>
</nav>
Save your changes.
Go to the docker-django-webapp-linux folder and rebuild the image:
docker build --tag appsvc-tutorial-custom-image .Update the image's tag to
latest:docker tag appsvc-tutorial-custom-image <registry-name>.azurecr.io/appsvc-tutorial-custom-image:latestReplace
<registry-name>with the name of your registry.Push the image to the registry:
docker push <registry-name>.azurecr.io/appsvc-tutorial-custom-image:latestWhen the image push is complete, the webhook notifies App Service about the push, and App Service tries to pull in the updated image. Wait a few minutes, and then verify that the update is deployed by going to
https://<app-name>.azurewebsites.net.
Connect to the container by using SSH
SSH enables improved-security communication between a container and a client. To enable an SSH connection to your container, you must configure your custom image for it. When the container is running, you can open an SSH connection.
Configure the container for SSH
The sample app used in this tutorial already has the necessary configuration in Dockerfile, which installs the SSH server and also sets the sign-in credentials. This section is informational only. To connect to the container, skip to the next section.
ENV SSH_PASSWD "root:Docker!"
RUN apt-get update \
        && apt-get install -y --no-install-recommends dialog \
        && apt-get update \
  && apt-get install -y --no-install-recommends openssh-server \
  && echo "$SSH_PASSWD" | chpasswd
Note
This configuration doesn't allow external connections to the container. SSH is available only through the Kudu/SCM site. The Kudu/SCM site is authenticated with your Azure account.
root:Docker! shouldn't be altered when you use SSH. SCM/KUDU uses your Azure portal credentials. Changing this value will result in an error when you use SSH.
Dockerfile also copies the sshd_config file to the /etc/ssh/ folder and exposes port 2222 on the container:
COPY sshd_config /etc/ssh/

# ...

EXPOSE 8000 2222
Port 2222 is an internal port accessible only by containers within the bridge network of a private virtual network.
Finally, the entry script, init.sh, starts the SSH server.
#!/bin/bash
service ssh start
Open the SSH connection to the container
Go to
https://<app-name>.scm.azurewebsites.net/webssh/hostand sign in with your Azure account. Replace<app-name>with the name of your web app.When you sign in, you're redirected to an informational page for the web app. Select SSH at the top of the page to open the shell and use commands.
For example, you can examine the processes running within the app by using the
topcommand.
Clean up resources
The resources you created in this article might incur ongoing costs. To clean up the resources, you only need to delete the resource group that contains them:
az group delete --name msdocs-custom-container-tutorial
Next steps
What you learned:
- Deploy a custom image to a private container registry.
- Deploy the custom image to App Service.
- Update and redeploy the image.
- Access diagnostic logs.
- Connect to the container by using SSH.
- Push a custom Docker image to Container Registry.
- Deploy the custom image to App Service.
- Configure environment variables.
- Pull the image into App Service by using a managed identity.
- Access diagnostic logs.
- Enable CI/CD from Container Registry to App Service.
- Connect to the container by using SSH.
Go to the next tutorial:
Or check out other resources:


