How to create data registry
Note
Azure Maps Data registry service retirement
The Azure Maps Data registry service is now deprecated and will be retired on 9/30/25. For more information, see End of Life Announcement of Azure Maps Data Registry.
The data registry service enables you to register data content in an Azure Storage Account with your Azure Maps account. An example of data might include a collection of Geofences used in the Azure Maps Geofencing service. Another example is ZIP files containing drawing packages (DWG) or GeoJSON files that Azure Maps Creator uses to create or update indoor maps.
Prerequisites
Important
- This article uses the
us.atlas.microsoft.comgeographical URL. If your account wasn't created in the United States, you must use a different geographical URL. For more information, see Access to Creator services. - In the URL examples in this article you will need to replace:
{Azure-Maps-Subscription-key}with your Azure Maps subscription key.{udid}with the user data ID of your data registry. For more information, see The user data ID.
Prepare to register data in Azure Maps
Before you can register data in Azure Maps, you need to create an environment containing all required components. You need a storage account with one or more containers that hold the files you wish to register and managed identities for authentication. This section explains how to prepare your Azure environment to register data in Azure Maps.
Create managed identities
There are two types of managed identities: system-assigned and user-assigned. System-assigned managed identities have their lifecycle tied to the resource that created them. User-assigned managed identities can be used on multiple resources. For more information, see managed identities for Azure resources.
Use the following steps to create a managed identity, add it to your Azure Maps account.
Create a system assigned managed identity:
- Go to your Azure Maps account in the Azure portal.
- Select Identity from the Settings section in the left menu.
- Toggle the Status to On.


For more information, see managed identities for Azure resources.
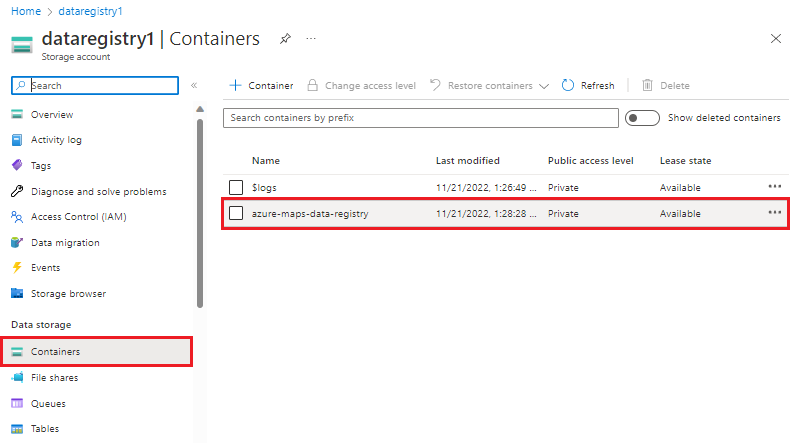
Create a container and upload data files
Before adding files to a data registry, you must upload them into a container in your Azure storage account. Containers are similar to a directory in a file system, they're how your files are organized in your Azure storage account.
To create a container in the Azure portal, follow these steps:
From within your Azure storage account, select Containers from the Data storage section in the navigation pane.
Select + Container in the Containers pane to bring up the New container pane.
Select Create to create the container.
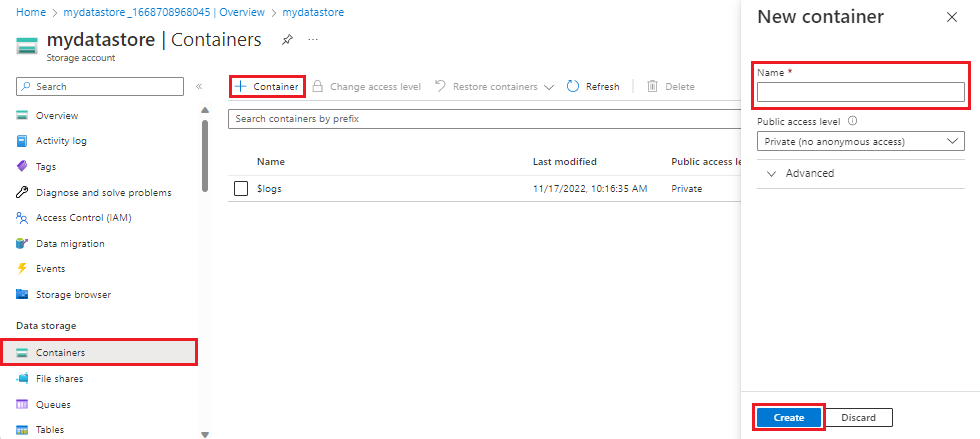
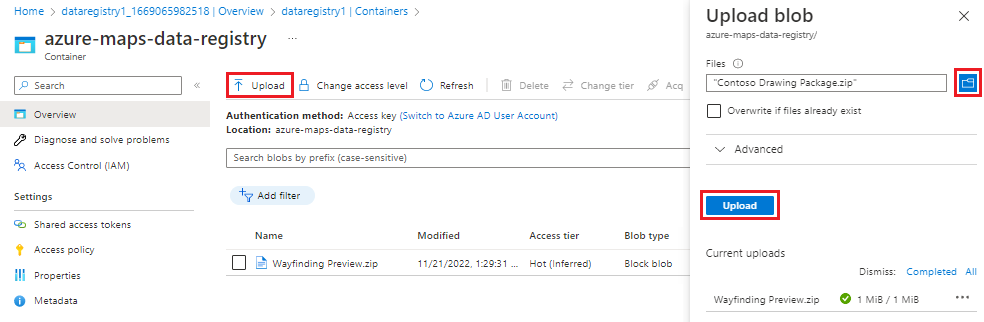
Once your container has been created, you can upload files into it.
Once the container is created, select it.
Select Upload from the toolbar, select one or more files
Select the Upload button.


Add a datastore
Once you've created an Azure storage account with files uploaded into one or more containers, you're ready to create the datastore that links the storage accounts to your Azure Maps account.
Important
All storage accounts linked to an Azure Maps account must be in the same geographic location. For more information, see Azure Maps service geographic scope.
Note
If you do not have a storage account see Create a storage account.
Select Datastore from the left menu in your Azure Maps account.
Select the Add button. An Add datastore screen appears on the right side.
Enter the desired Datastore ID then select the Subscription name and Storage account from the drop-down lists.
Select Add.
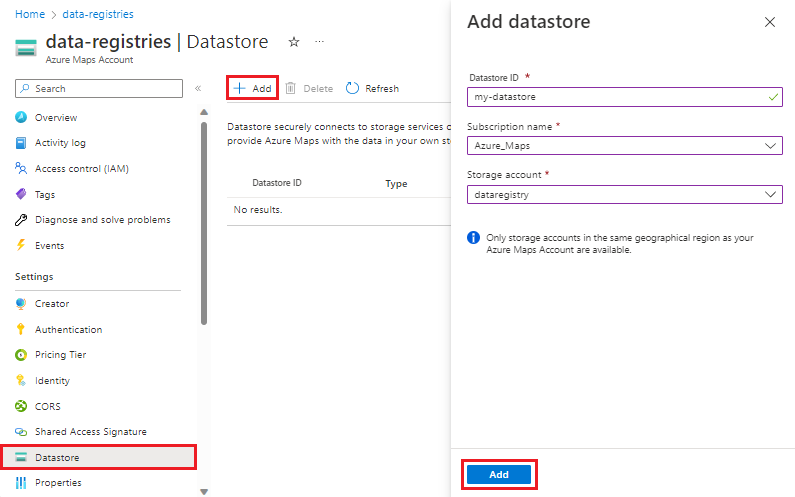

The new datastore now appears in the list of datastores.
Assign roles to managed identities and add them to the datastore
Once your managed identities and datastore are created, you can add the managed identities to the datastore, and simultaneously assign them the Contributor and Storage Blob Data Reader roles. While it's possible to add roles to your managed identities directly in your managed identities or storage account, which you can easily do while simultaneously associating them with your Azure Maps datastore directly in the datastore pane.
Note
Each managed identity associated with the datastore will need the Contributor and Storage Blob Data Reader roles granted to them. If you do not have the required permissions to grant roles to managed identities, consult your Azure administrator. To assign roles to your managed identities and associate them with a datastore:
Select Datastore from the left menu in your Azure Maps account.
Select one or more datastores from the list, then Assign roles.
Select the Managed identity to associate to the selected datastore(s) from the drop-down list.
Select both Contributor and Storage Blob Data Reader in the Roles to assign drop-down list.

Select the Assign button.

Data registry properties
With a datastore created in your Azure Maps account, you're ready to gather the properties required to create the data registry.
There are the AzureBlob properties that you pass in the body of the HTTP request, and The user data ID passed in the URL.
The AzureBlob
The AzureBlob is a JSON object that defines properties required to create the data registry.
| Property | Description |
|---|---|
kind |
Defines what type of object being registered. Currently AzureBlob is the only kind that is supported. |
dataFormat |
The data format of the file located in blobUrl. Its format can either be GeoJSON for the spatial service (Deprecated1) or ZIP for the conversion service (Deprecated1). |
msiClientId |
The ID of the managed identity being used to create the data registry. |
linkedResource |
The ID of the datastore registered in the Azure Maps account. The datastore contains a link to the file being registered. |
blobUrl |
A URL pointing to the Location of the AzurebBlob, the file imported into your container. |
1 Azure Maps Creator, and the Data registry and Spatial services are now deprecated and will be retired on 9/30/25.
The following two sections provide you with details how to get the values to use for the msiClientId, blobUrl properties.
The msiClientId property
The msiClientId property is the ID of the managed identity used to create the data registry. There are two types of managed identities: system-assigned and user-assigned. System-assigned managed identities have their lifecycle tied to the resource that created them. User-assigned managed identities can be used on multiple resources. For more information, see managed identities for Azure resources.
When using System-assigned managed identities, you don't need to provide a value for the msiClientId property. The data registry service automatically uses the system assigned identity of the Azure Maps account when msiClientId is null.


The blobUrl property
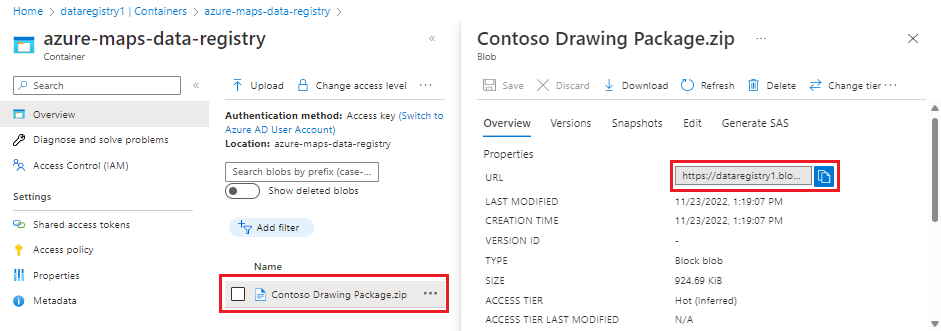
The blobUrl property is the path to the file being registered. You can get this value from the container that it was added to.
data registry
Select your storage account in the Azure portal.
Select Containers from the left menu.
A list of containers appear. Select the container that contains the file you wish to register.
The container opens, showing a list of the files previously uploaded.
Select the desired file, then copy the URL.

The user data ID
The user data ID (udid) of the data registry is a user-defined GUID that must conform to the following Regex pattern:
^[a-fA-F0-9]{8}-[a-fA-F0-9]{4}-[a-fA-F0-9]{4}-[a-fA-F0-9]{4}-[a-fA-F0-9]{12}$
Tip
The udid is a user-defined GUID that must be supplied when creating a data registry. If you want to be certain you have a globally unique identifier (GUID), consider creating it by running a GUID generating tool such as the Guidgen.exe command line program (Available with Visual Studio).
Create a data registry
Now that you have your storage account with the desired files linked to your Azure Maps account through the datastore and have gathered all required properties, you're ready to use the data registry API to register those files. If you have multiple files in your Azure storage account that you want to register, you need to run the register request for each file (udid).
Note
The maximum size of a file that can be registered with an Azure Maps datastore is one gigabyte.
To create a data registry:
Provide the information needed to reference the storage account that is being added to the data registry in the body of your HTTP request. The information must be in JSON format and contain the following fields:
{
"kind": "AzureBlob",
    "azureBlob": {
        "dataFormat": "geojson",
        "linkedResource": "{datastore ID}",
        "blobUrl": "https://teststorageaccount.blob.core.windows.net/testcontainer/test.geojson"
    }
}
Note
When using System-assigned managed identities, you will get an error if you provide a value for the msiClientId property in your HTTP request.
For more information on the properties required in the HTTP request body, see Data registry properties.
Once you have the body of your HTTP request ready, execute the following HTTP PUT request:
https://us.atlas.microsoft.com/dataRegistries/{udid}?api-version=2023-06-01&subscription-key={Your-Azure-Maps-Subscription-key}For more information on the
udidproperty, see The user data ID.Copy the value of the Operation-Location key from the response header.
Tip
If the contents of a previously registered file is modified, it will fail its data validation and won't be usable in Azure Maps until it's re-registered. To re-register a file, rerun the register request, passing in the same AzureBlob used to create the original registration. The value of the Operation-Location key is the status URL that you'll use to check the status of the data registry creation in the next section, it contains the operation ID used by the Get operation API.
Note
The value of the Operation-Location key will not contain the subscription-key, you will need to add that to the request URL when using it to check the data registry creation status.
Check the data registry creation status
To (optionally) check the status of the data registry creation process, enter the status URL you copied in the Create a data registry section, and add your subscription key as a query string parameter. The request should look similar to the following URL:
https://us.atlas.microsoft.com/dataRegistries/operations/{udid}?api-version=2023-06-01&subscription-key={Your-Azure-Maps-Primary-Subscription-key}
Get a list of all files in the data registry
Use the List request to get a list of all files registered in an Azure Maps account:
https://us.atlas.microsoft.com/dataRegistries?api-version=2023-06-01&subscription-key={Azure-Maps-Subscription-key}
The following sample demonstrates three possible statuses, completed, running and failed:
{
  "value": [
    {
      "udid": "f6495f62-94f8-0ec2-c252-45626f82fcb2",
      "description": "Contoso Indoor Design",
      "kind": "AzureBlob",
      "azureBlob": {
        "dataFormat": "zip",
        "msiClientId": "3263cad5-ed8b-4829-b72b-3d1ba556e373",
        "linkedResource": "my-storage-account",
        "blobUrl": "https://mystorageaccount.blob.core.windows.net/my-container/my/blob/path1.zip",
        "sizeInBytes": 29920,
        "contentMD5": "CsFxZ2YSfxw3cRPlqokV0w=="
      },
      "status": "Completed"
    },
    {
      "udid": "8b1288fa-1958-4a2b-b68e-13a7i5af7d7c",
      "kind": "AzureBlob",
      "azureBlob": {
        "dataFormat": "geojson",
        "msiClientId": "3263cad5-ed8b-4829-b72b-3d1ba556e373",
        "linkedResource": "my-storage-account",
        "blobUrl": "https://mystorageaccount.blob.core.windows.net/my-container/my/blob/path2.geojson",
        "sizeInBytes": 1339
      },
      "status": "Running"
    },
    {
      "udid": "7c1288fa-2058-4a1b-b68f-13a6h5af7d7c",
      "description": "Contoso Geofence GeoJSON",
      "kind": "AzureBlob",
      "azureBlob": {
        "dataFormat": "geojson",
        "linkedResource": "my-storage-account",
        "blobUrl": "https://mystorageaccount.blob.core.windows.net/my-container/my/blob/path3.geojson",
        "sizeInBytes": 1650,
        "contentMD5": "rYpEfIeLbWZPyaICGEGy3A=="
      },
      "status": "Failed",
      "error": {
        "code": "ContentMD5Mismatch",
        "message": "Actual content MD5: sOJMJvFParkSxBsvvrPOMQ== doesn't match expected content MD5: CsFxZ2YSfxw3cRPlqokV0w==."
      }
    }
  ]
}
The data returned when running the list request is similar to the data provided when creating a registry with a few additions:
| property | description |
|---|---|
| contentMD5 | MD5 hash created from the contents of the file being registered. For more information, see Data validation |
| sizeInBytes | The size of the content in bytes. |
Replace a data registry
If you need to replace a previously registered file with another file, rerun the register request, passing in the same AzureBlob used to create the original registration, except for the blobUrl. The BlobUrl needs to be modified to point to the new file.
Data validation
When you register a file in Azure Maps using the data registry API, an MD5 hash is created from the contents of the file, encoding it into a 128-bit fingerprint and saving it in the AzureBlob as the contentMD5 property. The MD5 hash stored in the contentMD5 property is used to ensure the data integrity of the file. Since the MD5 hash algorithm always produces the same output given the same input, the data validation process can compare the contentMD5 property of the file when it was registered against a hash of the file in the Azure storage account to check that it's intact and unmodified. If the hash isn't the same, the validation fails. If the file in the underlying storage account changes, the validation fails. If you need to modify the contents of a file that has been registered in Azure Maps, you need to register it again.