How to create and deploy an Azure Cloud Service (classic)
Important
Cloud Services (classic) is now deprecated for all customers as of September 1st, 2024. Any existing running deployments will be stopped and shut down by Microsoft and the data will be permanantly lost starting October 2024. New deployments should use the new Azure Resource Manager based deployment model Azure Cloud Services (extended support).
The Azure portal provides two ways for you to create and deploy a cloud service: Quick Create and Custom Create.
This article explains how to use the Quick Create method to create a new cloud service and then use Upload to upload and deploy a cloud service package in Azure. When you use this method, the Azure portal makes available convenient links for completing all requirements as you go. If you're ready to deploy your cloud service when you create it, you can do both at the same time using Custom Create.
Note
If you plan to publish your cloud service from Azure DevOps, use Quick Create, and then set up Azure DevOps publishing from the Azure Quickstart or the dashboard. For more information, see Continuous Delivery to Azure by Using Azure DevOps, or see help for the Quick Start page.
Concepts
Three components are required to deploy an application as a cloud service in Azure:
- Service Definition
The cloud service definition file (.csdef) defines the service model, including the number of roles. - Service Configuration
The cloud service configuration file (.cscfg) provides configuration settings for the cloud service and individual roles, including the number of role instances. - Service Package
The service package (.cspkg) contains the application code and configurations and the service definition file.
You can learn more about these components and how to create a package here.
Prepare your app
Before you can deploy a cloud service, you must create the cloud service package (.cspkg) from your application code and a cloud service configuration file (.cscfg). The Azure SDK provides tools for preparing these required deployment files. You can install the SDK from the Azure Downloads page, in the language in which you prefer to develop your application code.
Three cloud service features require special configurations before you export a service package:
- If you want to deploy a cloud service that uses Transport Layer Security (TLS), previously known as Secure Sockets Layer (SSL), for data encryption, configure your application for TLS.
- If you want to configure Remote Desktop connections to role instances, configure the roles for Remote Desktop.
- If you want to configure verbose monitoring for your cloud service, enable Azure Diagnostics for the cloud service. Minimal monitoring (the default monitoring level) uses performance counters gathered from the host operating systems for role instances (virtual machines). Verbose monitoring gathers more metrics based on performance data within the role instances to enable closer analysis of issues that occur during application processing. To find out how to enable Azure Diagnostics, see Enabling diagnostics in Azure.
To create a cloud service with deployments of web roles or worker roles, you must create the service package.
Before you begin
- If you need to install the Azure SDK, choose Install Azure SDK to open the Azure Downloads page, and then download the SDK for the language in which you prefer to develop your code. You have an opportunity to do the installation later.
- If any role instances require a certificate, create the certificates. Cloud services require a .pfx file with a private key. You can upload the certificates to Azure as you create and deploy the cloud service.
Create and deploy
Sign in to the Azure portal.
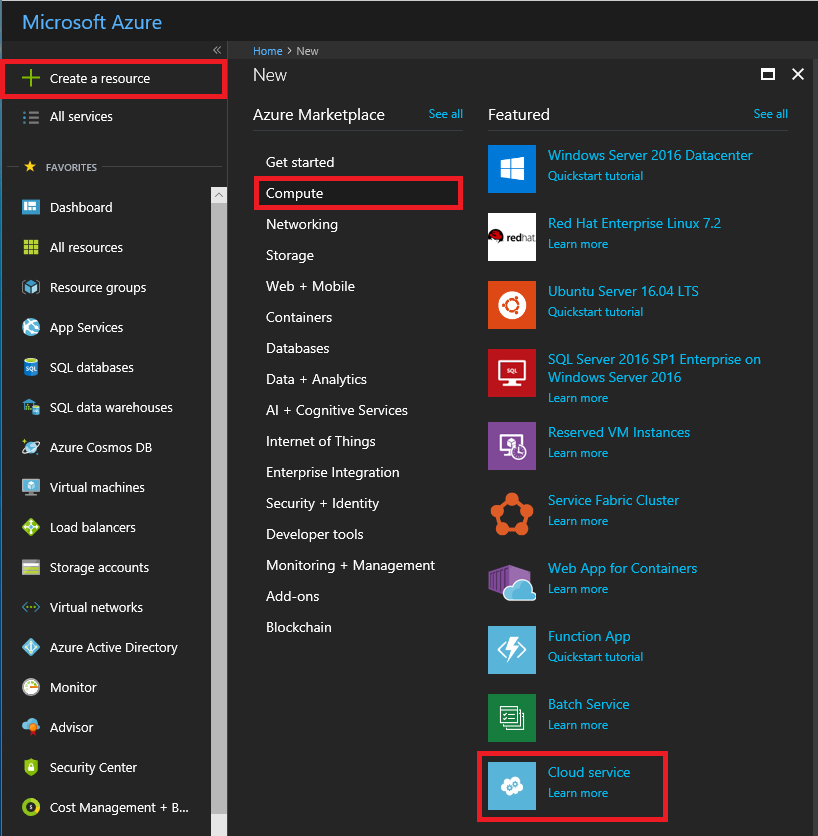
Choose Create a resource > Compute, and then scroll down to and select Cloud Service.
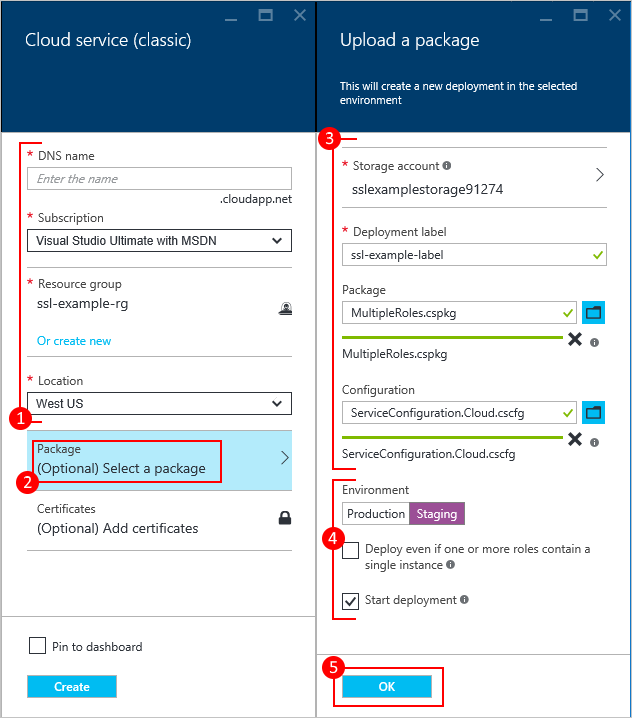
In the new Cloud Service pane, enter a value for the DNS name.
Create a new Resource Group or select an existing one.
Select a Location.
Select Package, which opens the Upload a package pane. Fill in the required fields. If any of your roles contain a single instance, ensure Deploy even if one or more roles contain a single instance is selected.
Make sure that Start deployment is selected.
Select OK, which closes the Upload a package pane.
If you don't have any certificates to add, choose Create.
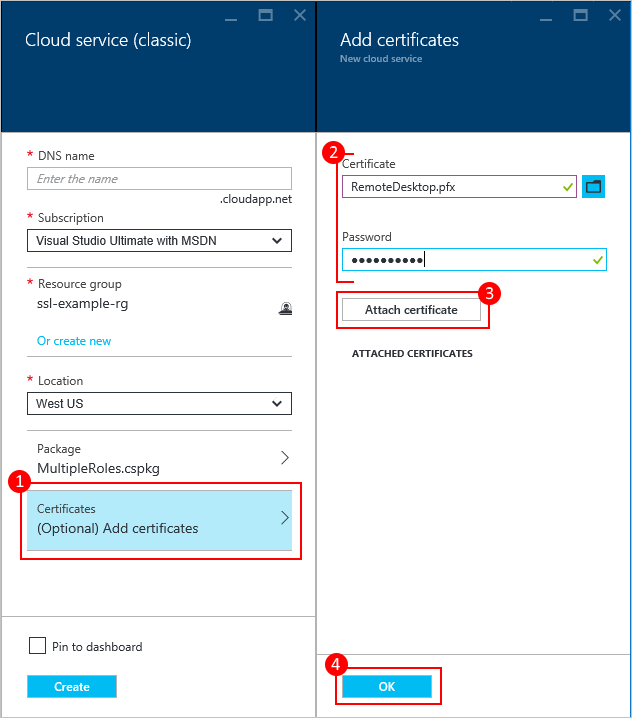
Upload a certificate
If your deployment package was configured to use certificates, you can upload the certificate now.
Select Certificates, and on the Add certificates pane, select the TLS/SSL certificate .pfx file, and then provide the Password for the certificate,
Select Attach certificate, and then choose OK on the Add certificates pane.
Select Create on the Cloud Service pane. When the deployment reaches the Ready status, proceed to the next steps.
Verify your deployment completed successfully
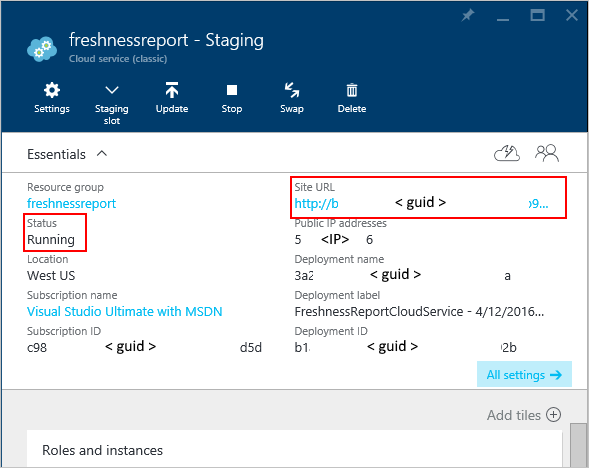
Select the cloud service instance.
The status should show that the service is Running.
Under Essentials, select the Site URL to open your cloud service in a web browser.
Next steps
- General configuration of your cloud service.
- Configure a custom domain name.
- Manage your cloud service.
- Configure TLS/SSL certificates.