Σημείωμα
Η πρόσβαση σε αυτήν τη σελίδα απαιτεί εξουσιοδότηση. Μπορείτε να δοκιμάσετε να εισέλθετε ή να αλλάξετε καταλόγους.
Η πρόσβαση σε αυτήν τη σελίδα απαιτεί εξουσιοδότηση. Μπορείτε να δοκιμάσετε να αλλάξετε καταλόγους.
Important
This feature is in Beta. No workspace setting is required to enable it. Install the Agent Bricks CLI to get started.
This quickstart takes you from an empty directory to a deployed custom agent using the Agent Bricks CLI (databricks-agentbricks), the Azure Databricks command-line tool for building and deploying agents. The Agent Bricks CLI manages model access, memory, sessions, tools, and tracing for you, so you can focus on your agent's logic.
How the Agent Bricks CLI works
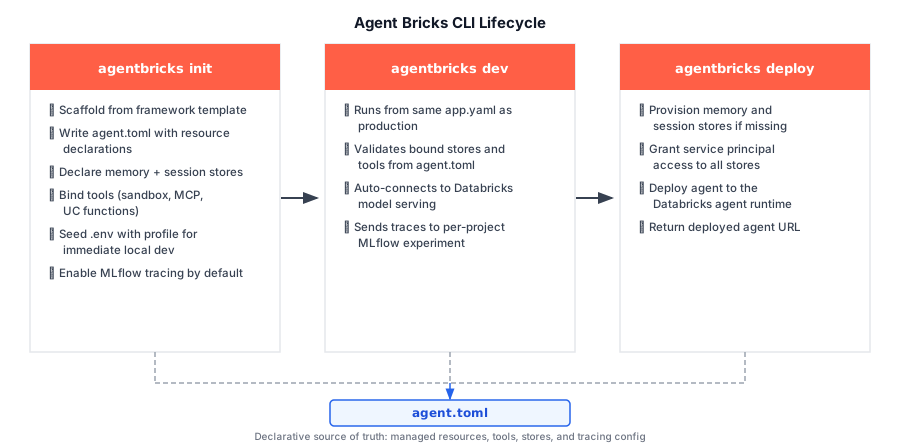
The Agent Bricks CLI scaffolds a local project from a framework template, with the runtime, tests, and an optional chat UI already wired up. You write the application logic (model, tools, and prompts), and the CLI runs it locally and deploys it. The declarative agent.toml file is the source of truth for the Azure Databricks-managed resources that your agent depends on, such as tools, memory, sessions, and tracing. agentbricks deploy reads it to provision and wire everything up.
Three commands take an agent from a blank directory to production:
agentbricks initscaffolds the project and writesagent.toml.agentbricks devruns the agent locally, using the same runtime and environment that Azure Databricks uses.agentbricks deployprovisions the declared resources and rolls out the deployment.
Prerequisites
The Databricks CLI, installed and on your path.
Python 3.11 or above. Databricks recommends Python 3.12. If the install or
agentbricks devfails because of the Python version, see Troubleshooting.uv, which runs the scaffolded project foragentbricks init,agentbricks dev, andagentbricks deploy.Install the Agent Bricks CLI. To install it as a
uvtool, run the following:uv tool install databricks-agentbricksTo install it with
pipinstead, runpip install databricks-agentbricks.
Step 1: Authenticate
Authenticate to your workspace with OAuth, save a named profile, and set it as the Agent Bricks CLI's default:
databricks auth login --host https://<your-workspace-url> --profile <profile>
agentbricks login --profile <profile>
Step 2: Scaffold the project
Scaffold a new agent project, choosing a framework template with --framework:
agentbricks init --framework langgraph my-agent
cd my-agent
Step 3: Run the agent locally
Run the agent on your machine to test it before you deploy:
agentbricks dev
agentbricks dev serves the chat app and the agent's API at http://localhost:8000, using the same command and environment as the Azure Databricks agent runtime, connected to Azure Databricks model serving.
Open the URL in a browser to chat with the agent. Keep the server running for the next step.
Step 4: Test the agent locally
In a second terminal, send a request to the agent's invocations API:
curl -X POST http://localhost:8000/api/invocations \
  -H 'Content-Type: application/json' \
  -d "{\"id\":\"$(uuidgen)\",\"session_id\":\"$(uuidgen)\",\"input\":[{\"role\":\"user\",\"content\":\"Hello\"}]}"
If uuidgen isn't available, replace each $(uuidgen) with any UUID.
The request body has the following fields:
id: A new UUID for each request.session_id: The conversation that the request belongs to. To send a follow-up message in the same conversation, reuse the session ID with a newid.input: The messages to send to the agent.
The response contains the invocation's status and an output field with the agent's messages. For all request fields, see Request body.
Step 5: Deploy the agent
From the project directory, deploy the agent to the Azure Databricks agent runtime:
agentbricks deploy
agentbricks init recorded the name my-agent in agent.toml, so you don't pass a name. The CLI creates an app named agent-bricks-my-agent. Use that name in agentbricks deployments and agentbricks endpoint commands.
The Agent Bricks CLI provisions any bound stores, grants the agent's service principal access to them, and rolls out the deployment. A first deploy takes a few minutes, mostly to start the app's compute. agentbricks deploy waits until the agent answers, then returns the deployment's URL.
To return immediately instead of waiting for the deploy to finish, add --no-wait to agentbricks deploy, and then run agentbricks deployments wait.
If the deploy fails, view the deployment's logs:
agentbricks deployments logs agent-bricks-my-agent
Step 6: Test the deployed agent
Send a request to the deployed agent:
agentbricks endpoint invoke agent-bricks-my-agent \
  --path /api/invocations \
  --json "{\"id\":\"$(uuidgen)\",\"session_id\":\"$(uuidgen)\",\"input\":[{\"role\":\"user\",\"content\":\"Hello\"}]}"
As in Step 4, if uuidgen isn't available, replace each $(uuidgen) with any UUID.
The command looks up the app's URL and authenticates with your default profile. To call the API with curl and an OAuth token instead, see Query an agent that uses DurableAgentServer. To chat with the agent in a browser, open the deployment's URL.
Next steps
- Full command walkthrough and Agent Bricks CLI capabilities: Agent Bricks CLI.
- Query a deployed agent: Query agents deployed on Azure Databricks.
- Bind managed memory and sessions: Agent memory.
- Add tools and MCP services: MCPs.
- View agent traces with MLflow: Tracing overview.