Define approvals and checks
Azure DevOps Services
A pipeline is made up of stages. A pipeline author can control whether a stage should run by defining conditions on the stage. Another way to control if and when a stage should run is through approvals and checks.
Approvals and other checks aren't defined in the yaml file. Users modifying the pipeline yaml file can't modify the checks performed before start of a stage. Administrators of resources manage checks using the web interface of Azure Pipelines.
Pipelines rely on resources such as environments, service connections, agent pools, variable groups, and secure files. Checks enable the resource owner to control if and when a stage in any pipeline can consume a resource. As an owner of a resource, you can define checks that must be satisfied before a stage consuming that resource can start. For example, a manual approval check on an environment ensures that deployment to that environment only happens after the designated user reviews the changes being deployed.
A stage can consist of many jobs, and each job can consume several resources. Before the execution of a stage can begin, all checks on all the resources used in that stage must be satisfied. Azure Pipelines pauses the execution of a pipeline before each stage, and waits for all pending checks to be completed.
There are five categories of approvals and checks and they run in the order they were created within each category. Checks are reevaluated based on the retry interval specified in each check. If all checks aren't successful until the timeout specified, then that stage isn't executed. If any of the checks terminally fails (for example, if you reject an approval on one of the resources), then that stage isn't executed.
You can retry a stage when approvals and checks time out.
Static checks run first and then pre-check approvals run. The categories in order are:
- Static checks: Branch control, Required template, and Evaluate artifact
- Pre-check approvals
- Dynamic checks: Approval, Invoke Azure Function, Invoke REST API, Business Hours, Query Azure Monitor alerts
- Post-check approvals
- Exclusive lock
You can also see the execution order on the Approvals and checks tab.
Important
Checks can be configured on environments, service connections, repositories, variable groups, secure files, and agent pools.
Service connections cannot be specified by variable.
Approvals
You can manually control when a stage should run using approval and checks. This check is commonly used to control deployments to production environments.
Sign in to your Azure DevOps organization, and then navigate to your project.
Select Pipelines > Environments, and then select your environment.
Select the Approvals and checks tab, and then select the + sign to add a new check.
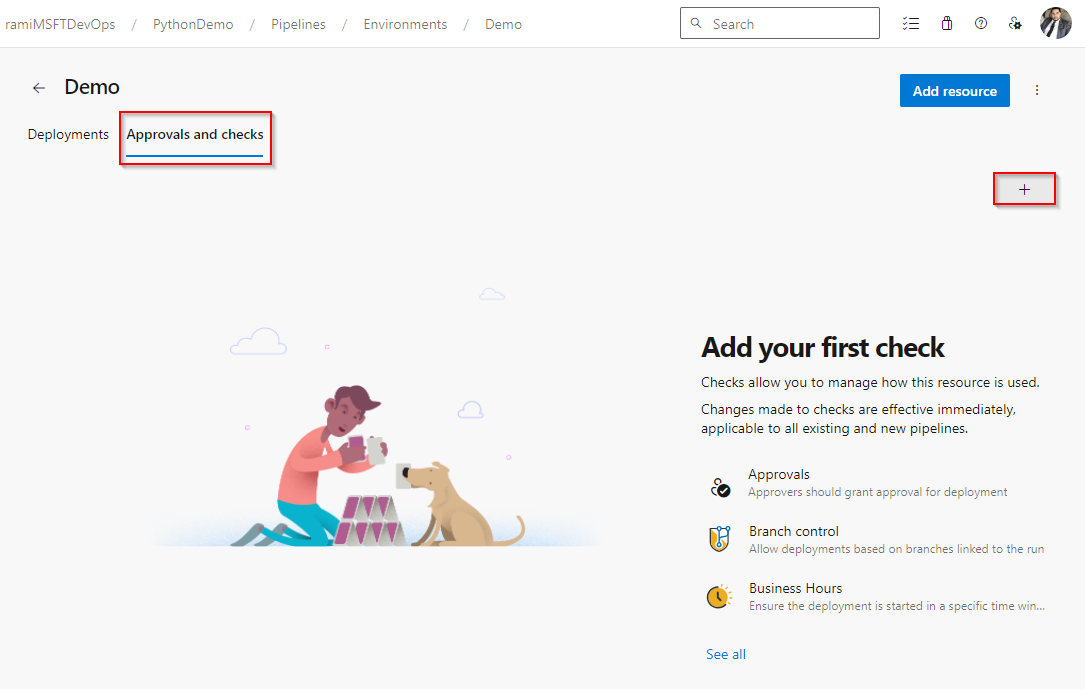
Select Approvals, and then select Next.
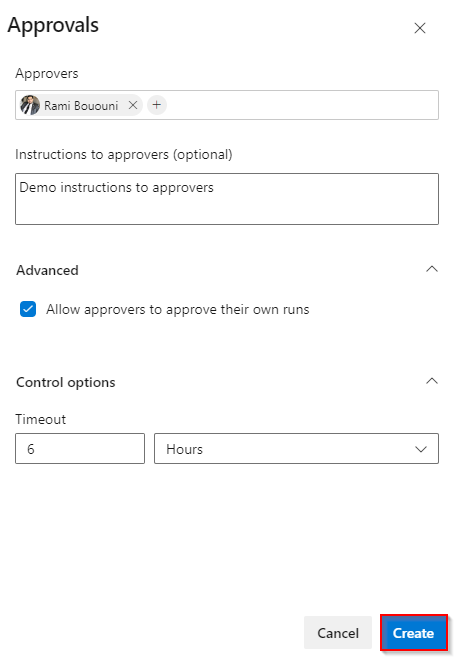
Add users or groups as your designated Approvers, and, if desired, provide instructions for the approvers. Specify if you want to permit or restrict approvers from approving their own runs, and specify your desired Timeout. If approvals aren't completed within the specified Timeout, the stage is marked as skipped.
Select Create when you're done.
Once the approval check is triggered, a prompt window, as shown in the following example, is presented in the user interface. This window provides the option for approvers to either reject or approve the run, along with any accompanying instructions.
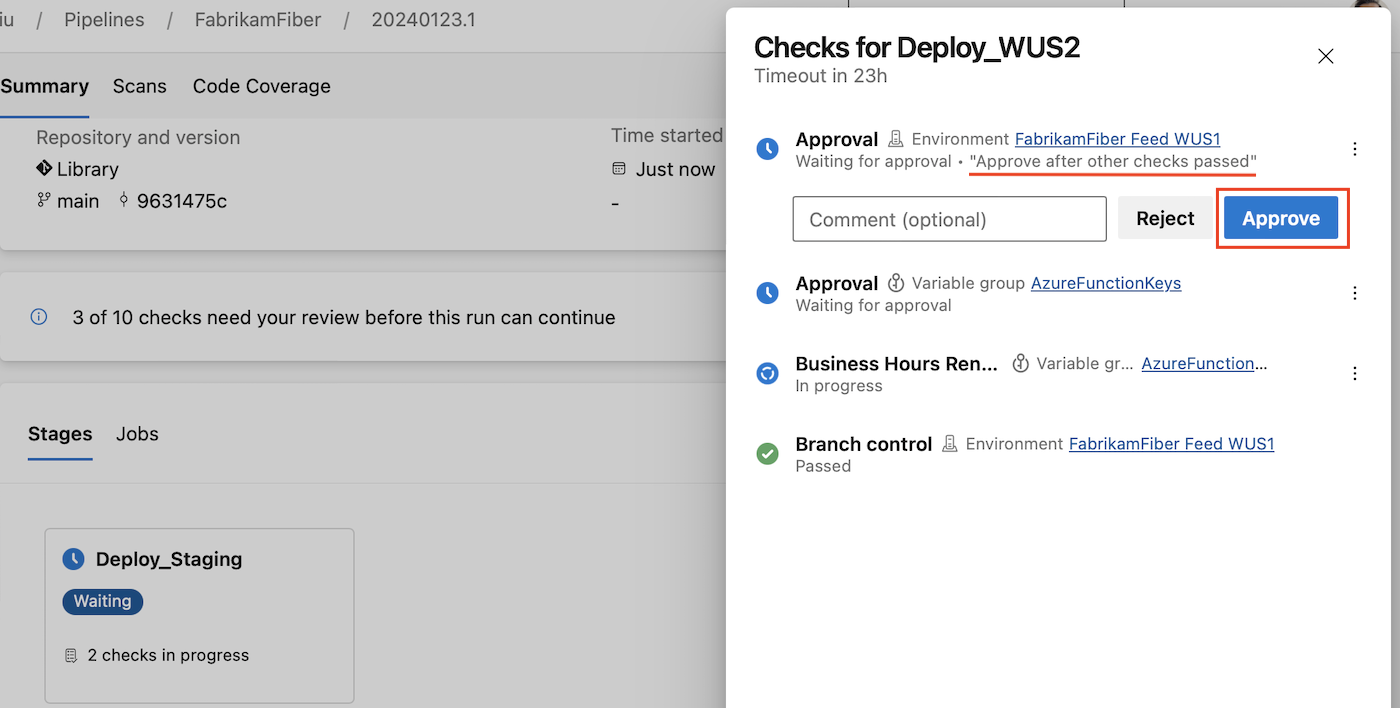
The list of users who can review an Approval is fixed at the time approvals & checks start running. That is, changes to the list of users and groups of an approval check done after checks start executing aren't picked up.
Note
If a group is designated as an approver, only one user within the group needs to approve for the run to proceed.
Deferred approvals
There are situations when the time when an approval is given and the time the deployment should start don't match. For example, you might want to wait to deploy a new release until a low-traffic time in the evening.
To address this scenario, you can defer an approval and set the time the approval becomes effective.
Select Defer approval.
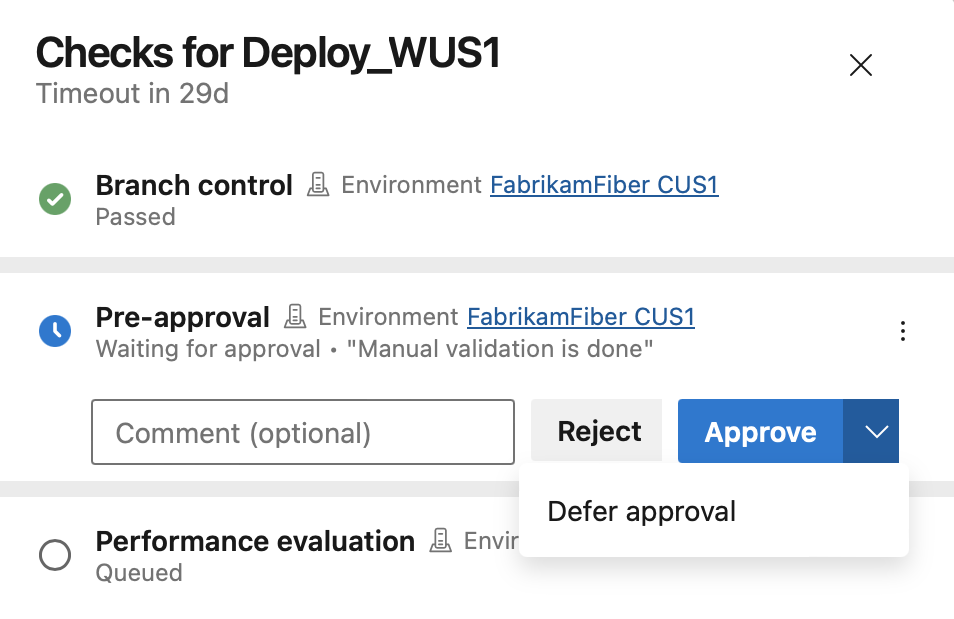
Set the approval time.
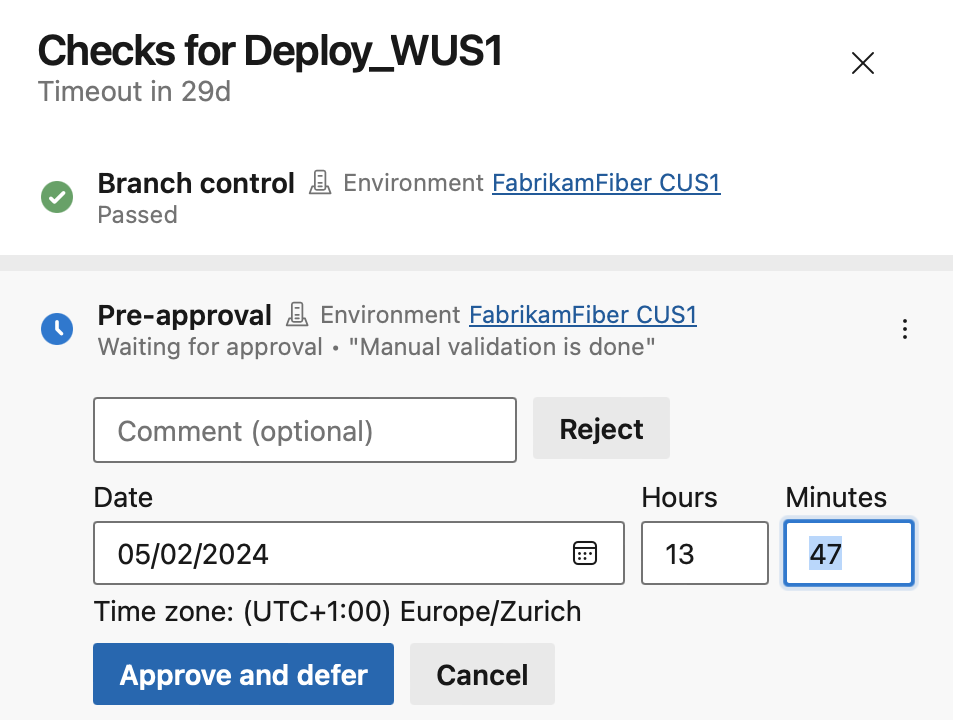
You'll see the approval in the Checks panel as a pre-approval. The approval is effective at the set time.
Branch control
Using the branch control check, you can ensure all the resources linked with the pipeline are built from the allowed branches and that the branches have protection enabled. This check helps in controlling the release readiness and quality of deployments. In case multiple resources are linked with the pipeline, source for all the resources is verified. If you've linked another pipeline, then the branch of the specific run being deployed is verified for protection.
To define the branch control check:
In your Azure DevOps project, go to the resource (for example, environment) that needs to be protected.
Navigate to Approvals and Checks for the resource.
Choose the Branch control check and provide a comma-separated list of allowed branches. You can mandate that the branch should have protection enabled. You can also define the behavior of the check if the protection status for one of the branches isn't known. A branch is considered protected if at least one policy has been applied (including policies applied at the repository level).
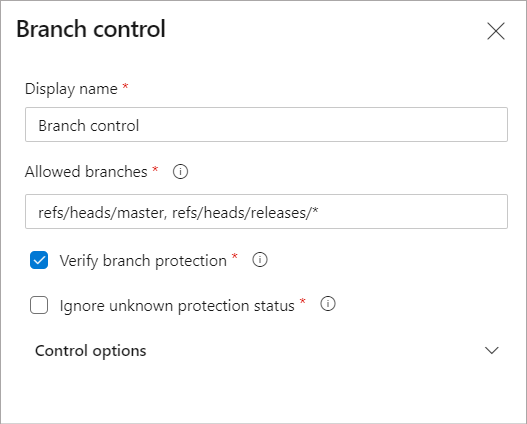
At run time, the check would validate branches for all linked resources in the run against the allowed list. If any of the branches doesn't match the criteria, the check fails and the stage is marked failed.
Note
The check requires the branch names to be fully qualified. Make sure the format for branch name is refs/heads/<branch name>
Business hours
In case you want all deployments to your environment to happen in a specific time window only, then business hours check is the ideal solution. When you run a pipeline, the execution of the stage that uses the resource waits for business hours. If you have multiple runs executing simultaneously, each of them is independently verified. At the start of the business hours, the check is marked successful for all the runs.
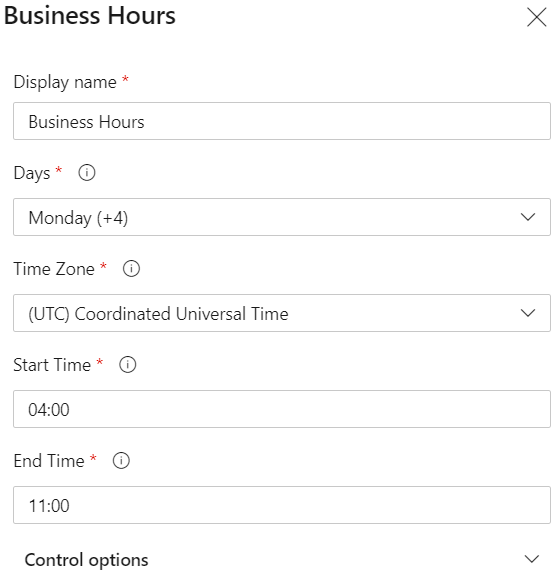
If execution of the stage hasn't started at the end of business hours (held up by to some other check), then the business hours approval is automatically withdrawn and a reevaluation is scheduled for the next day. The check fails if execution of the stage doesn't start within the Timeout period specified for the check, and the stage is marked as failed.
Invoke Azure function
Azure functions are the serverless computation platform offered by Azure. With Azure functions, you can run small pieces of code (called "functions") without worrying about application infrastructure. Given the high flexibility, Azure functions provide a great way to author your own checks. You include the logic of the check-in Azure function such that each execution is triggered on http request, has a short execution time, and returns a response. While defining the check, you can parse the response body to infer if the check is successful. The evaluation can be repeated periodically using the Time between evaluations setting in control options. Learn More
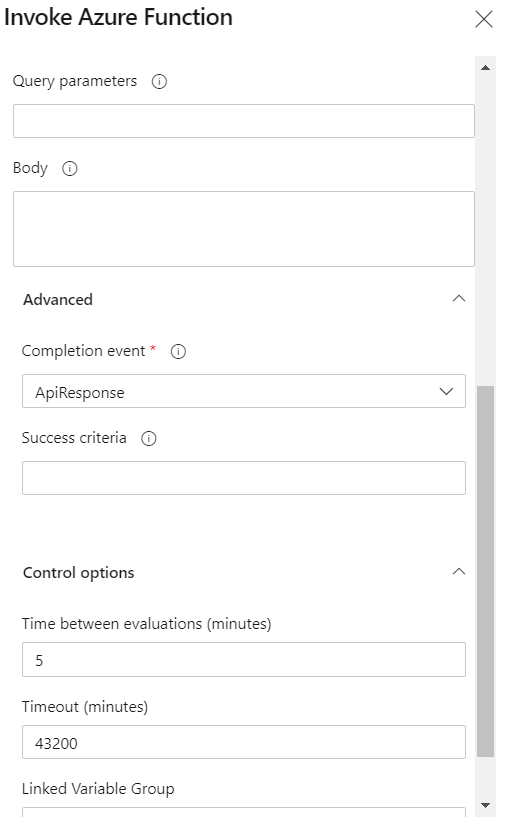
If your check doesn't succeed within the configured Timeout, the associated stage is skipped. Stages depending on it are skipped as well. For more information, see the Azure Function App task.
Note
User defined pipeline variables are accessible to the check starting with Sprint 215.
Read more about the recommended way to use invoke Azure function checks. Checks need to follow specific rules depending on their mode and the number of retries to be compliant.
Invoke REST API
Invoke REST API check enables you to integrate with any of your existing services. Periodically, make a call to a REST API and continue if it returns a successful response. Learn More
The evaluation can be repeated periodically using the Time between evaluations setting in control options. If your check doesn't succeed within the configured Timeout, the associated stage is skipped. Stages depending on it are skipped as well. For more information, see Invoke REST API task.
Note
User defined pipeline variables are accessible to the check starting with Sprint 215.
Read more about the recommended way to use invoke REST API checks.
Query Azure Monitor Alerts
Azure Monitor offers visualization, query, routing, alerting, autoscale, and automation on data from the Azure infrastructure and each individual Azure resource. Alerts are a standard means to detect issues with the health of infrastructure or application, and take corrective actions. Canary deployments and staged rollouts are common deployment strategies used to lower risk of regressions to critical applications. After deploying to a stage (set of customers), the application is observed for a period of time. Health of the application after deployment is used to decide whether the update should be made to the next stage or not.
Query Azure Monitor Alerts helps you observe Azure Monitor and ensure no alerts are raised for the application after a deployment. The check succeeds if no alert rules are activated at the time of evaluation. Learn More
The evaluation is repeated after Time between evaluations setting in control options. The checks fail if the stage hasn't started execution within the specified Timeout period.
Required template
With the required template check, you can enforce pipelines to use a specific YAML template. When this check is in place, a pipeline fails if it doesn't extend from the referenced template.
To define a required template approval:
In your Azure DevOps project, go to the service connection that you want to restrict.
Open Approvals and Checks in the menu next to Edit.
In the Add your first check menu, select Required template.
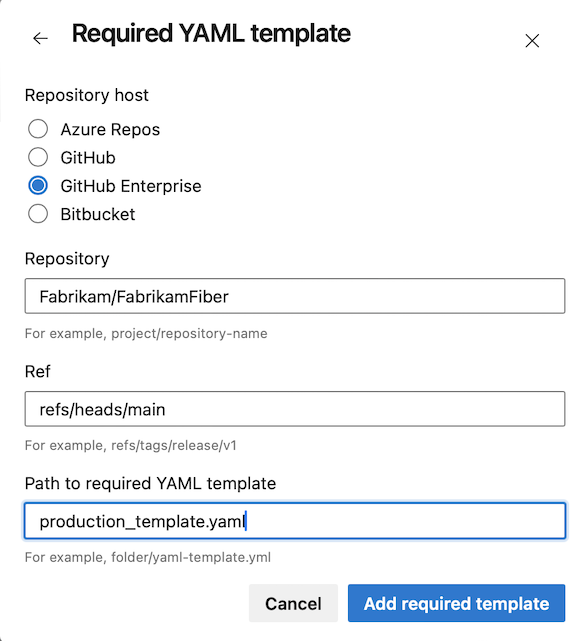
Enter details on how to get to your required template file.
- Repository type: The location of your repository (GitHub, Azure, or Bitbucket).
- Repository: The name of your repository that contains your template.
- Ref: The branch or tag of the required template.
- Path to required template: The name of your template.
You can have multiple required templates for the same service connection. In this example, the required template is production_template.yaml.
Disable a check
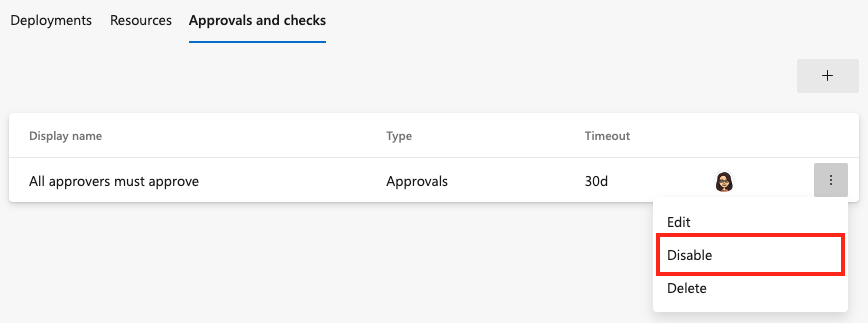
When debugging a check, you might want to temporarily disable and then enable it again. To disable or enable a check:
In your Azure DevOps project, go to the resource with a check.
Open the Approvals and Checks tab.
In the contextual menu, select Disable or Enable.
Bypass a check
In some circumstances such as a hotfix deployment, you may need to bypass a check. You can only bypass a check only if you have the administrator permission for the resource where the check is defined.
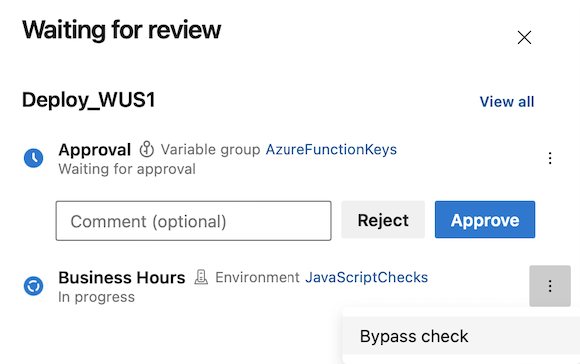
To bypass an approval, business hours, invoke Azure function, or invoke REST API check, select Bypass check when the resource is waiting for review. Here's an example of bypassing the business hours check.
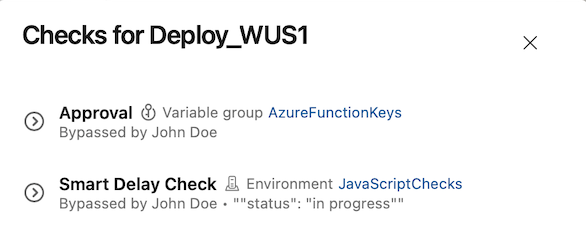
When you bypass a check, you'll see who bypassed the check in the checks panel.
Evaluate artifact
You can evaluate artifacts to be deployed to an environment against custom policies.
Note
Currently, this works with container image artifacts only
To define a custom policy evaluation over the artifacts, follow the below steps.
In your Azure DevOps Services project, navigate to the environment that needs to be protected. Learn more about creating an environment.
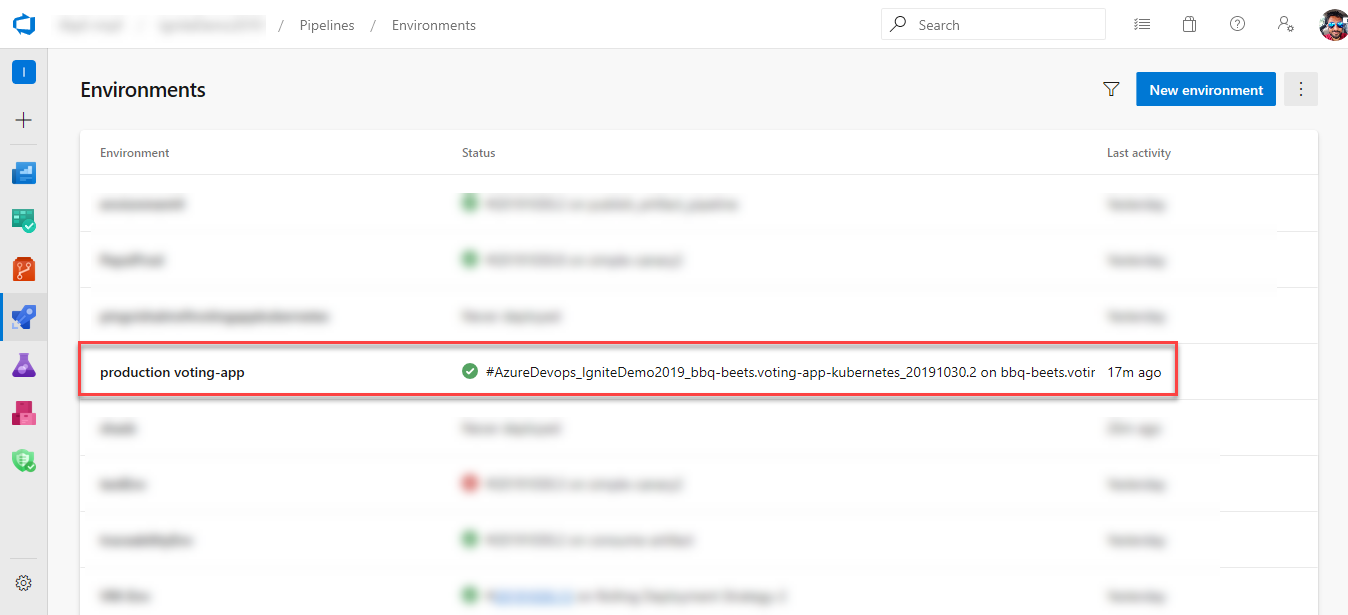
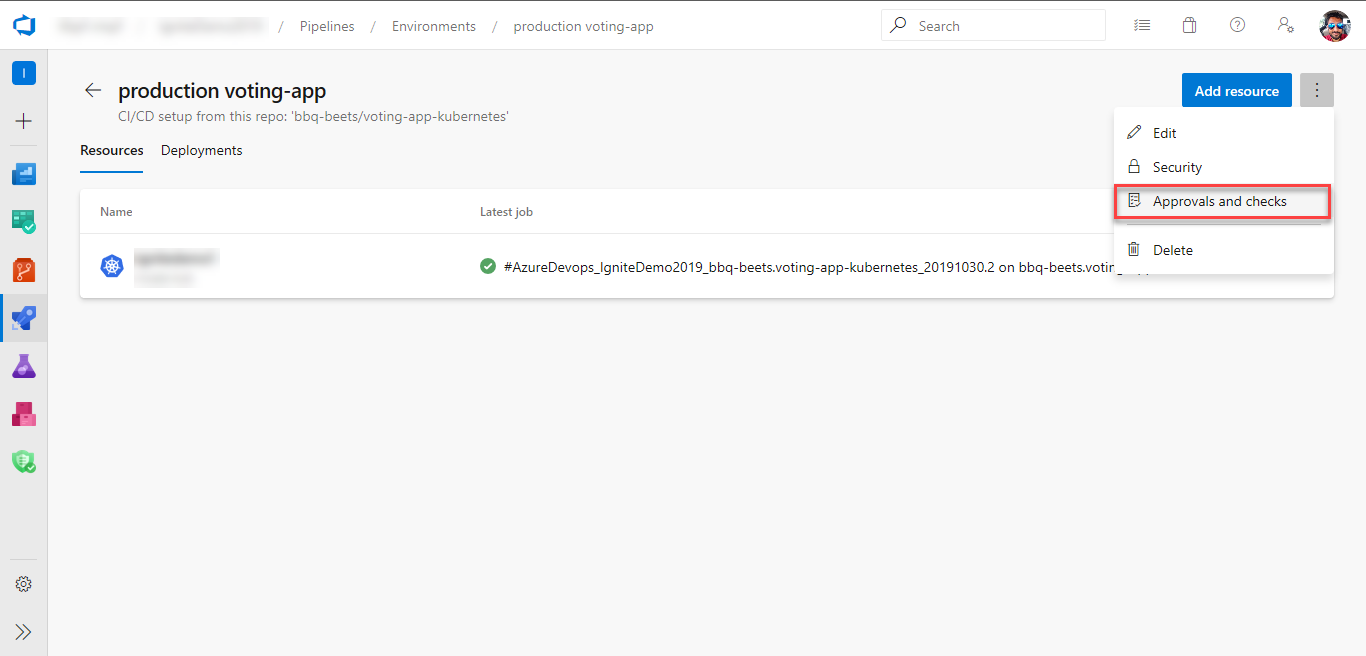
Navigate to Approvals and checks for the environment.
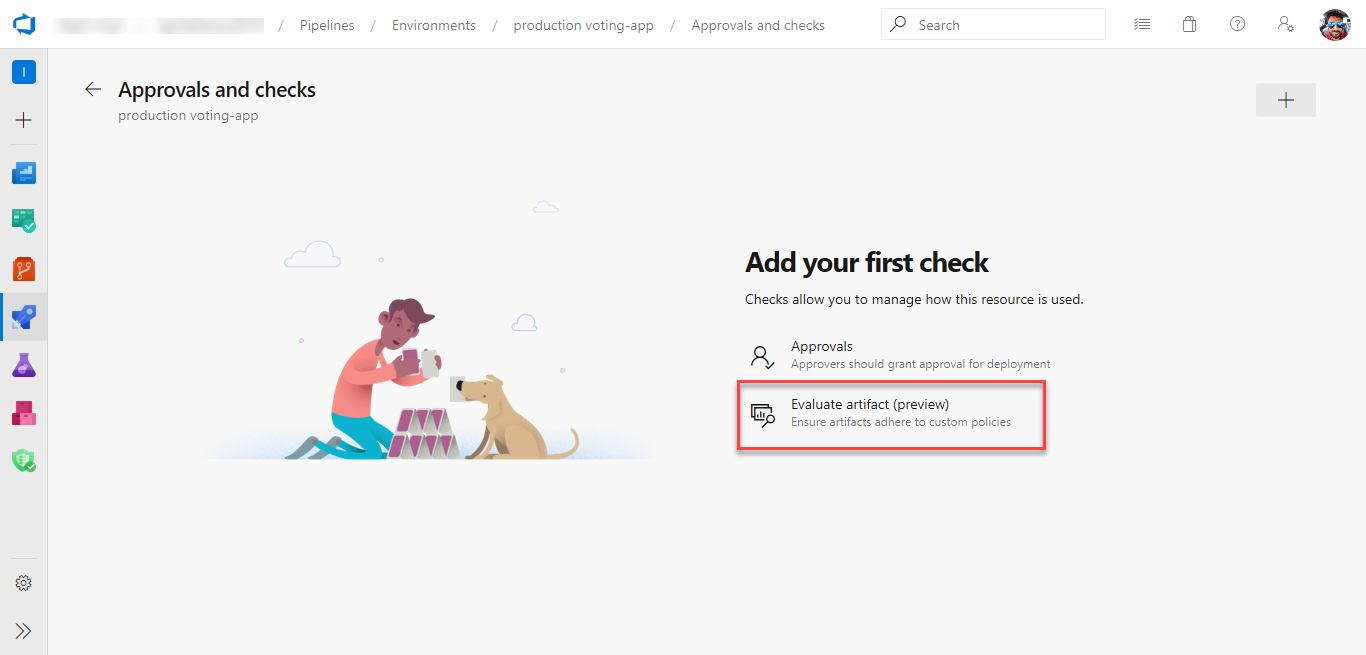
Select Evaluate artifact.
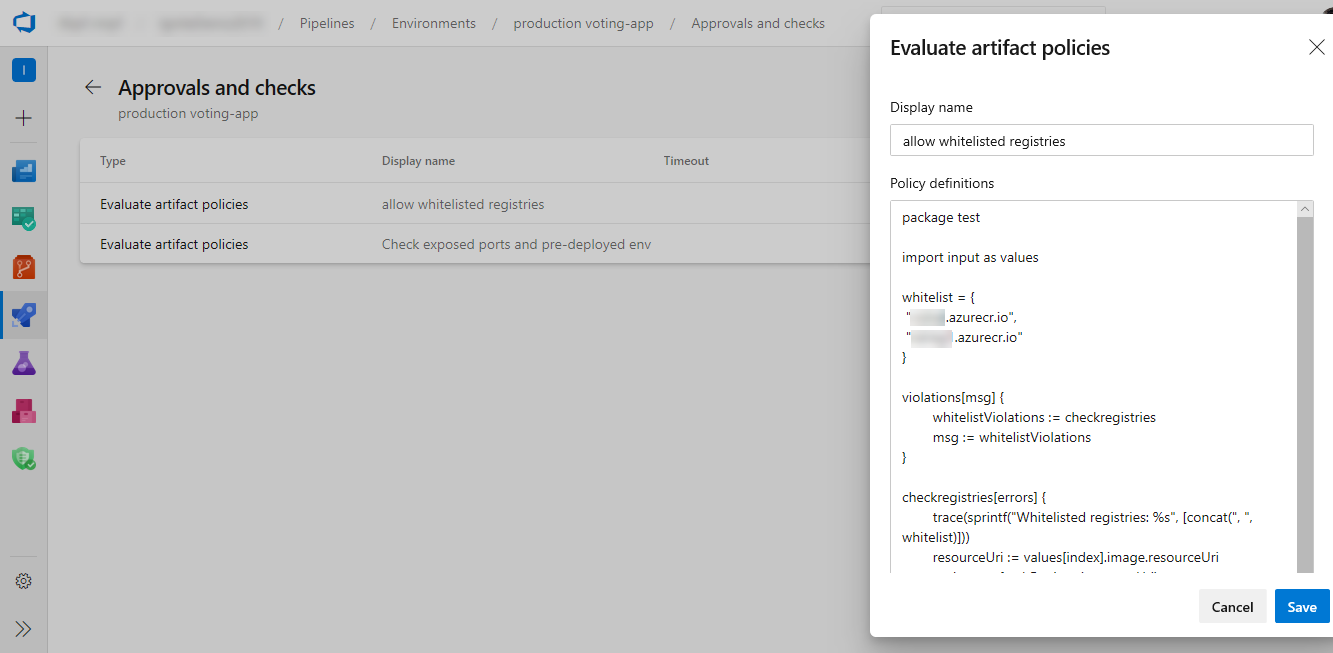
Paste the policy definition and select Save. See more about writing policy definitions.
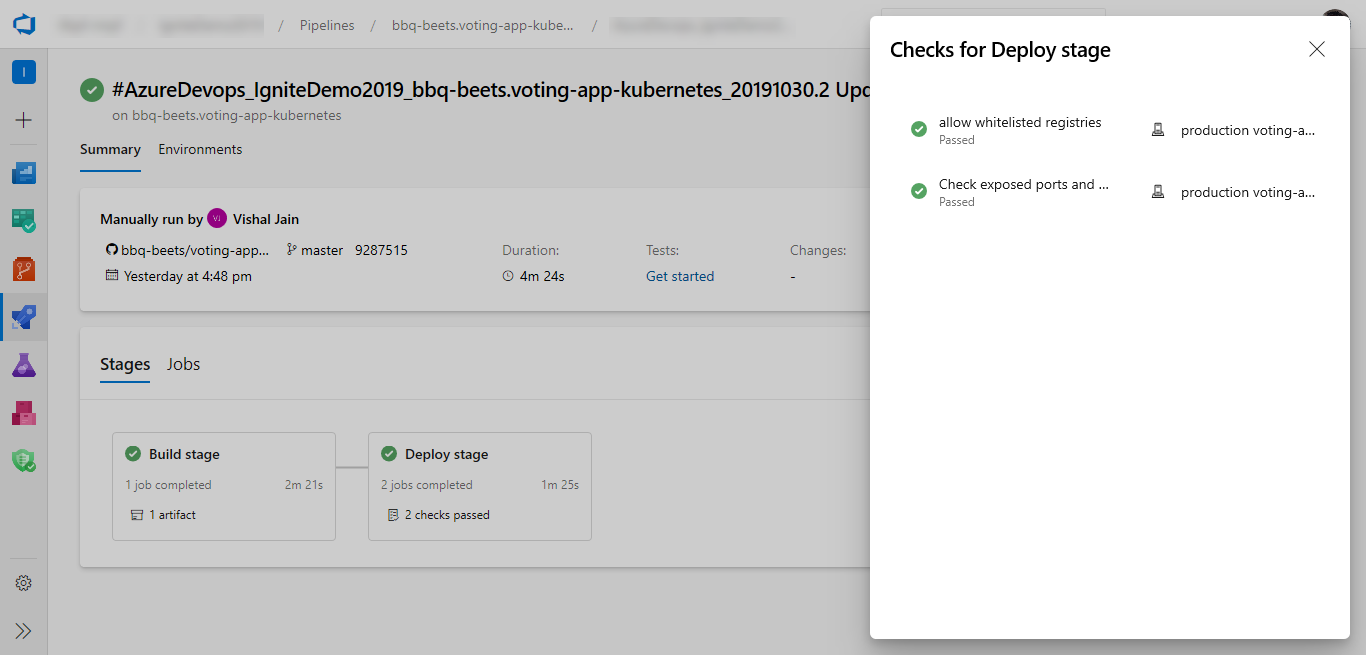
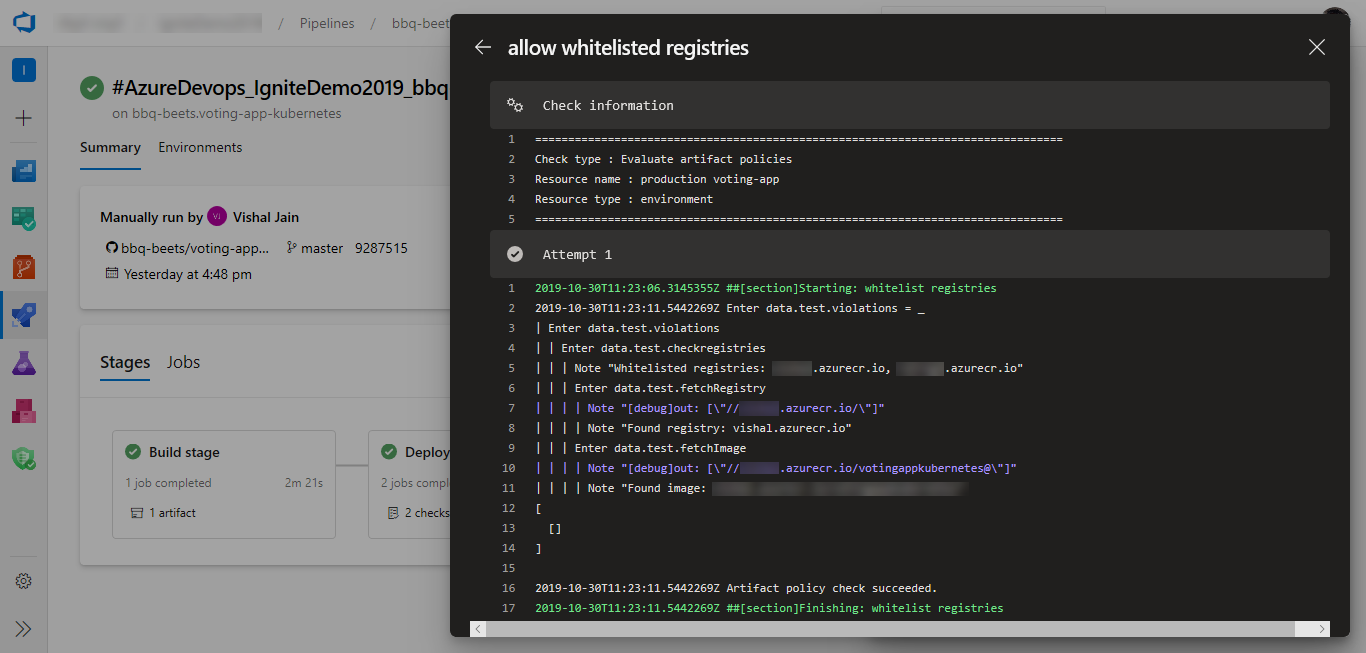
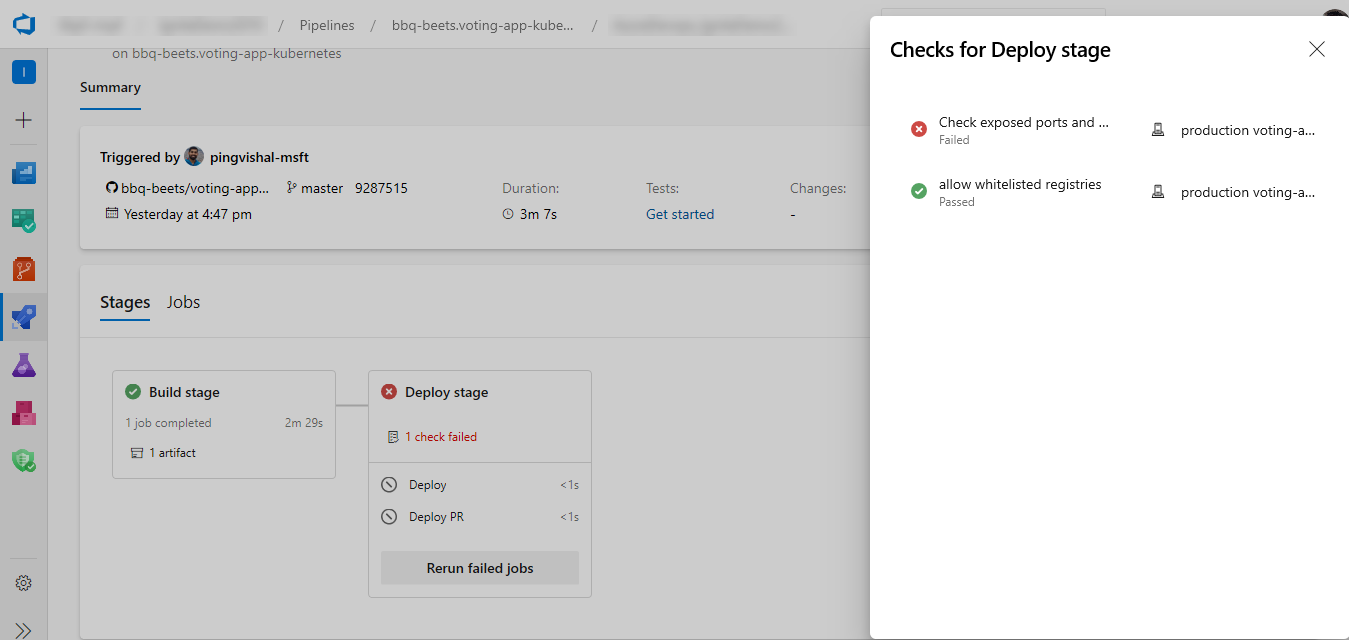
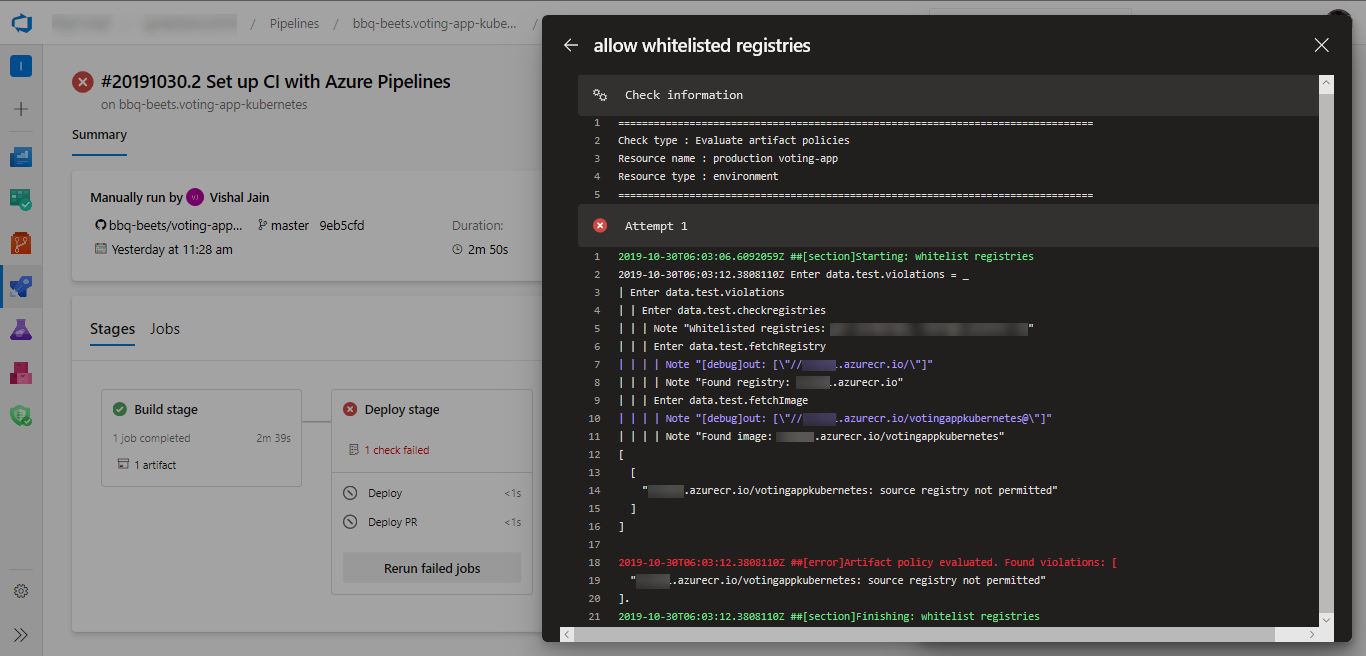
When you run a pipeline, the execution of that run pauses before entering a stage that uses the environment. The specified policy is evaluated against the available image metadata. The check passes when the policy is successful and fails otherwise. The stage is marked failed if the check fails.
Exclusive lock
The exclusive lock check allows only a single run from the pipeline to proceed and can be set at the stage or pipeline level. All stages in all runs of that pipeline that use the resource are paused. When the stage using the lock completes, then another stage can proceed to use the resource. Also, only one stage is allowed to continue.
The lockBehavior property determines how other stages handle locks. When you specify the lockBehavior property for a stage, a lock is automatically created for that stage. There are two possible lockBehavior values:
runLatest- Only the latest run acquires the lock to the resource.runLatestis the default if nolockBehavioris specified.sequential- All runs acquire the lock to the protected resource sequentially.
To use an exclusive lock check with sequential deployments or runLatest, follow these steps:
Enable the exclusive lock check on the environment (or another protected resource). The exclusive lock option is an available check.

In the YAML file for the pipeline, specify a property called
lockBehavior. This can be specified for the whole pipeline or for a given stage:
Set on a stage:
stages:
- stage: A
  lockBehavior: sequential
  jobs:
  - job: Job
    steps:
    - script: Hey!
Set on the pipeline:
lockBehavior: runLatest
stages:
- stage: A
  jobs:
  - job: Job
    steps:
    - script: Hey!
If you don't specify a lockBehavior and a lock is set on a resource, the default value of runLatest is used.
The exclusive lock check allows only a single run from the pipeline to proceed. All stages in all runs of that pipeline that use the resource are paused. When the stage using the lock completes, then another stage can proceed to use the resource. Also, only one stage is allowed to continue. Any other stages that tried to take the lock will be canceled.
ServiceNow Change Management
This checks needs the ServiceNow Change Management extension to be installed from the marketplace
The servicenow change management check allows for an integration of ServiceNow change management process in the pipelines. By adding the check, a new change request in ServiceNow can be automatically created at the start of the stage. The pipeline waits for the change process to complete before starting the stage. More details are available here.
Multiple Approvals and Checks
A stage can consist of many jobs, and each job can consume several resources. Before the execution of a stage can begin, all checks on all the resources used in that stage must be satisfied. Azure Pipelines pauses the execution of a pipeline prior to each stage, and waits for all pending checks to be completed.
A single final negative decision causes the pipeline to be denied access and the stage to fail. The decisions of all approvals and checks except for invoke Azure function / REST API and Exclusive lock are final. You can rerun successful invoke Azure function / REST API checks.
When using invoke Azure function / REST API checks in the recommended way, their access decisions are also final.
When you specify Time between evaluations for an invoke Azure function / REST API check to be non-zero, the check's decision is non-final. This scenario is worth exploring.
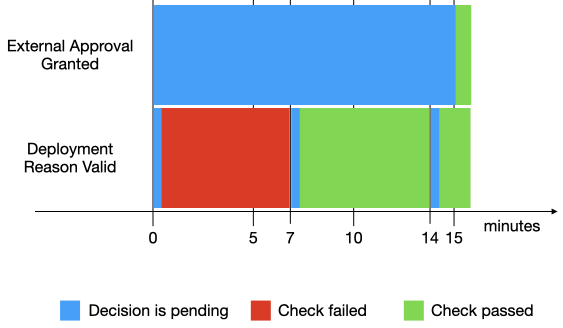
Let us look at an example. Imagine your YAML pipeline has a stage that uses a service connection. This service connection has two checks configured for it:
- An asynchronous check, named External Approval Granted, that verifies that an external approval is given and is configured in the recommended way.
- A synchronous check, named Deployment Reason Valid, that verifies that the deployment reason is valid and for which you set the Time between evaluations to 7 minutes.
A possible checks execution is shown in the following diagram.
In this execution:
- Both checks, External Approval Granted and Deployment Reason Valid, are invoked at the same time. Deployment Reason Valid fails immediately, but because External Approval Granted is pending, it is retried.
- At minute 7, Deployment Reason Valid is retried and this time it passes.
- At minute 15, External Approval Granted calls back into Azure Pipelines with a successful decision. Now, both checks pass, so the pipeline is allowed to continue to deploy the stage.
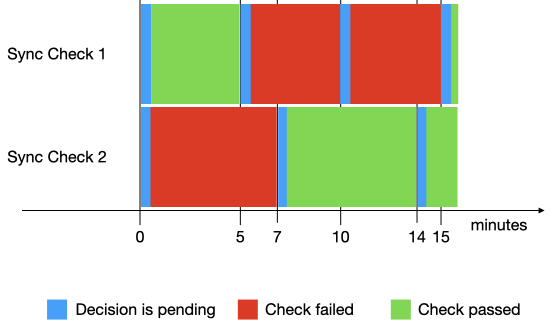
Let us look at another example, involving two synchronous checks. Assume your YAML pipeline has a stage that uses a service connection. This service connection has two checks configured for it:
- A synchronous check, named Sync Check 1, for which you set the Time between evaluations to 5 minutes.
- A synchronous check, named Sync Check 2, for which you set the Time between evaluations to 7 minutes.
A possible checks execution is shown in the following diagram.
In this execution:
- Both checks, Sync Check 1 and Sync Check 2, are invoked at the same time. Sync Check 1 passes, but it is retried, because Sync Check 2 fails.
- At minute 5, Sync Check 1 is retried but fails, so it is retried.
- At minute 7, Sync Check 2 is retried and succeeds. The pass decision is valid for 7 minutes. If Sync Check 1 doesn't pass in this time interval, Sync Check 2 is retried.
- At minute 10, Sync Check 1 is retried but fails, so it is retried.
- At minute 14, Sync Check 2 is retried and succeeds. The pass decision is valid for 7 minutes. If Sync Check 1 doesn't pass in this time interval, Sync Check 2 is retried.
- At minute 15, Sync Check 1 is retried and succeeds. Now, both checks pass, so the pipeline is allowed to continue to deploy the stage.
Let us look at an example that involves an approval and a synchronous check. Imagine you configured a synchronous check and an approval for a service connection with a Time between evaluations of 5 minutes. Until the approval is given, your check runs every 5 minutes, regardless of decision.
FAQ
The checks defined didn't start. What happened?
The evaluation of checks starts once the stage conditions are satisfied. You should confirm run of the stage started after the checks were added on the resource and that the resource is consumed in the stage.
How can I use checks for scheduling a stage?
Using the business hours check, you can control the time for start of stage execution. You can achieve the same behavior as predefined schedule on a stage in designer releases.
How can I take advance approvals for a stage scheduled to run in future?
This scenario can be enabled.
- The business hours check enables all stages deploying to a resource to be scheduled for execution between the time window
- When approvals are configured on the same resource, the stage would wait for approvals before starting.
- You can configure both the checks on a resource. The stage would wait on approvals and business hours. It would start in the next scheduled window after approvals are complete.
Can I wait for completion of security scanning on the artifact being deployed?
In order to wait for completion of security scanning on the artifact being deployed, you would need to use an external scanning service like AquaScan. The artifact being deployed would need to be uploaded at a location accessible to the scanning service before the start of checks, and can be identified using predefined variables. Using the Invoke REST API check, you can add a check to wait on the API in the security service and pass the artifact identifier as an input.
How can I use output variables from previous stages in a check?
By default, only predefined variables are available to checks. You can use a linked variable group to access other variables. The output variable from the previous stage can be written to the variable group and accessed in the check.
