Use Azure DNS to provide custom domain settings for an Azure service
Azure DNS provides name resolution for any of your Azure resources that support custom domains, or that have a fully qualified domain name (FQDN). For example, you might have an Azure web app you want your users to access using contoso.com or www.contoso.com as the FQDN. This article walks you through configuring Azure DNS to access your Azure service with custom domains.
You can configure a vanity or custom domain for Azure Function Apps, Public IP addresses, App Service (Web Apps), Blob storage, and Azure CDN
Prerequisites
To use Azure DNS for your custom domain, you must first delegate your domain to Azure DNS. See Delegate a domain to Azure DNS for instructions on how to configure your name servers for delegation. Once your domain is delegated to your Azure DNS zone, you now can configure your DNS records needed.
Azure Function App
To configure a custom domain for Azure function apps, a CNAME record is created and configured on the function app itself. A CNAME record maps a domain name to another domain or subdomain. In this case, you create a CNAME in your public domain and provision the CNAME alias to be the FQDN of your custom domain.
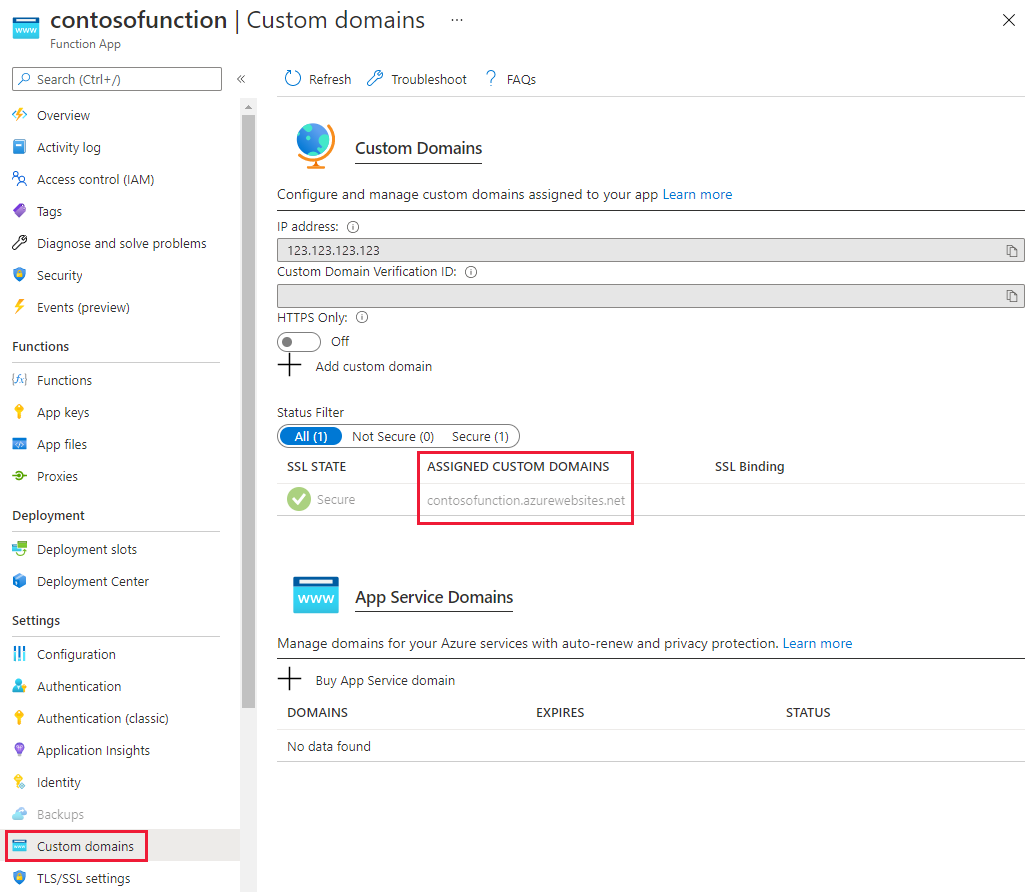
Navigate to Function App and select your function app. Select Custom domains under Settings. Note the current url under assigned custom domains, this address is used as the alias for the DNS record created.
Navigate to your DNS Zone and select + Record set. Enter the following information on the Add record set page and select OK to create it.
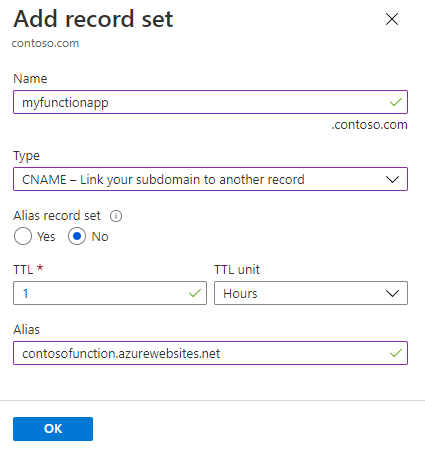
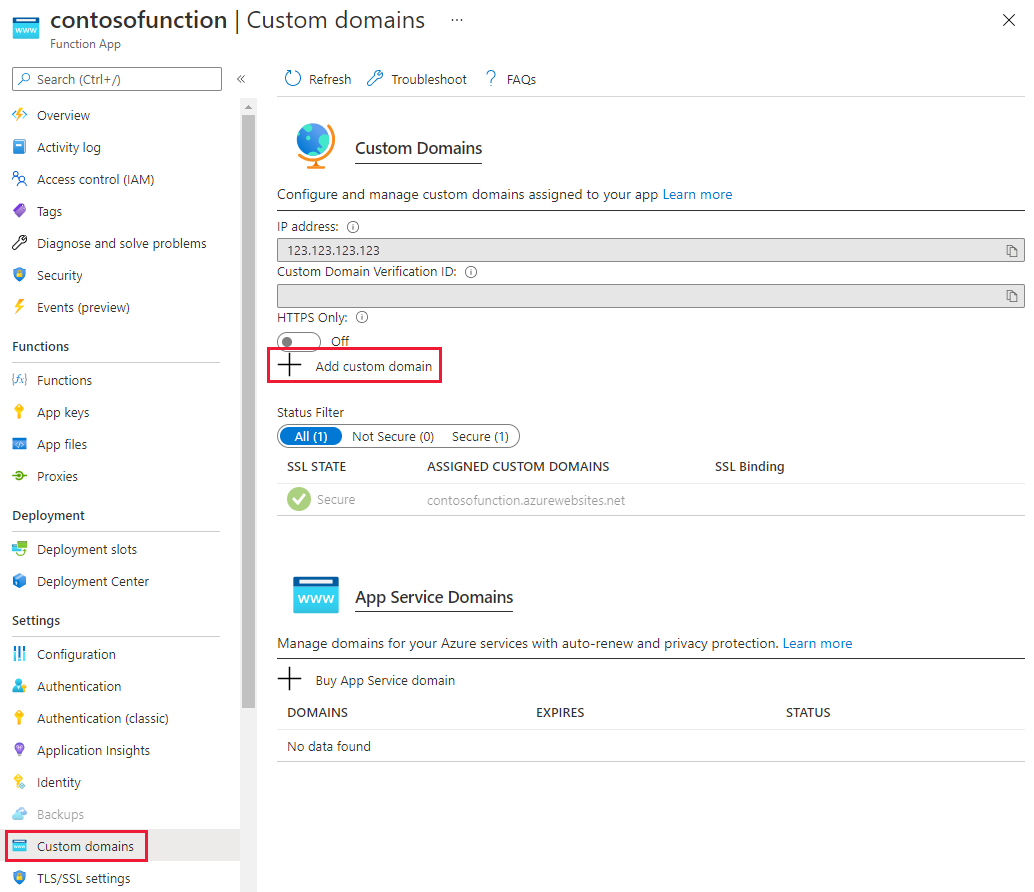
Property Value Description Name myfunctionapp This value along with the domain name label is the FQDN for the custom domain name. Type CNAME Use a CNAME record is using an alias. TTL 1 1 is used for 1 hour TTL unit Hours Hours are used as the time measurement Alias contosofunction.azurewebsites.net The DNS name you're creating the alias for, in this example it's the contosofunction.azurewebsites.net DNS name provided by default to the function app. Navigate back to your function app, select Custom domains under Settings. Then select + Add custom domain.
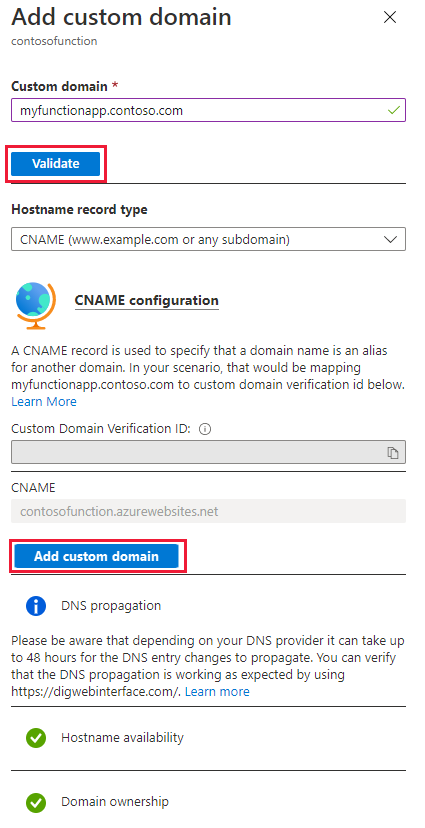
On the Add custom domain page, enter the CNAME record in the Custom domain text field and select Validate. If the record is found, the Add custom domain button appears. Select Add custom domain to add the alias.
Public IP address
To configure a custom domain for services that use a public IP address resource such as Application Gateway, Load Balancer, Cloud Service, Resource Manager VMs, and, Classic VMs, an A record is used. An A record (address record) maps a domain name to an IP address. In this case, you create a new A record in your public domain and configure it to have an IP address corresponding to the public IP address of your Azure service.
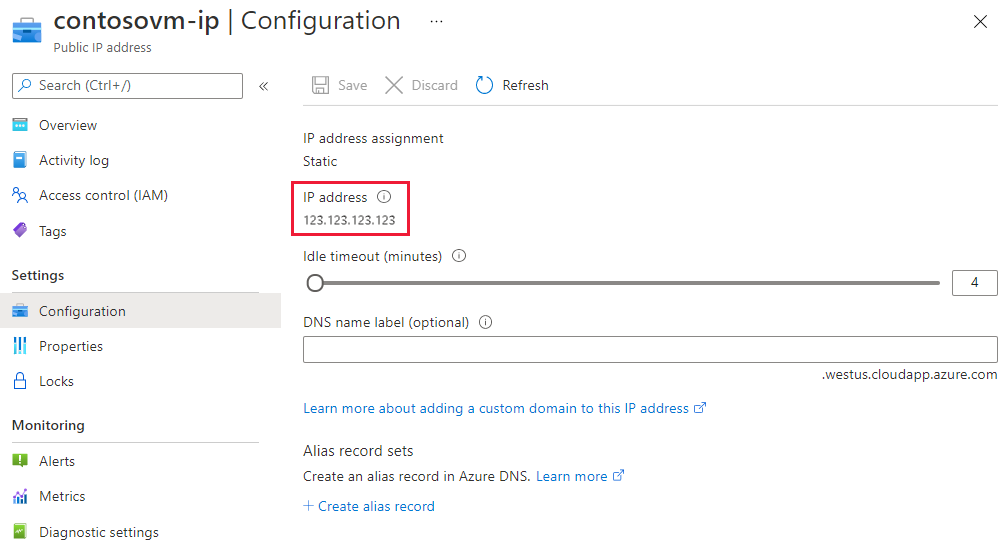
Navigate to the Public IP resource and select Configuration. Note the IP address shown.
Navigate to your DNS Zone and select + Record set. Enter the following information on the Add record set page and select OK to create it.
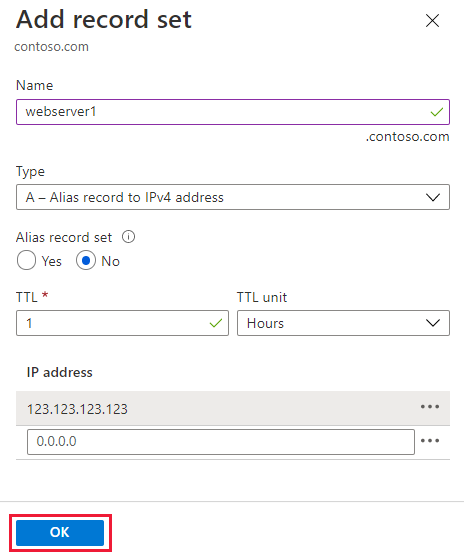
Property Value Description Name webserver1 This value along with the domain name label is the FQDN for the custom domain name. Type A Use an A record as the resource is an IP address. TTL 1 1 is used for 1 hour TTL unit Hours Hours are used as the time measurement IP Address <your ip address>The public IP address. Once the A record is created, run
nslookupto validate the record resolves.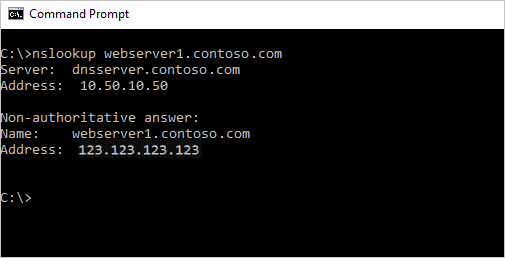
App Service (Web Apps)
The following steps take you through configuring a custom domain for an app service web app.
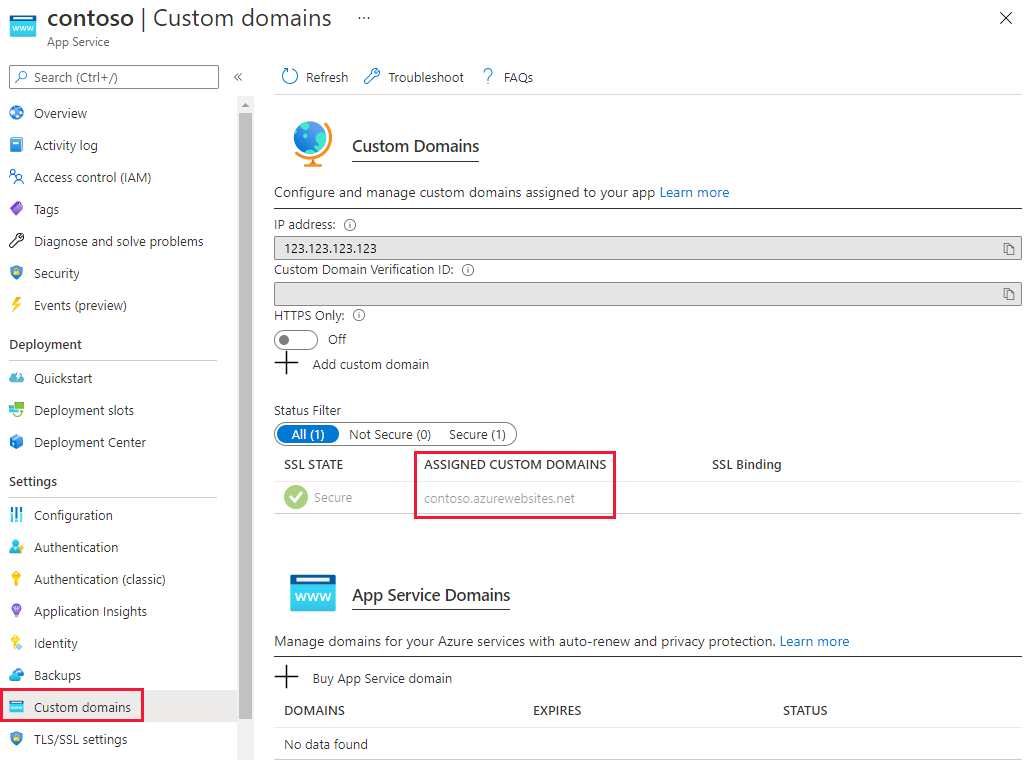
Navigate to App Service and select the resource you're configuring a custom domain name, and select Custom domains under Settings. Note the current url under assigned custom domains, this address is used as the alias for the DNS record created.
Navigate to your DNS Zone and select + Record set. Enter the following information on the Add record set page and select OK to create it.
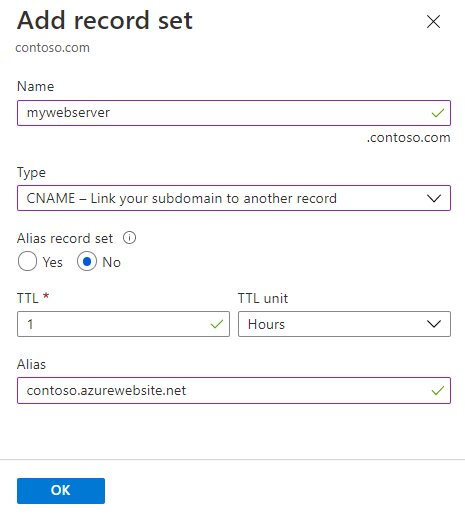
Property Value Description Name mywebserver This value along with the domain name label is the FQDN for the custom domain name. Type CNAME Use a CNAME record is using an alias. If the resource used an IP address, an A record would be used. TTL 1 1 is used for 1 hour TTL unit Hours Hours are used as the time measurement Alias contoso.azurewebsites.net The DNS name you're creating the alias for, in this example it's the contoso.azurewebsites.net DNS name provided by default to the web app. Navigate back to your web app, select Custom domains under Settings. Then select + Add custom domain.
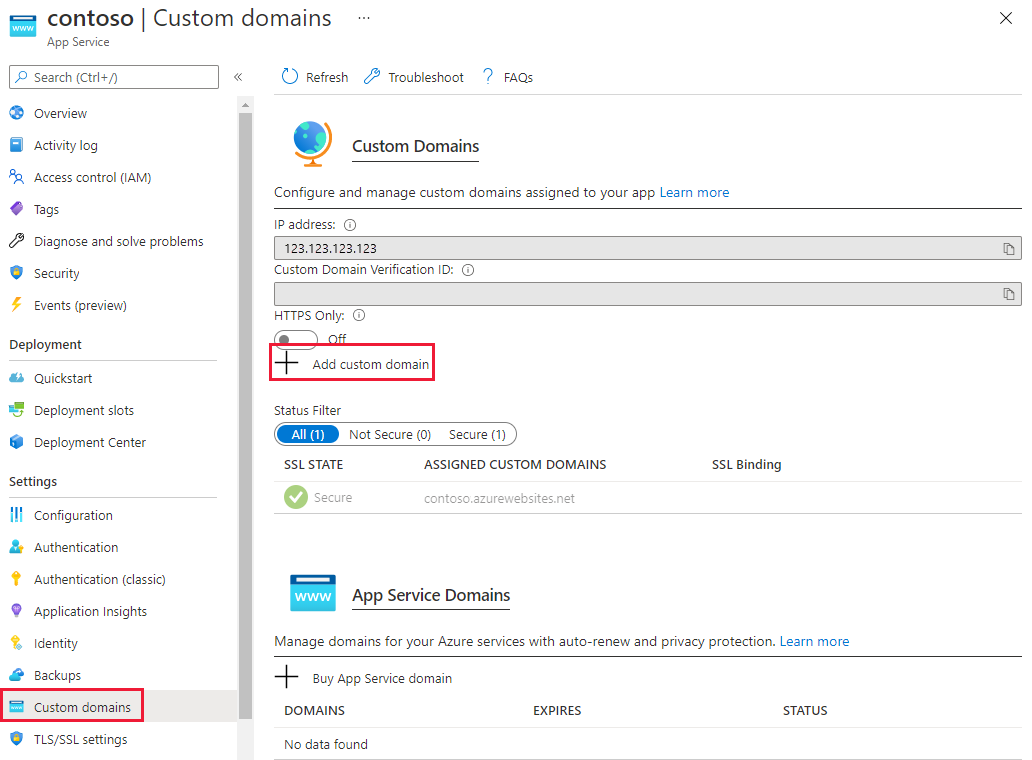
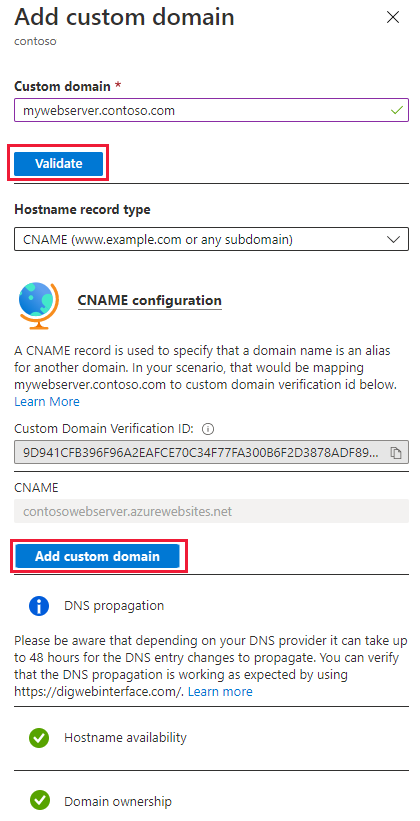
On the Add custom domain page, enter the CNAME record in the Custom domain text field and select Validate. If the record is found, the Add custom domain button appears. Select Add custom domain to add the alias.
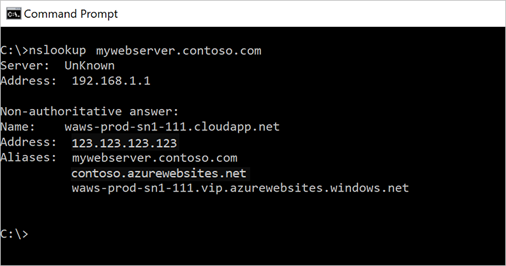
Once the process is complete, run nslookup to validate name resolution is working.
To learn more about mapping a custom domain to App Service, visit map an existing custom DNS name to Azure Web Apps.
To learn how to migrate an active DNS name, see migrate an active DNS name to Azure App Service.
If you need to purchase a custom domain for your App Service, see buy a custom domain name for Azure Web Apps.
Blob storage
The following steps take you through configuring a CNAME record for a blob storage account using the asverify method. This method ensures there's no downtime.
Navigate to Storage Accounts, select your storage account, and select Networking under Settings. Then select the Custom domain tab. Note the FQDN in step 2, this name is used to create the first CNAME record.
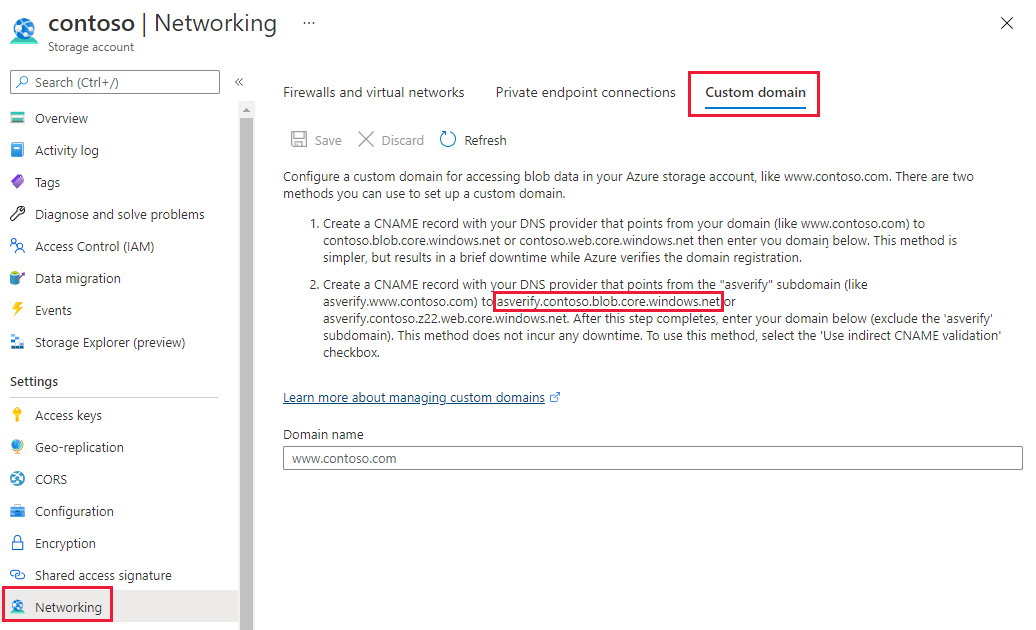
Navigate to your DNS Zone and select + Record set. Enter the following information on the Add record set page and select OK to create it.
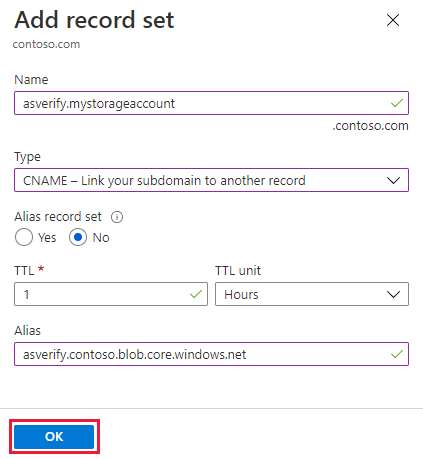
Property Value Description Name asverify.mystorageaccount This value along with the domain name label is the FQDN for the custom domain name. Type CNAME Use a CNAME record is using an alias. TTL 1 1 is used for 1 hour TTL unit Hours Hours are used as the time measurement Alias asverify.contoso.blob.core.windows.net The DNS name you're creating the alias for, in this example it's the asverify.contoso.blob.core.windows.net DNS name provided by default to the storage account. Navigate back to your storage account and select Networking and then the Custom domain tab. Type in the alias you created without the asverify prefix in the text box, check Use indirect CNAME validation, and select Save.
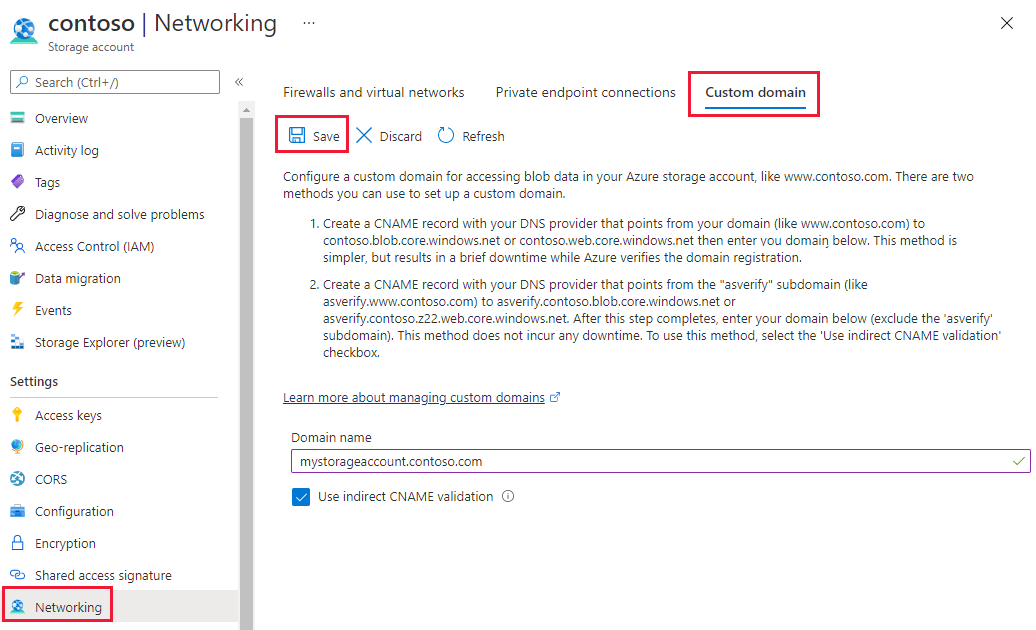
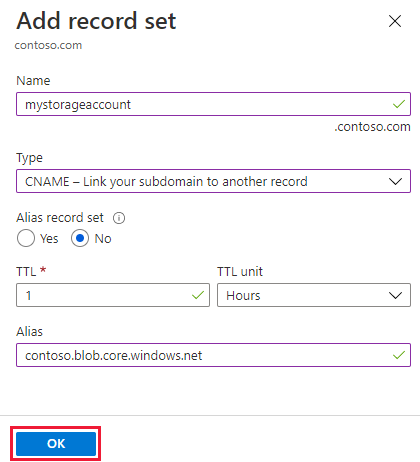
Return to your DNS zone and create a CNAME record without the asverify prefix. After that point, you're safe to delete the CNAME record with the asverify prefix.
Validate DNS resolution by running
nslookup.
To learn more about mapping a custom domain to a blob storage endpoint visit Configure a custom domain name for your Blob storage endpoint
Azure CDN
The following steps take you through configuring a CNAME record for a CDN endpoint using the cdnverify method. This method ensures there's no downtime.
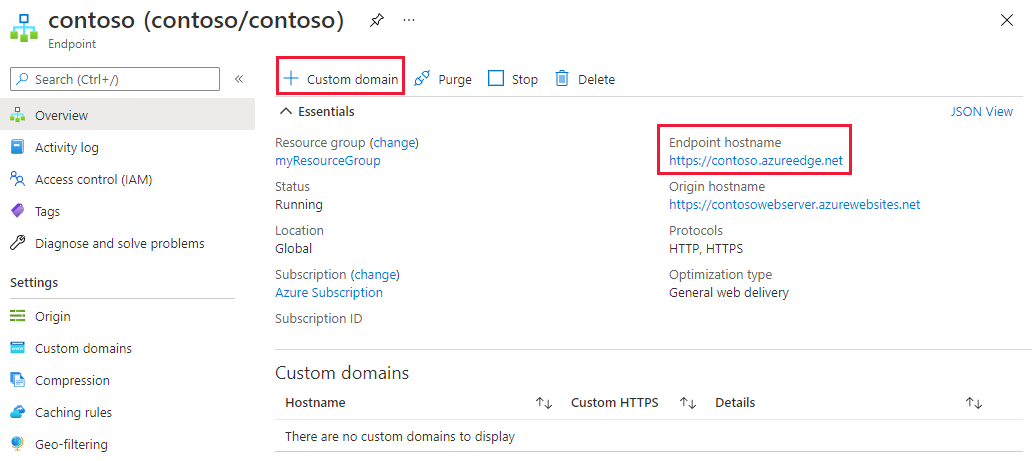
Navigate to your CDN profile and select the endpoint you're working with. Select + Custom domain. Note the Endpoint hostname as this value is the record that the CNAME record points to.
Navigate to your DNS Zone and select + Record set. Enter the following information on the Add record set page and select OK to create it.
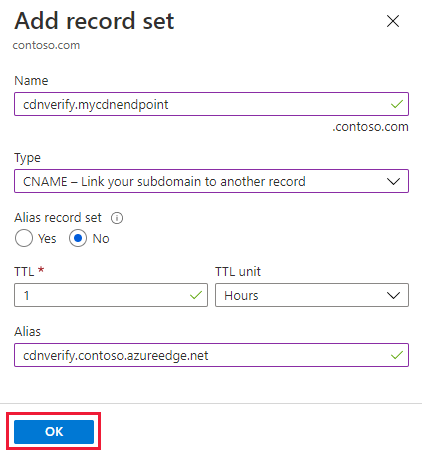
Property Value Description Name cdnverify.mycdnendpoint This value along with the domain name label is the FQDN for the custom domain name. Type CNAME Use a CNAME record is using an alias. TTL 1 1 is used for 1 hour TTL unit Hours Hours are used as the time measurement Alias cdnverify.contoso.azureedge.net The DNS name you're creating the alias for, in this example it's the cdnverify.contoso.azureedge.net DNS name provided by default to the CDN endpoint. Navigate back to your CDN endpoint and select + Custom domain. Enter your CNAME record alias without the cdnverify prefix and select Add.
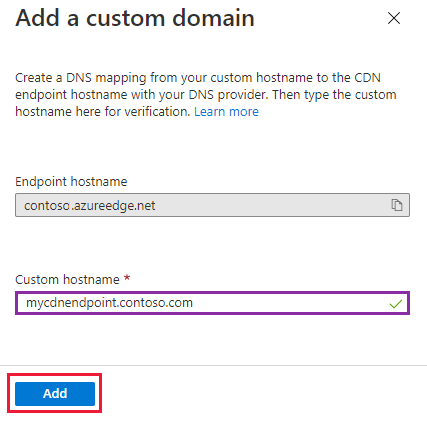
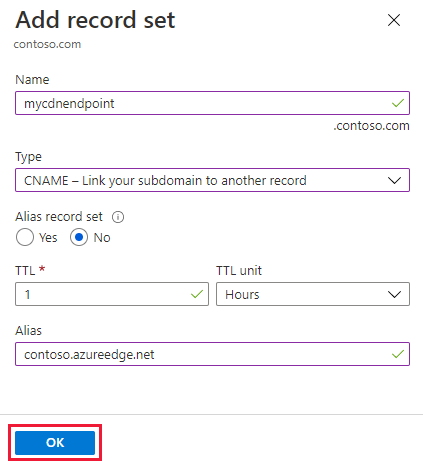
Return to your DNS zone and create a CNAME record without the cdnverify prefix. After that point, you're safe to delete the CNAME record with the cdnverify prefix.
For more information on CDN and how to configure a custom domain without the intermediate registration step visit Map Azure CDN content to a custom domain.
Next steps
Learn how to configure reverse DNS for services hosted in Azure.