Manage device enrollments in the Azure portal
A device enrollment creates a record of a single device or a group of devices that may at some point register with the Azure IoT Hub Device Provisioning Service (DPS). The enrollment record contains the initial configuration for the device(s) as part of that enrollment. Included in the configuration is either the IoT hub to which a device will be assigned, or an allocation policy that applies to a set of IoT hubs. This article shows you how to manage device enrollments for your provisioning service.
The Device Provisioning Service supports two types of enrollments:
- Enrollment groups: Used to enroll multiple related devices.
- Individual enrollments: Used to enroll a single device.
Important
If you have trouble accessing enrollments from the Azure portal, it may be because you have public network access disabled or IP filtering rules configured that block access for the Azure portal. To learn more, see Disable public network access limitations and IP filter rules limitations.
Prerequisites
- Create an instance of Device Provisioning Service in your subscription and link it to an IoT hub. For more information, see Quickstart: Set up the IoT Hub Device Provisioning Service.
Create an enrollment group
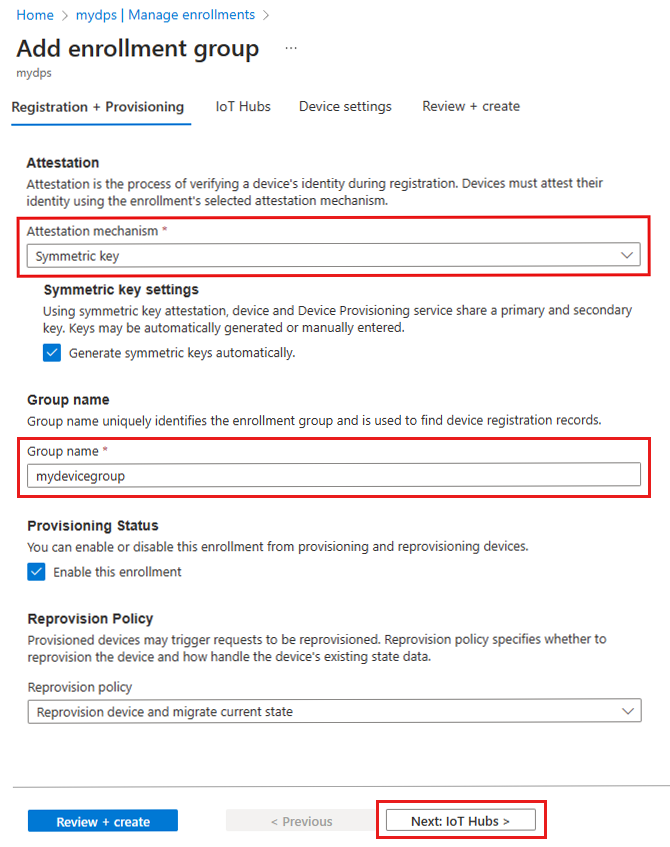
An enrollment group is an entry for a group of devices that share a common attestation mechanism. We recommend that you use an enrollment group for a large number of devices that share an initial configuration, or for devices that go to the same tenant. Enrollment groups support either X.509 certificate or symmetric key attestation.
For a walkthrough that demonstrates how to create and use enrollment groups with X.509 certificates, see the Provision multiple X.509 devices using enrollment groups tutorial.
To create an X.509 certificate enrollment group:
Sign in to the Azure portal and navigate to your Device Provisioning Service instance.
Select Manage enrollments from the Settings section of the navigation menu.
At the top of the page, select Add enrollment group.
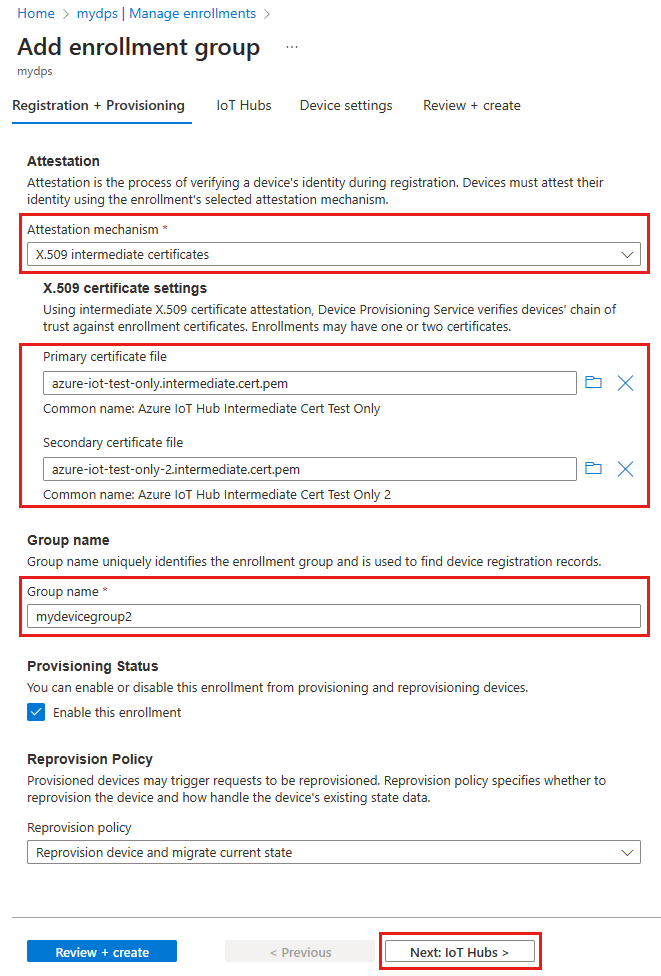
On the Registration + provisioning tab of the Add enrollment group page, provide the following information to configure the enrollment group details:
Field Description Attestation Select X.509 intermediate certificates as the Attestation mechanism if you want to upload intermediate certificates to be used for just this enrollment group, or select X.509 certificates uploaded to this Device Provisioning Service if you already have uploaded intermediate certificates. X.509 certificate settings Depending on the attestation method that you chose, either upload or select the primary and secondary intermediate certificates for this enrollment group. Group name Provide a name for the group of devices. The enrollment group name is a case-insensitive string (up to 128 characters long) of alphanumeric characters plus the special characters: '-','.','_',':'. The last character must be alphanumeric or dash ('-').Provisioning status Check the Enable this enrollment box if you want this enrollment group to be available to provision devices. Uncheck this box if you want the group to be disabled. You can change this setting later. Reprovision policy Choose a reprovision policy that reflects how you want DPS to handle devices that request reprovisioning. For more information, see Reprovision policies 
Select Next: IoT hubs.
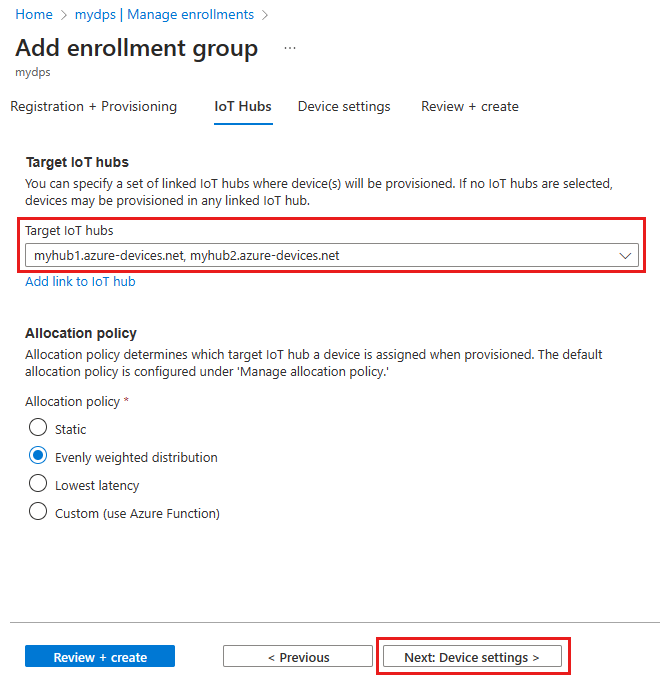
On the IoT hubs tab of the Add enrollment group page, provide the following information to determine which IoT hubs the enrollment group can provision devices to:
Field Description Target IoT hubs Select one or more of your linked IoT hubs, or add a new link to an IoT hub. To learn more about linking IoT hubs to your DPS instance, see How to link and manage IoT hubs. Allocation policy If you selected more than one linked IoT hub, select how you want to assign devices to the different hubs. To learn more about allocation policies, see How to use allocation policies.
If you selected only one linked IoT hub, we recommend using the Evenly weighted distribution policy.
Select Next: Device settings
On the Device settings tab of the Add enrollment group page, provide the following information to define how newly provisioned devices will be configured:
Field Description IoT Edge Check the Enable IoT Edge on provisioned devices if all the devices provisioned through this group will run Azure IoT Edge. Uncheck this box if this group is for non-IoT Edge-enabled devices only. Either all devices in a group will be IoT Edge-enabled or none can be. Device tags Use this text box to provide any tags that you want to apply to the device twins of provisioned devices. Desired properties Use this text box to provide any desired properties that you want to apply to the device twins of provisioned devices. For more information, see Understand and use device twins in IoT Hub.
Select Next: Review + create.
On the Review + create tab, verify all of your values then select Create.
Create an individual enrollment
An individual enrollment is an entry for a single device that may be assigned to an IoT hub. Devices using X.509 certificates, symmetric key, and TPM attestation are supported.
For a walkthrough of how to create and use individual enrollments with X.509 certificates, see Quickstart:Provision an X.509 certificate device.
To create an X.509 certificate individual enrollment:
Sign in to the Azure portal and navigate to your Device Provisioning Service instance.
Select Manage enrollments from the Settings section of the navigation menu.
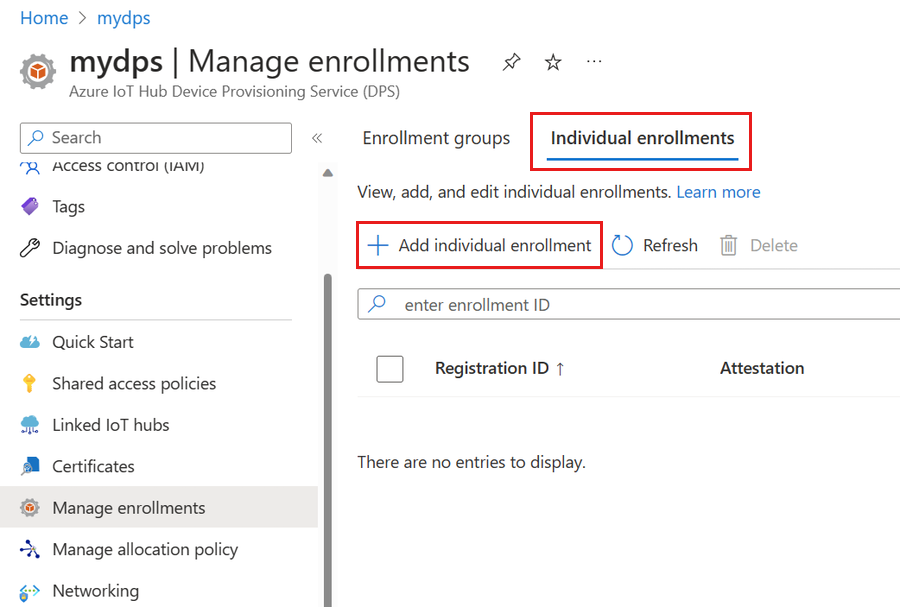
Select the Individual enrollments tab, then select Add individual enrollment.

On the Registration + provisioning of the Add enrollment page, provide the following information to configure the enrollment details:
Field Description Attestation Select X.509 client certificates as the Attestation mechanism. X.509 certificate settings Upload one or two certificates that will be used to verify the device for this enrollment. Provisioning status Check the Enable this enrollment box if you want this enrollment to be available to provision its device. Uncheck this box if you want the enrollment to be disabled. You can change this setting later. Reprovision policy Choose a reprovision policy that reflects how you want DPS to handle devices that request reprovisioning. For more information, see Reprovision policies. Select Next: IoT hubs.
On the IoT hubs tab of the Add enrollment page, provide the following information to determine which IoT hubs the enrollment can provision devices to:
Field Description Target IoT hubs Select one or more of your linked IoT hubs, or add a new link to an IoT hub. To learn more about linking IoT hubs to your DPS instance, see How to link and manage IoT hubs. Allocation policy If you selected more than one linked IoT hub, select how you want to assign devices to the different hubs. To learn more about allocation policies, see How to use allocation policies.
If you selected only one linked IoT hub, we recommend using the Evenly weighted distribution policy.Select Next: Device settings
On the Device settings tab of the Add enrollment page, provide the following information to define how newly provisioned devices will be configured:
Field Description Device ID Provide a device ID that will be assigned to the provisioned device in IoT Hub. If you don't provide a device ID, the registration ID will be used. IoT Edge Check the Enable IoT Edge on provisioned devices if the provisioned device will run Azure IoT Edge. Uncheck this box if this enrollment is for a non-IoT Edge-enabled device. Device tags Use this text box to provide any tags that you want to apply to the device twin of the provisioned device. Desired properties Use this text box to provide any desired properties that you want to apply to the device twin of the provisioned device. For more information, see Understand and use device twins in IoT Hub.
Select Next: Review + create.
On the Review + create tab, verify all of your values then select Create.
Update an enrollment entry
To update an existing enrollment entry:
Sign in to the Azure portal and navigate to your Device Provisioning Service instance.
Select Manage enrollments from the Settings section of the navigation menu.
Select either the Enrollment groups or Individual enrollments tab, depending on whether you want to update an enrollment group or an individual enrollment.
Select the name of the enrollment entry that you wish to modify.
On the enrollment entry details page, you can update all items, except the security type and credentials.
Once completed, select Save.
Remove a device enrollment
To remove an enrollment entry:
Sign in to the Azure portal and navigate to your Device Provisioning Service instance.
Select Manage enrollments from the Settings section of the navigation menu.
Select either the Enrollment groups or Individual enrollments tab, depending on whether you want to remove an enrollment group or an individual enrollment.
Select the enrollment entry you want to remove.
At the top of the page, select Delete.
When prompted to confirm, select Yes.
Once the action is completed, you'll see that your entry has been removed from the list of device enrollments.
Note
Deleting an enrollment group doesn't delete the registration records for devices in the group. DPS uses the registration records to determine whether the maximum number of registrations has been reached for the DPS instance. Orphaned registration records still count against this quota. For the current maximum number of registrations supported for a DPS instance, see Quotas and limits.
You may want to delete the registration records for the enrollment group before deleting the enrollment group itself. You can see and manage the registration records for an enrollment group manually on the Registration Records tab for the group in Azure portal. You can retrieve and manage the registration records programmatically using the Device Registration State REST APIs or equivalent APIs in the DPS service SDKs, or using the az iot dps enrollment-group registration Azure CLI commands.
Next steps
- Learn more about How to link and manage IoT hubs.
- Understand How to use allocation policies to provision devices across multiple IoT hubs.
