A Storage Mover project is used to organize migration jobs into logical tasks or components. A project contains at least one job definition, which in turn describes each data source and target endpoint for your project. The Understanding the Storage Mover resource hierarchy article contains more detailed information about the relationship between a Storage Mover and its projects.
When you define a project, it's a good idea to add all related, inter-dependent data sources into the same project so that they can be migrated together. You should add all the data sources necessary to migrate a single workload rather than create projects for each data source in your migration plan. You may also choose to create individual projects for each distinct group of data sources in your migration plan.
This article guides you through the creation and management of Azure Storage Mover projects. To follow these examples, you'll need a top-level storage mover resource. If you haven't yet created one, follow the steps within the Create a Storage Mover resource article before continuing.
After you complete the steps within this article, you'll be able to create and manage projects using the Azure portal and Azure PowerShell.
Create a project
The first step in defining a migration job is the creation of a project resource. After the project has been created, you can add source and target endpoints for your data source. In this example, you'll intentionally leave the description field blank. You'll then add it in the View and edit a project's properties section later in this article.
Important
If you have not yet deployed a resource using the resource provider, you'll need to create your top level resource.
Caution
Renaming project resources is not supported. It's a good idea to ensure that you've named the project appropriately since you will not be able to change the project name after it is provisioned.
Navigate to the Project Explorer page in the Azure portal to access your projects. The default All projects view displays the names of any provisioned projects and a summary of the jobs they contain.

Select Create project to open the Create a Project pane. Provide a project name value in the Project name field, but leave the Project description field empty. Finally, select Create to provision the project.
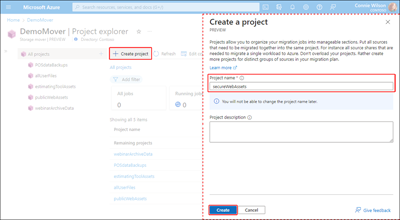
Creating a project requires you to decide on a name. Refer to the resource naming convention to choose a supported name. A description is optional and can contain up to 1024 single-byte characters.
The New-AzStorageMoverProject cmdlet is used to create a new project within a storage mover resource you previously deployed. If you haven't yet installed the Az.StorageMover module:
## Ensure you are running the latest version of PowerShell 7
$PSVersionTable.PSVersion

## Your local execution policy must be set to at least remote signed or less restrictive
Set-ExecutionPolicy -ExecutionPolicy RemoteSigned -Scope CurrentUser

## If you don't have the general Az PowerShell module, install it first
Install-Module -Name Az -Scope CurrentUser -Repository PSGallery -Force

## Lastly, the Az.StorageMover module is not installed by default and must be manually requested.
Install-Module -Name Az.StorageMover -Scope CurrentUser -Repository PSGallery -Force
The Install Azure PowerShell article has more details.
You'll need to supply values for the required -Name, -ResourceGroupName, and -StorageMoverName parameters. The -Description parameter is optional.
It's always a good idea to create and use variables to store lengthy or potentially complex strings.
## Set variables
$subscriptionID     = "Your subscription ID GUID"
$resourceGroupName  = "demoResourceGroup"
$storageMoverName   = "demoMover"
$projectName        = "demoProject"
$projectDescription = ""
Connect to your Azure account by using the Connect-AzAccount cmdlet. Specify the ID for your subscription by providing a value for the -Subscription parameter as shown in the example.
Connect-AzAccount -Subscription $subscriptionID
After you've successfully connected, you can use the New-AzStorageMoverProject cmdlet to create your new project as shown in the following example.
New-AzStorageMoverProject `
   -ResourceGroupName $resourceGroupName `
   -StorageMoverName $storageMoverName `
   -Name $projectName `
   -Description $projectDescription
The following sample response contains the ProvisioningState property whose value indicates that the project was successfully created.
Description                  : This is a project used for demonstration.
Id                           : /subscriptions/<GUID>/resourceGroups/
                              demoResourceGroup/providers/Microsoft.StorageMover/storageMovers/
                              demoMover/projects/demoProject
Name                         : testingAgain
ProvisioningState            : Succeeded
SystemDataCreatedAt          : 8/17/2022 1:19:00 AM
SystemDataCreatedBy          : user@contoso.com
SystemDataCreatedByType      : User
SystemDataLastModifiedAt     : 8/17/2022 1:19:00 AM
SystemDataLastModifiedBy     : user@contoso.com
SystemDataLastModifiedByType : User
Type                         : microsoft.storagemover/storagemovers/projects
View and edit a project's properties
Depending on your use case, you may need to retrieve either a specific project, or a complete list of all your project resources. You may also need to add or edit a project's description.
Follow the steps in this section to view projects accessible to your Storage Mover resource.
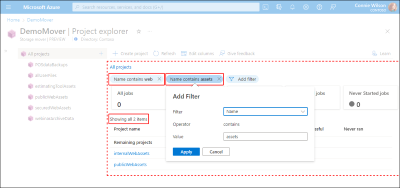
Navigate to the Project explorer page within the Azure portal to view a list of available projects. You can create and apply filters to limit or shape your view. To narrow the scope of the results, you can continue to add more filters.
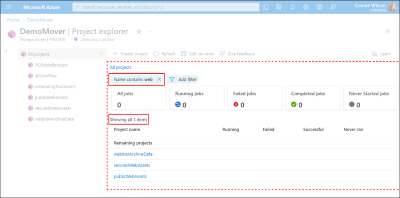
Filters may also be edited or removed as needed as shown in the example below. Currently, only filtering projects by name is supported.
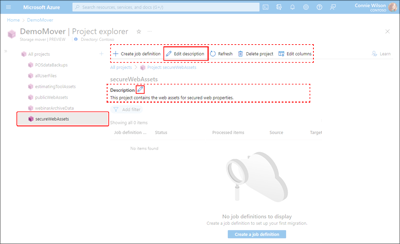
From within the project explorer pane or the results list, select the name of the project created in the previous section. The project's properties and job summary data are displayed in the details pane.
If the project lacks a valid description, select Add description to display the Edit description pane.
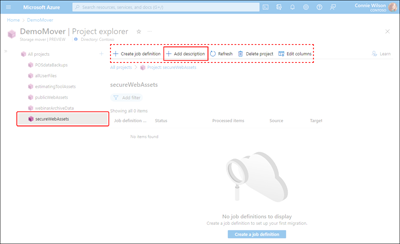
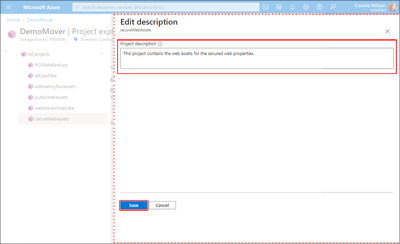
If a description exists, it will be displayed below the Description heading. Select either the Edit icon next to the description or the Edit description icon to display the editing pane. The image below shows the location of the two icons.
In the editing pane, modify your project's description. At the bottom of the pane, select Save to commit your changes.
Use the Get-AzStorageMoverProject cmdlet to retrieve a list of projects resources. Optionally, you can supply a -Name parameter value to retrieve a specific project resource. Calling the cmdlet without the optional parameter returns a list of all provisioned projects within your resource group.
The following example retrieves a specific project resource by specifying the demoProject value.
  Get-AzStorageMoverProject `
    -ResourceGroupName $resourceGroupName `
    -StorageMoverName $storageMoverName `
    -Name "demoProject"
The sample response below contains the specified project's properties, including the empty Description.
   Description                  :
   Id                           : /subscriptions/<GUID>/resourceGroups/
                                  demoResourceGroup/providers/Microsoft.StorageMover/storageMovers/
                                  demoMover/projects/demoProject
   Name                         : demoProject
   ProvisioningState            : Succeeded
   SystemDataCreatedAt          : 7/15/2022 6:22:51 PM
   SystemDataCreatedBy          : user@contoso.com
   SystemDataCreatedByType      : User
   SystemDataLastModifiedAt     : 8/16/2022 10:36:52 PM
   SystemDataLastModifiedBy     : user@contoso.com
   SystemDataLastModifiedByType : User
   Type                         : microsoft.storagemover/storagemovers/projects
In order to add the missing description to the project returned by the cmdlet, you'll need to use the Update-AzStorageMoverProject cmdlet. In this instance, however, the -ResourceGroupName, -StorageMoverName, and -Name parameters are all required. You'll also want to provide the missing Project description value with the -Description parameter as shown in the following example.
Update-AzStorageMoverProject `
   -Name demoProject `
   -ResourceGroupName $resourceGroupName `
   -StorageMoverName $storageMoverName `
   -Description "Demo project managed with PowerShell."
The ProvisioningState included within the response confirms that the project was successfully updated.
  Description                  : Demo project managed with PowerShell.
  Id                           : /subscriptions/<GUID>/resourceGroups/
                                  demoResourceGroup/providers/Microsoft.StorageMover/storageMovers/
                                  demoMover/projects/demoProject
  Name                         : demoProject
  ProvisioningState            : Succeeded
  SystemDataCreatedAt          : 7/15/2022 6:22:51 PM
  SystemDataCreatedBy          : user@contoso.com
  SystemDataCreatedByType      : User
  SystemDataLastModifiedAt     : 8/24/2022 7:47:50 AM
  SystemDataLastModifiedBy     : user@contoso.com
  SystemDataLastModifiedByType : User
  Type                         : microsoft.storagemover/storagemovers/projects
Delete a project
The removal of a project resource should be a relatively rare occurrence in your production environment, though there may be occasions where it may be helpful. To delete a Storage Mover project resource, follow the provide example.
Warning
Deleting a project is a permanent action and cannot be undone. It's a good idea to ensure that you're prepared to delete the project since you will not be able to restore it at a later time.
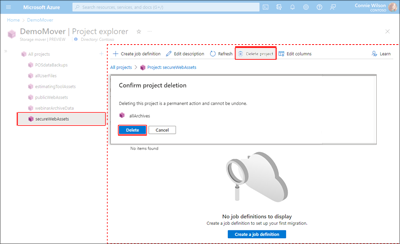
Navigate to the Project Explorer page in the Azure portal to view your projects and a summary of the jobs they contain.
First, within either the Project explorer pane or the results list, select the name of the project you want to delete. Next, select Delete project from within the Project details pane. Finally, within the Confirm project deletion dialog, select Delete to permanently remove your project. Refer to the highlighted selections within the following image if needed.
Warning
Deleting a project will delete all contained job definitions, their run history and results. Deleting any of these resources is permanent and cannot be undone. Storage endpoints are not affected.
Use the Remove-AzStorageMoverProject to permanently delete a project resource. Provide the project's name with the -Name parameter, and resource group and storage mover resource names with the -ResourceGroupName and -StorageMoverName parameters, respectively.
Remove-AzStorageMoverProject `
   -Name $projectName `
   -ResourceGroupName $resourceGroupName `
   -StorageMoverName $storageMoverName
Warning
Deleting a project will delete all contained job definitions, their run history and results. Deleting any of these resources is permanent and cannot be undone. Storage endpoints are not affected.
Next steps
After your projects are created, you can begin working with job definitions.


