Σημείωμα
Η πρόσβαση σε αυτήν τη σελίδα απαιτεί εξουσιοδότηση. Μπορείτε να δοκιμάσετε να εισέλθετε ή να αλλάξετε καταλόγους.
Η πρόσβαση σε αυτήν τη σελίδα απαιτεί εξουσιοδότηση. Μπορείτε να δοκιμάσετε να αλλάξετε καταλόγους.
Analyzing clickstream data is an effective way for businesses to optimize website traffic and gain insights into user behavior. This quickstart outlines how you can build a streaming application for analyzing website clickstream data.
The method outlined in this guide uses a PowerShell script to deploy Azure resources with autogenerated sample data streams. The autogenerated data enables exploring various stream analytic scenarios and helps you deploy Azure resources effortlessly.
Here are the typical scenarios for processing and analyzing clickstream:
- Filter clickstream requests
- Join clickstream with a file
Prerequisites
- Azure subscription. If you don't have an Azure subscription, create a free account.
- Install Git.
- Azure PowerShell module. Visit here to install or upgrade.
Filter clickstream requests
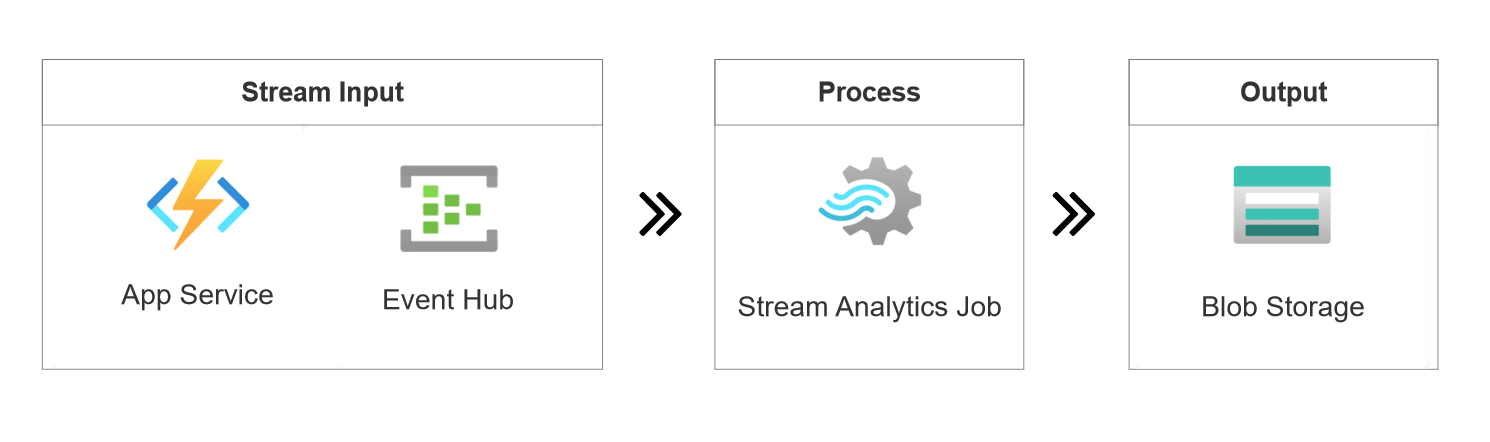
In this example, you learn to extract GET and POST requests from a website clickstream and store the output results to an Azure Blob Storage. Here's the architecture for this example:
Sample of a website clickstream:
{
    "EventTime": "2022-09-09 08:58:59 UTC",
    "UserID": 465,
    "IP": "203.0.113.170",
    "Request": {
    "Method": "GET",
    "URI": "/index.html",
    "Protocol": "HTTP/1.1"
    },
    "Response": {
    "Code": 200,
    "Bytes": 42682
    },
    "Browser": "Chrome"
}
Use the scripts available in the GitHub repository to deploy the required resources:
Open PowerShell from the Start menu and clone this GitHub repository to your working directory.
git clone https://github.com/Azure/azure-stream-analytics.gitGo to the BuildApplications folder.
cd .\azure-stream-analytics\BuildApplications\Sign in to Azure and enter your Azure credentials in the pop-up browser.
Connect-AzAccountReplace
$subscriptionIdwith your Azure subscription ID and run the following command to deploy Azure resources. This process might take a few minutes to complete..\CreateJob.ps1 -job ClickStream-Filter -eventsPerMinute 11 -subscriptionid $subscriptionIdeventsPerMinuteis the input rate for generated data. In this case, the input source generates 11 events per minute.- You can find your subscription ID in Azure portal > Subscriptions.
After the deployment finishes, it opens your browser automatically. You can see a resource group named ClickStream-Filter-rg-* in the Azure portal. The resource group contains the following five resources:
Resource Type Name Description Azure Function clickstream* Generate clickstream data Event Hubs clickstream* Ingest clickstream data for consuming Stream Analytics Job ClickStream-Filter Define a query to extract GETrequests from the clickstream inputBlob Storage clickstream* Output destination for the Stream Analytics job App Service Plan clickstream* A necessity for Azure Function You deployed a streaming application to extract requests from a website clickstream.
The Stream Analytics job ClickStream-Filter uses the following query to extract HTTP requests from the clickstream. Select Test query in the query editor to preview the output results.
SELECT System.Timestamp Systime, UserId, Request.Method, Response.Code, Browser
INTO BlobOutput
FROM ClickStream TIMESTAMP BY Timestamp
WHERE Request.Method = 'GET' or Request.Method = 'POST'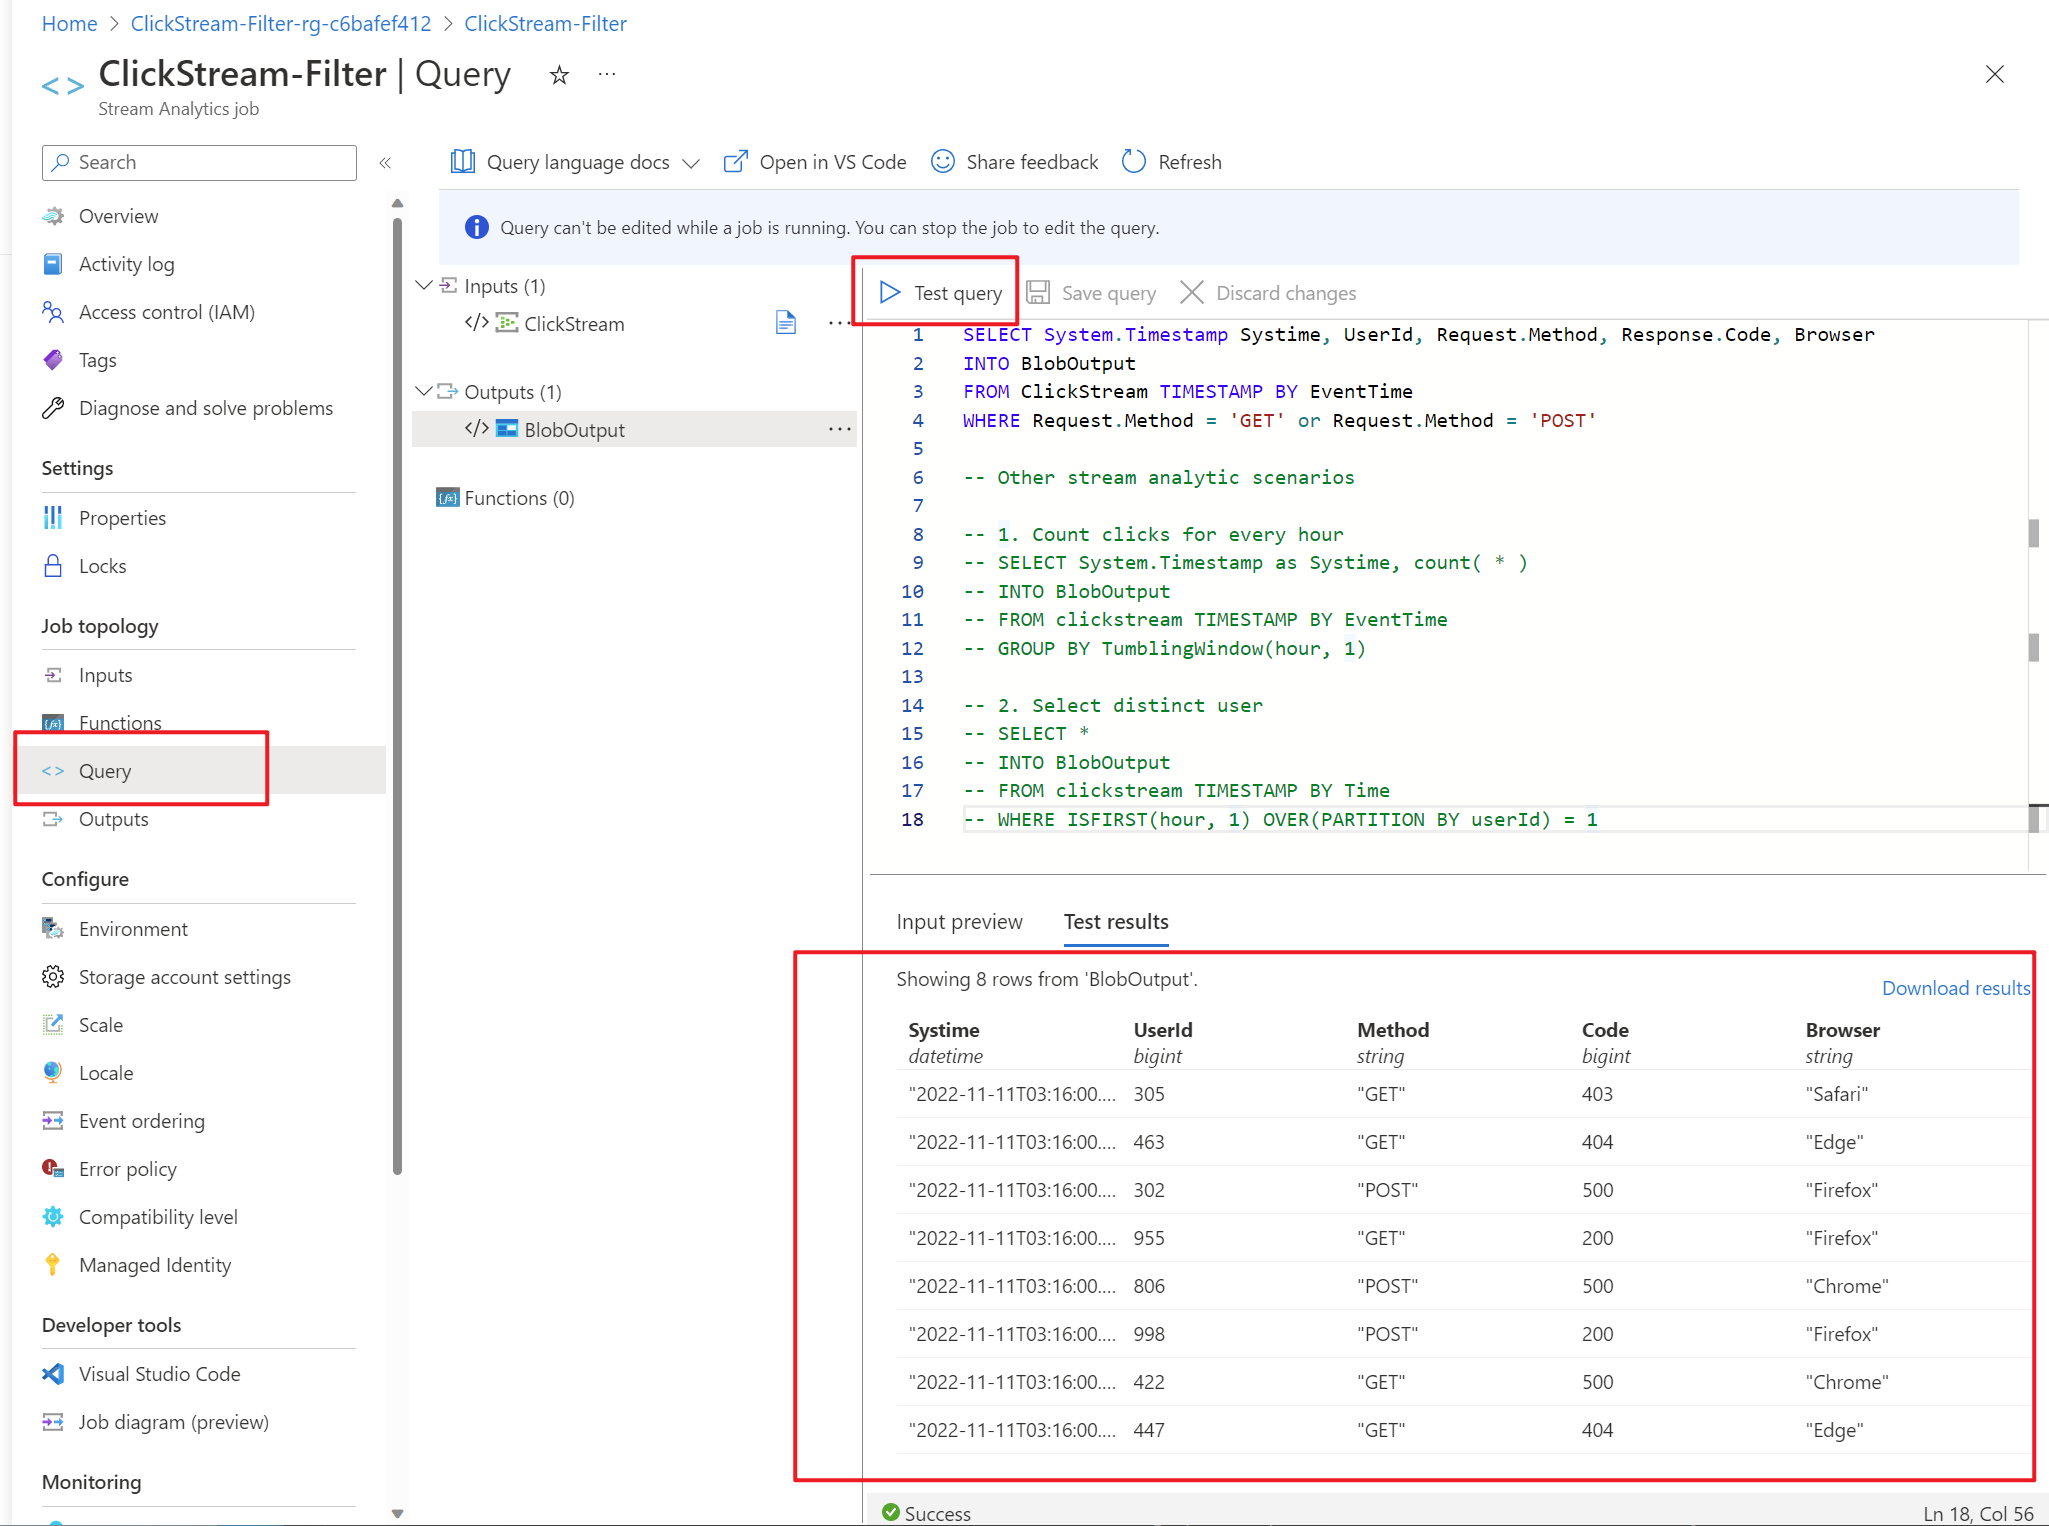
The following sample queries in the query comments are available for other stream analytic scenarios with one stream input.
Count clicks for every hour
select System.Timestamp as Systime, count( * )
FROM clickstream
TIMESTAMP BY EventTime
GROUP BY TumblingWindow(hour, 1)
Select distinct user
SELECT *
FROM clickstream
TIMESTAMP BY Time
WHERE ISFIRST(hour, 1) OVER(PARTITION BY userId) = 1
All output results are stored as a
JSONfile in Azure Blob Storage. You can find it via Blob Storage > Containers > job-output.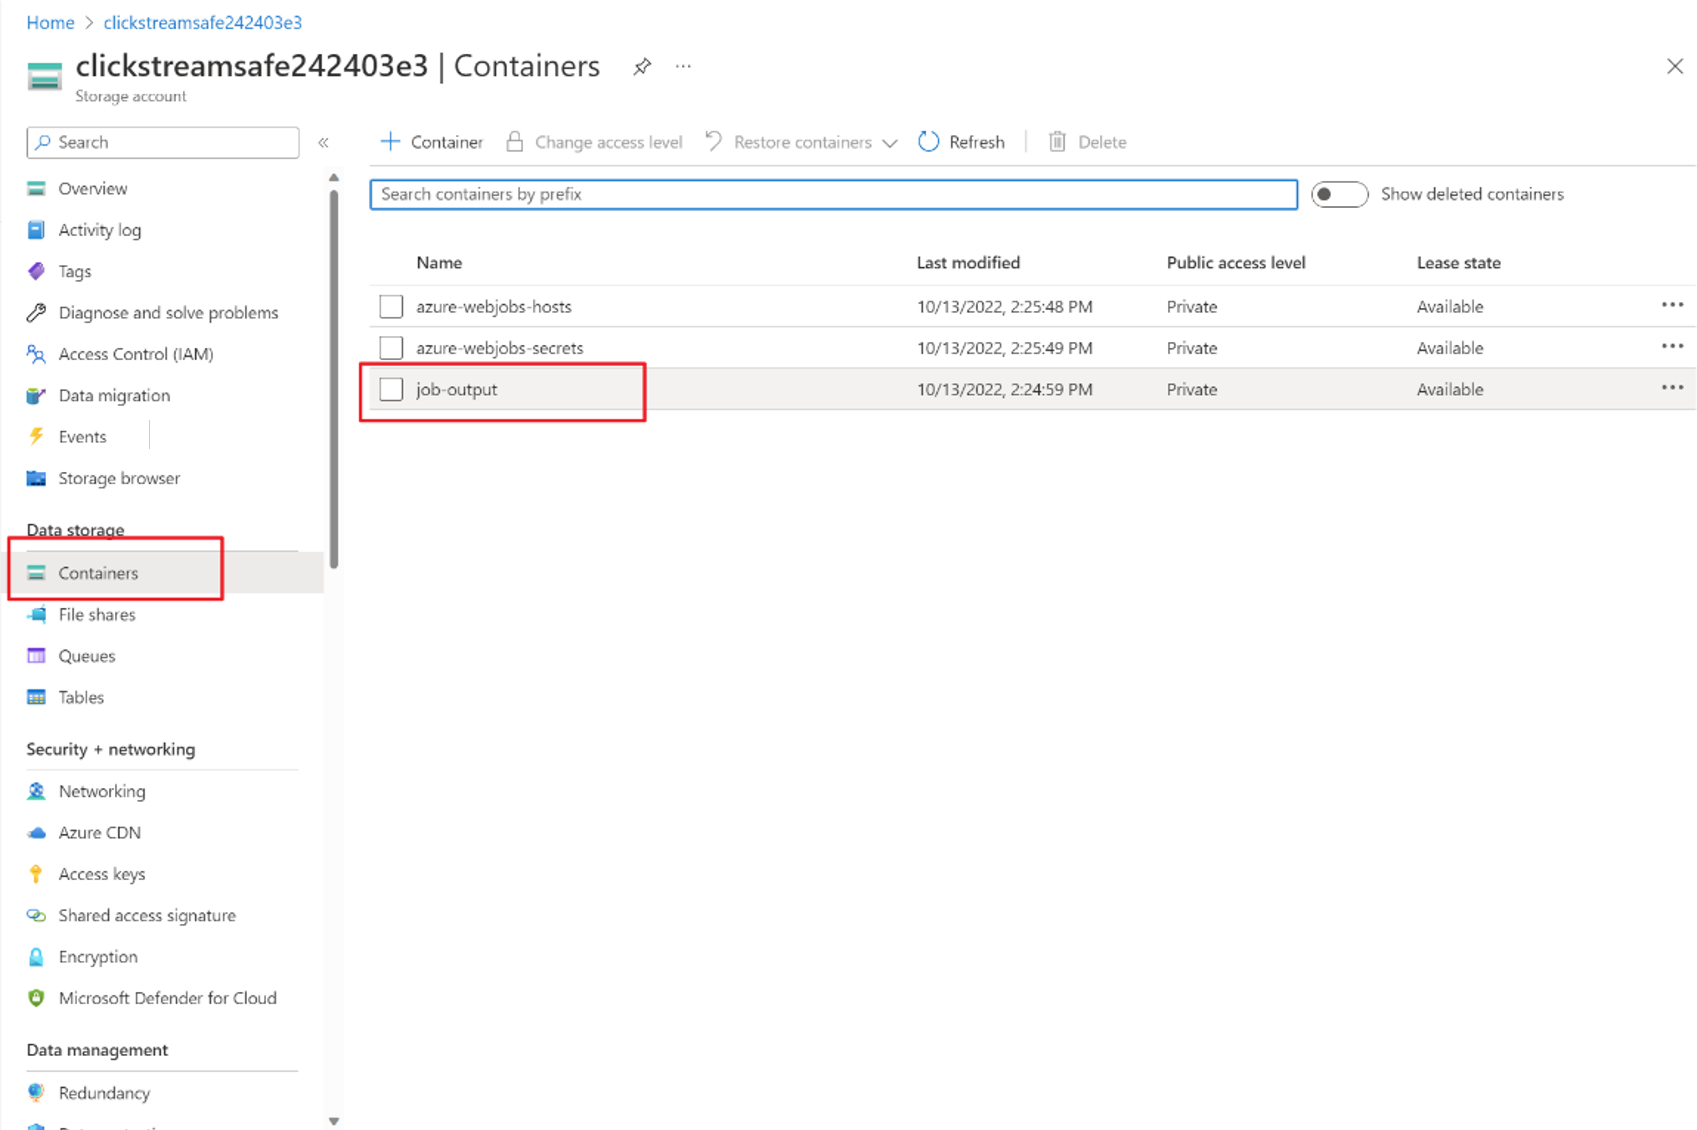
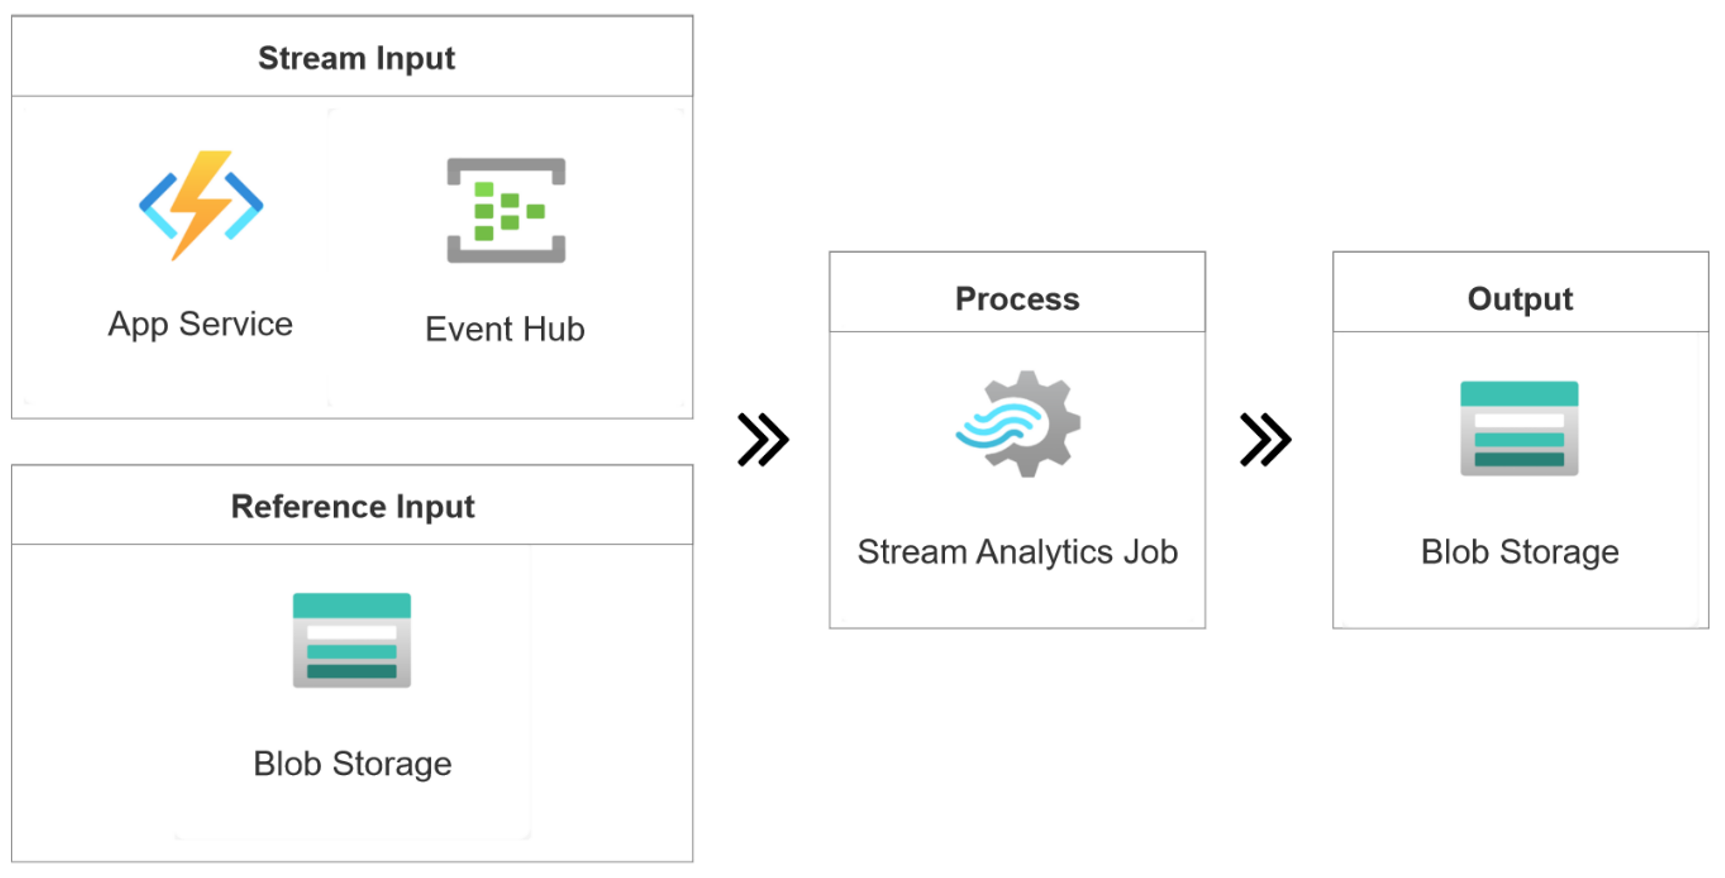
Join clickstream with a reference file
To find out the username for the clickstream by using a user file in storage, you can join the clickstream with a reference input as shown in the following architecture:
This section builds on the resources deployed in Filter clickstream requests. Run the following commands to create a new resource group:
Replace
$subscriptionIdwith your Azure subscription ID and run the following command to deploy Azure resources. This process might take a few minutes to complete..\CreateJob.ps1 -job ClickStream-RefJoin -eventsPerMinute 11 -subscriptionid $subscriptionIdAfter the deployment finishes, it opens your browser automatically. You can see a resource group named ClickStream-RefJoin-rg-* in the Azure portal. The resource group contains five resources.
The Stream Analytics job ClickStream-RefJoin uses the following query to join the clickstream with reference SQL input.
CREATE TABLE UserInfo(
  UserId bigint,
  UserName nvarchar(max),
  Gender nvarchar(max)
);
SELECT System.Timestamp Systime, ClickStream.UserId, ClickStream.Response.Code, UserInfo.UserName, UserInfo.Gender
INTO BlobOutput
FROM ClickStream TIMESTAMP BY EventTime
LEFT JOIN UserInfo ON ClickStream.UserId = UserInfo.UserId
You deployed a streaming application to join your user file with a website clickstream.
Clean up resources
If you no longer need the resource group, run this command in PowerShell to delete it.
Remove-AzResourceGroup -Name $resourceGroup
If you plan to use this project in the future, you can skip deleting the resource group and stop the job instead.
Next steps
To learn about Azure Stream Analytics, continue to the following articles: