Σημείωμα
Η πρόσβαση σε αυτήν τη σελίδα απαιτεί εξουσιοδότηση. Μπορείτε να δοκιμάσετε να εισέλθετε ή να αλλάξετε καταλόγους.
Η πρόσβαση σε αυτήν τη σελίδα απαιτεί εξουσιοδότηση. Μπορείτε να δοκιμάσετε να αλλάξετε καταλόγους.
This article explains how to integrate the point of sale (POS) with a new hardware device and generate the extension installer in Microsoft Dynamics 365 Commerce.
Hardware Station overview
Modern POS and Cloud POS use Hardware Station to connect to hardware peripherals, such as printers, cash drawers, scanners, and payment terminals.

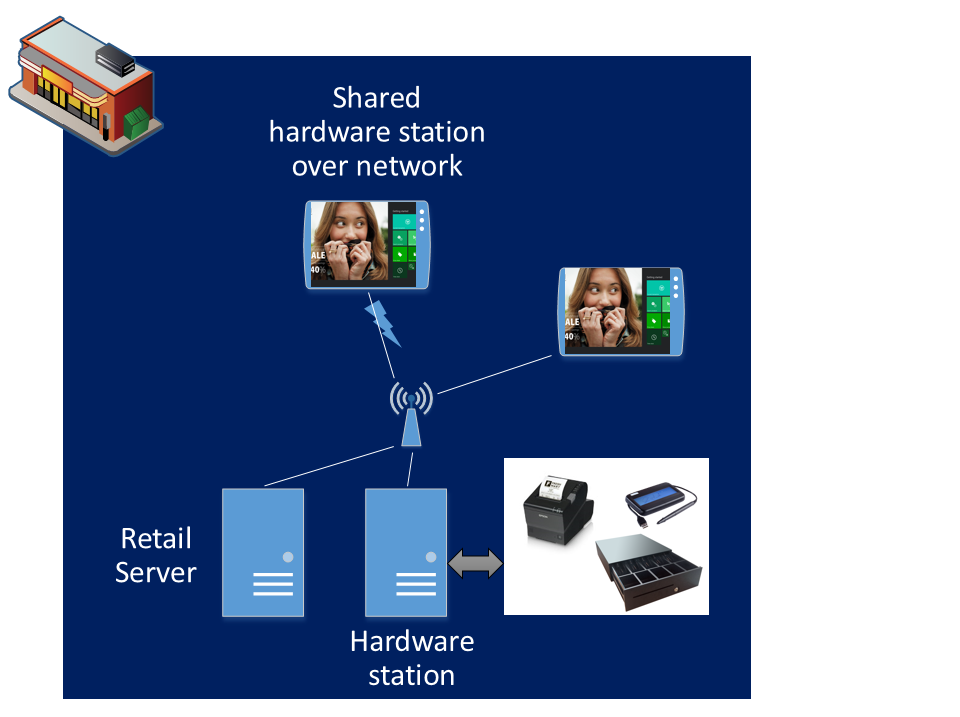
Hardware Station setup
Before you start, use the information in Configure and install Retail hardware station to install Hardware Station. The article also helps you understand what hardware is and how it's installed.
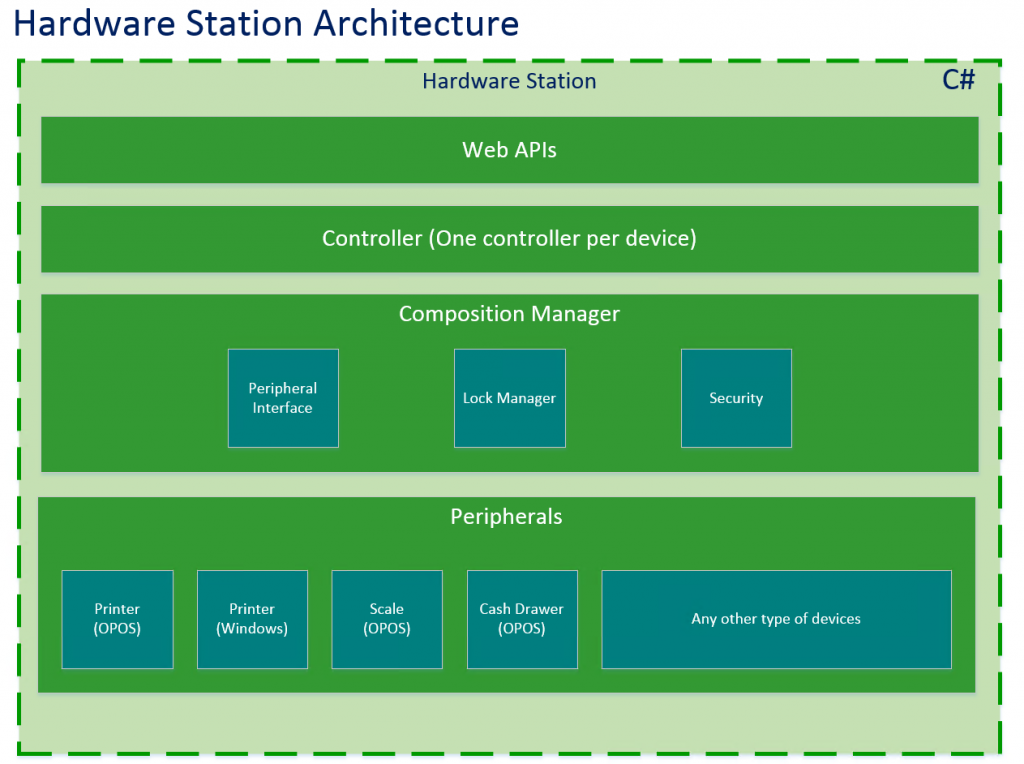
Hardware Station architecture
Hardware Station exposes Web APIs for Hardware Station application programming interfaces (APIs). You can extend Hardware Station by implementing a new controller for a new device (for example, a cash dispenser) or by overriding an existing controller for an existing device type (for example, a new Audio Jack magnetic stripe reader (MSR) implementation).
Hardware Station extensibility scenarios
You can extend Hardware Station by using the Managed Extensibility Framework (MEF), which .NET supports. Extensibility guideline: Always write your extension in your own extension assembly. By using this approach, you create a true extension and make upgrades much easier. Two basic scenarios exist for extension:
- Adding a new device – The out-of-box Hardware Station doesn't already support the device (for example, a cash dispenser). Therefore, you must add support for the new device in Hardware Station.
- Adding a new device type for an existing device – The out-of-box Hardware Station implementation already supports the device (for example, an MSR), but you must add support for a specific device type (for example, an Audio Jack MSR implementation).
To call custom Hardware station APIs from the POS, you must use a request and a response:
- HardwareStationDeviceActionRequest – The request that the POS sends to Hardware station.
- HardwareStationDeviceActionResponse – The response that the POS receives from Hardware station.
The class that you extend depends on the version of the Retail software development kit (SDK) that you're using.
- For Retail SDK version 10.0.11 or later, extend the IController interface.
HardwareStationDeviceActionRequest
The following code example shows the definition of HardwareStationDeviceActionRequest.
class HardwareStationDeviceActionRequest<TResponse extends HardwareStationDeviceActionResponse> extends Request<TResponse> {
    readonly device: string;
    readonly action: string;
    readonly actionData: any;
    constructor(device: string, action: string, actionData: any, correlationId?: string);
}
The following table describes the parameters.
| Parameter | Data type | Description |
|---|---|---|
| device | String | The device name that you pass to the Hardware station request should match the Export attribute that you add in the Hardware station Device extension controller class. |
| action | String | The method that you want to call in the Hardware Station extension. Pass the method name as a string value. The core POS Hardware station layer then calls the corresponding method from your Hardware Station extension code. The method should exactly match the method name in your Hardware station extension. Pass the Hardware Station extension as a parameter. |
| actionData | any | A custom parameter for the extension to pass. |
Sample code
The following code example creates a HardwareStationDeviceActionRequest object.
let hardwareStationDeviceActionRequest: HardwareStationDeviceActionRequest<HardwareStationDeviceActionResponse> =
    new HardwareStationDeviceActionRequest("Export attribute in Hardware station controller class",
        "extension method name in Hardware station", "Custom parameters/you can also pass custom object");
return this.extensionContextRuntime.executeAsync(hardwareStationDeviceActionRequest);
HardwareStationDeviceActionResponse
The following code example shows the definition of HardwareStationDeviceActionResponse.
class HardwareStationDeviceActionResponse extends Response {
    readonly response: any;
    constructor(response: any);
}
The following table describes the parameters.
| Parameter | Data type | Description |
|---|---|---|
| response | any | The response that the Hardware station extension code sends to the POS. |
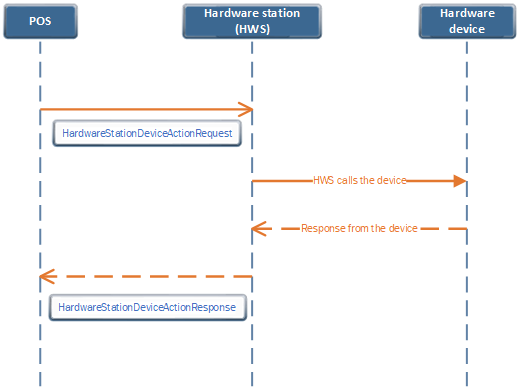
End-to-end flow
The following diagram shows the flow between the POS, Hardware station, and the hardware device.
Hardware station extension
To call your new hardware device, you must implement the Hardware station code. You call your hardware device from that code.
To implement the Hardware station extension for Retail SDK version 10.0.11 or later, follow these steps:
Create a new C# class library project by using the Microsoft .NET Framework version 4.6.1. Alternatively, use one of the samples in the Retail SDK as a template. (You can find the samples at ...\RetailSDK\SampleExtensions\HardwareStation\.) Use a sample as a template.
In the extension project, use the NuGet package manager to add the Microsoft.Dynamics.Commerce.Hosting.Contracts package. You can find the NuGet packages in the RetailSDK\pkgs folder.
Add a new controller class that extends the IController interface.
Add the RoutePrefix attribute to the controller class to expose the controller class to clients.
[RoutePrefix("ISVEXTENSIONDEVICE")]To implement your custom logic to call the hardware device, add a method in the controller class that has the HttpPost attribute. Pass this method as the second parameter (action parameter) to the POS HardwareStationDeviceActionRequest. From the extension method, the extension can call other requests, such as printing and cash drawer requests. Just include the relevant NuGet packages from the Retail SDK.
[HttpPost]
public async Task<bool> IsReady(IEndpointContext context)
{
}
Build the project.
To implement the Hardware station extension for Retail SDK versions that are earlier than version 10.0.11, follow these steps:
- Create a new C# class library project.
- Add a new controller class that extends HardwareStationController and IHardwareStationController.
- Add the Export attribute to the controller class. The Export attribute must be in all uppercase letters, and you must pass the value as a parameter from the POS extension. The device parameter that the POS HardwareStationDeviceActionRequest passes must match this value.
- To implement your custom logic to call the hardware device, add your method in the controller class. Pass this method as the second parameter (action parameter) to the POS HardwareStationDeviceActionRequest.
- Build the project.
To deploy the Hardware station extension in Modern POS and test it by using the local Hardware station, follow these steps:
Copy the output library to the C:\Program Files (x86)\Microsoft Dynamics 365\70\Retail Modern POS\ClientBroker\ext folder.
Open the HardwareStation.Extension.config file.
In the composition section, add the extension library details.
<add source="assembly" value="your extension library name" />Save the file.
Close Modern POS if it's running.
Open Task Manager, and end the dllhost.exe task.
Open Modern POS, and configure it to use the local Hardware station.
Validate your scenario.
To test by using Cloud POS, deploy the dynamics-link library (DLL) of the Hardware station extension to the shared Hardware station ext folder. Then update the HardwareStation.Extension.config file with the custom library in the shared Hardware station folder.
Retail SDK samples
The Retail SDK includes samples that you can use for reference.
- POS: \RetailSDK\POS\Extensions\FiscalRegisterSample
- Hardware station: \RetailSDK\SampleExtensions\HardwareStation\Extension.FiscalRegisterSample
Sample code for Retail SDK version 10.0.11 or later
namespace Contoso
{
    namespace Commerce.HardwareStation.ISVExtensionDevice
    {
        using Microsoft.Dynamics.Commerce.Runtime.Hosting.Contracts;
        using System;
        using System.Threading.Tasks;

        /// <summary>;
        /// Sample hardware station extension
        /// </summary>

        [RoutePrefix("ISVEXTENSIONDEVICE")]
        public class ISVExtensionDeviceController : IController
        {
            /// <summary>
            /// Sample.
            /// </summary>

            /// <param name="request">Custom request.<param>
            /// <returns>Result of Custom response.</returns>

            [HttpPost]
            public async Task<CustomResponse> Sample(CustomRequest request, IEndpointContext context)
            {
                CustomResponse response;
                try
                {
                    response = new CustomResponse();
                }
                catch (Exception ex)
                {
                    throw ex;
                }
                return await Task.FromResult(response);
            }
        }
        public class CustomResponse
        {
            public string sampleProp { get; set; }
            public CustomResponse()
            {
                this.sampleProp = "sampleValue";
            }
        }
    }
}
Sample POS code to call the Hardware station extension
From your POS extension, call the Hardware station by using the following pattern.
let hardwareStationDeviceActionRequest: HardwareStationDeviceActionRequest<HardwareStationDeviceActionResponse> =
    new HardwareStationDeviceActionRequest("ISVEXTENSIONDEVICE",
        "Sample", "Custom parameters or custom object");
return this.extensionContextRuntime.executeAsync(hardwareStationDeviceActionRequest);
Note
If you're not using the independent POS packaging SDK or sealed HWS installer, follow the steps in Create deployable packages to generate the package for deployment.
Package the HWS extension with Modern POS to use local HWS
Note
This section applies if you're using POS independent packaging SDK with version 10.0.22 or later of finance and operations apps.
To package the HWS extension with Modern POS to use local HWS, package the HWS extension with the POS. In the Modern POS JavaScript project, add a reference to your HWS project. Then use the POS installer project to create extension installer. For more information, see the sample JavaScript project in the Dynamics365Commerce.InStore/src/PosSample/ModernPos/ModernPos.jsproj GitHub repo.
If you have only HWS extension, remove all the other unwanted project references from the sample. The ModernPos.jsproj project creates the msix installer and then the installer project consumes this and creates the exe installer. The HWS extension is deployed as a UWP app extension.
Generate an extension installer for the Hardware station
Dynamics 365 Commerce 10.0.18 and later supports sealed installers. You can generate an extension installer separately from the base installer. You can independently install and service the extension installer. This functionality works only if you use the sealed self-service installers.
To generate the sealed extension installer for the Hardware station, follow these steps:
Download the sample Hardware station installer project from GitHub and open the HardwareStation.Installer.csproj project in Visual Studio.
Add your Hardware station extension project as a project reference to the HardwareStation.Installer.csproj installer project. Remove the existing sample project reference from the HardwareStation.Installer.csproj project.
The installer project consumes the Microsoft.Dynamics.Commerce.Sdk.Installers.HardwareStation package to generate the extension installer. The sample installer project class extends the ExtensionPackageInstallerSetup class to implement the installation steps.
To update the installer name, set the InstallerName variable in the sample code.
Update the sample installer project to perform additional logic during installation. For example, you could ping a server. To add logic, use the HardwareStationExtensionPackageInstallerSetup.cs file in the HardwareStation.Installer.csproj.
Add pre- and post-steps to the installer by implementing the IExtensionInstallerStep interface. To add steps, use the TestExtensionInstallerPreInstallStep.cs file and TestExtensionInstallerPostInstallStep.cs in the HardwareStation.Installer.csproj sample installer project.
Build the extension HardwareStation.Installer.csproj project to generate the shared Hardware station extension installer. The output of the project is the extension installer. You can find the generated extension installer path in the Visual Studio Output window after the build finishes.
Deploy the shared Hardware station extension for Point of Sale (POS) and test it in your scenario.
Note
You must install the sealed shared Hardware server installer before running the extension installer.
Run the extension installer by using the command prompt. Open the command prompt in admin mode and run the installer with the install parameter. To uninstall, run the extension installer with the uninstall parameter. For example:
C:\HardwareStation.Installer\bin\Debug\net461> .\HardwareStation.Installer.exe installClose POS if it's running.
Open POS and configure it to use the shared Hardware station.
Validate the extension hardware station scenario.